Vintage Inspired Halloween Banner Tutorial
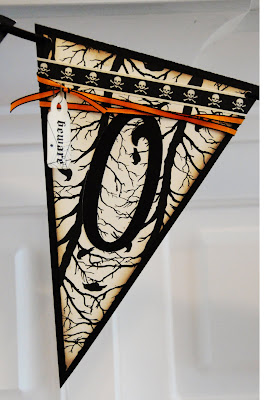
If you’d like to make your own vintage-inspired Halloween banner, it’s pretty simple. Just gather a bunch of black and white paper, ink the edges with walnut ink to give them an “old” look, use LOTS of black and orange glitter, and raid your scrapbook stash for any Halloween-themed embellishment you have.
Celebrate Halloween in style by creating a fun and unique vintage-inspired Halloween Banner. The banner in today’s free tutorial spells out “Got Candy?” but you could easily choose any Halloween phrase that you like.
Halloween Phrase Ideas
If you’re stumped, try using one of these phrases:
- Happy Halloween
- Spooky
- Shriek
- Boo to You
- Welcome
Halloween Banner Supplies
Most of my supplies came from Jenni Bowlin, Martha Stewart & Making Memories. The letters were cut with my Cricut, but if you don’t have one, don’t fret, you can buy pre-made chipboard letters that would be perfect.
- Black Cardstock
- Halloween Scrapbook Paper
- Old Book Pages
- UHU Glue Sticks
- 2 Yards Satin Ribbon
- Distress Ink & Applicator
- Hot Glue Gun
- Halloween stickers, embelisshments and ephemera.
How to Make A Halloween Banner
Decide what you would like your banner to say. Then you know how many triangles you need to cut. The hardest part is getting the triangles that make up the banner.
If you have a Cricut machine you could quickly cut out all of your triangles!
Step One: Create the Black Paper Base
For the Black bases, cut your cardstock to 6×9 (using white for demonstration purposes, since the black is too hard to photograph).
Next, find the center of the short side (the 6″ side) and place a mark.
Cut from the outside top corner to the center using your paper trimmer.
Repeat for the other side of the triangle.
Step Two: Cut the Inner Triangle
For the pattern paper pieces, you want a slightly smaller triangle, so cut those pieces 5 1/2″ x 8 1/4 “. Repeat the above steps.
For the pieces that I cut from scrapbook paper, I made 1 template then traced it on my printed paper. That way I made sure I got the section of the pattern paper that I wanted to use on each banner piece.
Step Three: Layer
Using your glue stick, glue the smaller triangle to the black triangle bases. Use a sponge and a bit of distress ink to add dimension to the triangles.
Step Four: Lettering
Cut out GOT CANDY? Use your Cricut machine. If you do not have a Cricut machine, you can use store-bought sticker letters. Use a glue stick to glue the stickers to the banner.
Step Five: Embellish
Use your Halloween stickers and other ephemera to embliss and decorate your paper triangles.
Finishing
Punch holes in the top corner of the triangles and feed the ribbon through the holes.
One last tip. I used eyelets in the corners of my banner, that way when I strung my ribbon though it would not tear the paper.


