Tuesday Tutorial: Scripture Case from a pair of Jeans
My son received a nice set of scriptures for his 8th birthday. He’s been toting them to church for almost a year and I’ve been worried the whole time something would happen to them. I’d been meaning to make him a scripture case and finally last week got around to it! (yes it took me almost a year to make it… )
While I was trying to think of what to make it out of I realized I have a stack of blue jeans that I’ve been saving for “something”… I bit the bullet and chopped up a pair of my jeans!
I made the case a bit bigger than the scriptures, (it fits the LDS compact quad scriptures). I wanted him to have extra room in them for papers, notes etc… If you want the bag to fit snugger, then just subract 1″ from ALL the measurements. (instead of 6×8 it would be 5×7 etc). You can also resize it for just a bible or other book. Just measure your book, then add 2″ to each . The scriptures are 3″ deep by 6″ wide x 4″ tall so my pieces were 6″ x 8″ (kept the same depth), so adjust accordingly to the size you want to fit.
To begin:
You will need:
1 pair of old jeans (adult size)
scraps of fabric:
2 6×8 for bag lining
1 3×21 for bag lining
2 5×8 for bag pocket
1 8×8 for flap lining
(you should be able to get it all out of one fat quarter)
Heat n Bond lite
Magnetic Snap
webbing for handle
contrast thread
jeans needle
If your jeans have a coin pocket. Cut it off (you won’t be able to unpick it) and set it aside. When you cut it out, keep the denim “backing” … (you want it to still be a pocket even when not attached to anything)..
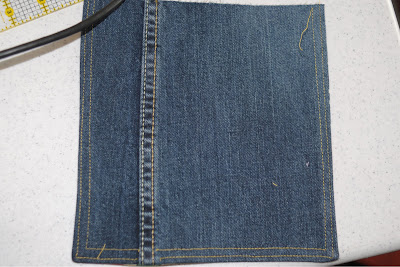
Cut off one of the legs of your jeans as high as you can. I decided to have part of the original seam of the jeans showing for the flap of the bag. So I measured a piece slightly bigger than 8×8, cut it out (keeping the seam in the right 1/3). After I cut it out, I used my quilting ruler to cut it to 8×8 and make sure it was square.
Cut from the denim also:
2 pieces 6″ x 8″
1 piece 3″ x 21″
(you may need both legs of the jeans depending on the size)
Take your 2 5×8 pieces of fabric and sew them right sides together across the 8″ side. Press the seam open and turn right side out. Press and top stitch along the top.
Place your sewn piece over your 6″x 8″ piece of denim.
Place your cut out coin pocket on top of this piece (as shown in the photo above).
Baste around the edges of the 6″x8″ denim piece to hold in place. Do NOT sew around the coin pocket, just along the bottom seam, you will attach the coin pocket to the bag pocket after you are done.
About 2″ up from the bottom and in the center of the fabric pocket, attach a magnetic snap. Make sure you only go through the fabric piece and not the denim also.
Sew straight lines to divide the pocket. Make sure you backstitch at the top of the pocket.
Take your 3″x 21″ denim piece and pin it to the 6×8 denim piece that has the pocket attached. Sew around 3 sides.
Trim any extra denim (of the 3″ wide piece) off the top.
Pin your other 6″x8″ denim piece to your 3″ x 21″ piece. Sew. (you will pin it the same way as shown in the photo above).
Repeat the above steps with your fabric (with the exception of attaching the pocket) to form the bag lining.
**note: I decided to add an applique at the last minute… BUT I would recommend adding it now before you complete the next step.*** If you would like to know how to add an applique letter you can refer to my tutorial here****
Take your 8×8 denim piece and your 8×8 fabric piece, place them right sides together and sew around 3 sides (leaving the top open). Clip corners and turn right side out.
Press.
Top stitch using contrast thread around the flap. I chose to do 2 rows of contrast top stitching.
Take the other part of your magnetic snap and attach it to the inside of the flap (the piece you just sewed). Place it in the center about 1″ up from the bottom.
Place the right side of your flap inside your bag facing the right side of the bag back. Stitch in place.
Cut your nylon webbing to the length you would like (I used 10″ long). Place it in the bag and center it in the bag gusset (the 3″ wide piece in the center of the bag). Stitch it in place on both sides. (the nylon webbing will be making a U shape inside of the bag, with the ends attached to each side of the bag).
Place your bag lining inside your bag (right sides together). Pin. MAKE sure the bag lining and bag pieces line up perfectly, if not adjust the seams on your bag lining piece until they do.
Sew 1/2″ down from the top of the bag according to the diagram below.
Turn bag right side out and press. Turn under the open edges of the bag along the front and press under. Top stitch (to close the opening), starting at the bag flap on one side, around the front to the other side of the bag flap.
To finish, you need to attach your coin pocket. Using fabric fuse or some other fabric glue, glue your coin pocket to your bag. Place a piece of freezer paper or wax paper to prevent the glue from bleeding through.
You’re done!! If you make one don’t forget to share your creation in the Polkadot Chair Flickr Group!


