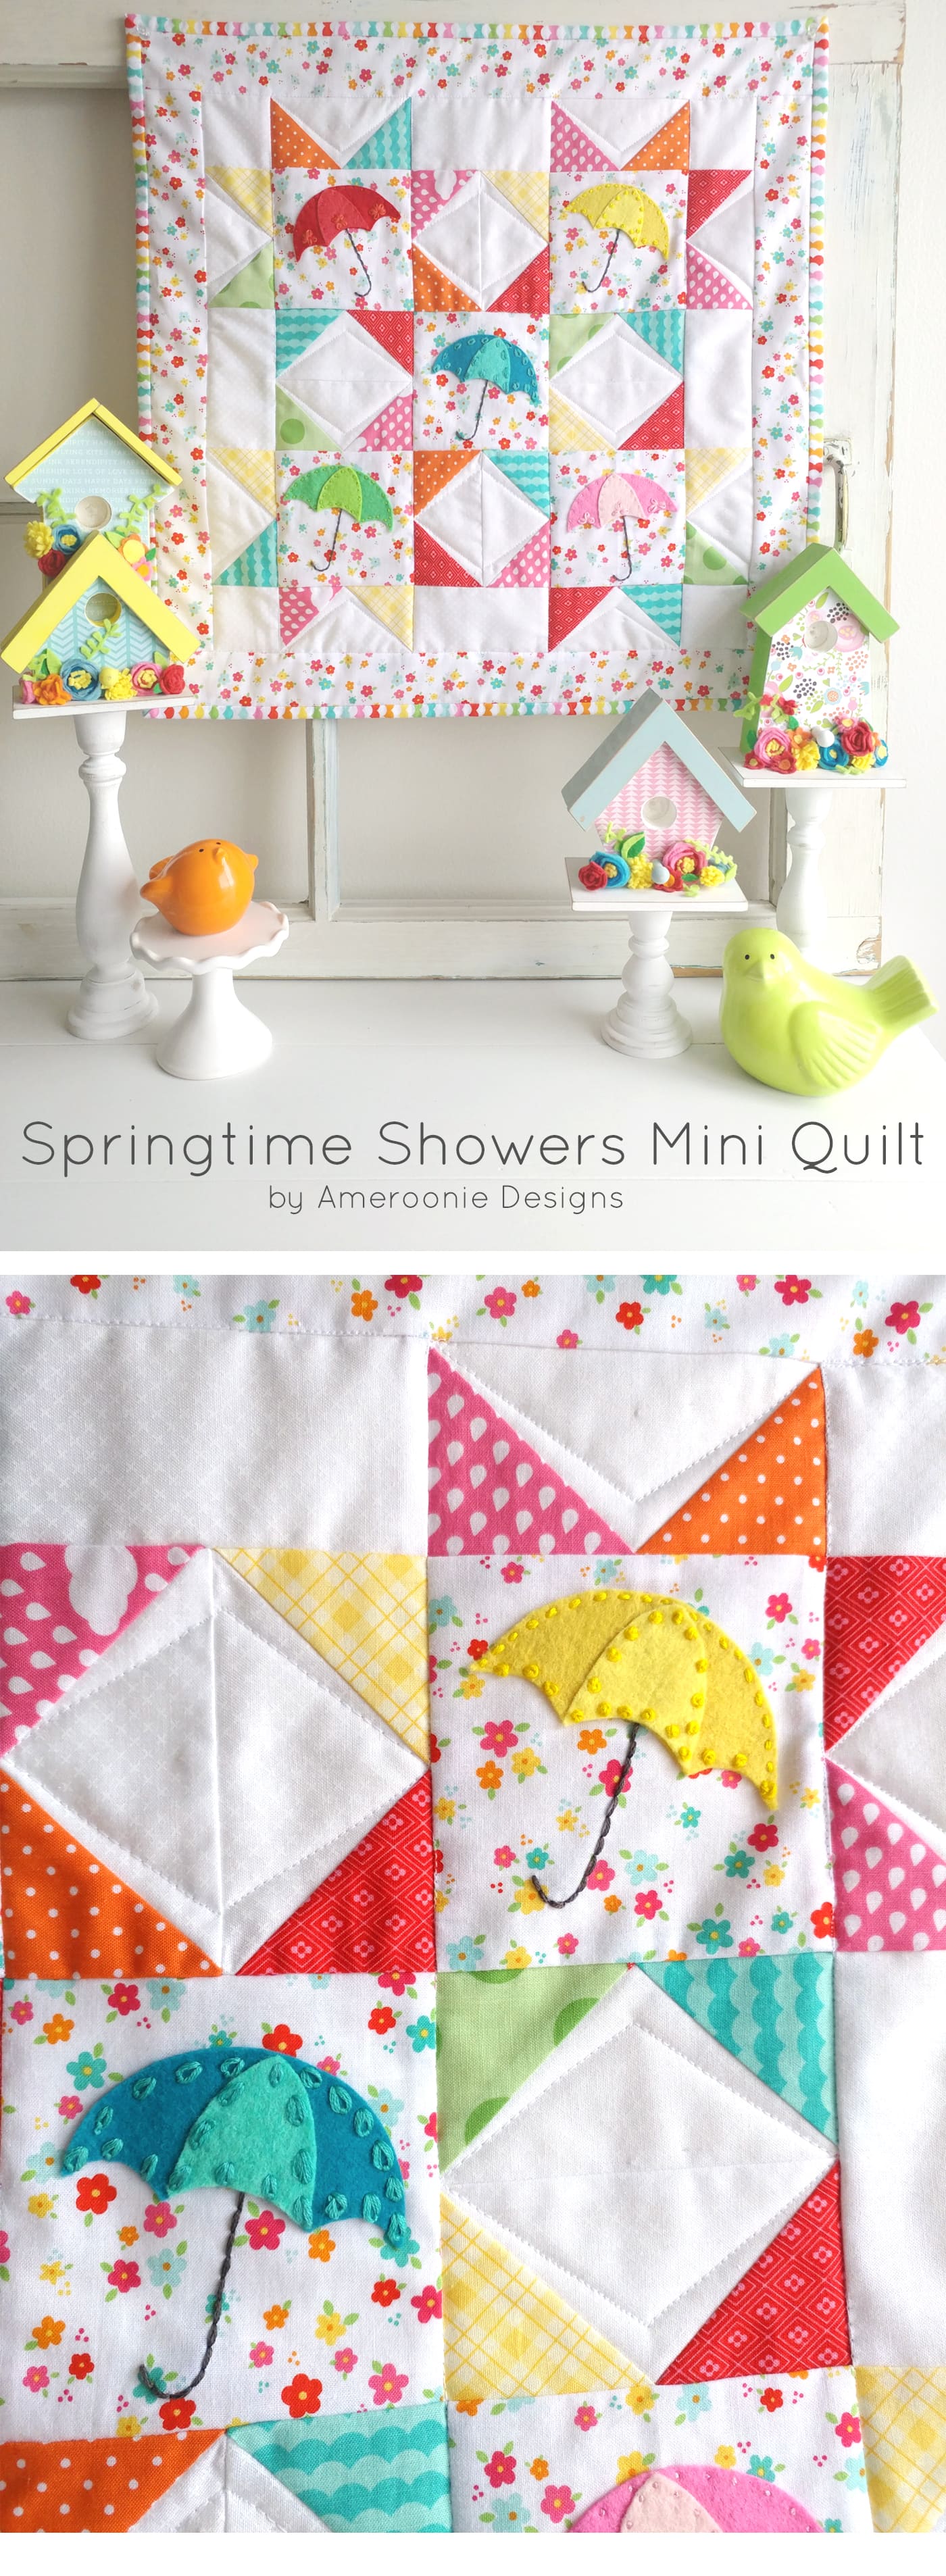
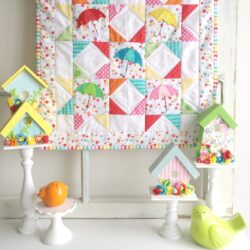
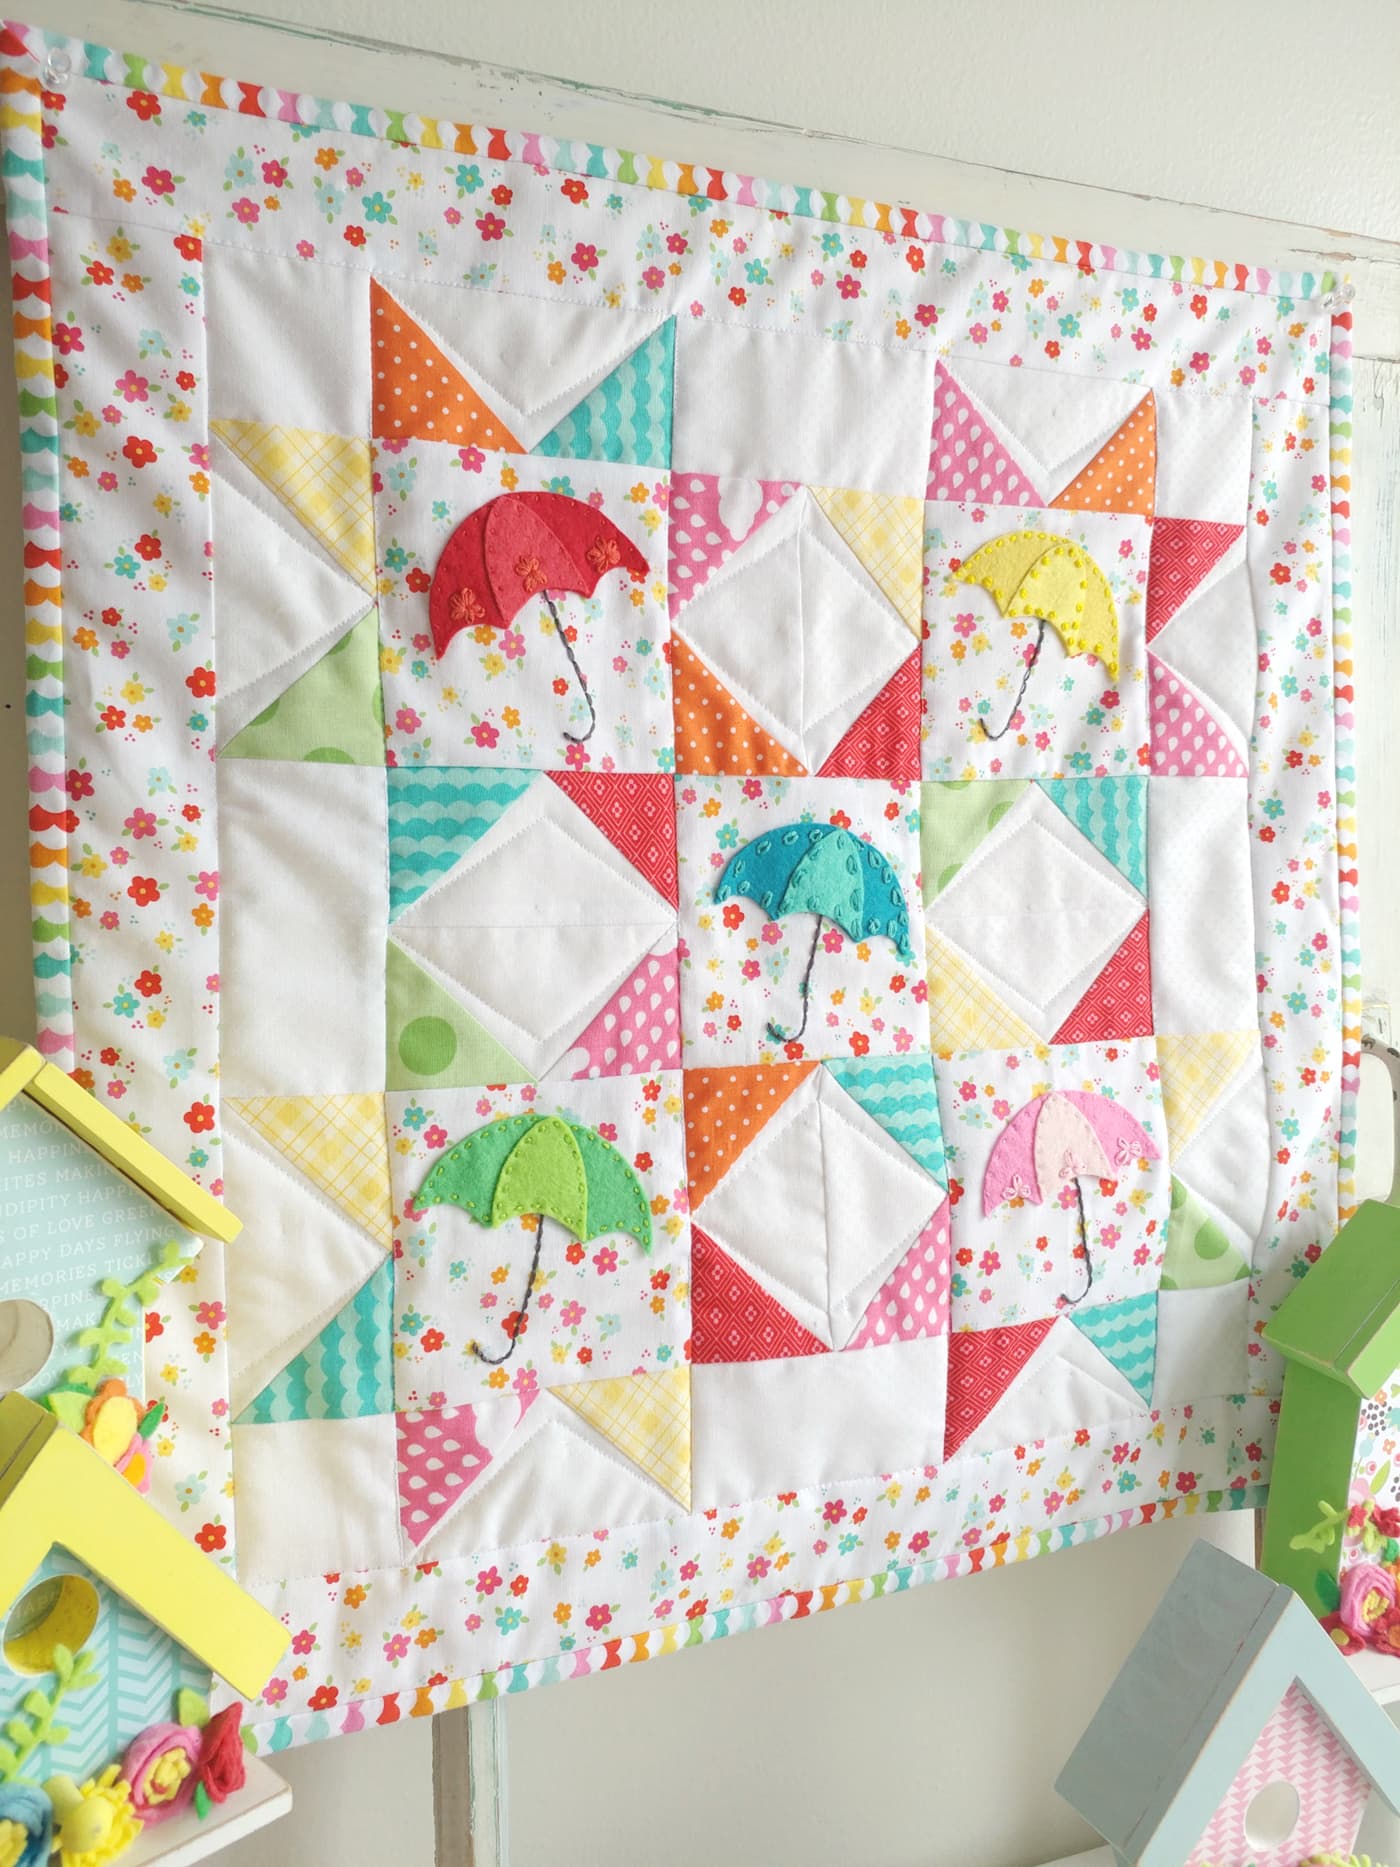
Springtime Showers Mini Quilt Pattern

Amy from Ameroonie Designs is back with us today sharing a free Springtime Showers Mini Quilt Pattern. It’s bright and cheery and just what I needed on this dreary, rainy day! If you don’t want to make a mini quilt, there are also instructions to turn it into a quilted pillow. If you like this project then you may also like this Wonderland Mini Quilt Pattern.

Hi! Amy Chappell from Ameroonie Designs here again! I live in Utah, and while we still have a few more months of winter weather, March has me ready for springtime dreaming! When I saw this Bloom Where You’re Planted fabric by Lori Whitlock for Riley Blake Designs, I knew just what I wanted to make.
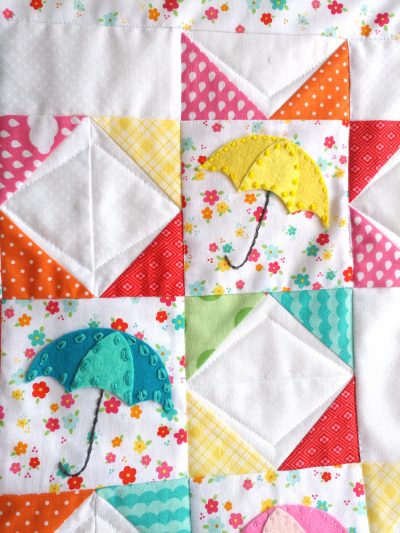
I love the look of scrappy quilts, so I decided to make this spring mini quilt out of scrappy sawtooth stars. I pulled from my stash and matched the colors in the floral print I wanted to use as the background for my umbrellas.
Fabric requirements for the Mini Quilt Pattern:
1/4 yard white on white background
1/4 yard small floral
1/4 yard for binding
16- 3″ colored squares from scraps
2/3 yard backing fabric
Additional supplies:
various felt colors- I highly recommend a quality wool blend
embroidery floss
sewing machine and tools
quilt batting
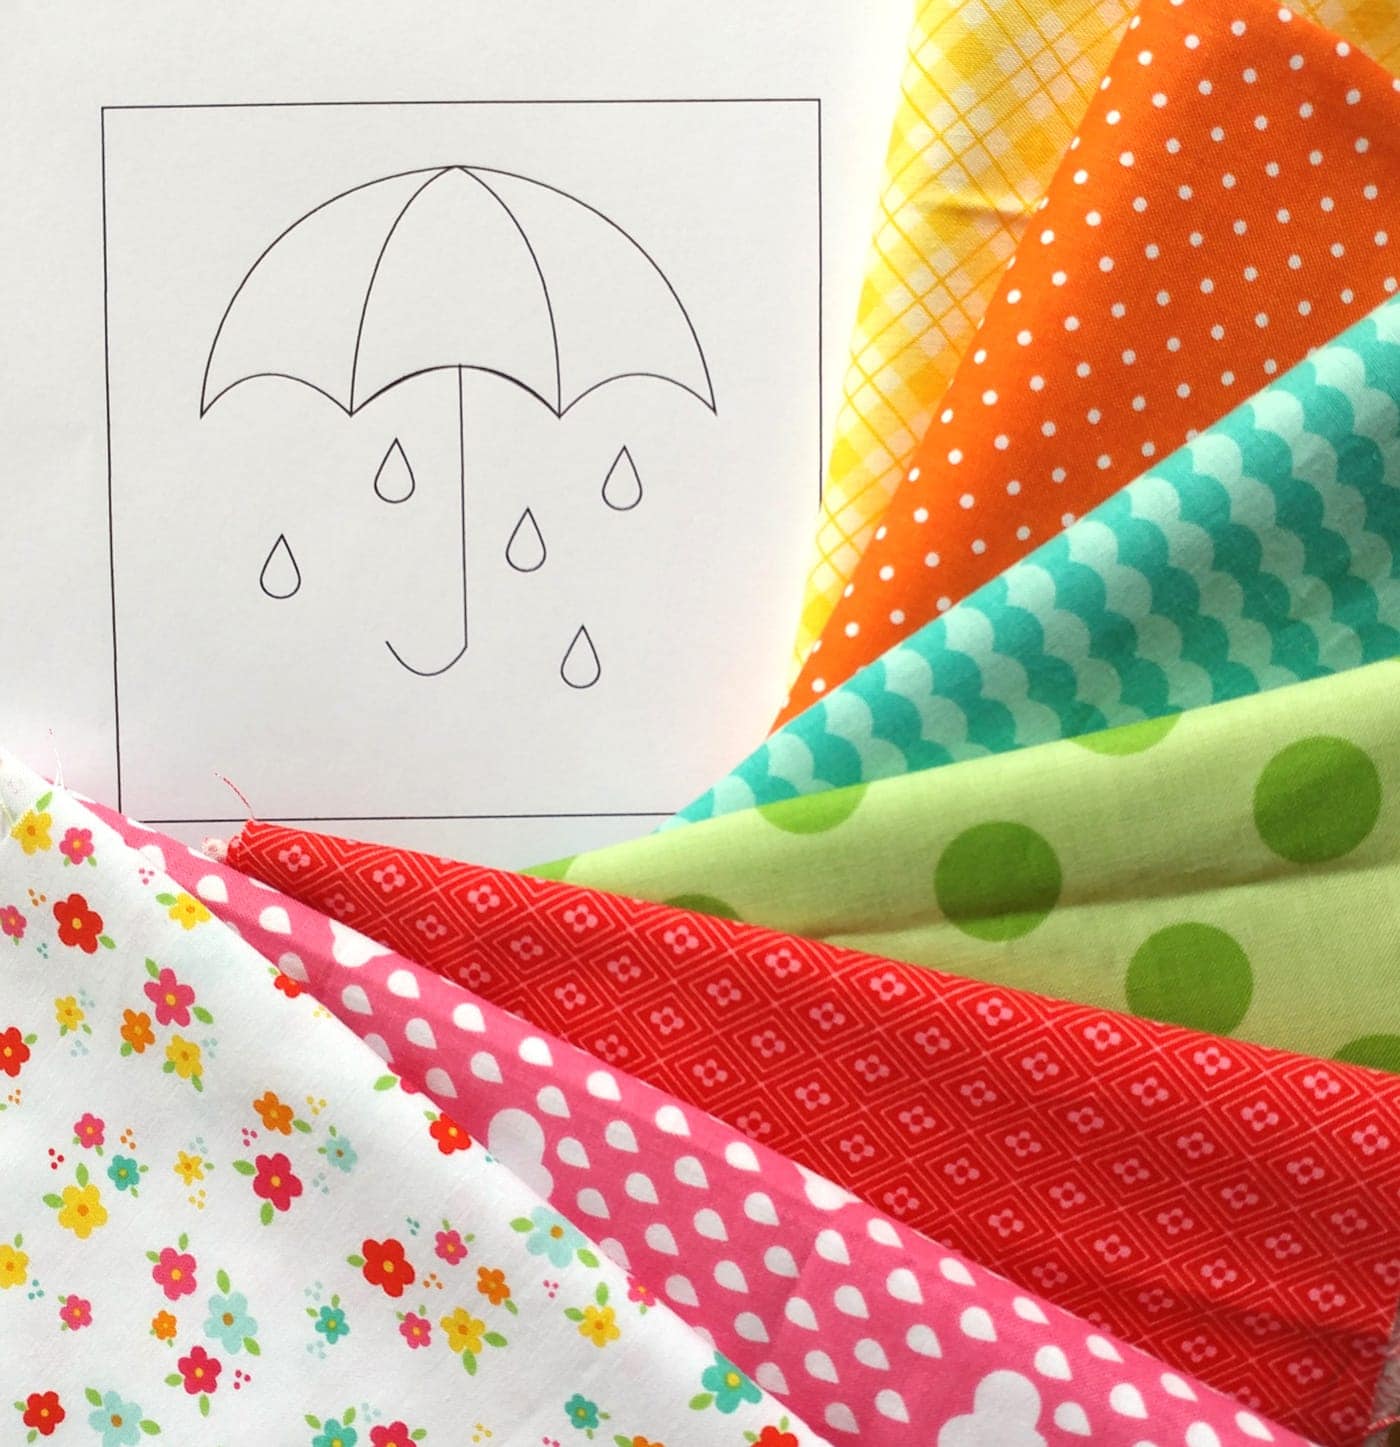
Umbrella Template
freezer paper
How to Get the Umbrella Template
Fill out this form, and we will email you a copy of the umbrella template.
Instructions
Springtime Showers Mini Quilt Pattern
Equipment
supplies
- 1/4 yard white on white background
- 1/4 yard small floral
- 1/4 yard for binding
- 16 squares 3″ colored squares from scraps
- 2/3 yard backing fabric
Additional supplies:
- 3-6 pieces various felt colors- I highly recommend a quality wool blend
- 3-6 skeins embroidery floss
- 1 piece Quilt Batting
- Umbrella Template Fill out the form on this page and we will email you a copy of the template
- Freezer Paper
Instructions
Cutting Directions:
- From white on white background fabric:4- 5 1/4″ squares4- 2 1/2″ squares4- 2 1/2″ X 4 1/2″ rectangles
- From small floral:5- 4 1/2″ squares2- 2 1/2″ X 16 1/2″ strips2- 2 1/2″ X 20 1/2″ strips
- From various colored scraps:16- 3″ squares
- From backing fabric:21″ square
- From quilt batting:21″ square
Directions to make the Mini Quilt:
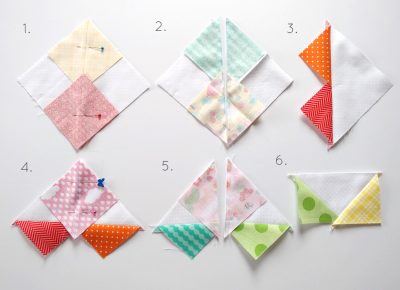
How to make the flying geese blocks:
- Begin by marking a diagonal line on the backs of all your 3″ colored squares. Divide them into 4 groups of 4. Take one 5 1/4″ white on white square and place it right side up in front of you. Take 2 squares from one of your groups and place them right side down on the white square so they line up diagonally from each other and the drawn lines line up. The corners will overlap.

- Pin the colored squares in place and sew on either side of your marked line with a scant 1/4″ seam. Cut apart on the drawn line.
- Press the colored triangles away from the white (seam allowance will go toward the triangles)
- Pin the other two colored squares from the group to the two halves. (see picture for positioning) They are still right sides together.
- Sew on either side of the marked line, again using a scant 1/4″ seam allowance. Cut along the drawn line.
- Press the colored triangle away from the white center. Square up to 2 1/2″ X 4 1/2″, making sure to leave 1/4″ between the point where the two colored triangles cross and the edge. Repeat for all groups, you should end with 16 flying geese units in all.
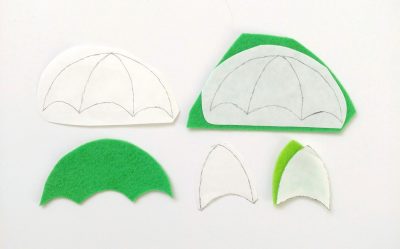
How to Create the Umbrella applique:
- *NOTE: you can leave off the umbrella applique if you like, the mini would be darling without it as well.
- I have found the best way for cutting applique pieces out of felt is to use freezer paper. Trace five umbrella tops onto the paper side of a small piece of freezer paper. Cut apart all the tops so they are separate.

- Use an iron on medium heat and press the umbrella tops onto the background color of felt you are going to use. Cut out along the outside of the umbrella top. Peel the freezer paper off the felt piece.
- Trim paper away from the centerpiece of the umbrella top, leaving a small margin around the lines. Press the paper onto the accent color of felt and cut it out.
- Stitch the umbrellas onto the 4 1/2″ floral squares using a sewing machine or embroidery floss- I used 3 strands of floss. I varied the position of the umbrellas on each square, just make sure to keep in mind seam allowances and room for the handle when you place the umbrella tops.

- Use the template to trace the umbrella handles onto the floral fabric. I use a lightbox, but you can also put it up against a window when it’s light outside to see the pattern. Stitch the handles using a back stitch and embroidery floss.
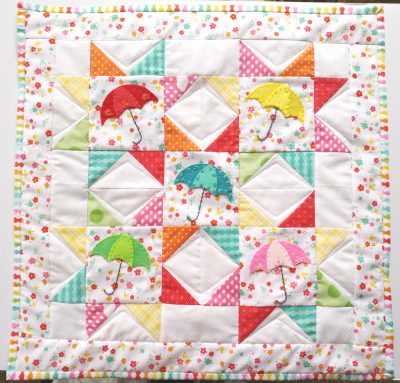
Assembling the Mini Quilt Top:
- Lay out your rows according to the picture:

- Row 1: 2 1/2″ square, flying geese block, 2 1/2″X 4 1/2″ rectangle, flying geese block, 2 1/2″ square.
- Row 2: flying geese block, 4 1/2″ square (umbrella), flying geese block, flying geese block, umbrella, flying geese block.
- Row 3: 2 1/2″ X 4 1/2″ rectangle, flying geese block, flying geese block, umbrella, flying geese block, flying geese block, 2 1/2″ X 4 1/2″ rectangle.
- Row 4: flying geese block, umbrella, flying geese block, flying geese block, umbrella, flying geese block.
- Row 5: 2 1/2″ square, flying geese block, 2 1/2″ X 4″ rectangle, flying geese block 2 1/2″ square.
- Assemble rows together, press seam allowances away from the flying geese blocks.
- Sew rows to each other, nesting seams together.
- Next, sew side borders on.
- Sew on top and bottom borders.
- Quilt and square up to 20″, bind and you are done!
- *If you are making a pillow cover, use a plain fabric for the back of your quilt sandwich when quilting.
- Cut your backing into two 20″ X 15″ rectangles. Press one 20″ side of each rectangle over 1″, then over 1″ again to create a hem. (if your backing is a directional print, make sure the sides you hem will be overlapping once placed on the back of your quilt).
- After your quilt is quilted and squared up to 20″ place face down and put backing pieces right side up on the back of the quilt, making sure they overlap, and the sides and top and bottom are lined up with the quilt. Baste in place. Bind the quilt as desired and now you have the option of a quilt or pillow!
*When making a quilted pillow cover, use a plain fabric for the back of your quilt sandwich when quilting.
Cut your backing into two 20″ X 15″ rectangles. Press one 20″ side of each rectangle over 1″, then over 1″ again to create a hem. (if your backing is a directional print, make sure the sides you hem will overlap once placed on the back of your quilt).
After your quilt is quilted and squared up to 20″, place faces down and put backing pieces right side up on the back of the quilt, making sure they overlap, and the sides, top, and bottom are lined up with the quilt. Baste in place. Bind the quilt as desired, and now you can have a quilt or pillow!
Other Fun Projects by Amy:
About the Maker:

Hi! My name is Amy Chappell, and I blog over at Ameroonie Designs. I currently live in Wyoming with my husband and six kids. I love being a mom but needed an outlet that would give me something to do that stayed done. Enter sewing and creating. I love the satisfaction of taking fabric and ideas and making something new. I also love that blogging has given me a way to meet new people and find a community of amazing people who love fabric and sewing as much as I do.
xoxo,
Amy
Ameroonie Designs
www.amerooniedesigns.com