
Patchwork Pillow Tutorial
This patchwork pom pom pillow is simple to construct thanks to a fun shortcut. If you like this project, you may also like this Bow Tie Pillow Pattern.
Equipment
Ingredients
- 18 3″ x 3″ squares of various prints of fabric
- 18 3″ x 3″ squares of stripe fabric
- 2 2″ x 15″ piece of border fabric
- 2 2″ x 18″ pieces border fabric
- 2 2″ x 15″ pieces of gridded interfacing
- 2 2″ x 18″ pieces of gridded interfacing
- 18″ x 18″ piece of fabric for pillow back
- 1 yard gridded fusible interfacing – cut a piece that is 20″ x 20″ to start.
- 2 1/4 yards of pom pom trim
- 18″ pillow form
Instructions
Step One: Gridded Interfacing
- We are going to use the quilters grid interfacing as a “shortcut” way to ensure that we get even points when stitching our pillow top together. I love using this technique. It makes for super fast and accurate piecing and is wonderful for small projects like pillows.
- I used this same technique to make the Norwegian-inspired Pillow that I created last Christmas. You can read the tutorial for that by clicking HERE.
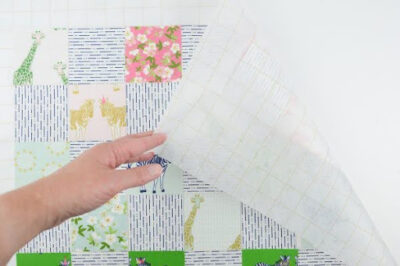
- The gridded interfacing is double-sided. One side has fusible adhesive. Begin by placing the fusible side up. The grid is broken down into 1″ squares. Since we are working with 3″ squares of fabric, each fabric square will cover 9 squares on the grid.
- Begin laying out your design. You want to have 6 rows of 6 squares each.
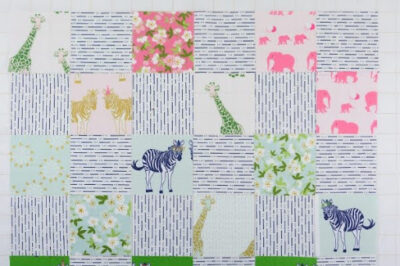
- My design alternated various prints of fabric with stripes of the same fabric. I think it helped to give the pillow some continuity and balance out all of the busy prints.
- For a bit of variety, I alternated the strips so that they go in different directions on the rows.

- I recommend working in small batches. Place the squares on top of the interfacing so that the edges of the fabric line up with the lines on the interfacing. The wrong side of the fabric will be touching the fusible side of the interfacing.
- When you have all of the squares in the correct place, move the piece to your ironing board. Press the squares with the iron so that the adhesive onto the interfacing secures the fabric in place.
- TIP: I notice that I need a pressing cloth when I’m adhering the squares. You can use a cloth or a silicone sheet if you have one.
Step Two: Stitching
- Fold the pillow top right sides facing, along the center line. Make sure that you’ve folded it EXACTLY along the grid line in the interfacing.
- Unfold and refold at the next row of squares. Keep repeating until you’ve sewn all the rows of squares together (all going in the same direction).
- Flip it over to the front and make sure you didn’t miss any squares.
- Flip it back over to the wrong side and clip the seams you just stitched at the intersection of the rows running in the opposite direction (this will help you to more easily fold the fabric in the opposite direction).
- Next begin stitching the rows of squares together, this time working in the opposite direction. Begin close to the center again and work your way out.
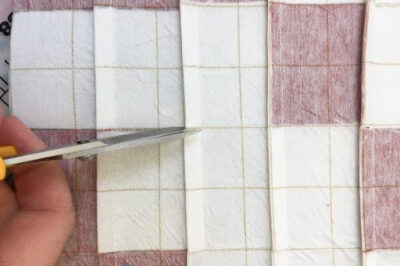
- When you are done, trim all of the excess interfacings off of the pillow top.
Step Three: Borders
- Iron the 2″ wide pieces of interfacing to the corresponding 2″ strips of fabric. Stitch the 15″ long strips of fabric to the pillow top and bottom. Press seam to one side. Stitch the 18″ long strips of fabric to the two sides of the pillow. Press seam to one side.
Step Four: Pom Pom Trim
- Pin the pom pom trim on the outside of the right side of the sewn pillow top so that the straight edge of the trim is close to the raw edge of the pillow.
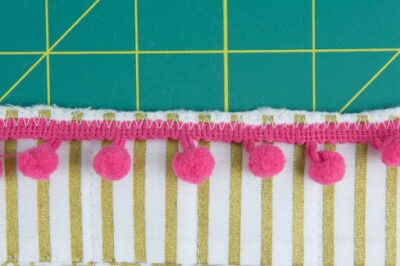
- Using your zig zag stitch, stitch the pom pom trim to the front of the pillow. Pivot at corners, and keep going until you are back where you started stitching.
Step Five: Finishing
- Layer the 18″ x 18″ piece of backing fabric onto the pillow top, right sides facing. Stitch together using a 1/4 1/2″ seam allowance. The seam allowance is less important than making sure that you are encasing all of the trim in the pillow. I recommend stitching with the pillow top facing up so that you can see where your pom pom trim was attached to the pillow front (you can see the zig-zag stitching line on the wrong side of the fabric).
- Leave a 10″ opening in one side of the pillow. Turn right side out. Feed pillow form into the pillow, and slip stitch the opening closed.