• Skip to primary navigation
  • Skip to main content
  • Skip to primary sidebar

The Polka Dot Chair logo

  • SEWING
    • Free Sewing Patterns
    • Bag Sewing Patterns
    • Costumes Sewing Tutorials
    • Apparel Sewing Patterns
    • Learn to Sew
    • Beginner Friendly Sewing Projects
    • Hand Embroidery Patterns
    • Tips & Techniques
    • All Sewing
  • QUILTING
    • Quilt Block Patterns
    • Learn to Quilt
    • Free Quilt Patterns
    • Quilt Patterns
    • All Quilting
  • CRAFTS
    • Disney
    • Cricut
    • Printables
    • All Crafts
  • HOLIDAYS
    • Seasonal Projects
    • Valentine’s Day
    • Easter
    • 4th of July
    • Halloween
    • Thanksgiving
    • Christmas
    • All Holidays
  • TUTORIALS
  • ABOUT
    • About Me
    • My Fabric Collections
    • Published Books
    • Press
    • FAQ’s
    • Contact
  • SUBSCRIBE
  • SHOP
menu icon
go to homepage
  • SHOP
  • TUTORIALS
  • SEWING
  • QUILTING
  • SUBSCRIBE
  • CRAFTS
  • HOLIDAY PROJECTS
  • ABOUT
    • Published Books
    • My Fabric Collections
  • CONTACT
    • Facebook
    • Instagram
    • YouTube
  • subscribe
    search icon
    Homepage link
    • SHOP
    • TUTORIALS
    • SEWING
    • QUILTING
    • SUBSCRIBE
    • CRAFTS
    • HOLIDAY PROJECTS
    • ABOUT
      • Published Books
      • My Fabric Collections
    • CONTACT
    • Facebook
    • Instagram
    • YouTube
  • ×

    Home » Crafts

    Memo Board Idea…

    Updated: Aug 26, 2013 by Melissa Mortenson · This post may contain affiliate links · This blog generates income via ads · 11 Comments

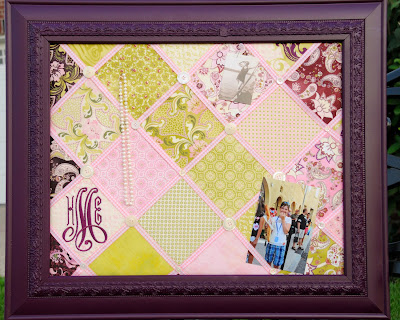
     I know that the memo board idea has been around for a while, but I thought this was a fun new twist on it. It is a great way to show off the beautiful Eva fabric and a perfect project if you are a beginning quilter. (the ribbon will hide your seams *grin*).
    The charm pack is perfect to use with this since you will get to use a large variety of fabrics to add interest and color to your board. I designed this board with cork so that it could do double duty. You could use it as a memo board or a pin board.
    Enjoy!

    1 Eva Charm Pack

    ¼″ wide ribbon
    Buttons of various sizes
    1 piece of foam core (buy it at your local craft store)
    1 package of cork tile squares
    fusible fleece

    Frame

    Spray Paint

    I designed my memo board to fit in a 12×16 frame that I already had (I spray painted it to match the fabric). This is the layout that I came up with to fit best in the frame. It seems like you will have extra squares, but you need to have enough give to wrap around the back of the cork and secure to the back of the frame.

    Sew the squares together like this. Use ¼″ seams.
    Next assemble your board base.
    Cut a piece of foam core to 12×16. Double check that it fits in your frame, it needs to be a bit loose to allow room for the fabric.
    To cut the foam core just use your rotary cutter and ruler… use an old blade since it will dull your blade.
    Cut and piece the cork squares to fit on the foam core pieces. You can also use your rotary cutter to cut the cork. Using hot glue secure at the corners. Cover the entire piece of foam core.

    Next cut 2 pieces of fusible fleece the same size as the foam core. You are making a sandwich. It will look like this from the side. You will have foam core, cork board, 2 layers fusible fleece then your fabric.

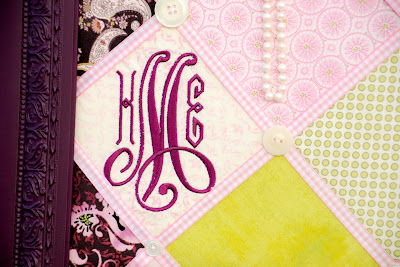
    If you wish, at this point add a monogram or applique image to one of the squares of your memo board.
    Then, iron the fusible fleece onto the backside of your charm square piece on the section of it that you want to SHOW in your frame. DOUBLE CHECK it is in the right spot before you iron it on.
    Next trim the fabric so that it is 2″ wider than the fusible fleece on all sides.
    Now you will begin to lay out your ribbon. Begin at one corner and working diagonally, start by pinning ribbon the width of your fabric along the seams.
    Next, start laying ribbon in the opposite direction. Every place that the ribbon overlaps place a pin. You will put a button here later. (make sure the ribbon is taught)
    Using your sewing machine, stitch the ends of each piece of ribbon down. This will prevent it slipping when you hand sew on your buttons.
    Using buttons of random sizes, begin hand sewing them on. You will sew them on each place the ribbon overlaps that will show in the frame.
    Take your fabric piece and lay it over the cork/foam core piece. Using a hot glue gun, generoulsy glue the fabric and ribbon to the back. Make sure that you put a dot of glue under the ends of each piece of ribbon.

    Flip it over and it will look like this! When you are done slip it into your frame and secure. Hang it up and enjoy!


    More Projects You May Enjoy

    • How to Make a Vintage Folded Fabric Star Ornament
    • close up of round fabric ornament with trim and ribbon attached
      How to Make a Retro Fabric Christmas Ornament with a Photo
    • two brightly colored pillows with jockey silk applique on gray chair
      DIY Derby Jockey Silks Pillows
    • multiple blown egg ornaments with painted hedgehogs on white wood table
      DIY Blown Egg Ornaments

    • Share
    • Email

    About Author

    Melissa Mortenson

    Melissa Mortenson is a blogger, designer, and content creator. She is the Polka Dot Chair blog founder and has been sharing fresh and creative ideas with readers since 2008. She is the author of “Project Teen, Handmade Gifts your Teen will Actually Love.” Her work and designs have been featured on HuffPost, TODAY, Pioneer Woman, HGTV, BuzzFeed, Better Homes & Gardens, and many other established publications. Her first fabric line, “Derby Style,” debuted in January 2015 through Riley Blake Designs.  Additional fabric collections have followed it in subsequent years. A mom of 3, she considers herself lucky to be living in Kentucky.

    Reader Interactions

    Comments

    1. lissa says

      August 26, 2009 at 10:45 am

      Every Mom needs to make one of those to celebrate “Back to School” Thanks for posting the project over at the Moda Bake Shop.

      -modalissa

      Reply
    2. a little bit biased says

      August 26, 2009 at 12:28 pm

      darling! Love it!

      Reply
    3. Brenda says

      August 26, 2009 at 3:29 pm

      Love it! Thank you! I’ve been going to make one for my daughters room, but never do! I’m motivated to do it now!
      Thank you!

      Reply
    4. Dallas Designing-Diva says

      August 26, 2009 at 5:03 pm

      This is just gorgeous. I can’t way to try it out!Thanks for sharing and inspiring.

      Reply
    5. Nicole says

      August 26, 2009 at 10:37 pm

      Very Cute!!! Moda sent me some of this fabric, which I totally love. I’m just having a real rough time coming up with a tutorial for it!

      Reply
    6. my happy bluebird says

      August 28, 2009 at 7:38 pm

      Thanks for posting this — my daughter wants me to make a memo board with her and I’ve been delaying it because I didn’t have the instructions — now I do thanks to you!

      The fabric you used is so pretty — can you tell me if the darker color is more burgundy, or, purplish?

      Thanks again… Linda

      Reply
    7. Stacy says

      August 29, 2009 at 6:11 pm

      Should have known it was you!! I don;t know anyone’s real name!! So making one of these this week with my friend! I will send you a pic when it is done!

      Reply
    8. Rebecca D. says

      August 31, 2009 at 1:09 am

      so so cute!!! I love that monogrammed patch!!! You do such great stuff!!!

      Reply
    9. lacey says

      September 01, 2009 at 11:12 am

      I really want this. In fact, I’ve been tempted to buy a wanna-be from Kids Company Store.
      I’m not gonna do it. I AM gonna make this. LOVE it!

      Reply
    10. Kalleigh Hathaway says

      October 02, 2009 at 7:22 pm

      Of all the projects you’ve posted at the Moda Bake Shop, this is my definite favorite. I found it today through a shop on the FabShopHop and am glad I found you too. Thanks!

      Reply
    11. tiles, flooring tiles, kitchen area ceramic tiles, wall surfaces and floorings, wall ceramic tiles, mosaic ceramic tiles, ceramic tile, kitchen flooring tiles, slate ceramic tiles, quarry floor tiles says

      September 10, 2014 at 12:10 am

      We’re a group of volunteers and starting a new schjeme
      in our community. Your web site provided us with
      useful info too work on. Youu have performed a formidable activity and our whole community will be grateful
      to you.

      Reply

    Leave a Reply Cancel reply

    Your email address will not be published. Required fields are marked *

    This site uses Akismet to reduce spam. Learn how your comment data is processed.

    Primary Sidebar

    Hello! It’s nice to meet you.

    I’m Melissa. I like to design things, like fabric, printables, and projects.

    I’m also a Mom and a Maker. I am like most of you, just trying to do my best every day. Some days I succeed, many days I fail.  I find joy in creating, if you do too, then I hope that you find something here bring a little “happy” to your life.  Find out more about me here.

    COPYRIGHT POLICY

    All my images and text are copyrighted. You may NOT use any images from this site in any kind of Video (this includes YouTube). If you would like to feature my work, you may use ONE (1) NON-COLLAGED image and must “follow” link back to my original blog post. You may NOT edit, crop, or change my images in any way without written permission. You MAY NOT print out or copy and distribute any text, images or patterns from this site. All patterns, content, instructions, and templates are for personal use ONLY! Thank you! Violators will be reported.

    Footer

    ↑ back to top

    About

    • Privacy Policy
    • Disclaimers
    • About Melissa
    • Instagram
    • Facebook
    • YouTube
    • Pinterest

    Newsletter

    • Sign Up! for emails and updates

    Contact

    • Contact
    • FAQ
    • Press
    • Published Books
    • Fabric Collections

    Welcome to the Polka Dot Chair! Here you’ll find easy, step-by-step, sewing, quilting, and crafting projects. We design projects for Makers of all skill levels. Beginners are welcome!

    DISCLAIMER:

    While every effort has been made to ensure the accuracy of the content on this website, the information is made available without warranty of any kind. The Polka Dot Chair accepts no responsibility or liability, whether direct or indirect, as to the currency or accuracy of the information, nor any consequence of its uses. This website is not intended to substitute the advice of a professional.

    Copyright © 2022 Polka Dot Chair

    [ Placeholder content for popup link ] WordPress Download Manager - Best Download Management Plugin