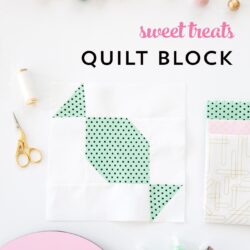
Sweet Treats Quilt Block Tutorial
This free pattern for a Sweet Treats Quilt Block has visions of sugarplums dancing in my head! You could use the pattern for this candy quilt block for Christmas, Halloween, or even Valentine’s Day!

Please welcome Liz of Simple Simon and Co! She’s the guest author for today’s tutorial.
At this time of year, I start getting sentimental about holidays from my youth, and one of the things I remember is a Christmas we spent in California when I was just a little girl, surrounded by lots of cousins and distant relatives. And one thing I remember about that Christmas was eating loads and loads of saltwater taffy.
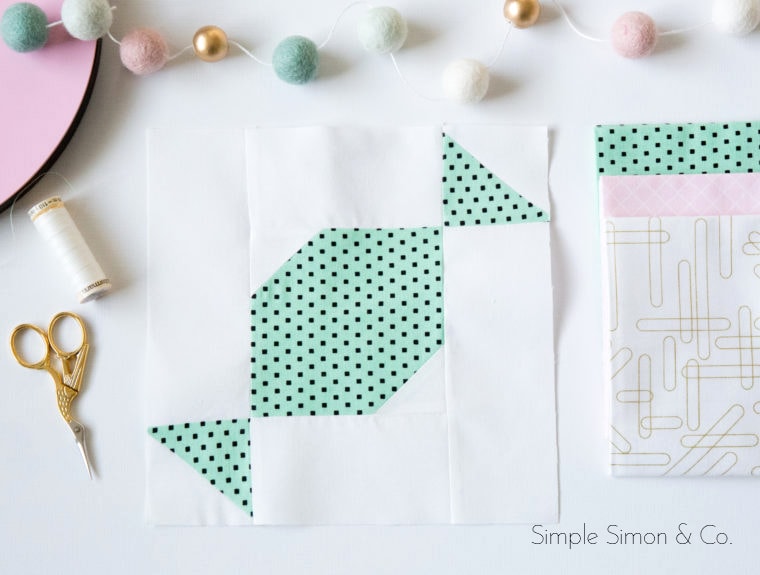
I am sharing one of my newest quilt blocks, which I’ve named “Sweet Treats” because it reminds me of a Christmas when I’d eat handfuls of Neapolitan salt water taffy. Yummm, it was so good.
I made this quilt block out of some white fabric and a piece of Shine Bright collection that looks like mint chocolate chip that I love as well…but you could use any fabric scraps you have on hand. Let’s get started!
Sweet Treats Quilt Block Tutorial
supplies
- 2 pieces 2.5″ by 6.5″ white rectangles
- 2 pieces 2.5″ by 4.5″ white rectangles
- 2 pieces 2″ by 2″ squares of white fabric
- 1 piece 4.5″ by 4.5″ square of print fabric
- 1 piece 3″ by 3″ square of white and one 3″ by 3″ square of print fabric
Instructions
Step One:
- Block size is 8" x 8" Finished.
- Take the two 3″ by 3″ squares of white and printed fabric and make two half-square triangle quilt blocks. HERE is an excellent tutorial if you need it. Press open. Then trim each HST to 2.5″ by 2.5″ squares.
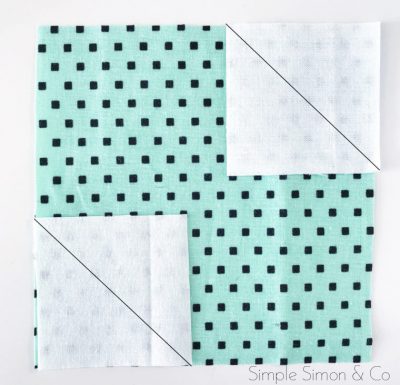
- Next, take your 4.5″ square and place your two 2″ white squares on two opposite corners. Then stitch along the lines shown below.

- Open your press piece and trim off the excess of the block you created in step #2.
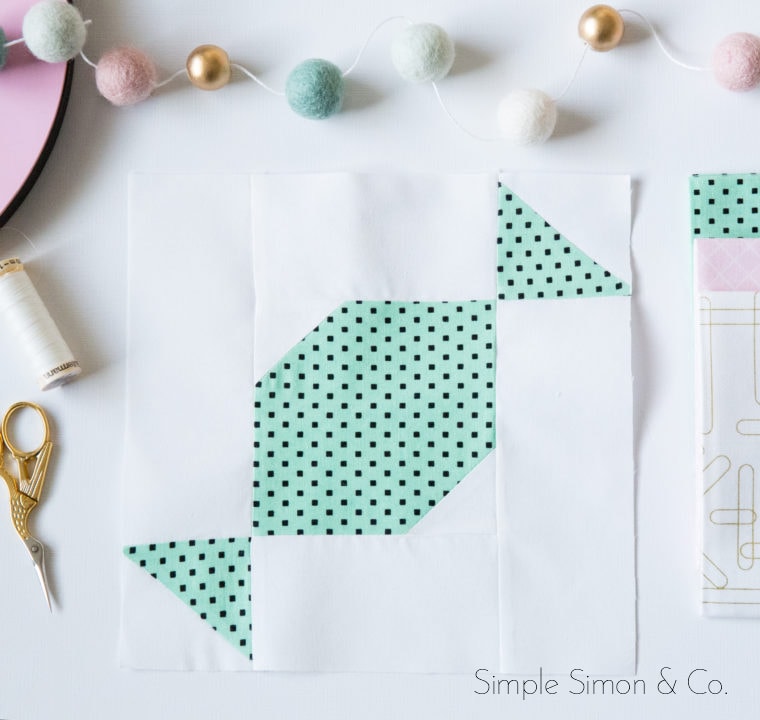
Step Two: Lay out your quilt block in the following order
- Row #1– one HST, one 2.5″ x 6.5″ rectangle
- Row #2–one 2.5″ x 4.5″ rectangle, 4.5″ x 4.5″ block, one 2.5″ x 4.5″ rectangle.
- Row #3–one 2.5″ x 6.5″ rectangle, one HST from Step One.

- After you have your rows placed, stitch each row together using a 1/4″ seam allowance. Press seams to one side. Then sew together the three rows to create the finished quilt block. The finished block size is 8" x 8". The block size before it's sewn into the quilt is 8 1/2" x 8 1/2".


About the Maker:

We are Elizabeth and Elizabeth, two girls who married brothers and ended up with the same name. We are also the same age, both former school teachers, have the same number of children, live in the same county, have dogs rescued from the pound, and share a love for sewing, quilting, and the art of homemaking.
Together we blog over at Simple Simon and Company where we get the opportunity to share tips, tricks, tutorials, recipes, and thoughts with our readership.
Other fun projects by Simple Simon & Co.
Free Quilt Pattern – the Sleepover Quilt
Tips & Tricks for Wool Applique