Lined Drawstring Bag Sewing Pattern & Free Cricut Cut Files
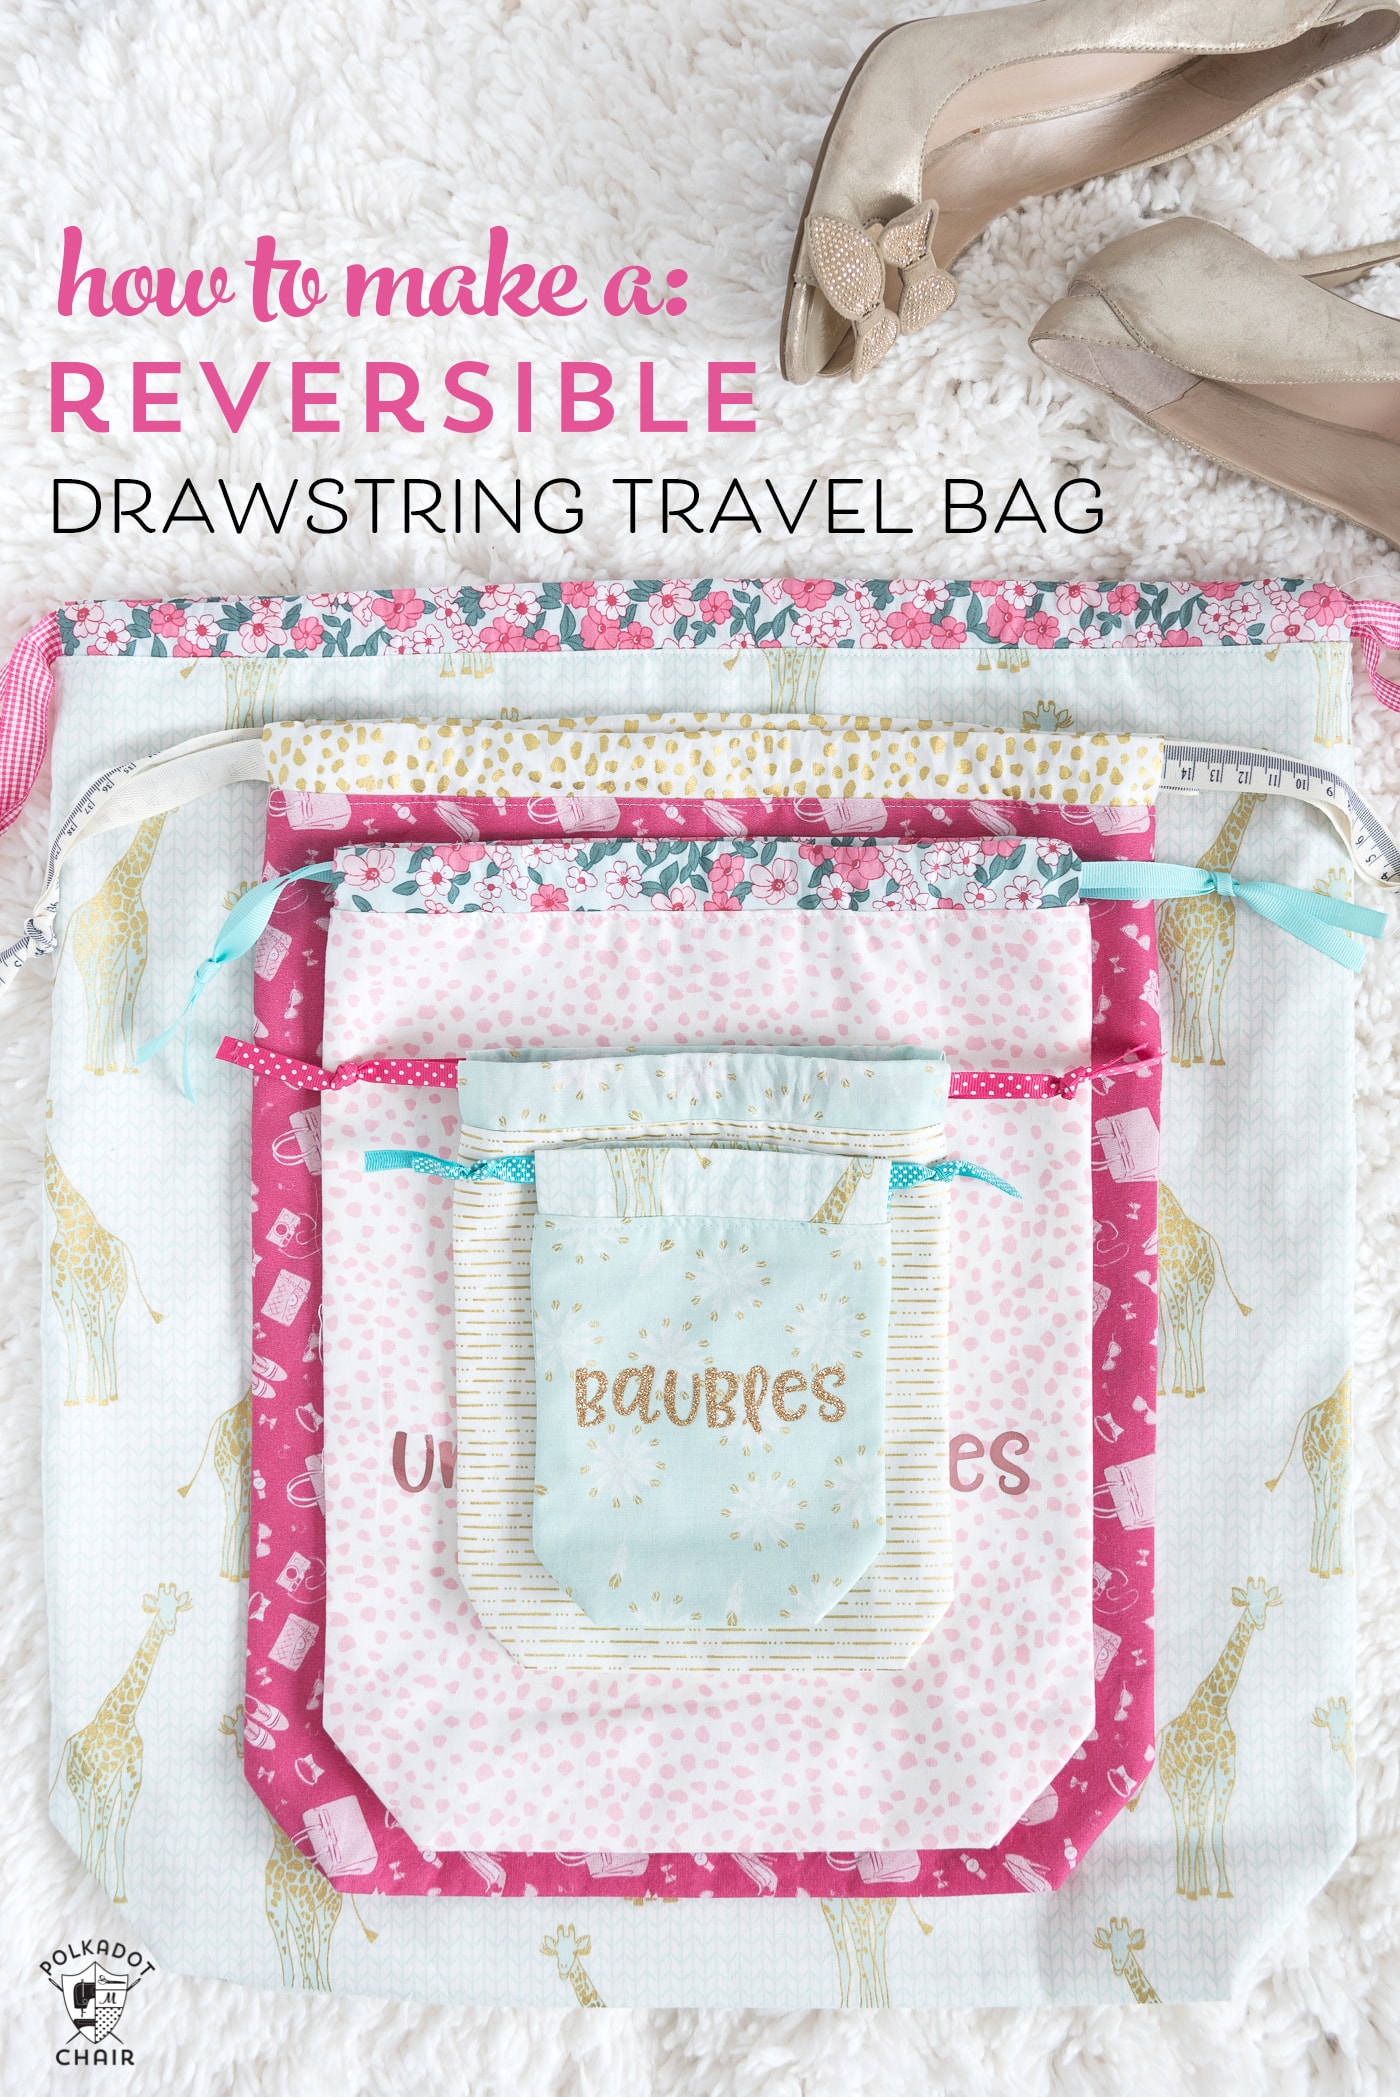
This lined drawstring bag sewing pattern & tutorial includes measurements to make the bags in 6 different sizes, one for each of your “travel necessities.” Plus, the bags are all REVERSIBLE! You can even personalize them a bit with some fun sayings.
Whenever I take a trip, whether a weekend getaway or a longer vacation, I’m always scrambling for bags to hold all of my stuff. So for selfish reasons, I created a bunch of drawstring bags to take with me when I travel.
I’ve included a bunch of free Cricut cut files that perfect complement your travel bags! Keep reading to find out more. This is sponsored content, and this contains affiliate links. I work as a Brand Ambassador for Cricut, I am thrilled to work with a company whose products I love to use.
Project Inspiration
Last weekend my husband and I were able to steal away to Chicago for a little weekend getaway sans kids. We try to go each year in December.
My husband attends a conference, and I tag along and hit the shops (and sometimes the museums) and eat as much pizza as I can fit in my stomach. Before we left, I had to laugh a bit at myself as I was packing for the weekend.
I was packing and stuffing charging cords in zip-loc bags and my flat iron in an old hotel laundry sack. I looked at myself and thought, “surely I can do better than this.”
Travel Bag Sewing Projects
I’m surprised that with as much as I sew, I haven’t sat down and stitched a bunch of travel bags for myself earlier. You should see what state my previous laundry bag was in. We got it for free at a hotel, and it was not nice when I got it several years ago.

I often forget to take the bag altogether and end up using the plastic bag in the hotel closet (which I’m guessing you’re not supposed to do unless you are having your laundry done at the hotel).
When we got home, I sat down and “brainstormed” a bunch of ideas for bags to take with me when I travel. Since Christmas is right around the corner, I thought you guys might enjoy a tutorial to make these drawstring bags. They’d be fabulous gifts!
How to Get the Sewing Pattern
Option 1: Printable Version
Buy the printable pattern in our shop! It includes instructions to make the bag in 6 different sizes, including a fat quarter-friendly pattern.
Option 2:
Read the directions on this website.
How to Add the Vinyl Lettering
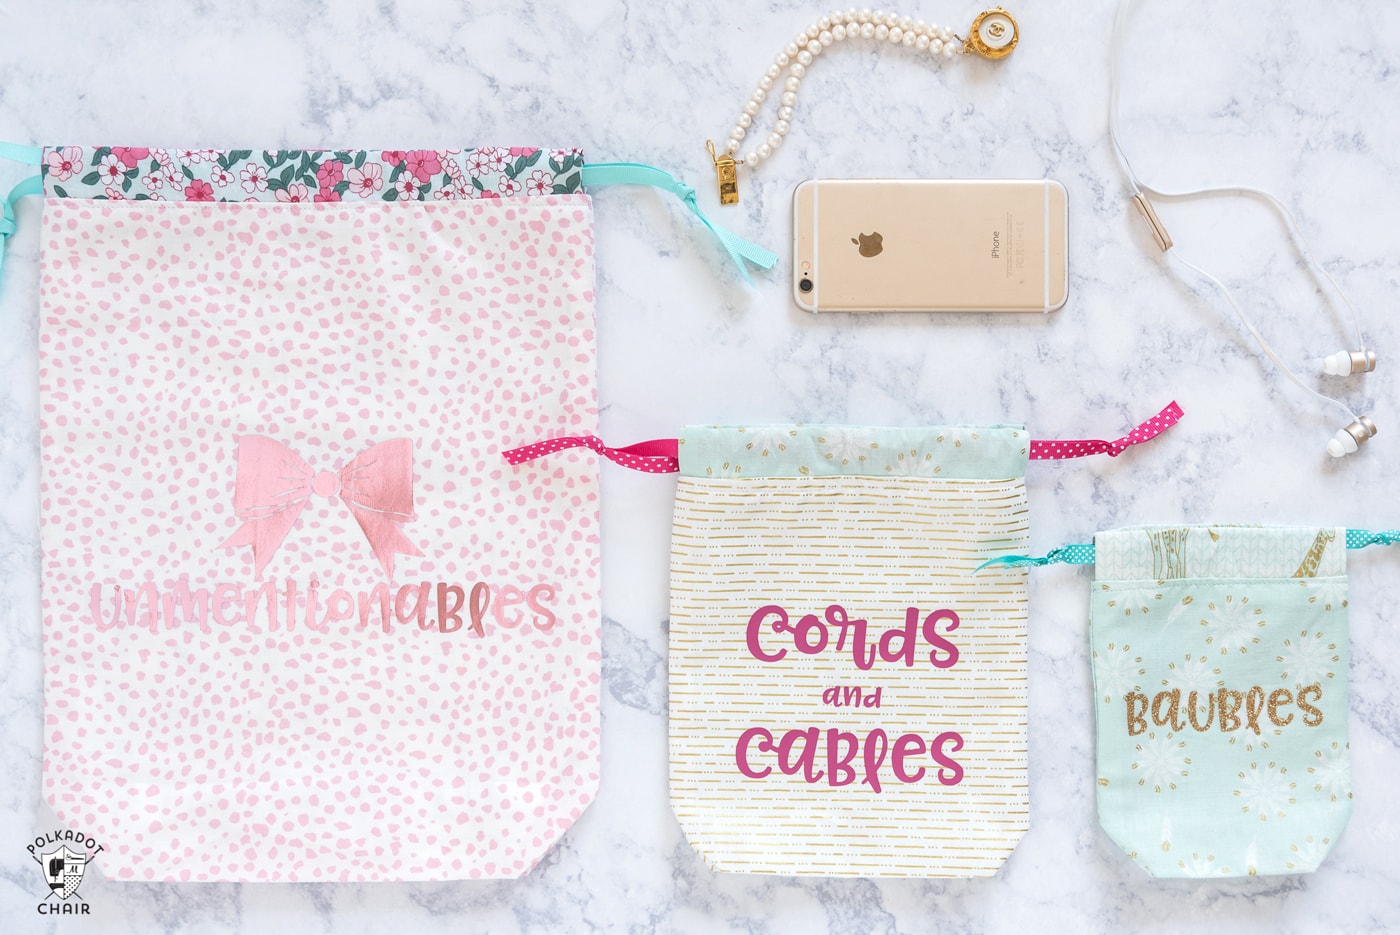
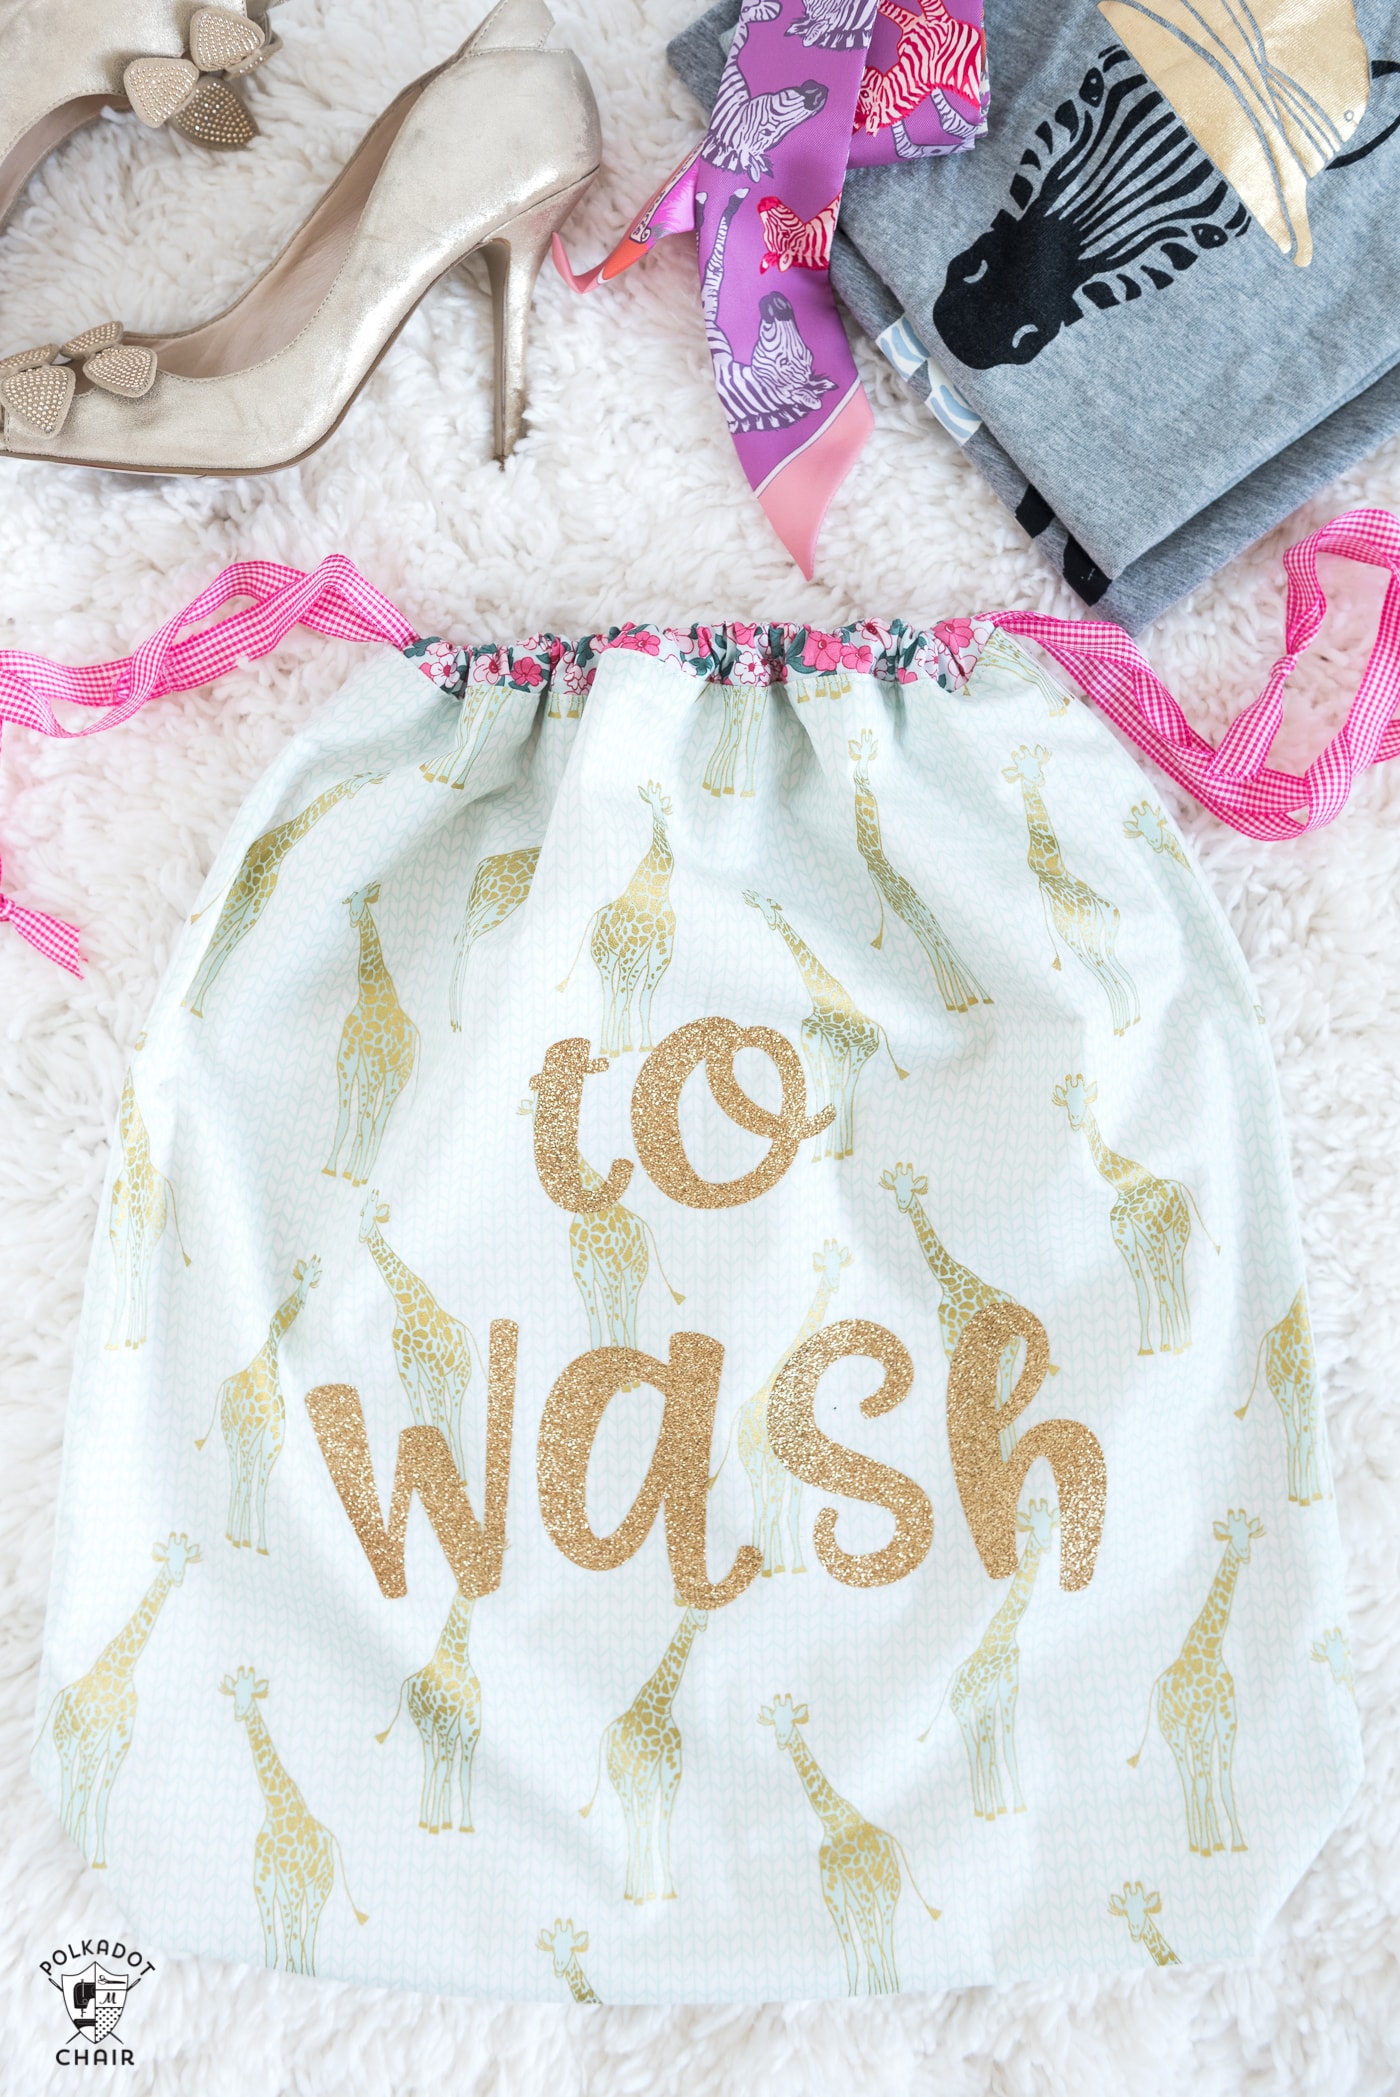
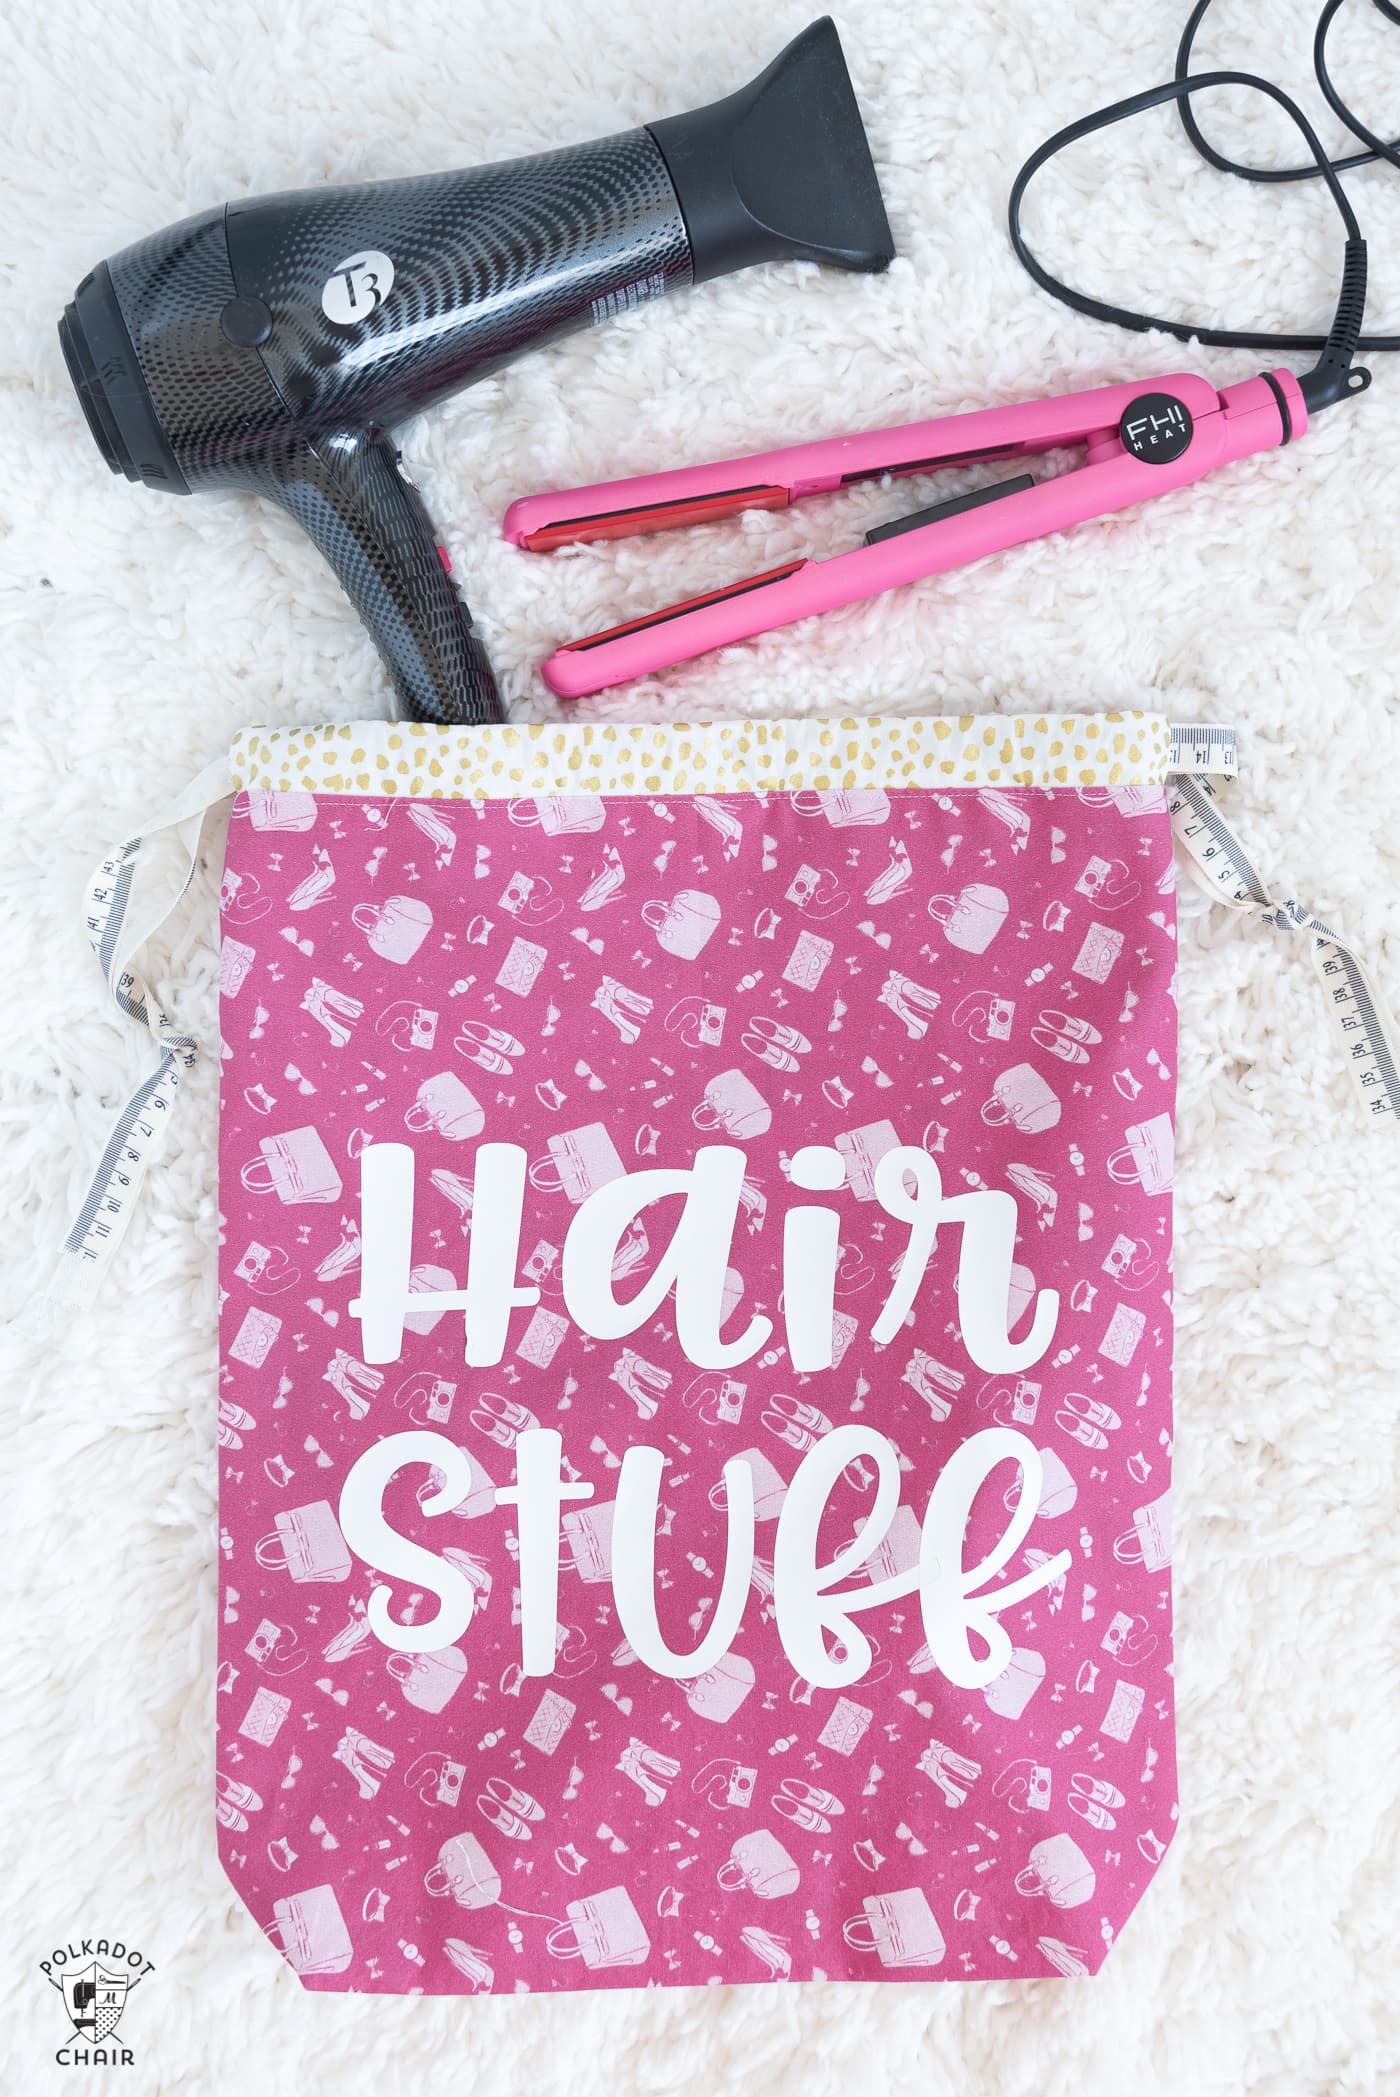
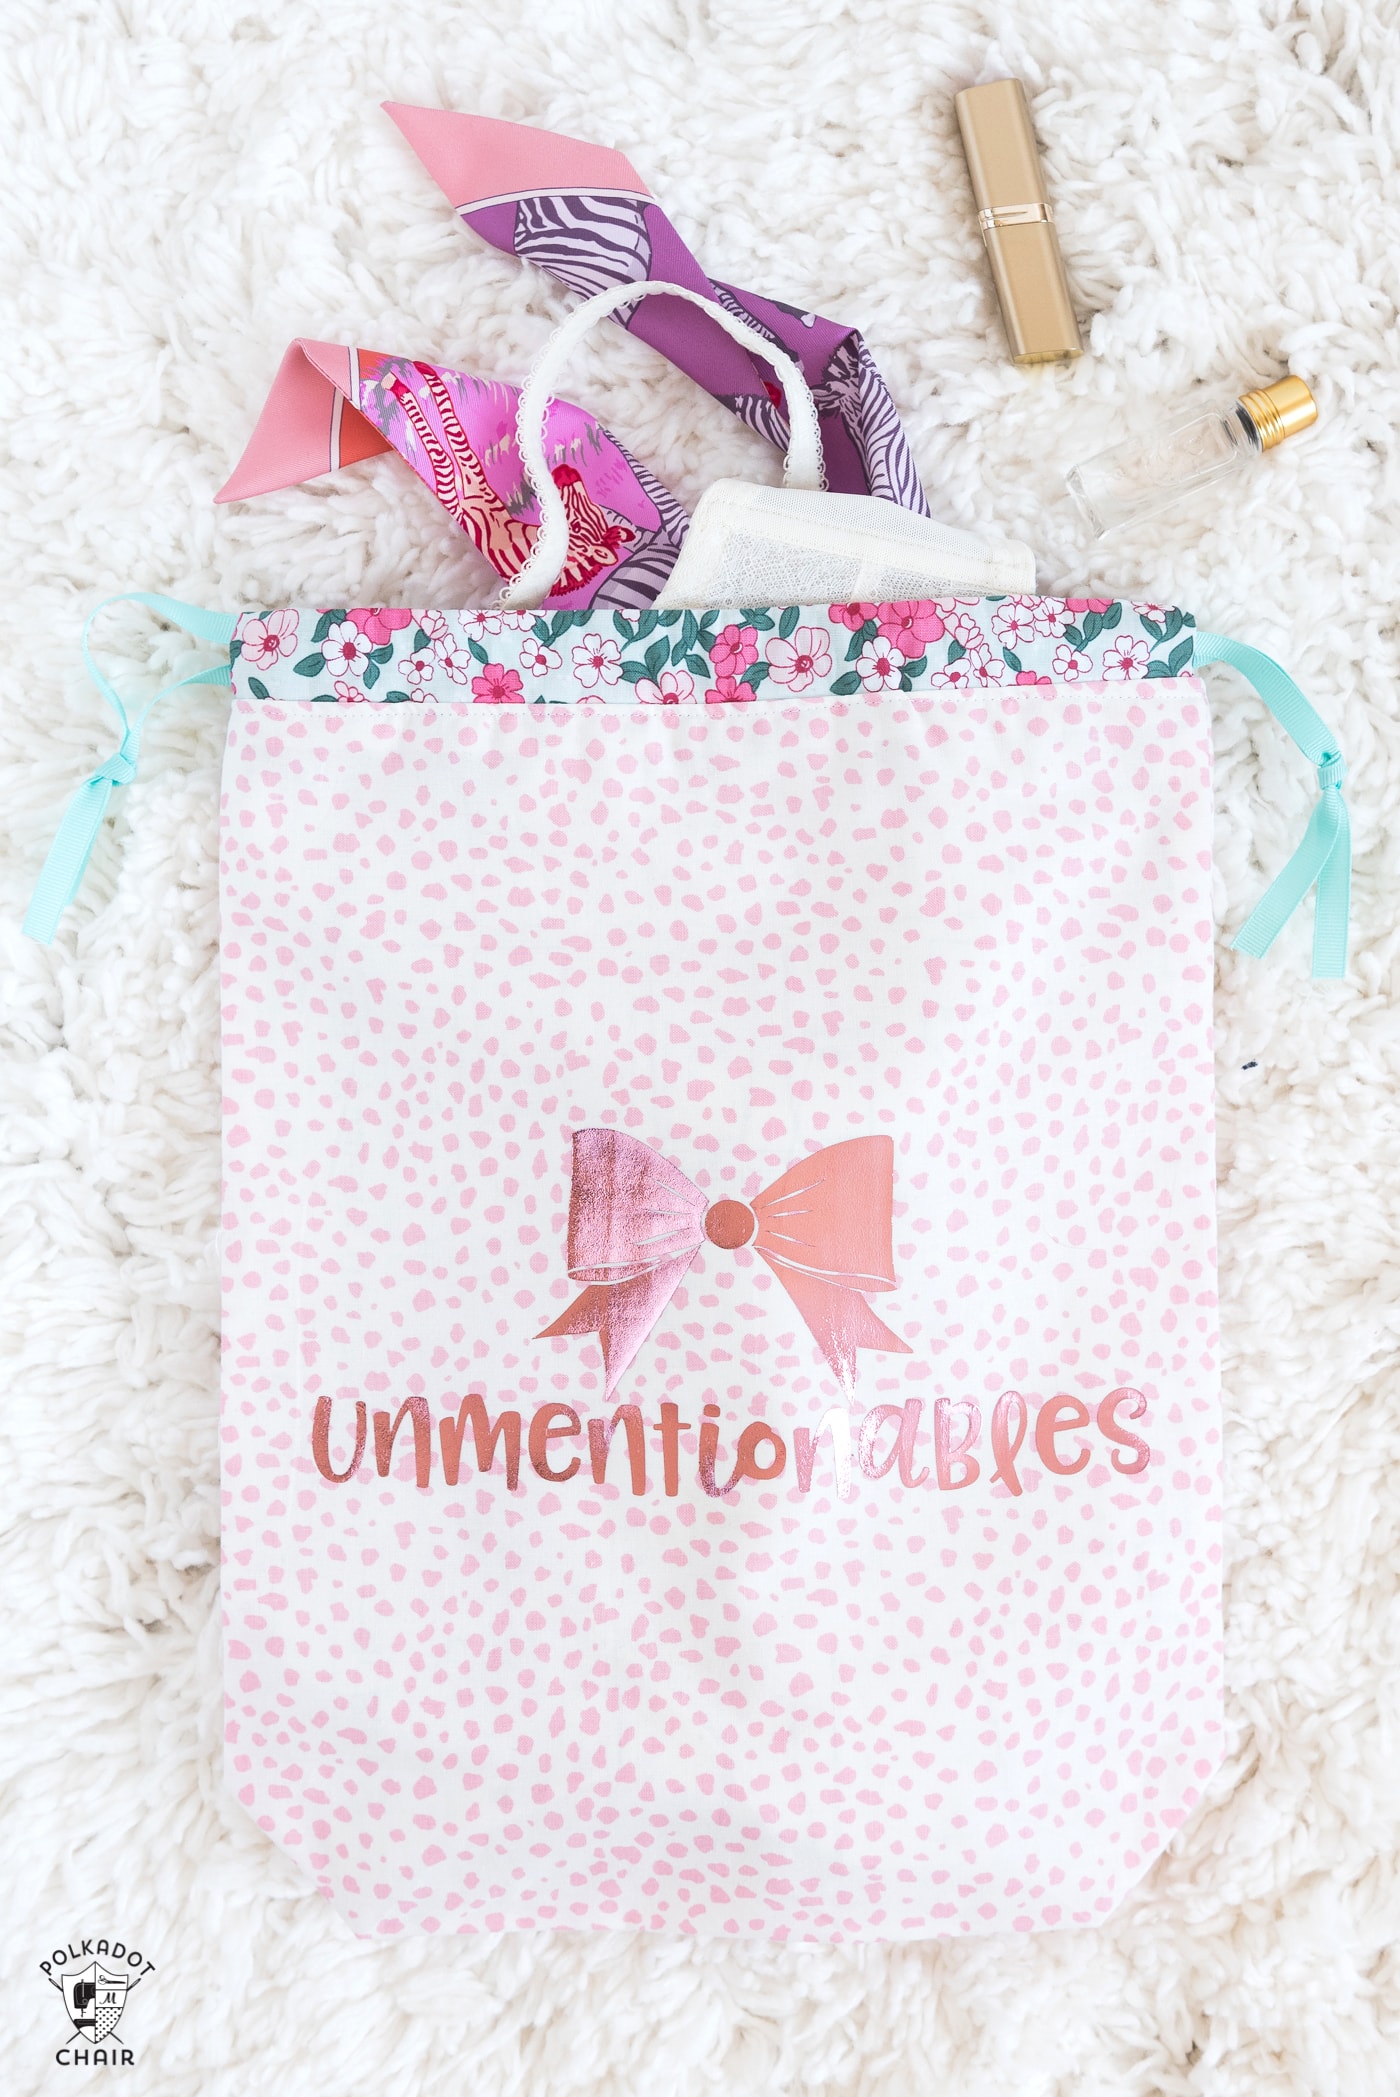
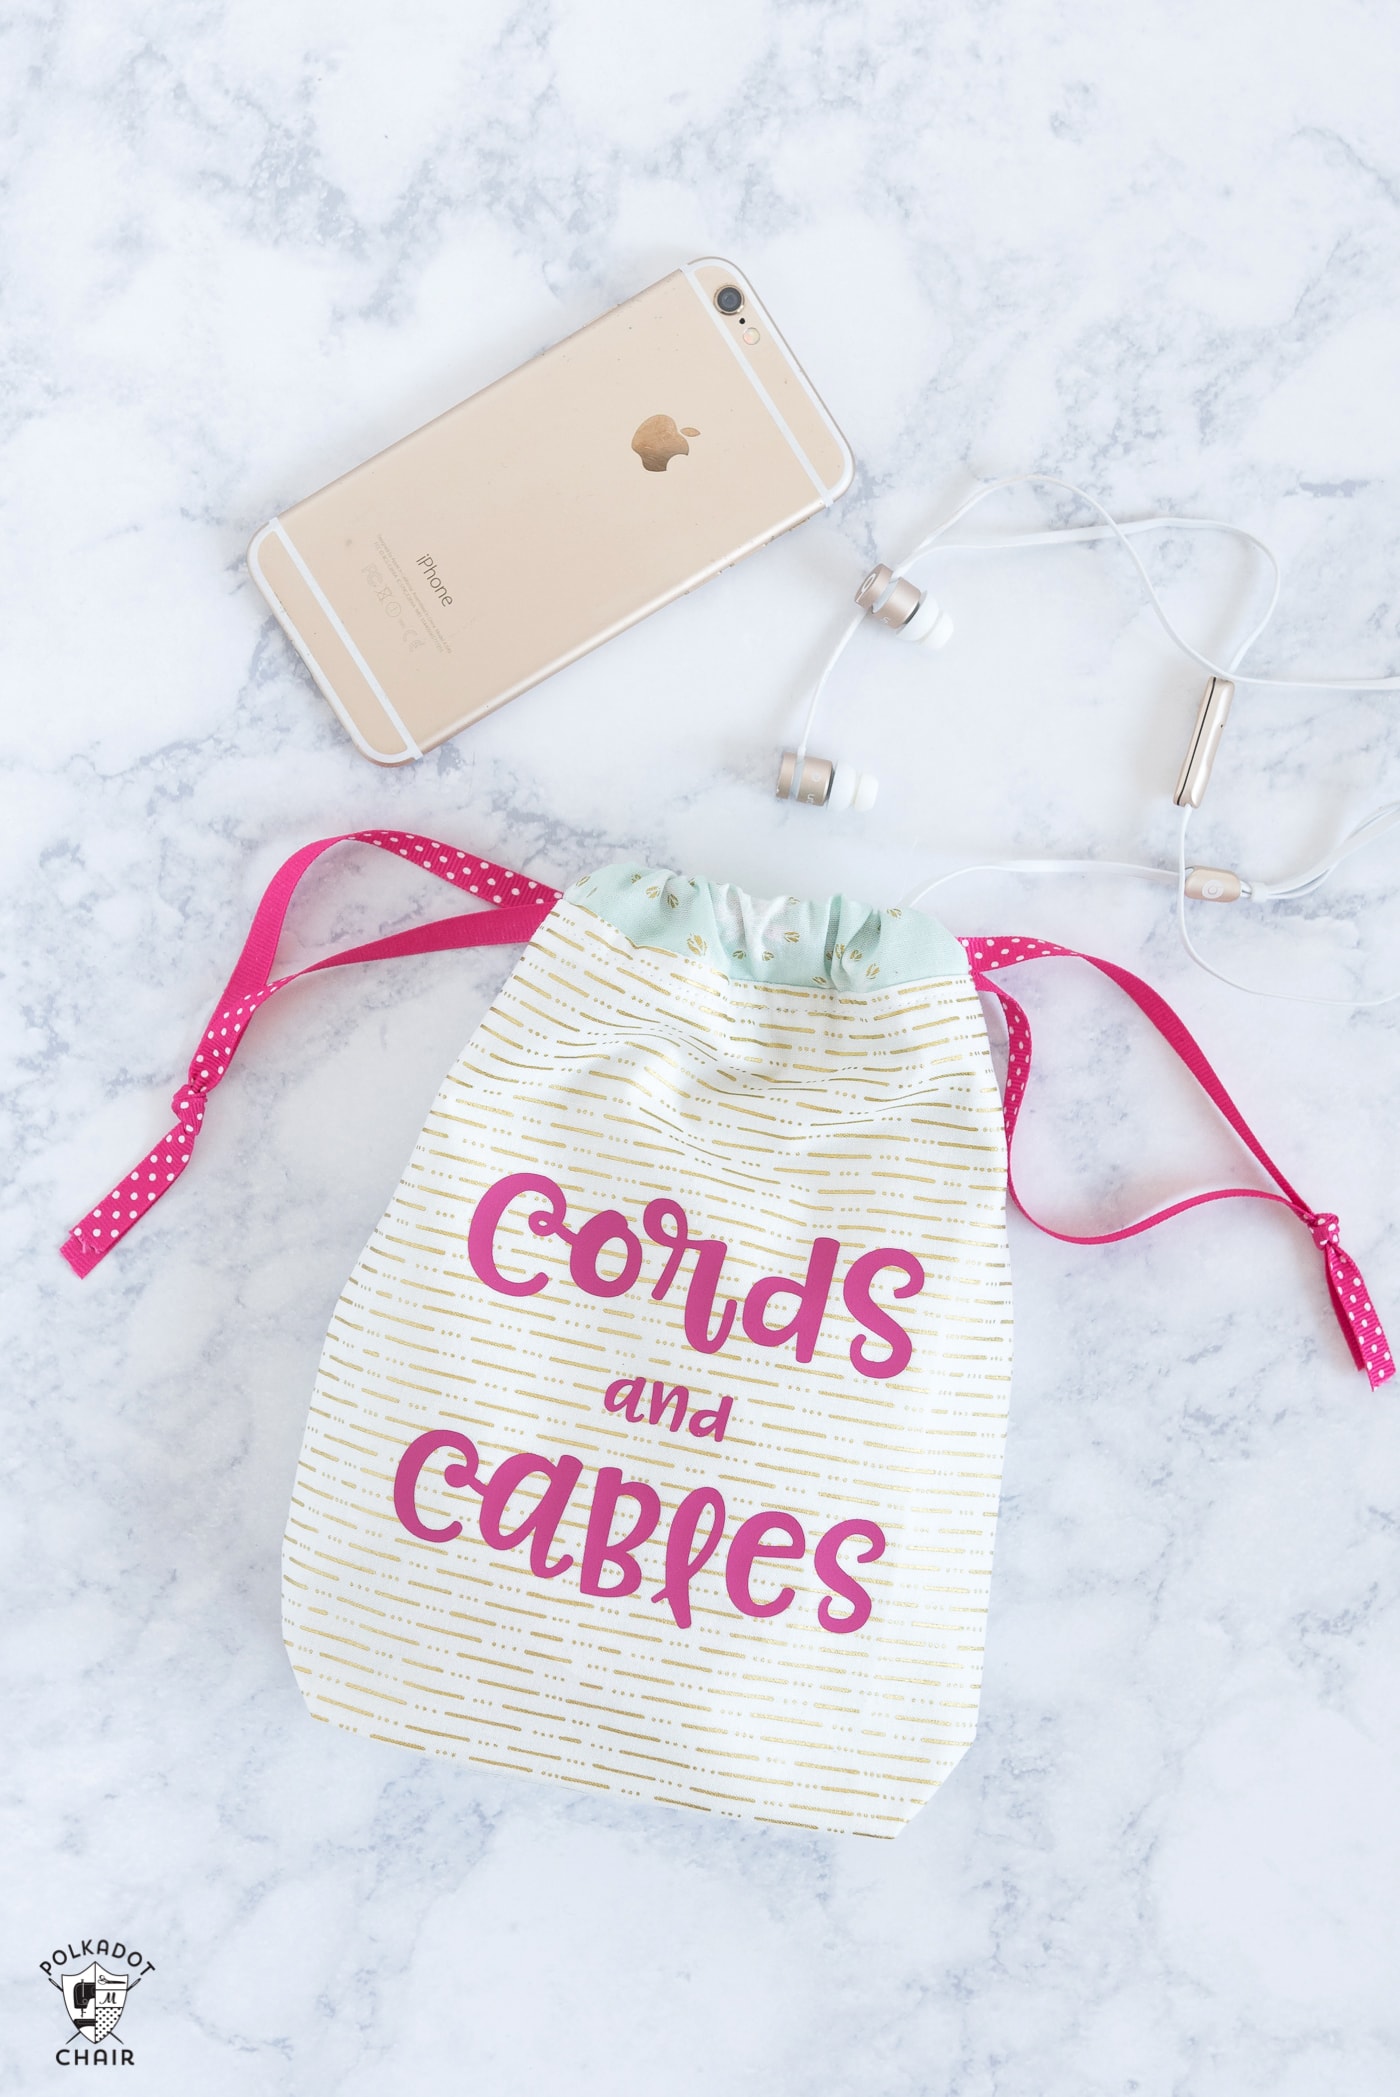
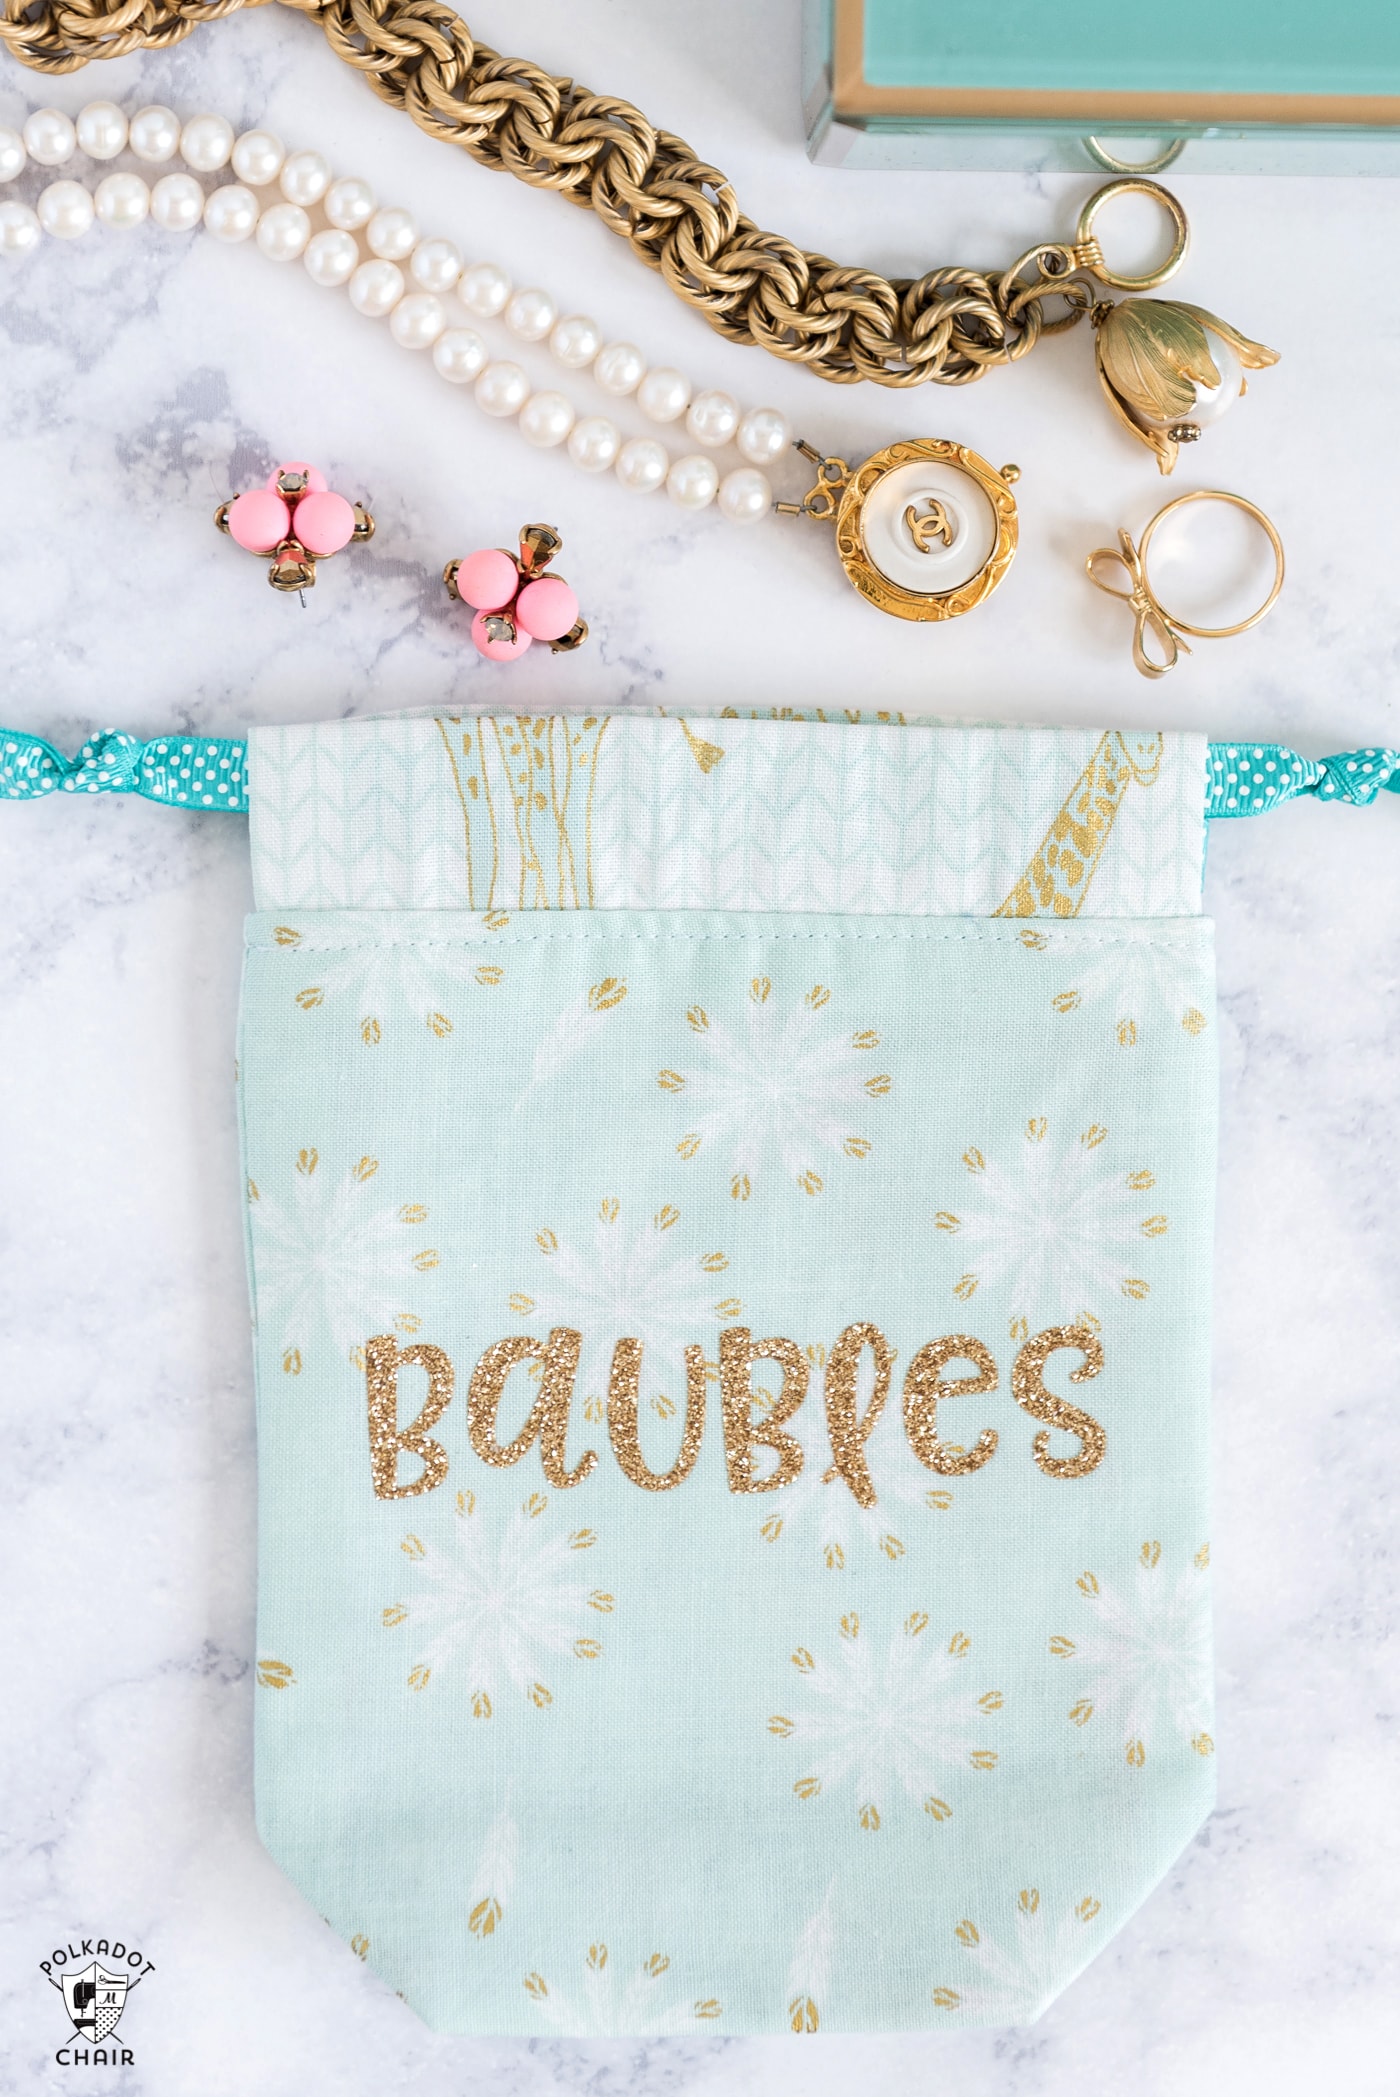
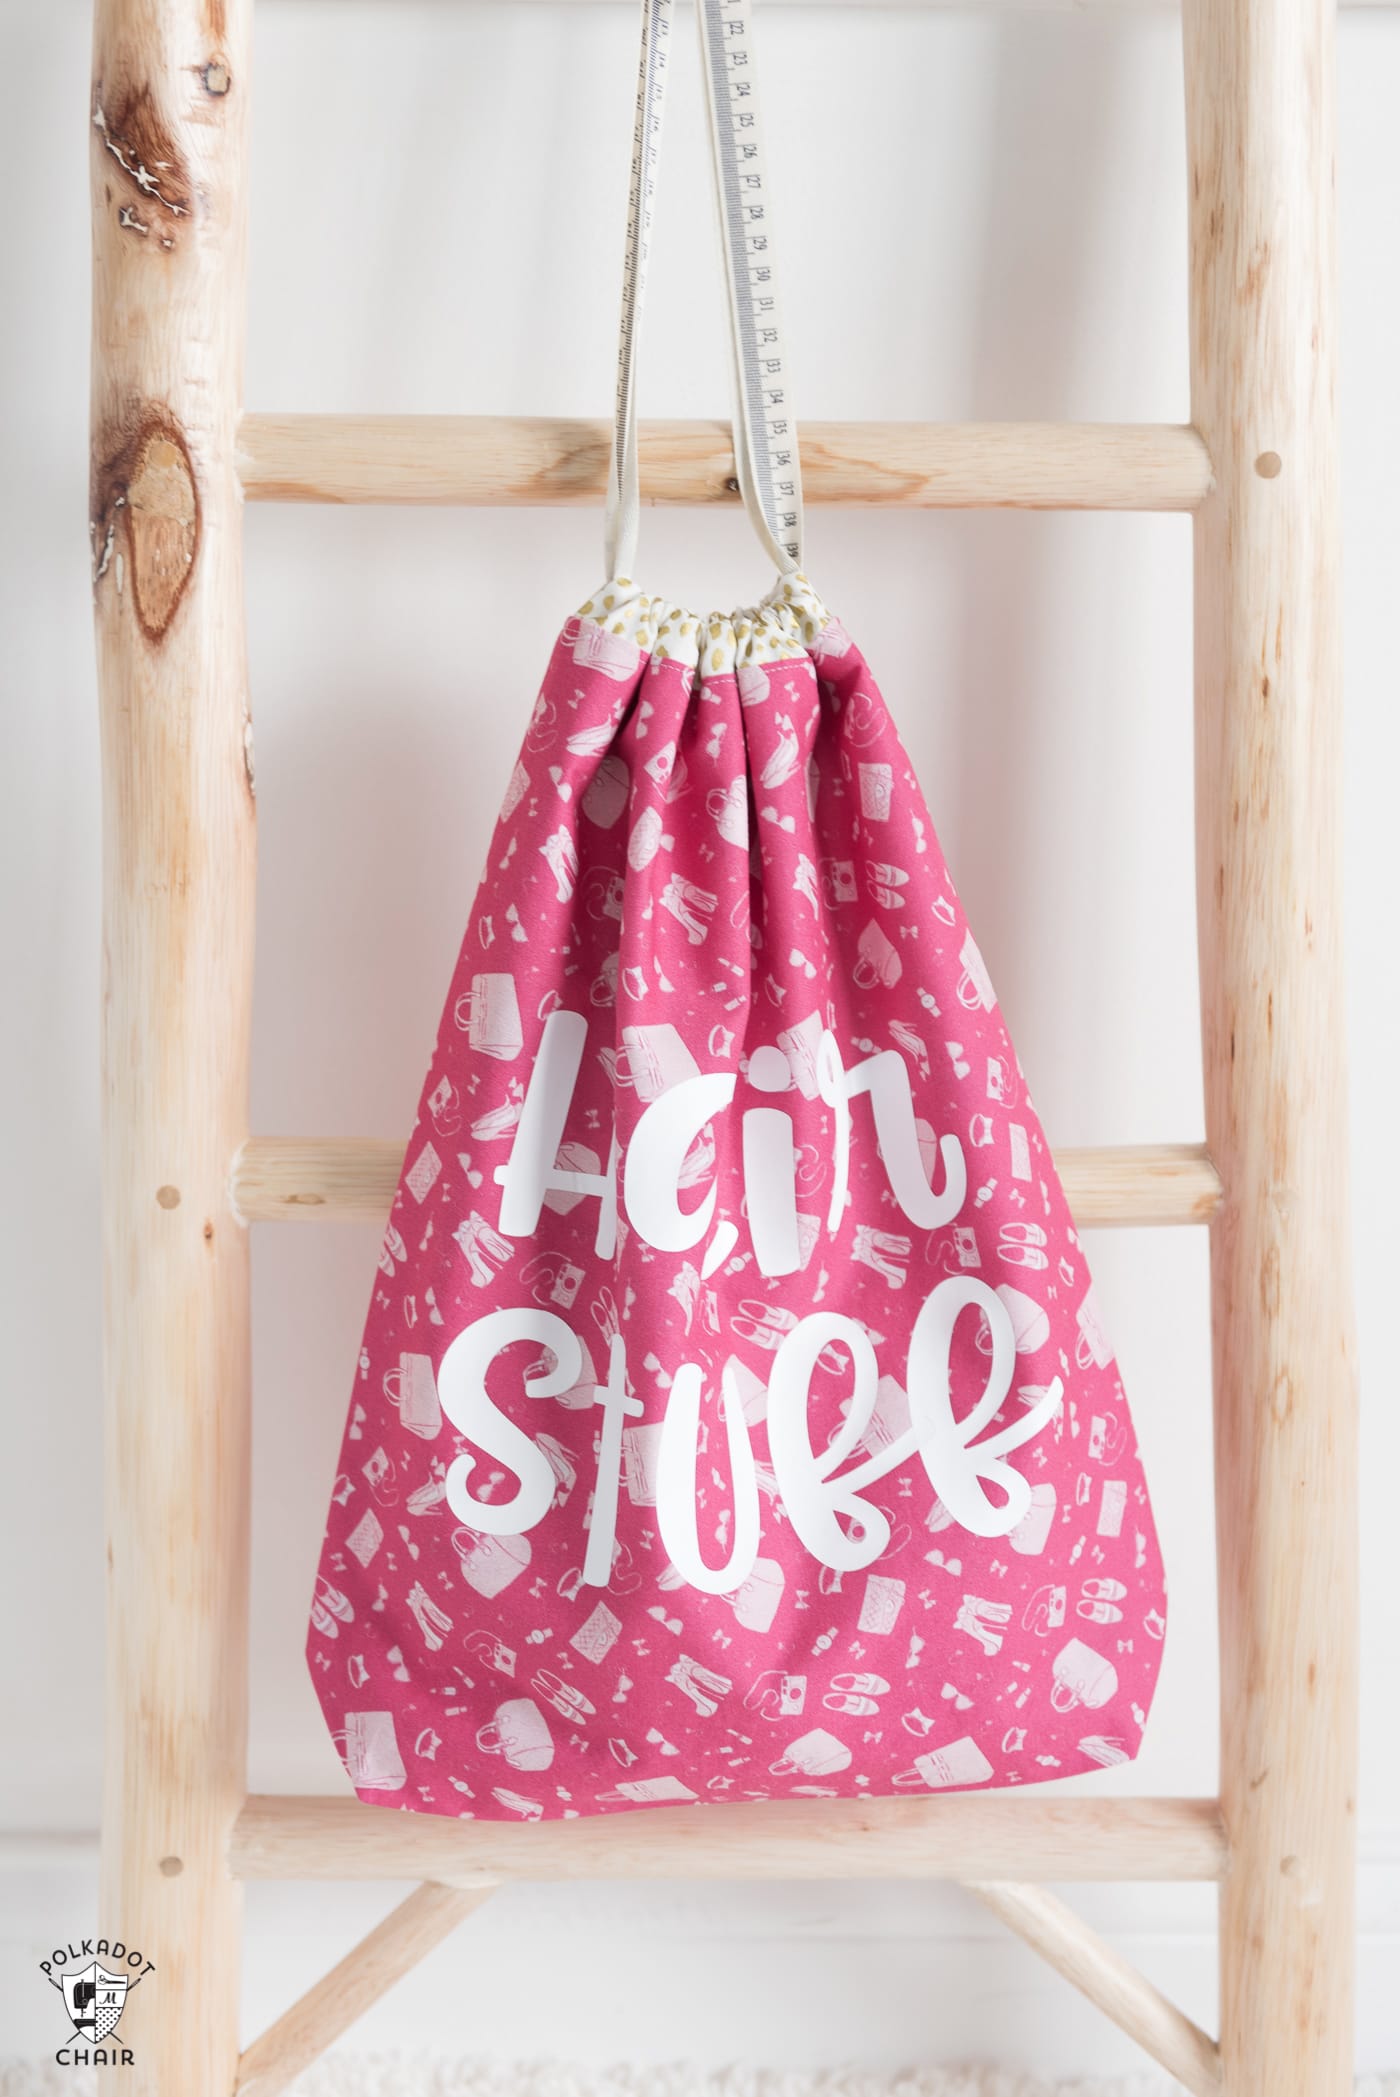
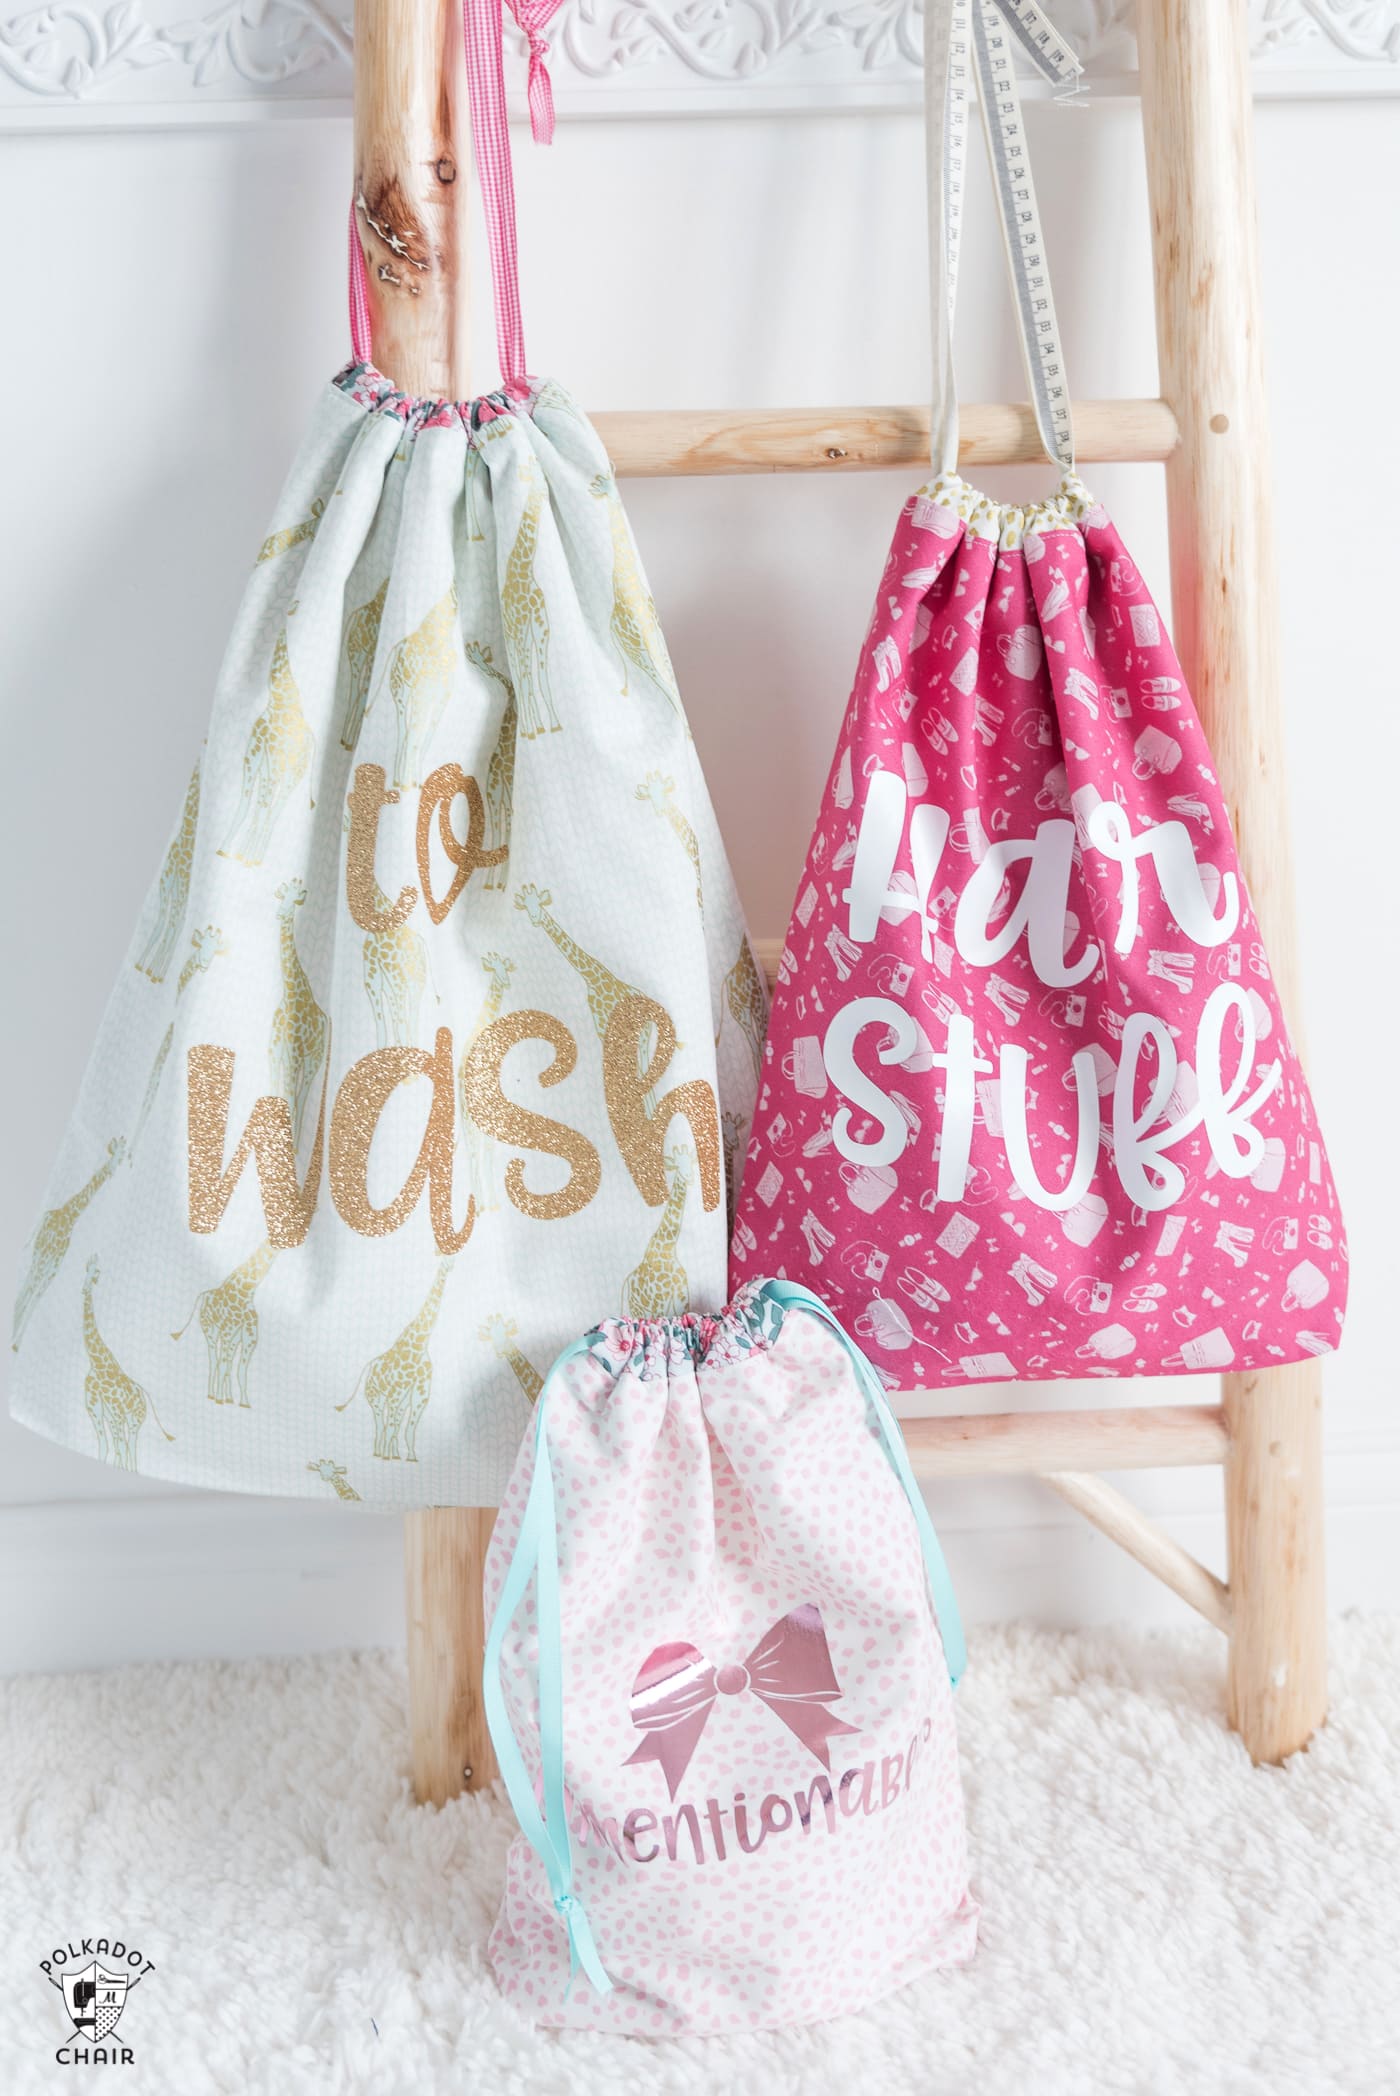
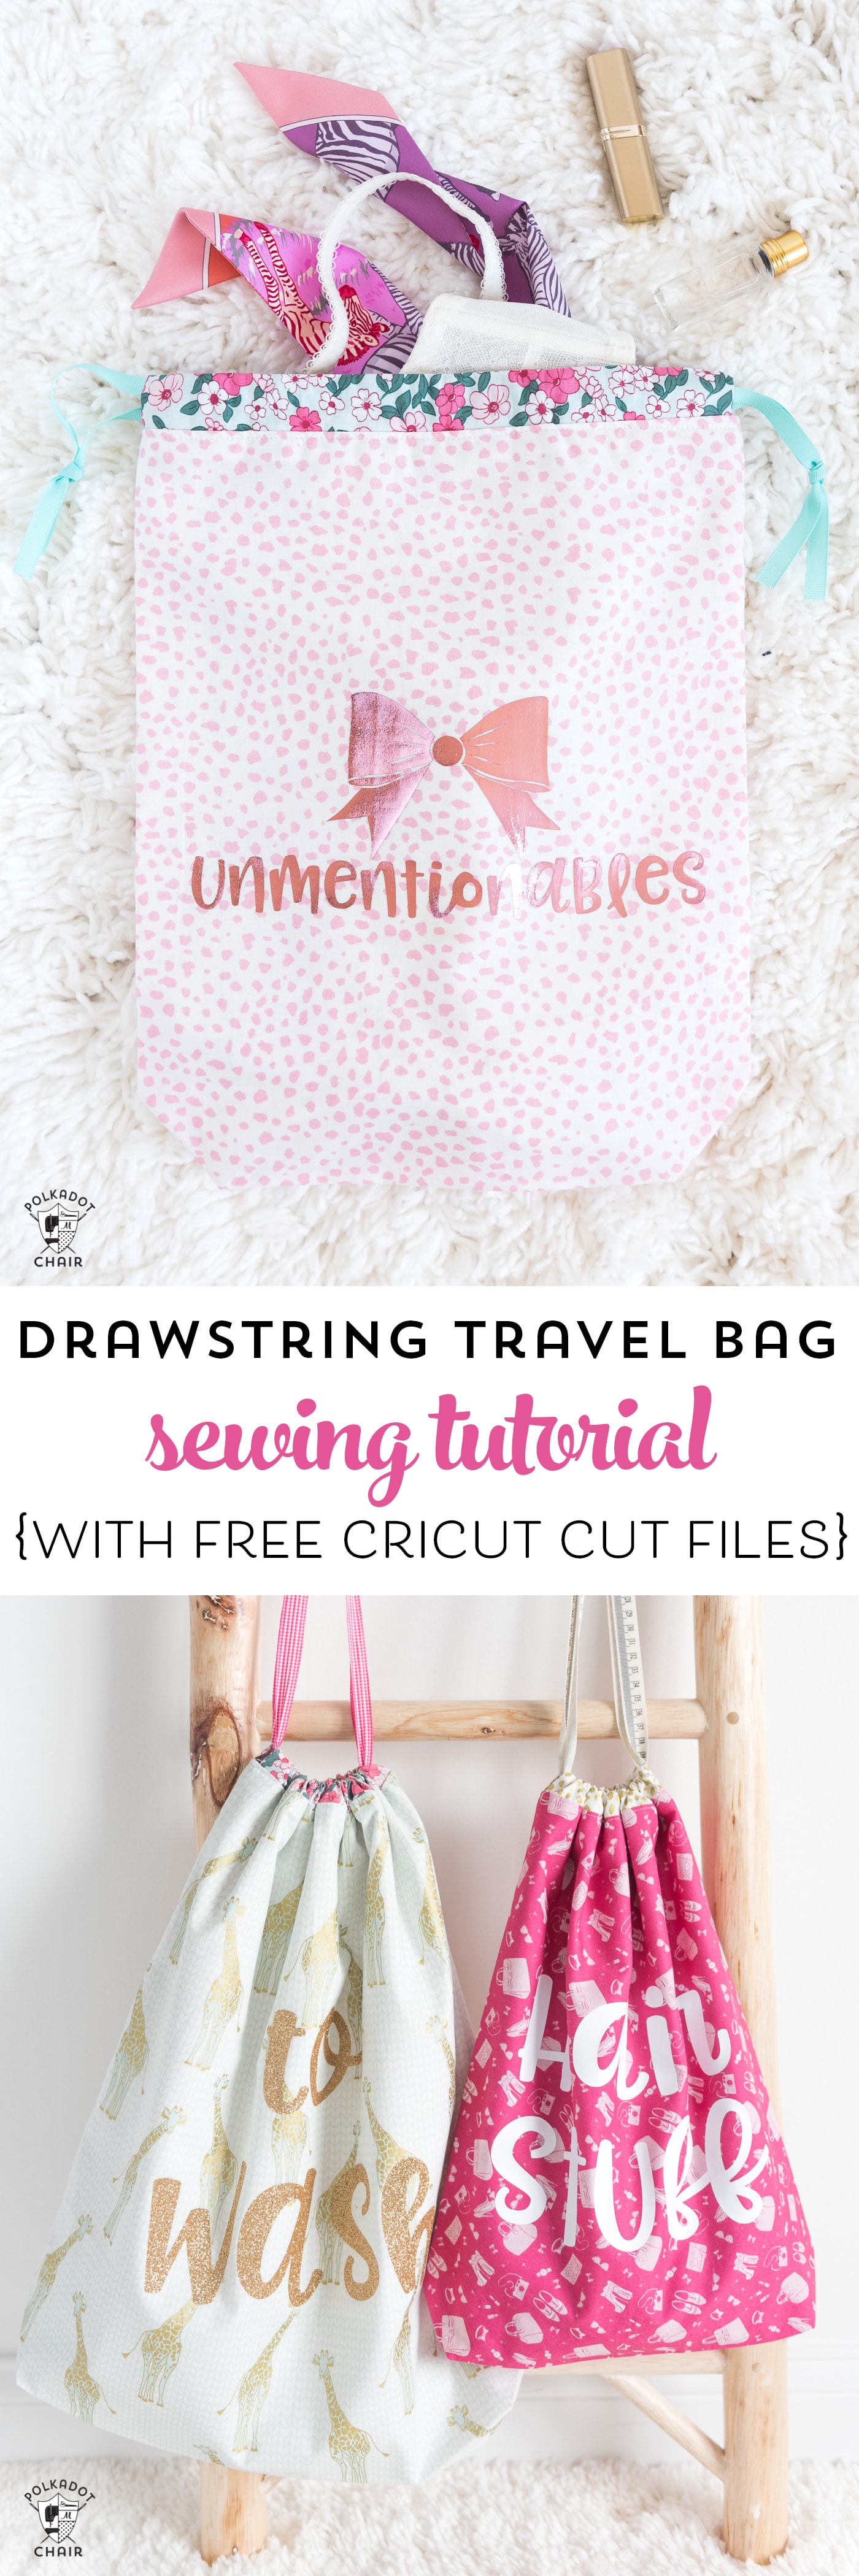
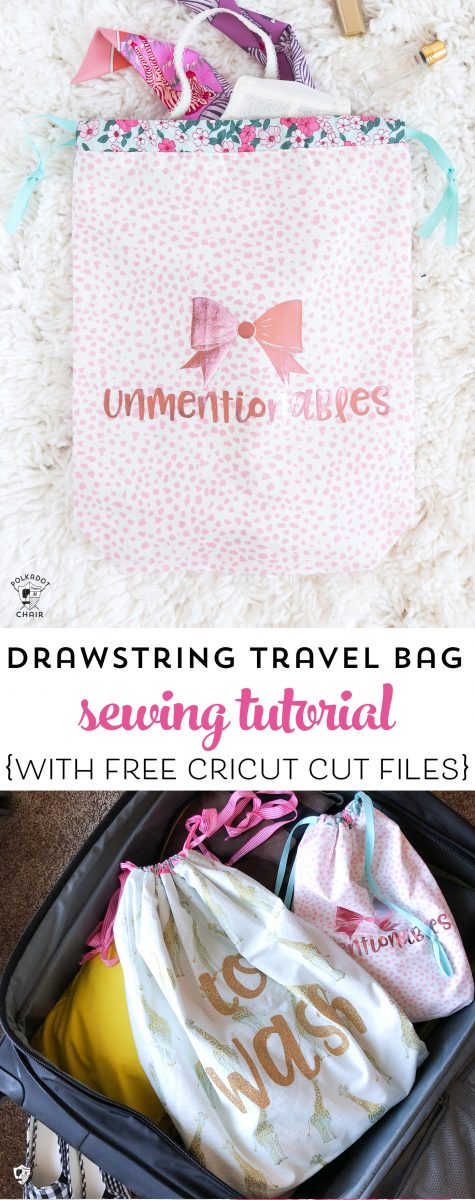
I used my Cricut Maker to cut out the iron-ons for the bags. I had so much fun personalizing each one. I’ve included FREE Cricut cut files for you to make your bags. I even added a few more “sayings” to the cut file download; included are:
- To Wash
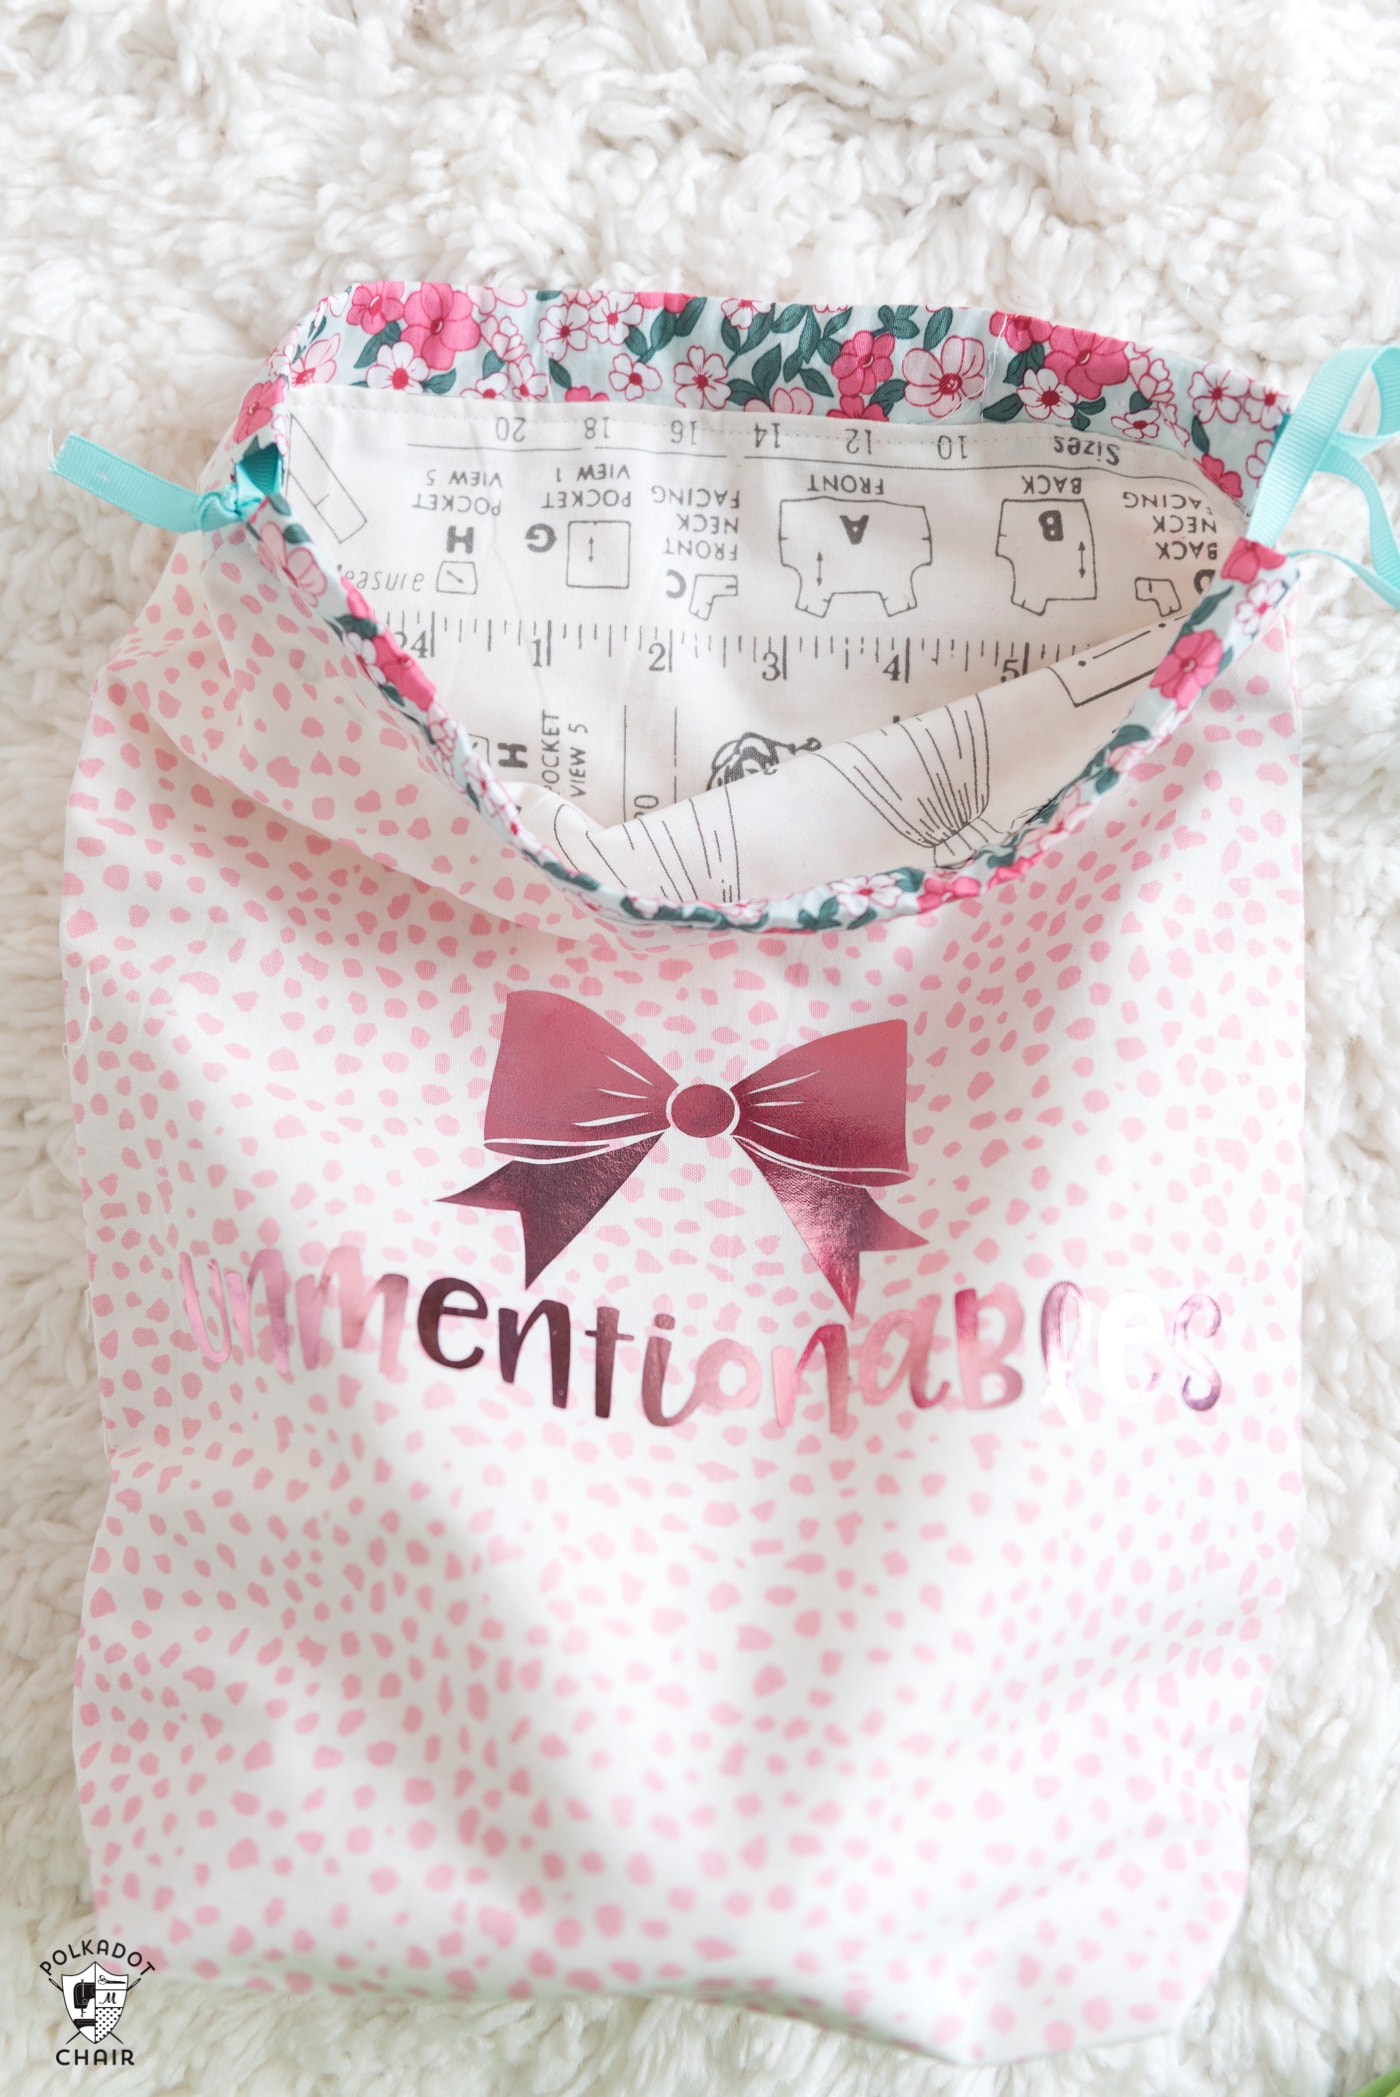
- Unmentionables
- Cords & Cables
- Baubles
- Hair Stuff
I also think these would be ADORABLE personalized with a name or a monogram. How cute would they be stitched up in bright colors to hold Legos or Matchbox Cars?
How to Get the SVG Files
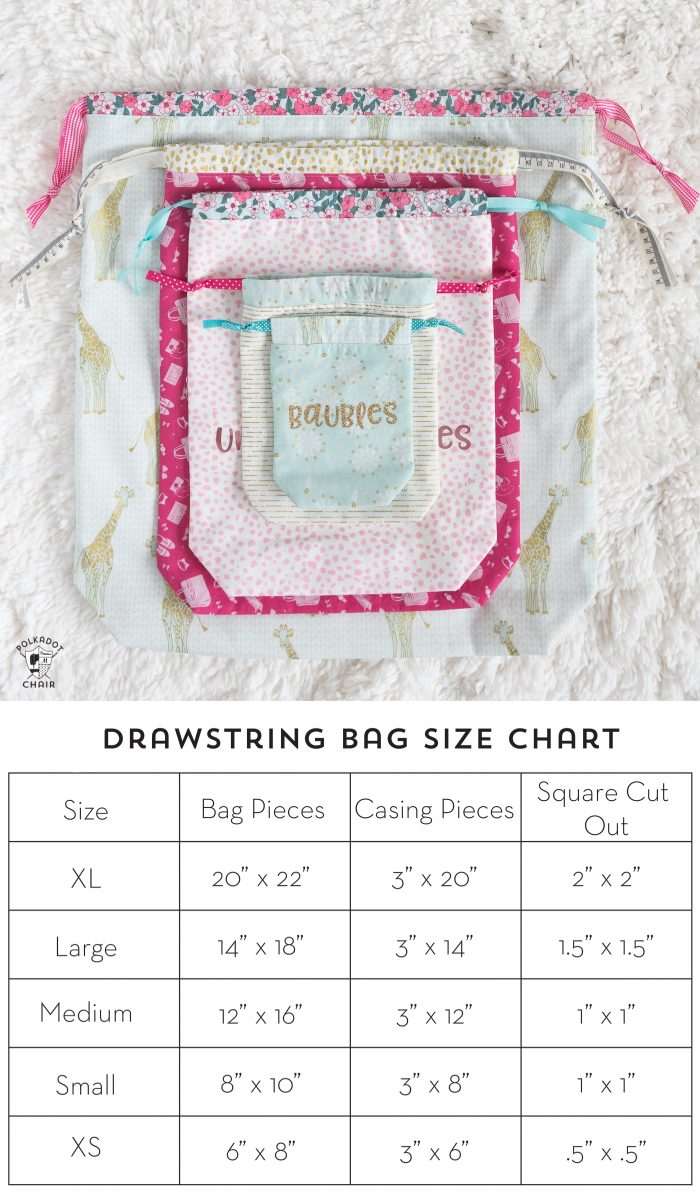
Lined Drawstring Bags – All the Details!
The bags are gusseted, meaning they have a bottom that is flat and can “poof out” and hold lots of stuff! They vary from 19″ x 22″ down to 5 ” x 7″.
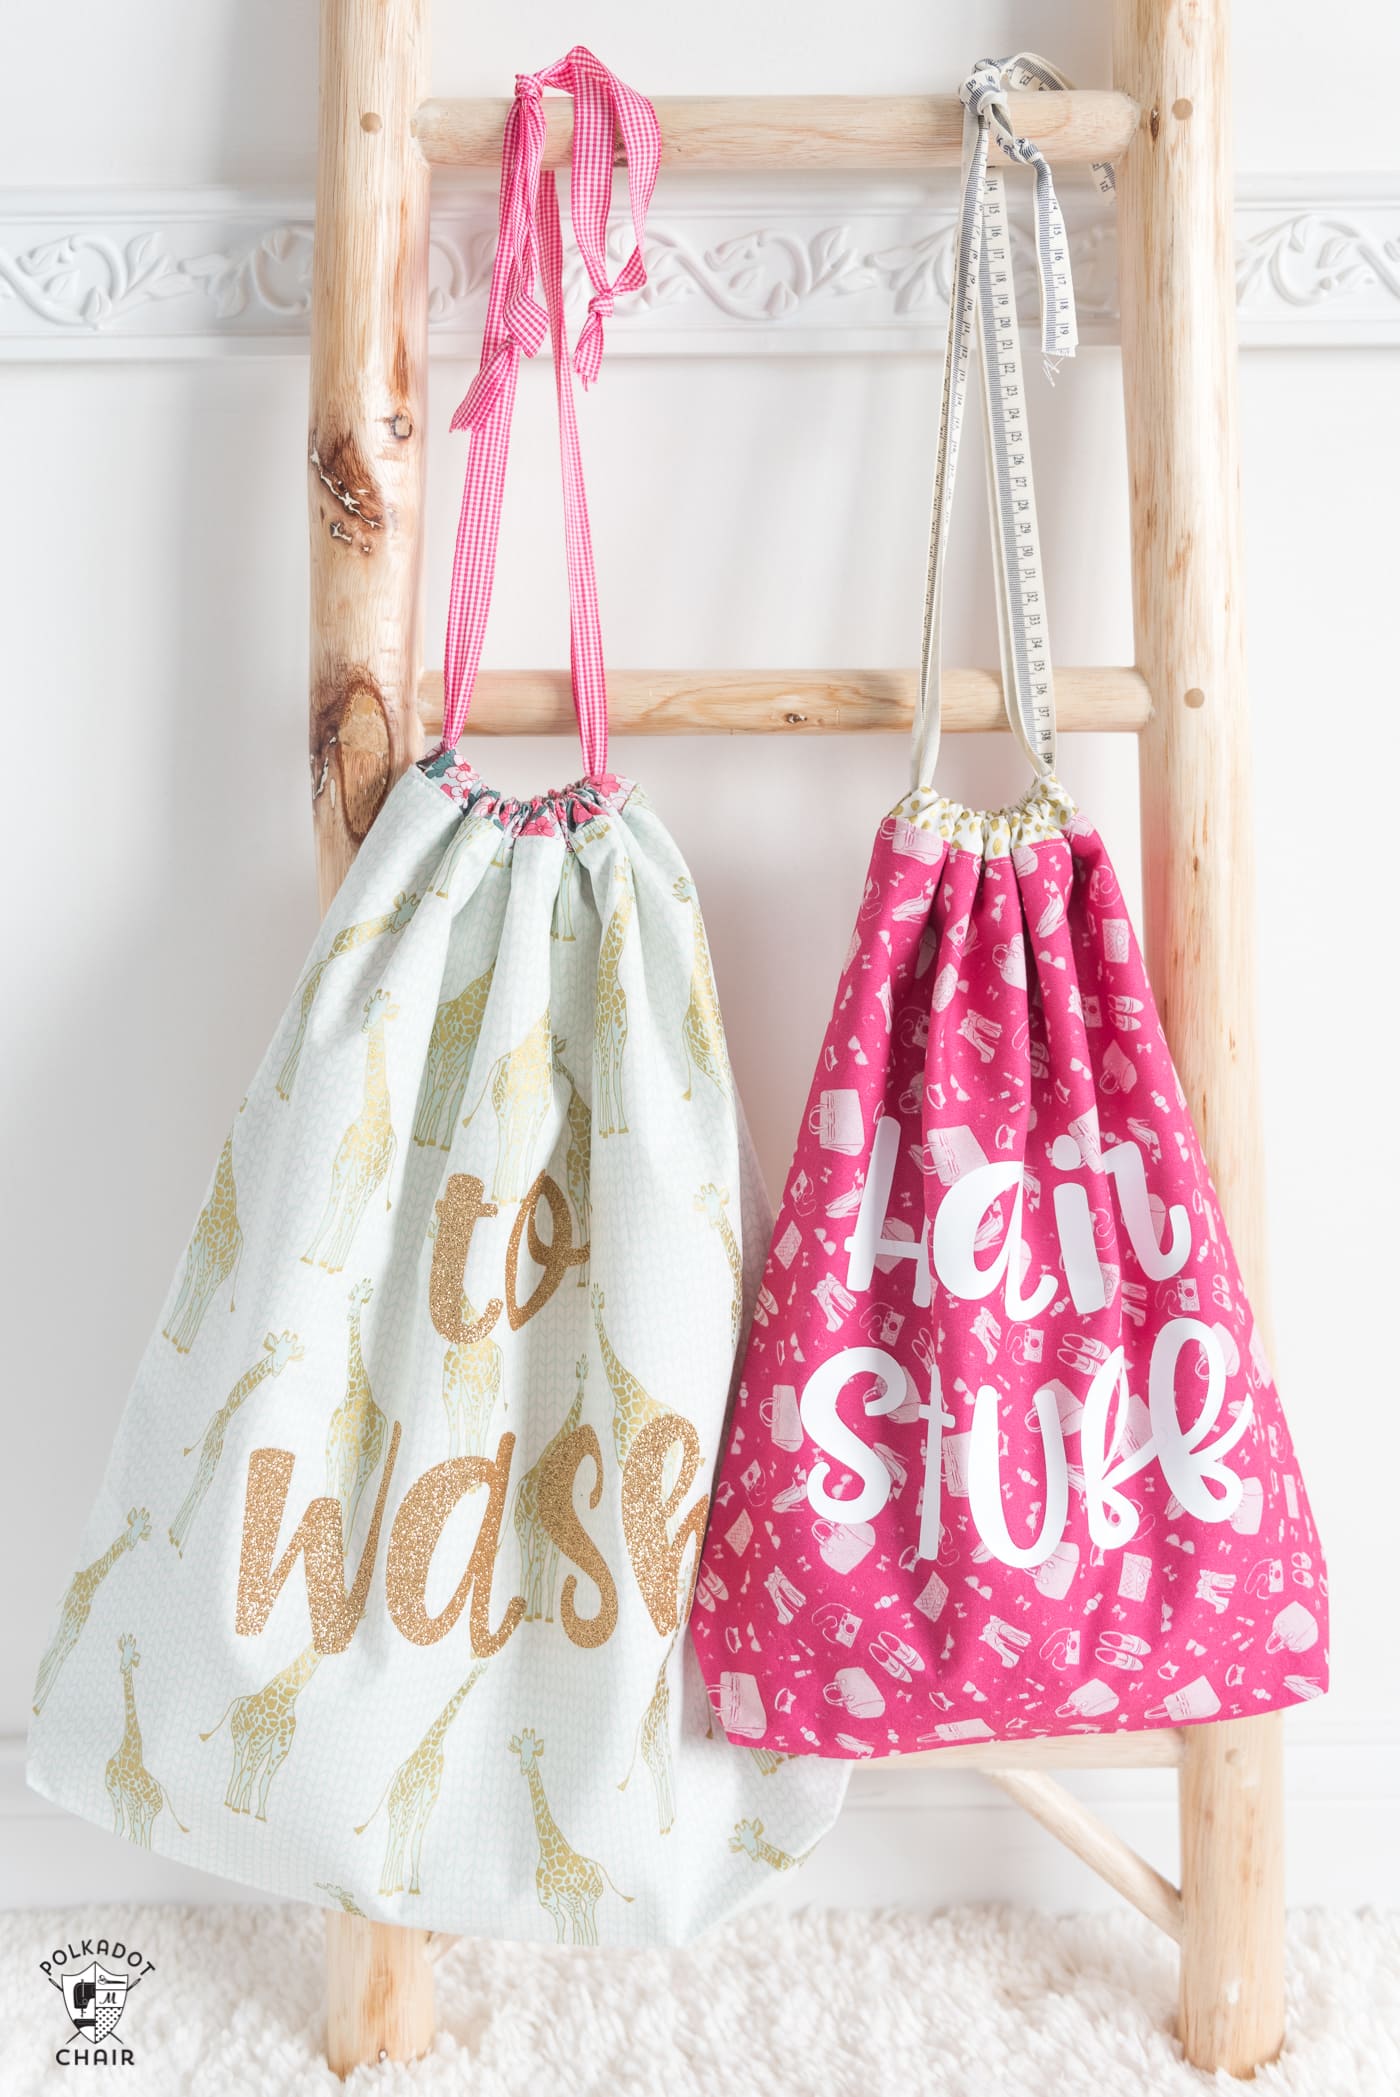
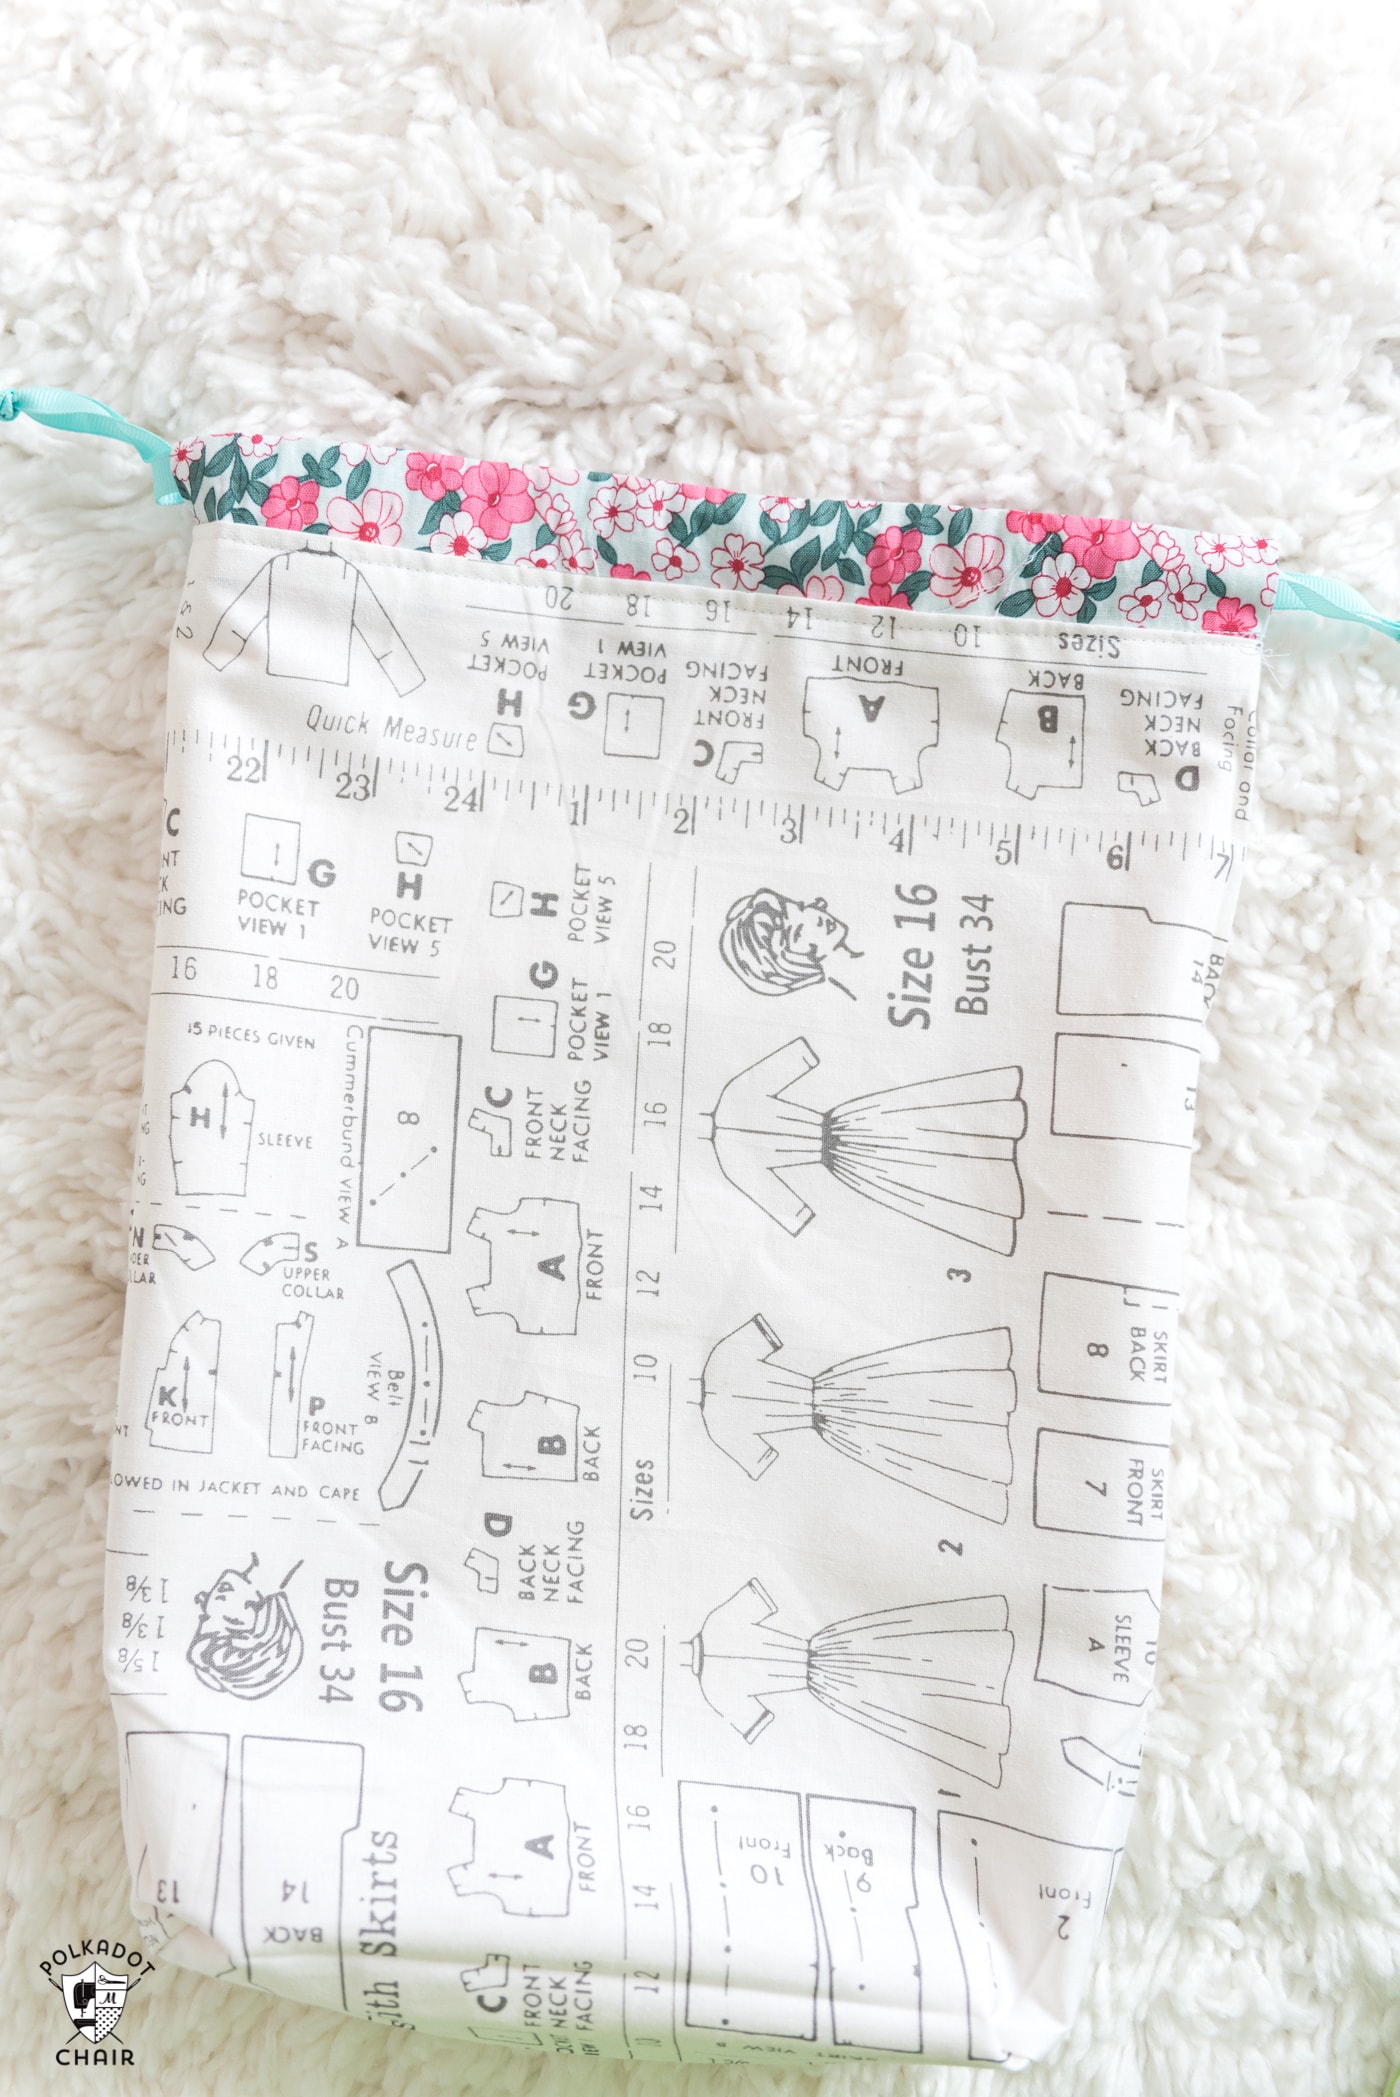
One of my favorite things about the bags, which I didn’t even realize until I made them, is that they are reversible. So when you get tired of one print, you can turn it inside out and have a new look.
I was also thinking while I was making them that they would be great to make out of laminate fabric since it’s so easy to wipe clean. If you decide to do that, make sure you read my “How to sew with Laminate Fabrics” post before you start.
Okay, are you ready to start?
Supplies for the Bag
Fabric for Bag Outside:
- 1/4 – 1/2 yard per bag (depending on size, see chart below)
- Fabric for Bag Lining:
- 1/4 – 1/2 yard per bag
- 2 1/2 yards 1/2″ – 3/4″ ribbon
- Basic Sewing Tools
- Seam Gauge
The fabrics used are Wonderland Two and other Melissa Mortenson fabrics.
For the Iron Ons:
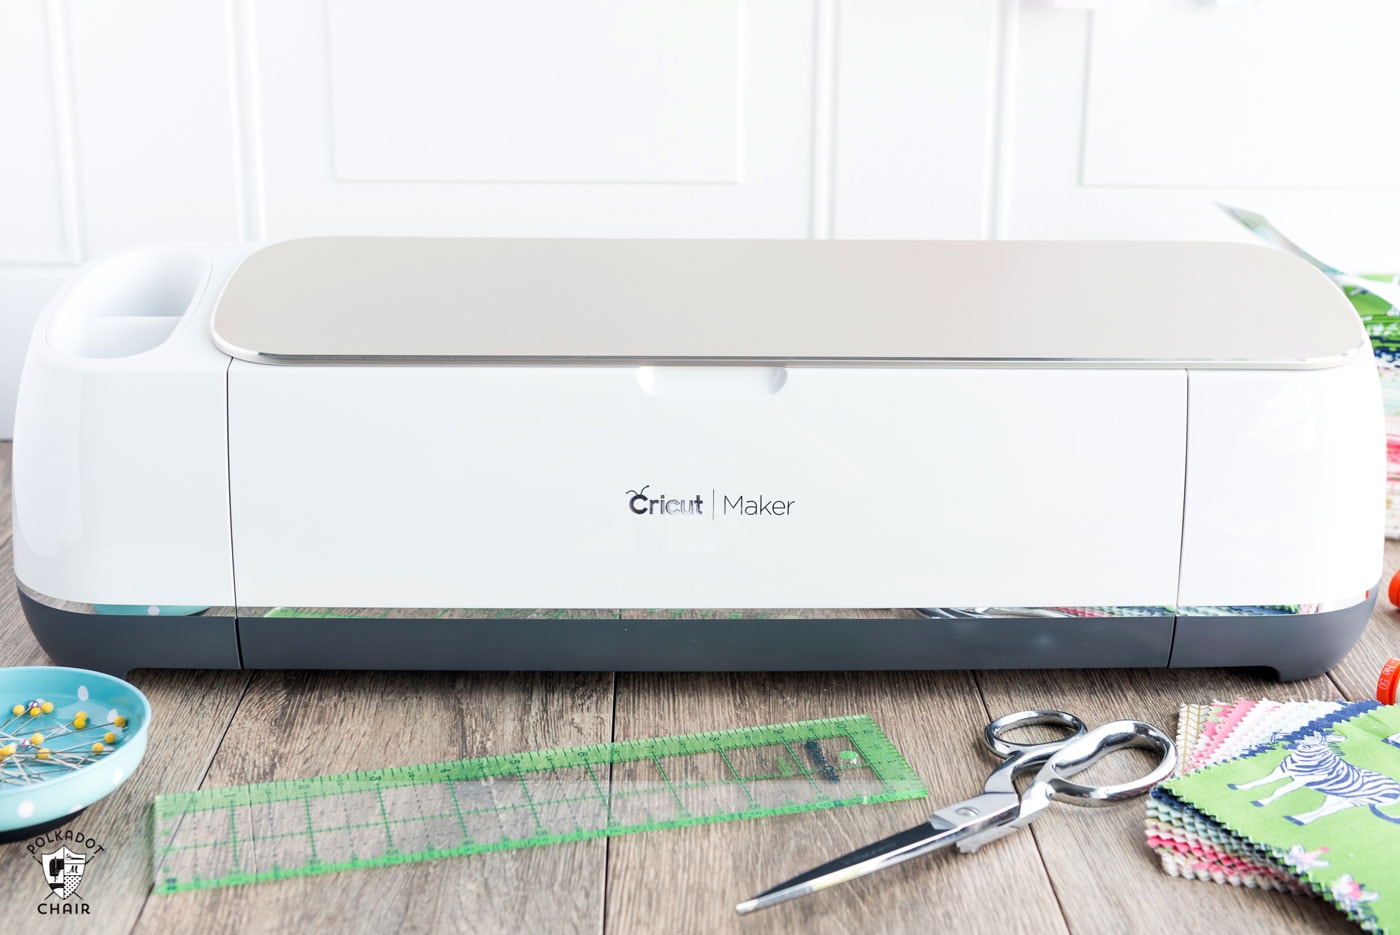
- Cricut Machine (I use the Maker – you can also use the Explore Machines)
- Cricut Iron-On Vinyl — I used: Pink Foil Iron On Gold Glitter Iron On White, Iron-On Lite
- Cricut EasyPress
- Cricut Iron-On Cut Files -fill out the form above, and we will email them to you.
- Cricut Essential Tools Set (makes it easier to weed the iron on after you cut it out)
Cutting Directions
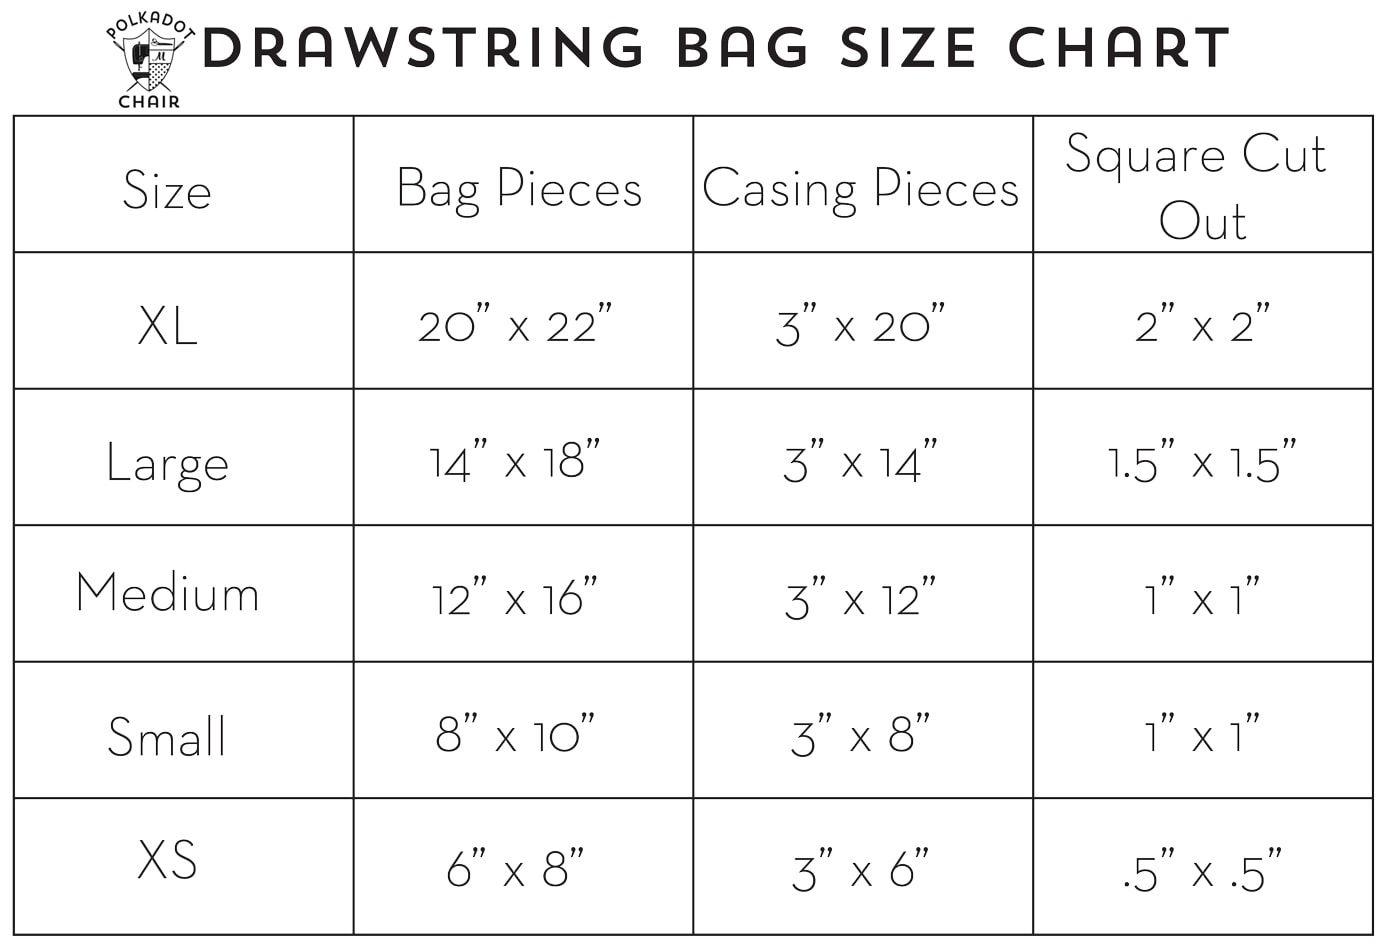
FYI: Bag finished dimensions are 1″ less than the bag pieces in width and the same height as the bag piece, including the bottom gusset.
Using the cutting guide above as a guide, cut out the pattern pieces for your bag. You will cut two pieces for the outside of the bag and two pieces for the bag lining from the measurement in the “Bag PIeces” column.
Cut two casing pieces from the measurement in the “Casing Pieces” column.
Prep:
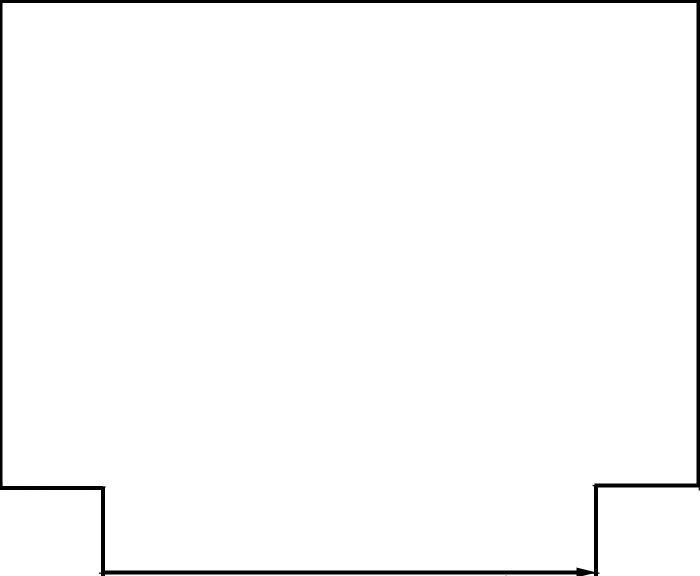
After you have cut out your pieces, you need to cut a square out of the bottom corners of the bag outside and bag lining pieces; refer to the illustration below if needed:
Sewing Instructions
Instructions are the same for ANY size bag. All seam allowances are 1/2″
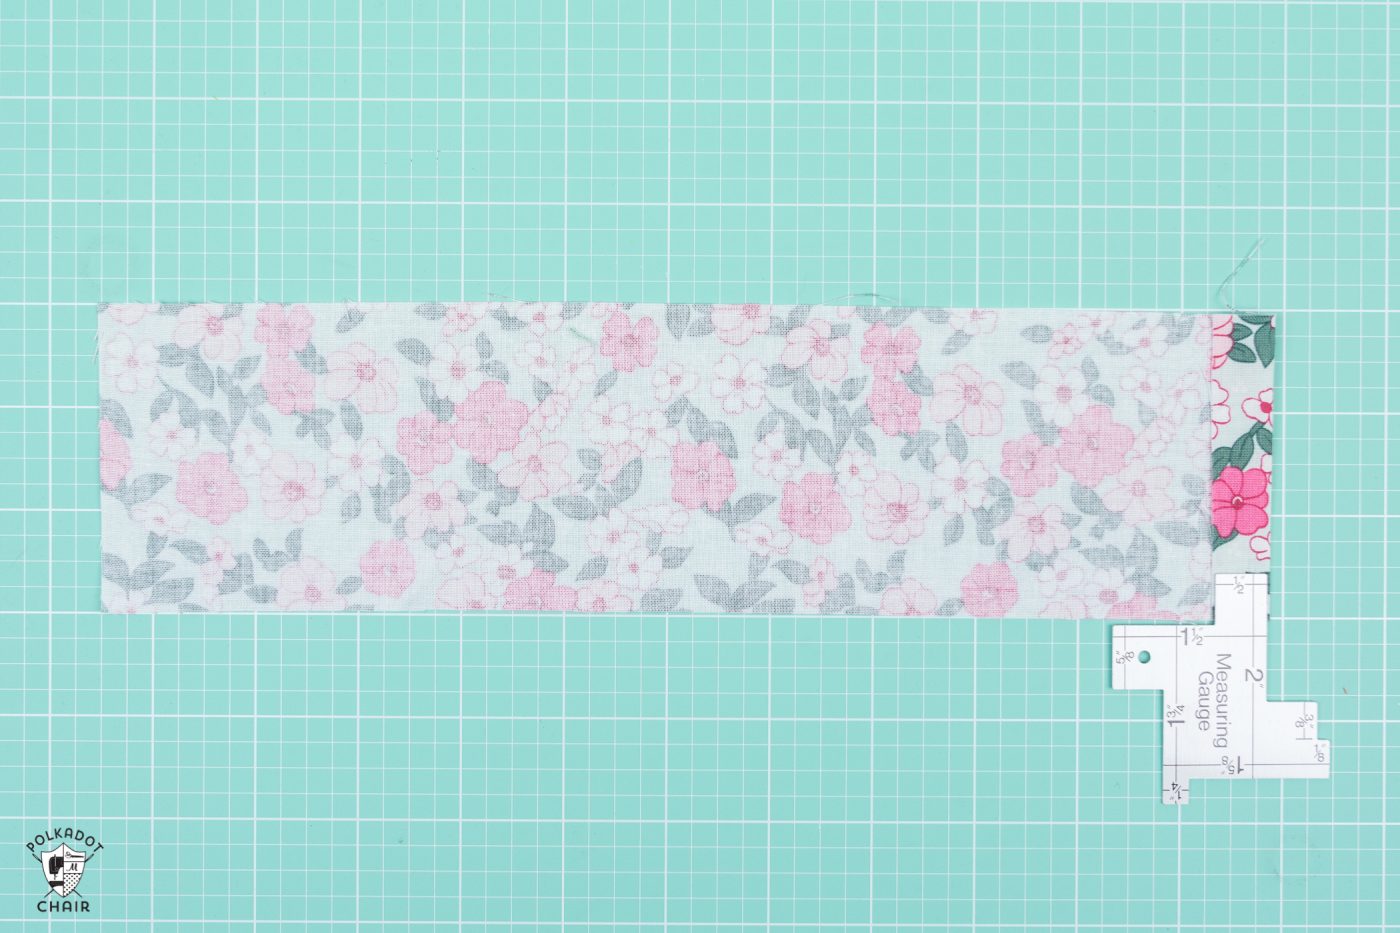
Begin by pressing the short ends of one of your bag casing pieces in 1/2″ on each edge. I recommend using a seam gauge for this step.
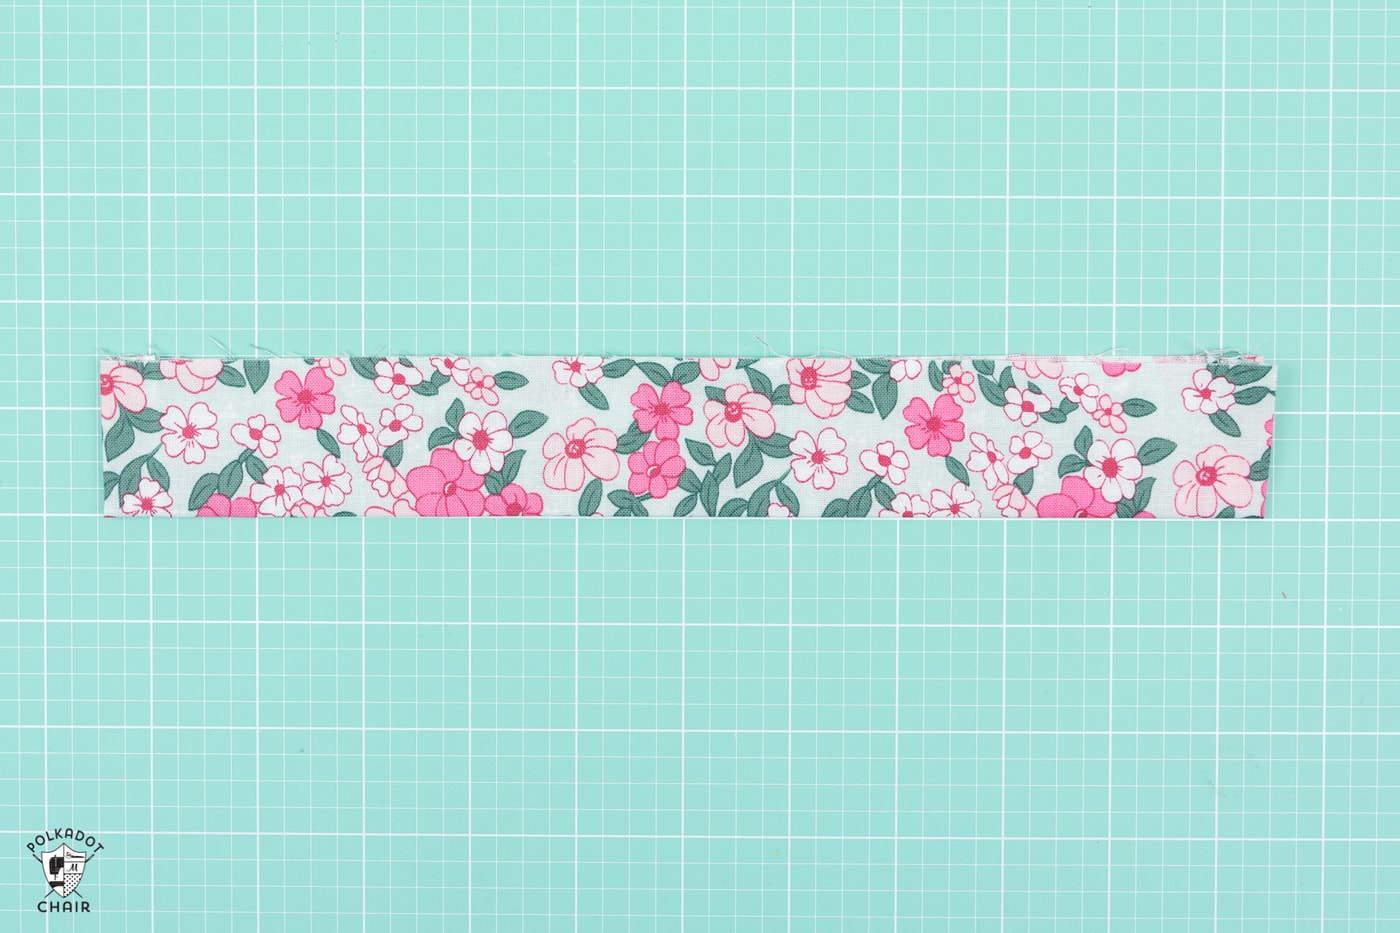
Next, fold the piece in half lengthwise and press. Repeat for other bag casing pieces.
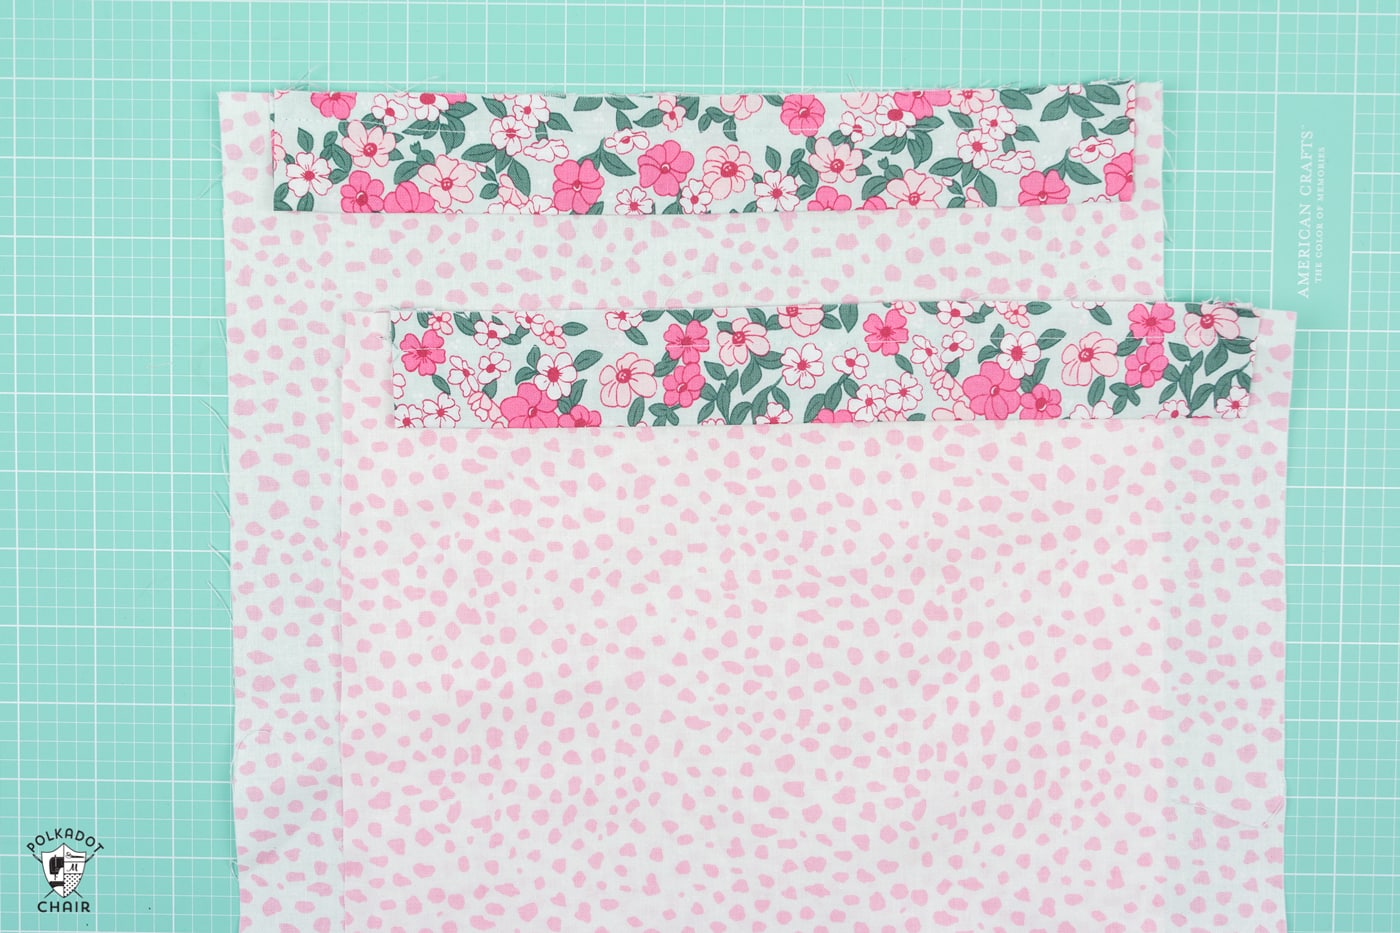
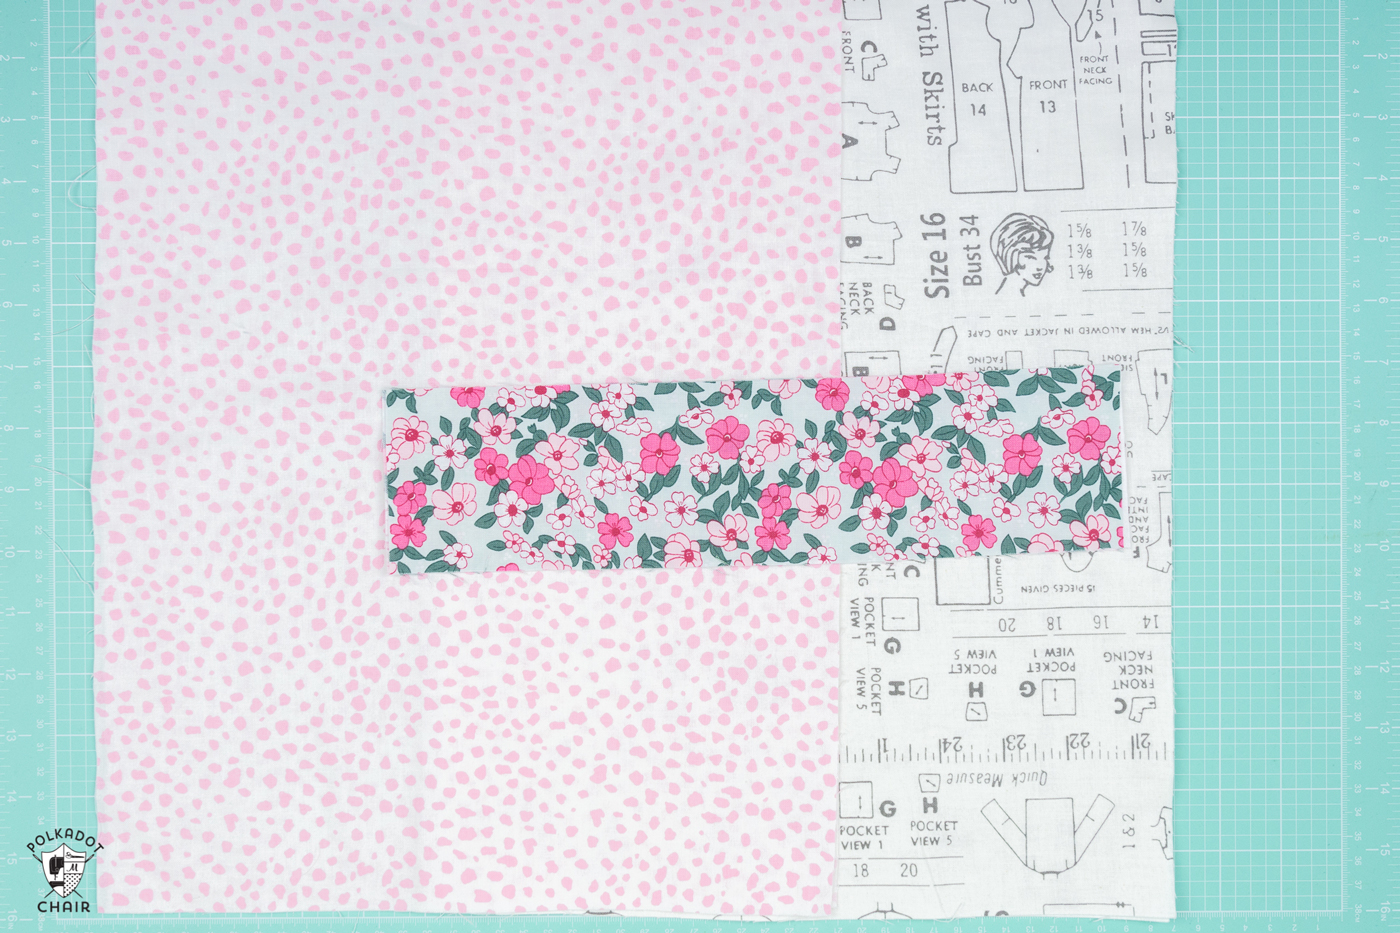
Pin the bag casing to the bag’s outside piece along the top edge. The raw edges will be flush, and the casing should be centered in the bag’s outside piece. Stitch in place.
Place the bag’s outside pieces together, right sides facing. Stitch along the two sides and the bottom of the bag. Do not stitch inside the square you cut out on the bottom of the bag. Press seams open. As you stitch the side seams, ensure you do not catch the casing pieces in the side seams.
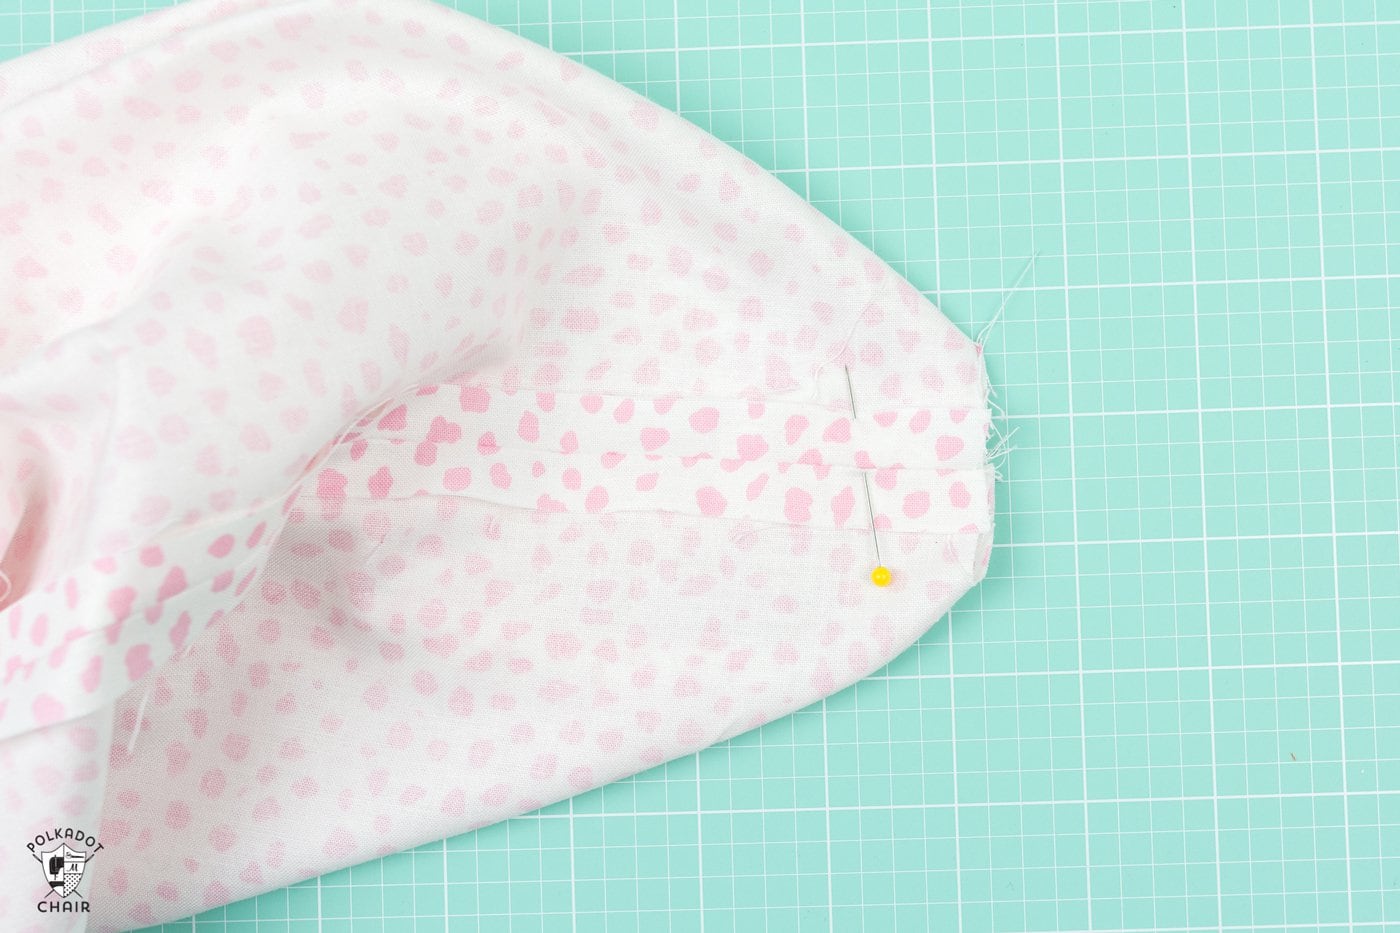
Pinch the bottom corner of the bag so that the side and bottom seams are on top of each other and the raw edges of the cut-out square are even. Stitch in place. Repeat for other bag corner.
Repeat for the bag lining pieces (you do not attach a casing to those pieces)
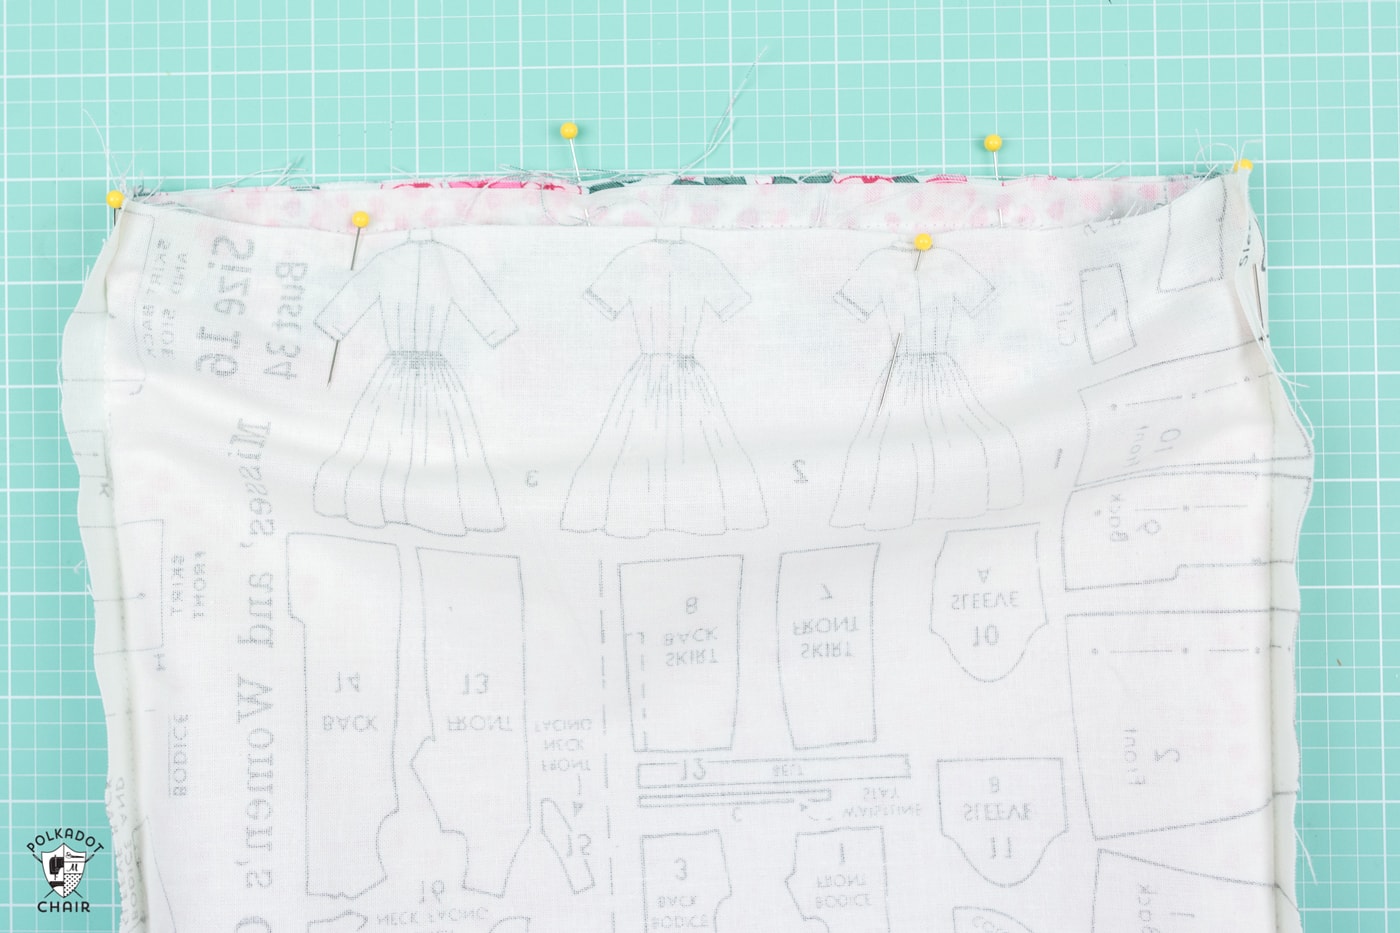
Turn the bag outside piece right side out. Slip it into the bag lining piece, right sides facing. Match side seams and centers.
Stitch around the perimeter of the bag, leaving a 4″ opening in one side.
Turn the bag right side out through the opening.
Press well. Topstitch around the top of the bag (on the bag, not the casing), making sure to catch the opening in the bag as you sew.
How to Add the Drawstring
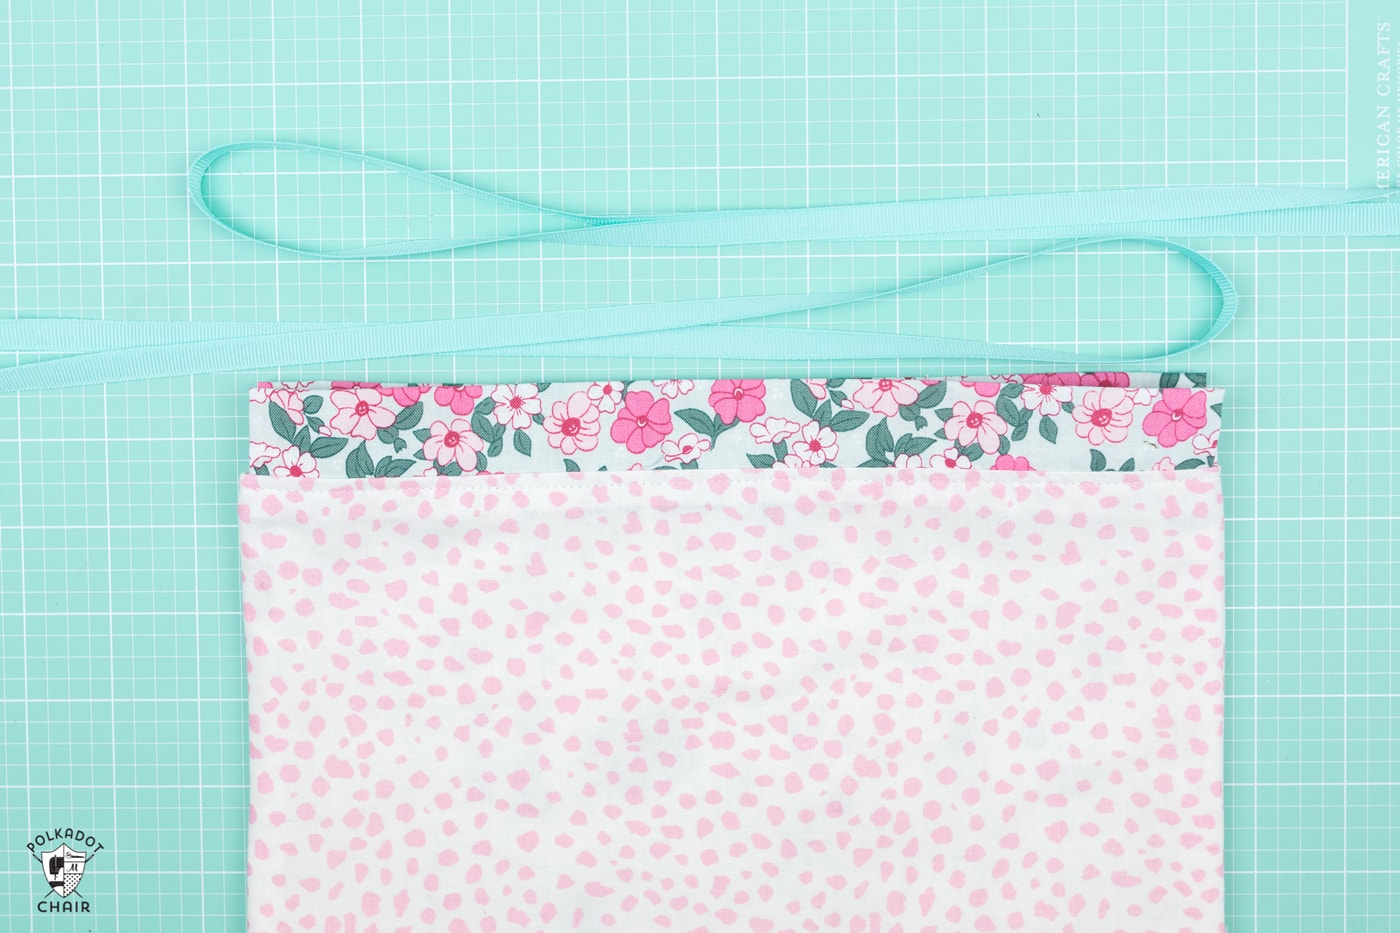
Cut two pieces of ribbon that are twice as wide as the bag plus 6-8″.
Feed one piece through the casing of the bag and knot on the other side. Feed the other ribbon through the bag starting on the opposite side of the bag. Knot the ends.
How to Create the Iron On with your Cricut
Now for the fun part, personalizing the bags with fun sayings!
You need to decide what size you want your iron-on to be. Measure your bag, considering that it’s a bit smaller when the drawstring is pulled.
Download the cut file (link above in supplies) and import it into the Cricut Design Space.
Click “ATTACH” to make all of the letters cut out at the same time.
Size to the correct size. Then click MAKE IT and follow the prompts on the screen. You will need a fine-point blade and a standard cutting mat.
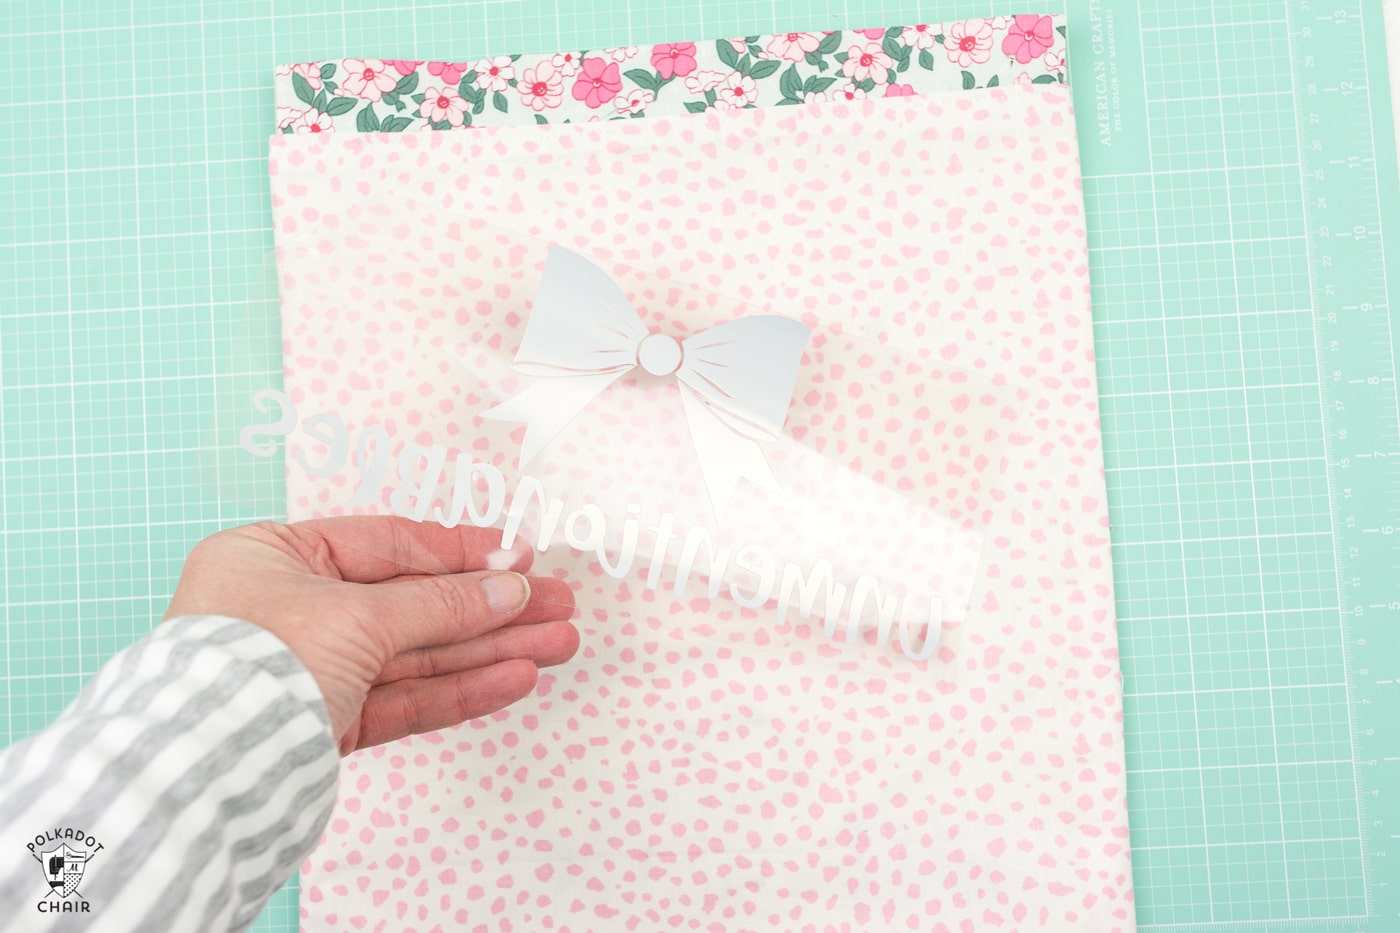
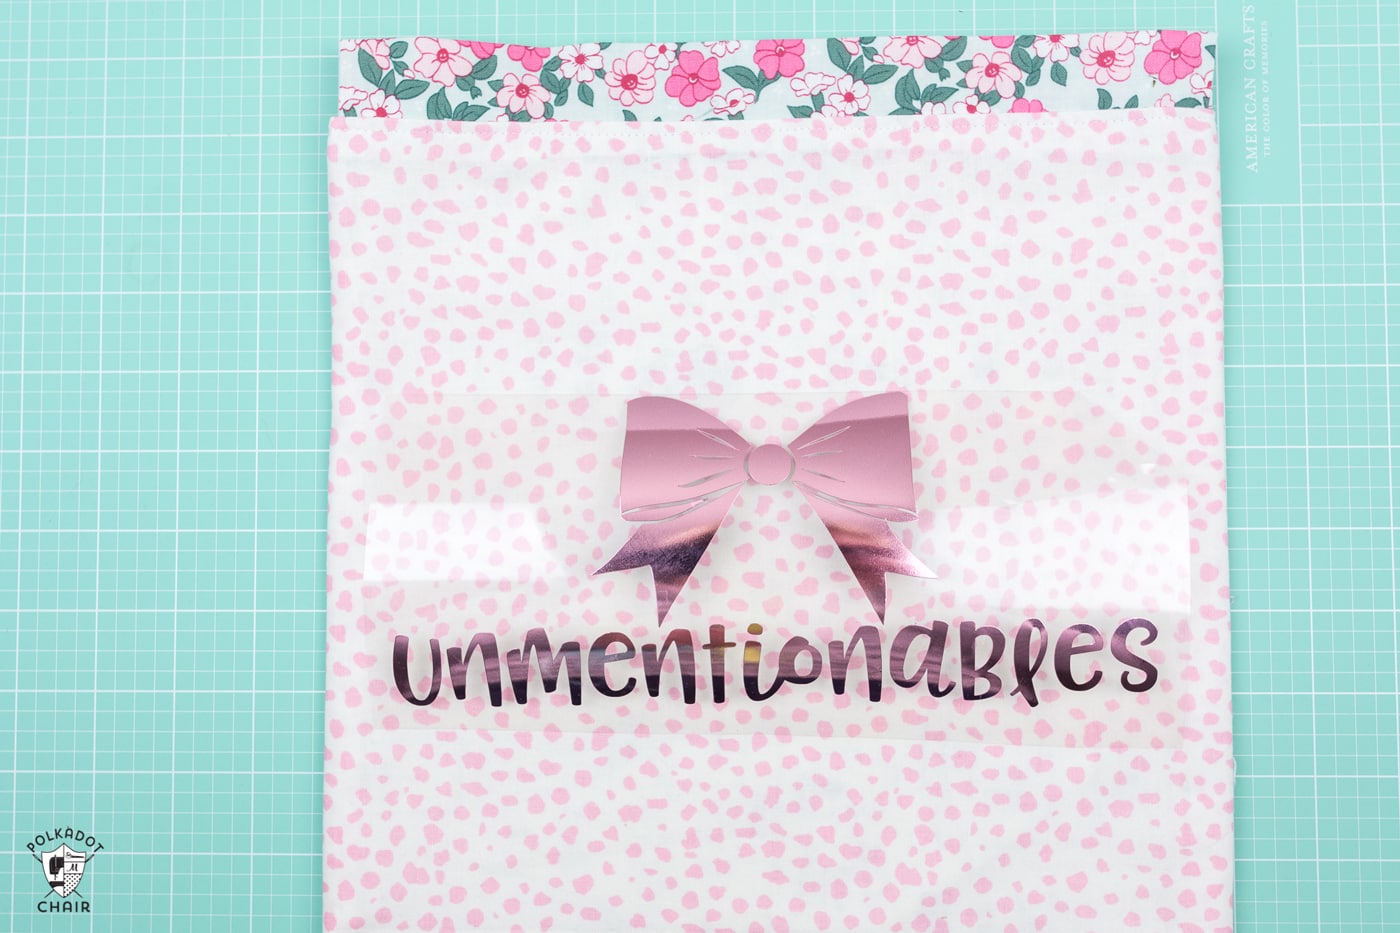
When your image is cut out, peel away the extra vinyl (referred to as weeding). Place the iron on in the location that you’d like on your bag.
Move your project to a flat surface that is not heat-sensitive. Place a folded towel down on the surface, then place your bag on top of the towel.

To read more about the EasyPress, click HERE
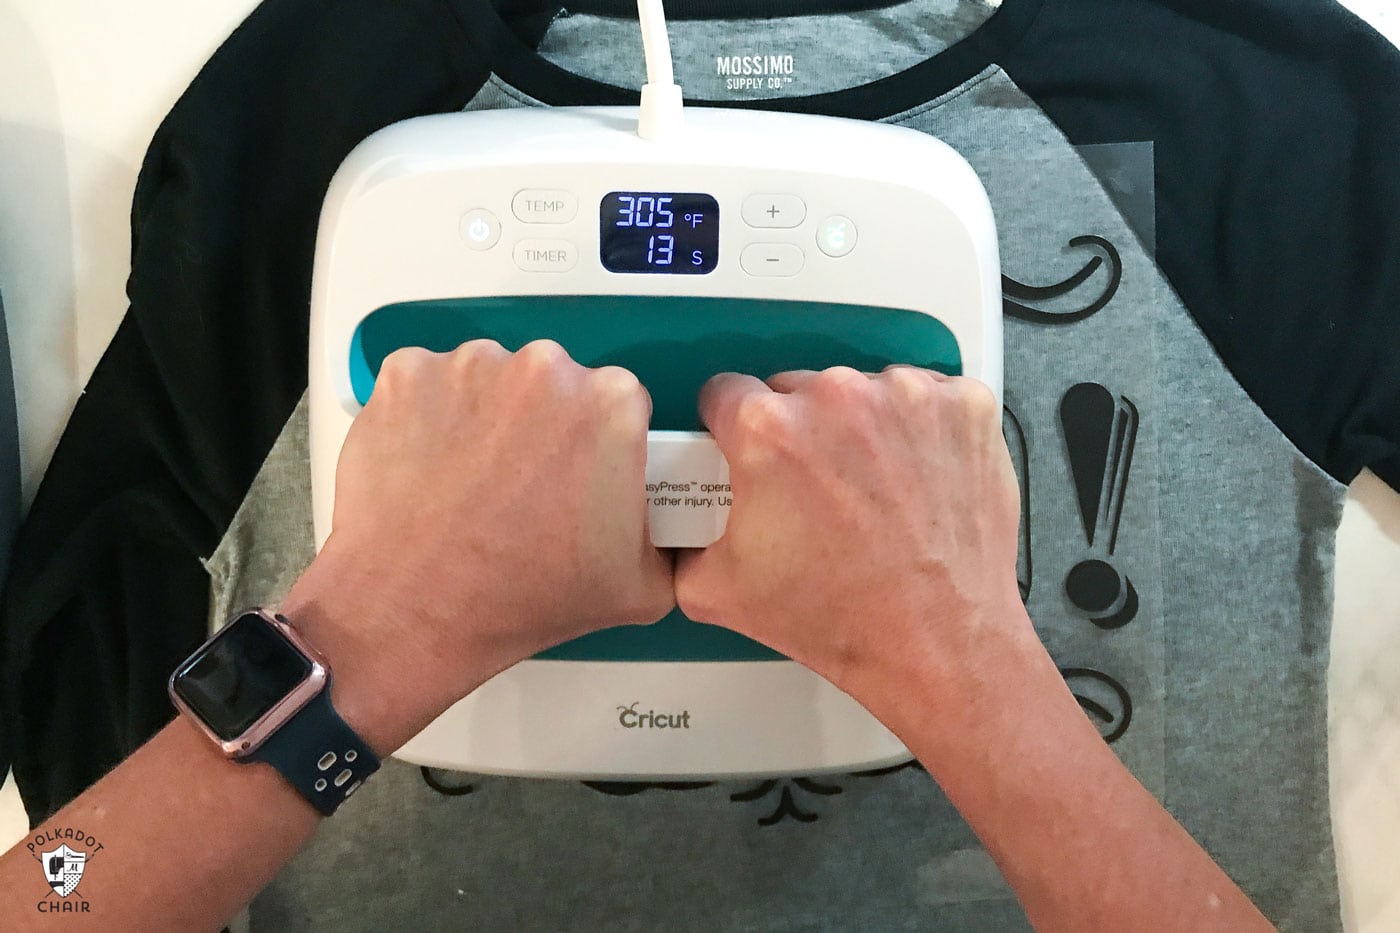
Tips for Using the EasyPress for the Iron-On
Turn on the EasyPress, and set the temperate and timer to the settings recommended on the machine based on your type of Iron-On Vinyl.
When preheated, place the EasyPress on top of your image. Press the Cricut button. When it beeps, move it to another spot of your iron-on. Repeat until you have set all parts of the iron on.
(image from some Halloween shirts we made in October)
Carefully remove the plastic covering from the iron on.
That’s it! You’re done!!
Now go make a bunch of them to give as gifts this Holiday season!!
Cricut is running some FANTASTIC specials on bundles for both the Maker Machine AND the Easy Press.
- Cricut Maker 3 (you can get great deals on machine bundles on Cricut.com)
- Roll Holder for Maker 3
- Cricut EasyPress (I like the large size the best): Make sure you get the EasyPress mat as well.
- Cricut Weeding Tools: (I use the small hook tool ALL the time, making weeding vinyl so much easier).
- Cricut BrightPad: A cordless, flat, bright lightbox. I use it to weed Cricut vinyl and use it all the time to trace applique shapes for sewing & quilting.
- Cricut Iron On Vinyl
- Cricut Permanent Vinyl
This is a sponsored conversation written by me on behalf of Cricut. The opinions and text are all mine.
Just in time. Going to make this before my trip at the end of this month. Ty
Which size bag did you make for each item? the jewelry one is the small one, but what do you suggest for shoes, laundry, cables and cords, and hair stuff?
Hi is this pattern available in a pdf? I love the tutorial, but having the directions/pattern in a print out option would be helpful!
Yes, you can get a PDF in our shop: https://shop.polkadotchair.com/collections/pint-sized-pattern/products/reversible-lined-drawstring-bag-in-6-sizes-digital-pdf
So adorable! What font did you use for the vinyl? The links are not working.
You can download the words in our Cricut Library. I’m not sure what the font was, it’s a few years ago.
Went back today with a clearer head and was able to download the drawstring bag cut outs finally. This time I was able to download all of them in one download as opposed to individually. It was user error on my part. Thanks.
Hi Melissa: I just tried to download the cricut files for the drawstring bag tutorial. When I click on the “download”, it takes me to a picture of the saying and when I clicked on the “Drawstring Bag” title above the downloads, it took me to a page to download, but again, it just took me to the picture of the saying. I also got a few other cricut files while I was there and they downloaded just fine. Thought I’d let you know. Thanks for your great tutorials.
I made the small size so I can separate my jewelry for each outfit when I travel. It works great! I also made a number of them for my shoes, so I can keep them neat and not get them scuffed or get anything on my clothes. I use Vera Bradley cosmetic bags and made one set to match my pink luggage and another set in Minnie Mouse prints to match my Disney luggage. These bags help me stay organized and tidy when I travel, and when I’m packing to go home I can immediately tell if something isn’t packed. Great pattern, thank you so much for sharing it!
So glad you like it!
My Grandmother and I (im her grand-daughter) were trying to sew this adorable bag, when we ran into a problem. When were ready to turn the fabric inside out, we ended up with two separate bags that had been sewn together, but not a lined bag. Can you answer this dilemma?
{P.s i really love this bag, and desire to wear it on my proud back}
I’d go back over the tutorial step by step again. It looks like you missed a step… it will yield one lined bag, not two.
These bags are just adorable. I somehow missed this post at Christmastime, so I’m so glad you posted this again!! the Cricut labels just take them to the NEXT level! Definitely going to make some of these for my nieces (and for me!).
Do you pre-wash the fabric before cutting? Also, what kind of ribbon did you use for the drawstring? Love these. Thank you!
I don’t pre wash the fabric. But that’s a “hot topic” and many people have a lot of different opinions about what’s best. I just used grograin ribbon I got at JoAnn’s.
How large a square do you cut out of the corners?
Depends on the size bag. Look at the chart that was provided. XL. 2″x2″, L. 1.5″x1.5″
These are listed in the last column on the right in the chart!
Thanks for answering that for me. I was away from my computer for a day or two and couldn’t get to it!! 🙂
These bags are great! I’ve been wanting to make drawstring bags for our shoes when we travel. I normally use Jeni Baker’s Lined Drawstring Bag tutorial, but this is a bit simpler, so I’m going to give it a try! I’m thinking I would need to make the XL size?
These bags are adorable! I’m in the process of making shirts for my daughter’s Girl Scout troop to wear at cookie booths, so that EasyPress would come in really handy!