• Skip to primary navigation
  • Skip to main content
  • Skip to primary sidebar

The Polka Dot Chair logo

  • SEWING
    • Free Sewing Patterns
    • Bag Patterns
    • Costumes
    • Apparel
    • Learn to Sew
    • Beginner Friendly
    • Embroidery Projects
    • Tips & Techniques
    • All Sewing
  • QUILTING
    • Quilt Blocks
    • Learn to Quilt
    • Free Patterns
    • Quilt Patterns
    • All Quilting
  • CRAFTS
    • Disney
    • Cricut
    • Printables
    • All Crafts
  • HOLIDAYS
    • Seasonal Projects
    • Valentine’s Day
    • Easter
    • 4th of July
    • Halloween
    • Thanksgiving
    • Christmas
    • All Holidays
  • TUTORIALS
  • ABOUT
    • About Me
    • My Fabric Collections
    • Published Books
    • Press
    • FAQ’s
    • Contact
  • SUBSCRIBE
  • SHOP
menu icon
go to homepage
  • SHOP
  • TUTORIALS
  • SEWING
  • QUILTING
  • SUBSCRIBE
  • CRAFTS
  • HOLIDAY PROJECTS
  • ABOUT
    • Published Books
    • My Fabric Collections
    • Facebook
    • Instagram
    • Pinterest
    • YouTube
  • subscribe
    search icon
    Homepage link
    • SHOP
    • TUTORIALS
    • SEWING
    • QUILTING
    • SUBSCRIBE
    • CRAFTS
    • HOLIDAY PROJECTS
    • ABOUT
      • Published Books
      • My Fabric Collections
    • Facebook
    • Instagram
    • Pinterest
    • YouTube
  • ×

    Home » Sewing » Accessories

    Lens cap cozy two ways

    Updated: Jun 6, 2013 by Melissa Mortenson · This post may contain affiliate links · This blog generates income via ads · 21 Comments

    Pin It
    Lens Cap Cozy Tutorial

    Something has been driving me crazy,  and this week I decided that I could fix it.   When I take photos I never know what to do with my lens cap.  I put it in my pocket, or the camera bag, or just put it on the table… with the end result being that I never put the lens cap BACK on my camera.

    A few days ago I got the idea to make a little pouch to attach to my camera strap to hold my lens cap  when I am shooting.

    Lens Cap Holder

    I made 2- I like both, you can make whichever one works best for you.

    Lens Cap

    Lens Cap Cozy One measures about 3.5″ x 3.5″ and closes using a magnetic snap.  The snap works great but was a bit hard to sew around, it turned out to be a bit small for my largest lens cap because of the snap.

    Lens Cap Pouch

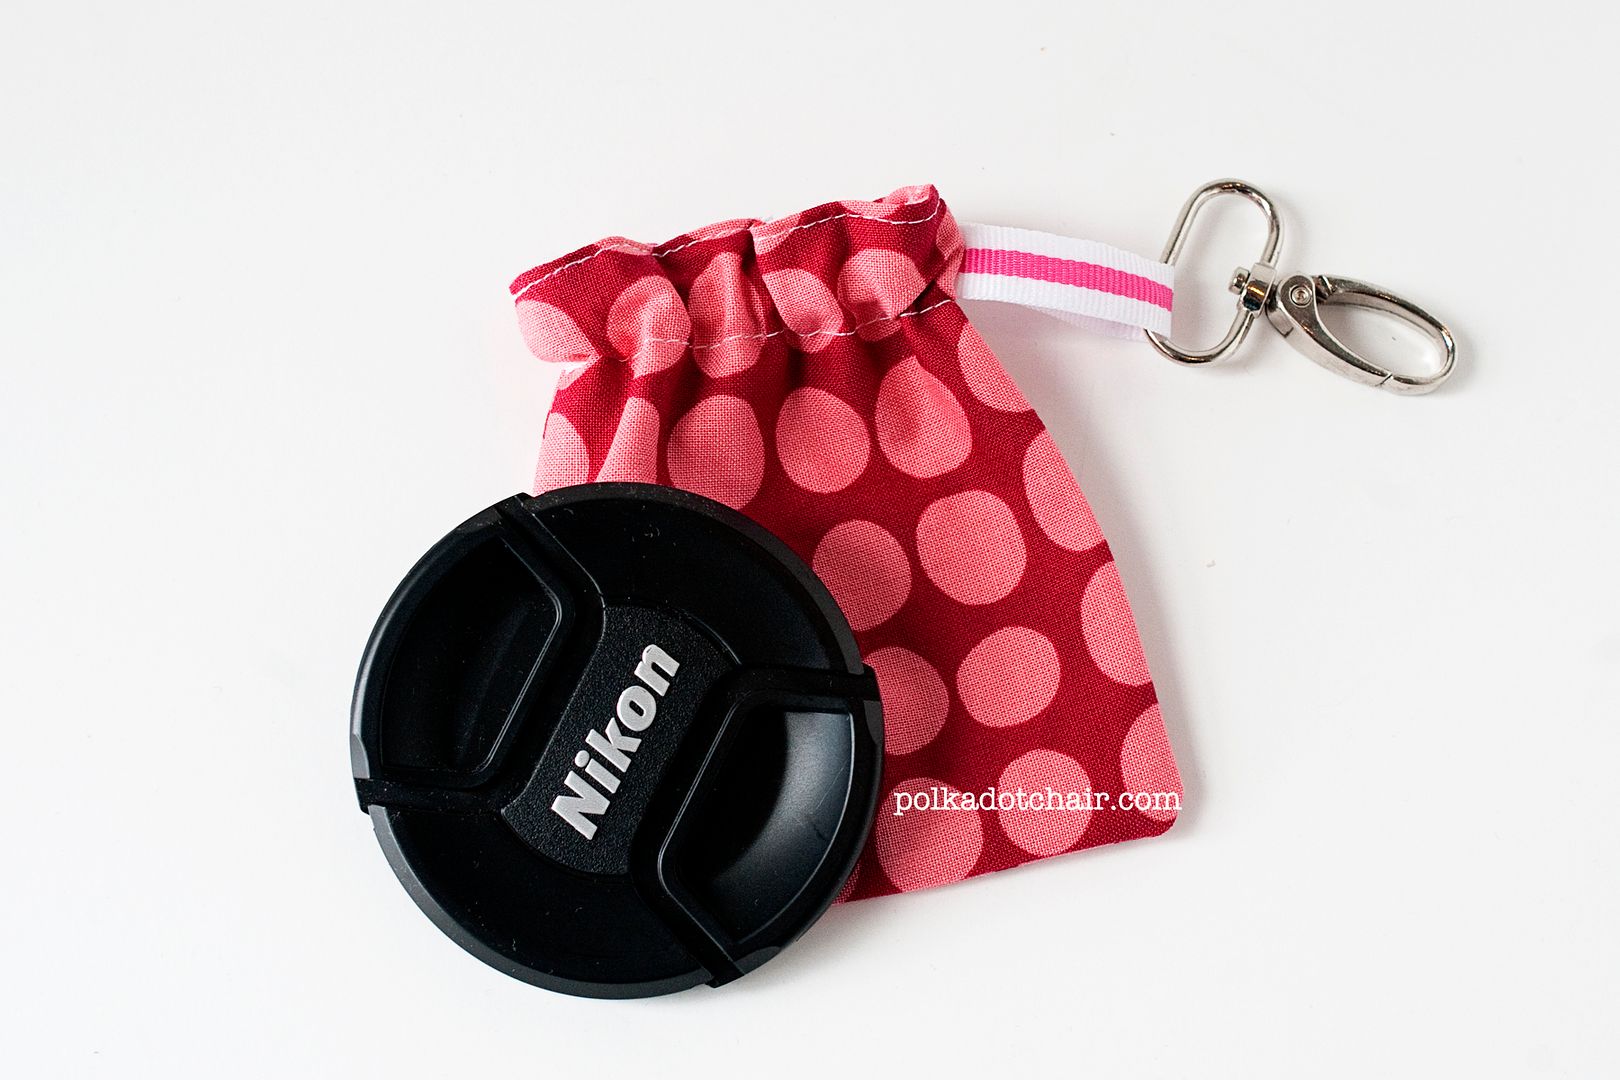
    Lens Cap Cozy Two is a bit larger at about 3.5″ x 4″ and closes using an elastic.  It’s larger size makes it easier to use with the lens cap to my biggest lenses,  and the elastic is a snap to put in.

    The cozy just clips on my camera strap. It’s small enough that it stays out of the way when I shoot.

    Here’s how I made it:

    First I’ll share how to make the one that closes with the magnetic snap, then I’ll let you know what to change to make the one that closes with elastic.

    You need:

    4 pieces of fabric 4″ x 4″ (cut them 4″ x 4.5″ for the elastic version)
    piece of ribbon
    hook
    magnetic snap
    if making the elastic closure you need ¼″ elastic instead of the magnetic snap.

    All seams are ¼″

    Feed the hook through the piece of ribbon.  Sew with hook facing in, into the seam of the cozy.  You will sew 2 pieces right sides together around 3 sides, leaving the top open.

    Stitch the 2 pieces for the lining together the same way.

    Attach magnetic snap to the top of the lining pieces.  Use a piece of plastic canvas under the snap to reinforce it.  Attach the snap approx. ½″ down from the top of the lining.

    Turn lining piece right side out.

    Slip lining piece into cozy outer piece, right sides together. Stitch along top seam, leaving an opening to turn the cozy right side out.

    Turn right side out and press.   Hand stitch opening closed.

    To make the elastic cozy:

    Cut your pieces to 4″ wide by 4.5″ tall, instead of 4″ x 4″.

    Stitch the outer piece together the same way as shown above.

    When stitching the lining, leave an opening in the side seam of the lining at the same measurement that you placed the ribbon on the outside piece- for example, if your ribbon was placed on the outer piece ½″ down, then leave an opening (½″ wide) ½″ down from the top of the lining.

    Attach front and lining pieces together the same as above.

    After you turn the cozy right side out,  stitch along the top edge of the cozy.

    Stitch again, just below the opening you left in the lining piece. These 2 stitching lines will form the casing for the elastic.

    Feed elastic through the casing you just made.

    Pull elastic so that it is tight but you can still slip a lens cap inside.  Stitch elastic ends closed, and feed back into cozy.

    Hand stitch opening closed.
    post signature

    More

    • Padded Laptop Case
    • Padded iPad case tutorial
    • Lego Storage Pouch Tutorial
    • Laminated Tablet Case Sewing Tutorial

    • Share
    • Email

    About Author

    Melissa Mortenson

    Melissa Mortenson is a blogger, designer, and content creator. She is the Polka Dot Chair blog founder and has been sharing fresh and creative ideas with readers since 2008. She is the author of “Project Teen, Handmade Gifts your Teen will Actually Love.” Her work and designs have been featured on HuffPost, TODAY, Pioneer Woman, HGTV, BuzzFeed, Better Homes & Gardens, and many other established publications. Her first fabric line, “Derby Style,” debuted in January 2015 through Riley Blake Designs.  Additional fabric collections have followed it in subsequent years. A mom of 3, she considers herself lucky to be living in Kentucky.

    Reader Interactions

    Comments

    1. Gina says

      March 01, 2012 at 3:53 am

      What an awsome idea! Love it, will you be selling these? Hope so, there is no way I would be able to make this. Sewing is not my thing, hubby and kids get scarred as soon as I grab a needle so that should give you an idea. Hugs Gina

      Reply
    2. Tracee says

      March 01, 2012 at 5:19 am

      Fabulous idea, I will definitely have to make one of those.

      Reply
    3. Dorian says

      March 01, 2012 at 8:10 am

      What a great idea, thanks!

      Reply
    4. traci says

      March 01, 2012 at 8:25 am

      Being someone who has permanently lost their lens cap twice, I think this is brilliant. Thanks for the great idea.

      Reply
    5. Cara Jane says

      March 01, 2012 at 8:50 am

      great idea, that will save loads of time looking for my lens cap!

      Reply
    6. Burgundy Buttons says

      March 01, 2012 at 8:51 am

      OMG- I love it! Greg would be so grateful not having to pick it up every time I lay it down!

      I tell him I am an Artiste’ and can’t be bothered! (said snobbily and with a french accent).

      Reply
    7. Barbara @ Nähtante Quilts says

      March 01, 2012 at 10:24 am

      I’m constantly facing the same problem with my camera cap. Aand if I’m not fast enough, by boys pick it up and put it into their toy box – lost cap until next spring cleaning. 😉
      A great idea, thanks a million for sharing!

      Reply
    8. Annie says

      March 01, 2012 at 11:45 am

      This is a great idea! I think I would make one with a velco closure. My cap is attached to my lens by an elastic strap. That strap is now stretched out. This would be a great replacement. Thanks for sharing the idea!

      Reply
    9. FashionArtProjects.com says

      March 01, 2012 at 1:03 pm

      genius idea! We just featured you on our Facebook Page!

      Reply
    10. Laura says

      March 01, 2012 at 3:18 pm

      So Cute and what a great idea. I need to make a “manly” one for my hubby. He is the photographer in the fam.

      Reply
    11. girlie girl says

      March 01, 2012 at 4:15 pm

      Love the fabrics! Where did you get the camera print fabric???

      Reply
    12. Chris {frecklemama} says

      March 01, 2012 at 11:19 pm

      Excellent project! Where did you get the sweet little silver hook hardware?

      Reply
    13. weaselwatchr says

      March 01, 2012 at 11:29 pm

      I would so buy the one with the camera on it. HINT HINT

      Reply
    14. mudnessa says

      March 03, 2012 at 10:44 pm

      Just made two of these with elastic tops for me and my mom. We are going on a vacation where we both take A LOT of pics. Thank you for sharing and you have solved the constant “oh crap where is my lens cap” we both always say.

      Reply
    15. Jen Conlon says

      March 08, 2012 at 5:43 pm

      Great tutorial! You’ve been featured on the Quality Sewing Tutorials blog.

      We hand select only the best free tutorials and patterns for the home sewist.

      Grab a brag button!

      Reply
    16. Beth Akins says

      March 30, 2012 at 6:34 am

      I’m a beginner at sewing, but I think I’ll try this! I’m always misplacing my lens cap! Thanks!

      Reply
    17. Nancy Myers says

      September 19, 2012 at 11:35 pm

      I think I will make one for my daughter for a Christmas present. Thank you.

      Reply

    Leave a Reply Cancel reply

    Your email address will not be published. Required fields are marked *

    This site uses Akismet to reduce spam. Learn how your comment data is processed.

    Primary Sidebar

    Hello! It’s nice to meet you.

    I’m Melissa. I like to design things, like fabric, printables, and projects.

    I’m also a Mom and a Maker. I am like most of you, just trying to do my best every day. Some days I succeed, many days I fail.  I find joy in creating, if you do too, then I hope that you find something here bring a little “happy” to your life.  Find out more about me here.

    COPYRIGHT POLICY

    All my images and text are copyrighted. You may NOT use any images from this site in any kind of Video (this includes YouTube). If you would like to feature my work, you may use ONE (1) NON-COLLAGED image and must “follow” link back to my original blog post. You may NOT edit, crop, or change my images in any way without written permission. You MAY NOT print out or copy and distribute any text, images or patterns from this site. All patterns, content, instructions, and templates are for personal use ONLY! Thank you! Violators will be reported.

    Footer

    ↑ back to top

    About

    • Privacy Policy
    • Disclaimers
    • About Melissa

    Newsletter

    • Sign Up! for emails and updates

    Contact

    • Contact
    • FAQ
    • Press
    • Published Books
    • Fabric Collections

    Welcome to the Polka Dot Chair! Here you’ll find easy, step-by-step, sewing, quilting, and crafting projects. We design projects for Makers of all skill levels. Beginners are welcome!

    DISCLAIMER:

    While every effort has been made to ensure the accuracy of the content on this website, the information is made available without warranty of any kind. The Polka Dot Chair accepts no responsibility or liability, whether direct or indirect, as to the currency or accuracy of the information, nor any consequence of its uses. This website is not intended to substitute the advice of a professional.

    Copyright © 2020 Polka Dot Chair

    [ Placeholder content for popup link ] WordPress Download Manager - Best Download Management Plugin