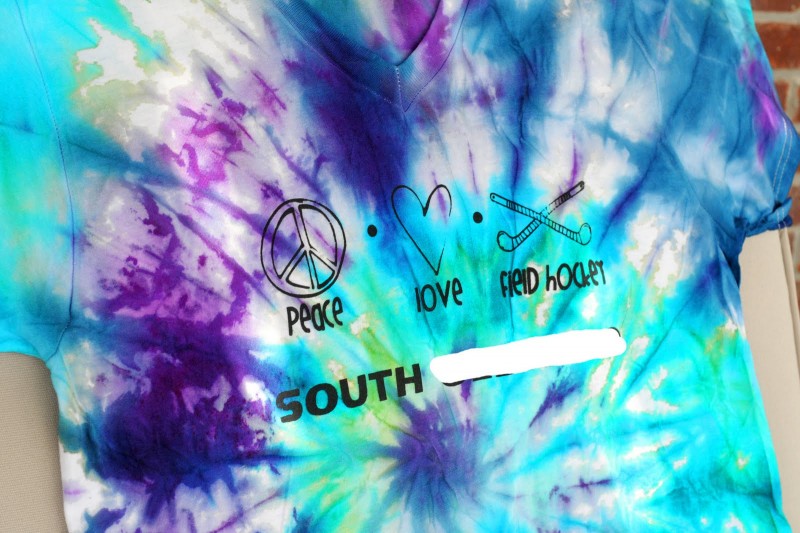
I got a few questions (okay a lot) last week about the tie dyed t-shirts, so I thought I’d do a little follow up today.
I FINALLY got 25 t-shirts printed today, I used my Yudu… many of you asked what a Yudu is, and I’m gonna tell you. But first I wanted to make sure you knew that this is not a paid review post… I bought this product last year and have been using it for a while… no “promotional consideration” is happening here 🙂
This is a Yudu, I got it last year online for a killer deal so thought I’d give it a try… It pretty much allows you to screen print things at home yourself. You print out your design from your computer on a transparency then go through a number of steps to create a silk screen. It’s pretty straight forward.
However there is an “aggravation factor”. I use the term “aggravation factor” quite a bit… For example, a 10 on the aggravation factor scale would be “totally not worth the time & energy, want to throw it out the window!” and a 1 would be “totally worth it! I’d do it over and over again!”… Photoshop and Illustrator are “5”‘s on my scale. Aggravating at first but sooo worth it after you get the hang of it.
I’d give the Yudu a 6… it’s not as easy as they make it look on t.v. (is anything?) BUT this is made up for by the fact that you are able to produce great looking items for not a lot of money. After my initial investment, it probably only cost me $10 to screen print 25 shirts. Which is perfect for school groups, church groups, family reunions etc.. Anything that you don’t want to pay a professional screen printer for.
This is my 2nd batch of shirts for the Field Hockey girls, I’d say I’ve done 50 shirts on it so far. If you have one or ever get one here are some things I’ve noticed while working with it.
1. When you first adhere the emulsion to the screen, make sure it’s perfect! That every little bit of the emulsion is wet and adhered properly. The first time I got too excited and didn’t do this step well, and didn’t get a good screen print from it.
2. Let the emulsion dry COMPLETELY before you expose it.
3. When doing the exposure (to create the design in the screen) put a bunch of coke cans on top to weight it down. They give even pressure without being too heavy.
4. If there is a hole or a bad spot after you do your exposure, and it’s close to your design, just start over. You’ll spend to much time trying to fix it.. thus increasing your aggravation factor :).
5. Keep baby wipes close by when screen printing.
6. After about 10 shirts your ink will start to dry a bit and get goopy, you may have to wash it off and start over again. (I think today I got a batch of bad ink, it was much thicker and hard to work with than usual, you might not have this same problem).
7. When making your design, the bolder the words/images the better. It’s hard to get small details to show up and the bolder letters just look better on t-shirts.
8. It will probably take 2-3 passes with the ink to get a full image.
9. By extra t-shirts, the ink is messy and odds are you will mess up a few.
10. Practice!!! It took me about 10 shirts today before I really got the hang of it…
11. Start the day before. There are a lot of steps that require “drying” time. If you prepare your screen the night before you need to use them it will save you a lot of waiting around time.
After you make the screens you can keep them indefinitely, so if you want to keep making more of the same thing you’ve already got it set up. However the box only comes with ONE silk screen, extra ones are about $20… so if you want to keep your first design and make something else you will have to buy another screen. You can reuse screens when you are done with them.
Overall, I’m glad I have it for this kind of project, but I don’t use it as much as I thought I would. I love having it for making team projects & stuff but when I just need 1 or 2 things printed I still think I would use freezer paper stencils.
I think the t-shirts came out soo cute!! The girls really did all the tie dye themselves… I didn’t even watch. We just bought a tie dye kit at the craft store and followed the directions on the box. It came with instructions for how to roll & tie the shirt for different effects. The only other tip I can give for doing it is to leave the ink on the t-shirts over night & use 100% cotton shirts. The 100% cotton t-shirts that soaked the longest had the best and brightest colors.


Those did turn out really cute.