How to Make a Girls Twirly Skirt; a Free Tutorial
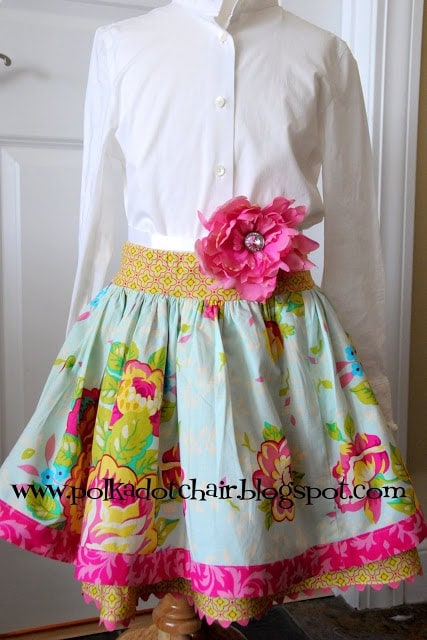
To make the skirt I started with a tutorial here… House on Hill Road. I can’t leave well enough alone and ended up making some changes. It needed some ric–rac.. I love ric rac.. If I were not 35 years old I would sew it to my own clothes!
Tonight after trying the first version of the skirt on my daughter, I decided that it was not fitting her right. She is very tiny and the skirt is very full. I decided that it needed a waistband to help the transition from the full skirt to the smaller waist. So I modified the one I started with to add a waistband. I’m sharing a tutorial for the skirt that I made with you today.
Before You Start a Few Tips:
First of all- it is IMPERATIVE that you PRESS and steam each piece AS YOU GO. Don’t wait until the end to do it all. This is the biggest thing you can do to make your garment look professional and not home-made.
Supplies to Make the Skirt:
You need:
(size of the pieces to be determined below)
2 pieces for the skirt top
2 pieces for the underskirt
2 pieces for the skirt band
1 piece for the waistband
To figure out the size of the skirt top, measure your models waist. Double that measurement. Write it down. This is the width of your fabric piece.
Measure down from the natural waist to determine how long you would like the skirt to be. I have found that 12″ is a pretty universal length for a 4 to 8 year old. This measurement is the height of your skirt piece.
For example: Sydney’s waist was 20″ so I cut 2 pieces of fabric 12″ x 40″. She is about a size 6x-7. (I picked the 12″ length after I measured how long I wanted it to be on her).
For the underskirt pieces, add 3″ to the length of the top skirt. Cut two more pieces. In my example, my 2 pieces are cut to 15″x40″
For the skirt band cut 2 pieces 3.5″x40″
For the waistband measure your model’s hips and add 2″. Syd’s were 24″ so I cut 1 piece of fabric 26″x4″. You can also just add 4-5″ to the waist measurement.
To attach the band to the skirt, refer to the tutorial for our Sydney’s Skirt found HERE.
After you have done that, sew the underskirt pieces together at the side seams. Press open.
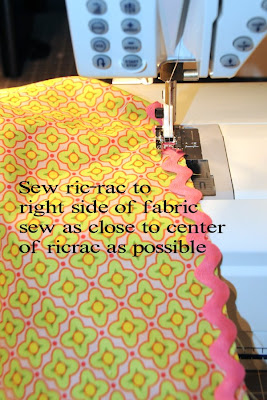
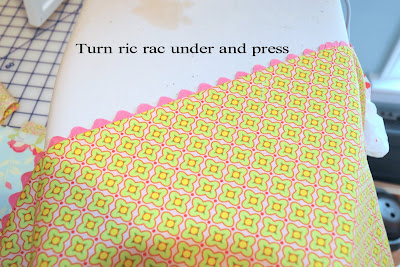
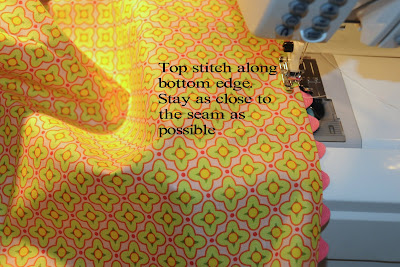
To attach ric rac to the hem of the skirt, do the following:
The bottom of the skirt will need to be finished in some way before you sew on the ric rac, I just used the overcast stitch, you can also use a zig zag stitch or a serger.
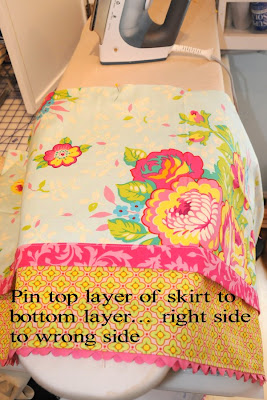

Next pin the 2 skirt pieces together.
Run 2 rows of gathering stitches along the top of the 2 skirt pieces. Set aside. On waistband piece, sew side seams and fold under one side 1/4″ and press. Fold under again 1/2″ and press. Then sew along the bottom edge, leaving open 1/2″ to make an elastic casing.
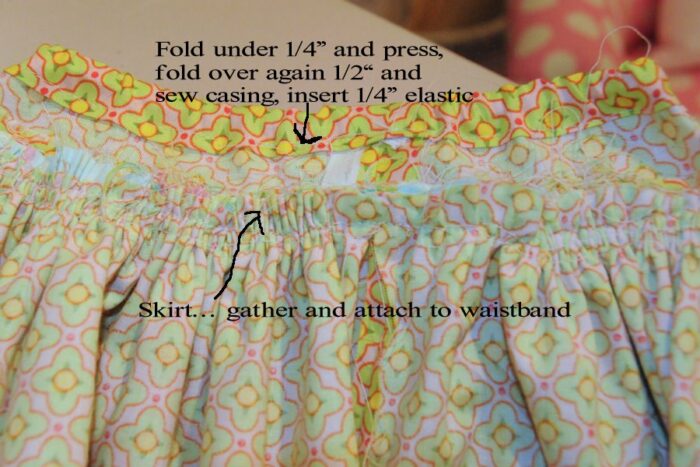
Gather the skirt and attach to waistband. When I gather skirts, I think it is easier to gather in sections rather than the whole skirt, that way if the thread breaks you don’t lose the whole piece.
Sew skirt to the UNFOLDED edge of the waistband.
Measure a piece of 1/4″ elastic to size and thread into the waistband. Sew casing closed. Press.

Viola! Finished!
Now to make some changes to the t-shirt—- where is a bedazzler when you need one? (I don’t have one any suggestions to add some “bling” to the shirt).


For a “matching” shirt, I use a pre-school coloring book to find an applique pattern. Then I cut out this pattern from a piece of the skirt fabric. I use a zigzag stitch around the edges. You can go as elaborate at you want, but I usually go for silhouette.
Thanks Melissa for yet another cute idea. I’m so sorry there are dishonest people who take the work of others and claim it as their own. I am grateful that you are kind enough to share your adorable ideas “free of charge” with the rest of us. I look forward to reading your blog daily. I have some Little Red Riding Hood fabric from Riley Blake. I’m going to use your tutorial to make skirts for my 3 granddaughters.
Blessings,
Kathy
You are so sweet Kathy! I’m so glad that you’ve made good use of the tutorial! That’s why I do this!
So happy I found your site. I will be using your skirt and dress tutorials for my grandchild. Love them.
Iam so glad I stumble over your blog
LOVE this skirt! I’m an honorary grandma to an adorable five year old and I am thrilled to find this cute free pattern (how generous of you!) Here’s a little hint (definitely not original with me…but I love it) Use dental floss and a wide zig zag stitch when you want to gather the waist. It never breaks! :o)
Blessings,
Sunny
I love this fabric!!! Do you happen to know the name? So beautiful! The skirt is super cute too 🙂
Thanks!!
Thank you so much for the tutorial! LOVE! And I thought maybe you’d like to check out my take… http://jinnynewlin.blogspot.com/2012/04/pdcc127-simon-says-stamp.html. Hugs!
I just found this tutorial and your blog! LOVE both! I’m your newest follower!
-Amy
amygigglesdesigns.blogspot.com
I pinned this on Pinterest so I could keep up with where the tutorial was. Hope that was ok! I want to make one for my niece.
That is a beautiful skirt! Thanks for sharing. I’m going to have to make a couple for my granddaughters.
Thank you! I made one for my daughter. You can see it here:
http://cheap-aholic.blogspot.com/2011/06/sew-happy.html