
How to Make a Girls Twirly Skirt; a Free Tutorial
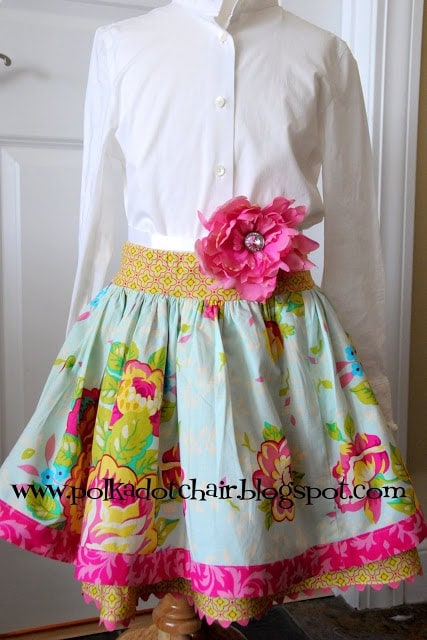
To make the skirt I started with a tutorial here… House on Hill Road. I can’t leave well enough alone and ended up making some changes. It needed some ric–rac.. I love ric rac.. If I were not 35 years old I would sew it to my own clothes!
Tonight after trying the first version of the skirt on my daughter, I decided that it was not fitting her right. She is very tiny and the skirt is very full. I decided that it needed a waistband to help the transition from the full skirt to the smaller waist. So I modified the one I started with to add a waistband. I’m sharing a tutorial for the skirt that I made with you today.
Before You Start a Few Tips:
First of all- it is IMPERATIVE that you PRESS and steam each piece AS YOU GO. Don’t wait until the end to do it all. This is the biggest thing you can do to make your garment look professional and not home-made.
Supplies to Make the Skirt:
You need:
(size of the pieces to be determined below)
2 pieces for the skirt top
2 pieces for the underskirt
2 pieces for the skirt band
1 piece for the waistband
To figure out the size of the skirt top, measure your models waist. Double that measurement. Write it down. This is the width of your fabric piece.
Measure down from the natural waist to determine how long you would like the skirt to be. I have found that 12″ is a pretty universal length for a 4 to 8 year old. This measurement is the height of your skirt piece.
For example: Sydney’s waist was 20″ so I cut 2 pieces of fabric 12″ x 40″. She is about a size 6x-7. (I picked the 12″ length after I measured how long I wanted it to be on her).
For the underskirt pieces, add 3″ to the length of the top skirt. Cut two more pieces. In my example, my 2 pieces are cut to 15″x40″
For the skirt band cut 2 pieces 3.5″x40″
For the waistband measure your model’s hips and add 2″. Syd’s were 24″ so I cut 1 piece of fabric 26″x4″. You can also just add 4-5″ to the waist measurement.
To attach the band to the skirt, refer to the tutorial for our Sydney’s Skirt found HERE.
After you have done that, sew the underskirt pieces together at the side seams. Press open.
To attach ric rac to the hem of the skirt, do the following:
The bottom of the skirt will need to be finished in some way before you sew on the ric rac, I just used the overcast stitch, you can also use a zig zag stitch or a serger.
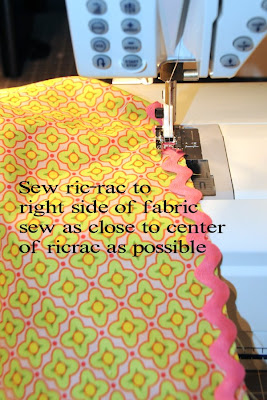
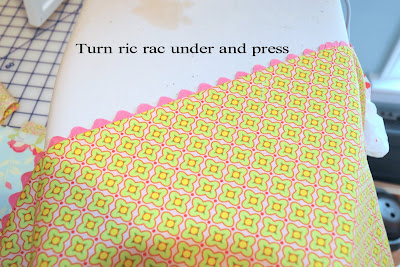
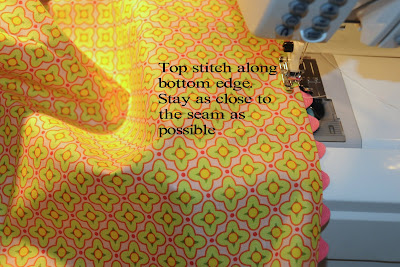
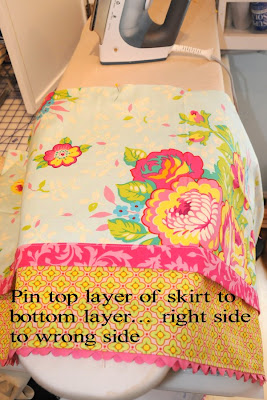

Next pin the 2 skirt pieces together.
Run 2 rows of gathering stitches along the top of the 2 skirt pieces. Set aside. On waistband piece, sew side seams and fold under one side 1/4″ and press. Fold under again 1/2″ and press. Then sew along the bottom edge, leaving open 1/2″ to make an elastic casing.
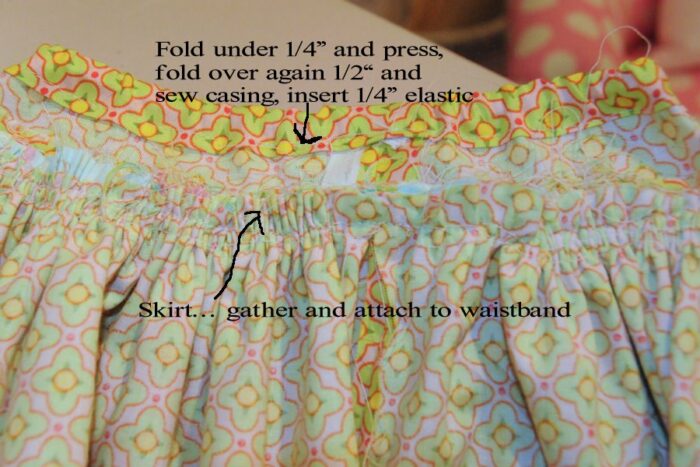
Gather the skirt and attach to waistband. When I gather skirts, I think it is easier to gather in sections rather than the whole skirt, that way if the thread breaks you don’t lose the whole piece.
Sew skirt to the UNFOLDED edge of the waistband.
Measure a piece of 1/4″ elastic to size and thread into the waistband. Sew casing closed. Press.
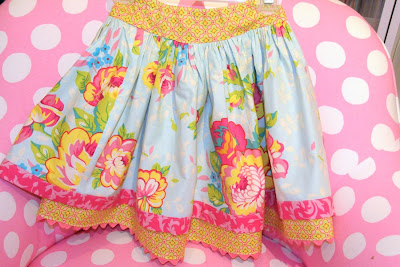
Viola! Finished!
Now to make some changes to the t-shirt—- where is a bedazzler when you need one? (I don’t have one any suggestions to add some “bling” to the shirt).
Thank you for sharing this wonderful tutorial! I made my granddaughter a Dorothy (wizard of oz) dress using it. I posted photos on my blog today. I’ll definitely be making more.
Love, love this skirt – and so easy! I’ve never made clothes before, but for a first timer thought this was pretty simple 🙂
Here is a link of my skirt on my blog:
http://itssewforyou.blogspot.com/2011/01/twirly-ballerina-skirt.html
~Melissa @ Its Sew For You
What are the fabric names you used here? They’re GORGEOUS!!!! I love the combo of pink, orange and blue :0)
Thanks for the tute…
I’m looking for an easy skirt tutorial & i found your blog
i’ll try it soon & made a cute skirt for my baby girl
btw you’ve been featured on my blog :
http://childhood-obsessions.blogspot.com
These turn out so cute! Thanks so much for posting the tutorial!!
http://wehmeyerfamily.blogspot.com/2010/02/take-break.html
Just wanted to say thank you for sharing!! I have one little girl and 3 boys. So it is fun to make her some fun things. Also thank you for posting it for free. I do hope people play nice!! As we can’t afford to pay for a pattern and then fabric on top of that, these day’s. You can buy clothes cheaper then that. But so not as CUTE!! Thank You!!!!
Thanks for all of your tutorials. I love your blog. I’ve got 3 girls (two are twins) and these skirts came out so adorable for Christmas. I posted one on my blog and linked back to yours. http://www.craftychicka.blogspot.com. I just finished the second one and I’m moving on to the third. They are so full and fun. Thanks for sharing your talents with all of us!!
Wow…I think I may try this one even though I hae never made clothes before only straight line stitches….is this too much of a project for a beginner? Very cute-
Woman, thank you so so much because my daughter has asked me about a skirt like this and we found gorgeous fabric, i’M A COMPLETE dumb rabbit and I can barely sew but I’m definetelt gonna take the chance, thanks for sharing this for free!
I love the skirt and diaper bag, do you make these to order? let me know!
What a great ric rac trick!
Thanks for this tutorial. I had a lot of fun combining it with Pink Picket Fence’s tulle skirt… Good stuff!
Thanks for the great tute! I made matching skirts for my daughter and a friend and posted a link back to your site. Love them!
skirts like these make me wish I had little girls… for now, I’ll have to settle for sewing for my nieces. I’ll link to your fabulous tutorial from my blog http://www.kojodesigns.blogspot.com!
I love it! Thanks for the tutorial.
LOVE IT! I saw the tutorial you referred to the other day ~ very cool that you put your own twist on it. I have two girls who LOVE skirts and with spring (hopefully soon) coming, I can’t wait to make some! Thanks for the tutorial!
This is killing me with cute. Thanks for the tutorial!
Melissa-
I have been DYING over the skirt on heather bailey’s site! so, you can imagine my excitement when I saw yours…IT’S DARLING! Thanks for sharing!!
Jenni Smith
That outfit is so flippin’ adorable that I am giddy right now, dreaming of one for my little one. Thanks for the great tutorial and tips!!
Jaime