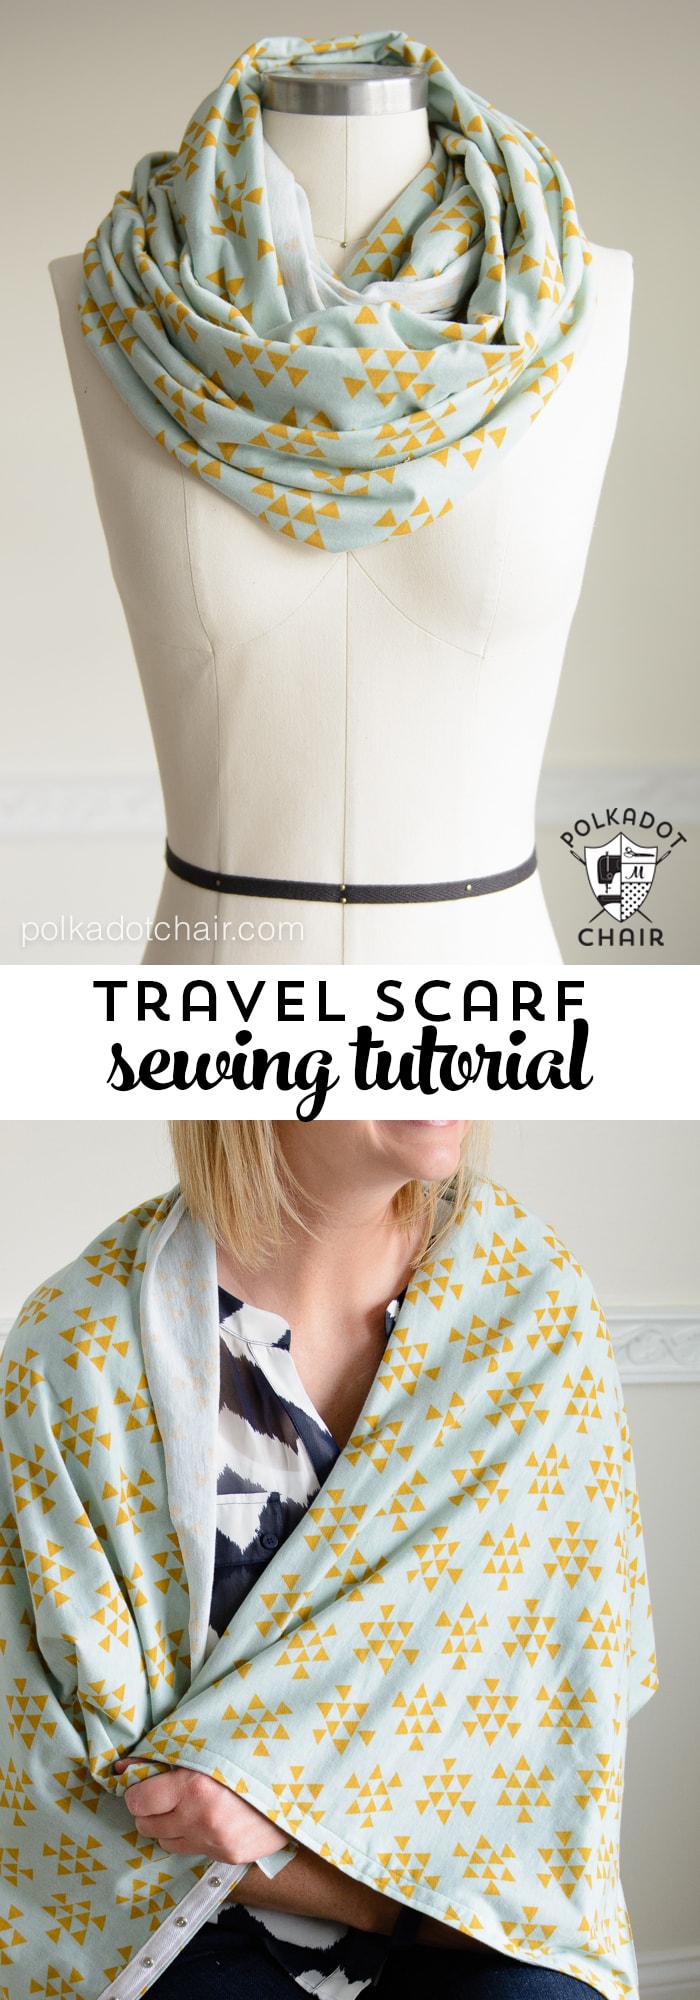
Snap Up Infinity Travel Scarf Sewing Tutorial

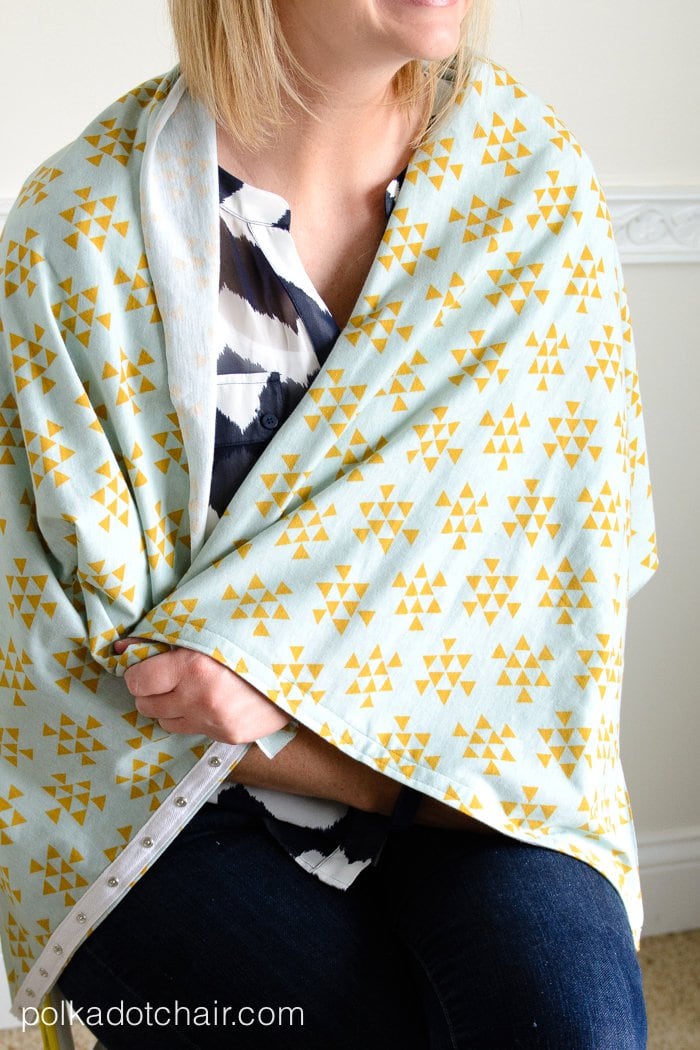
Learn how to make an infinity scarf with this free sewing pattern. This pattern is unique because it can snap and un-snap, so it doubles as a travel blanket. Keep reading to find out more! 

DIY scarf tutorial

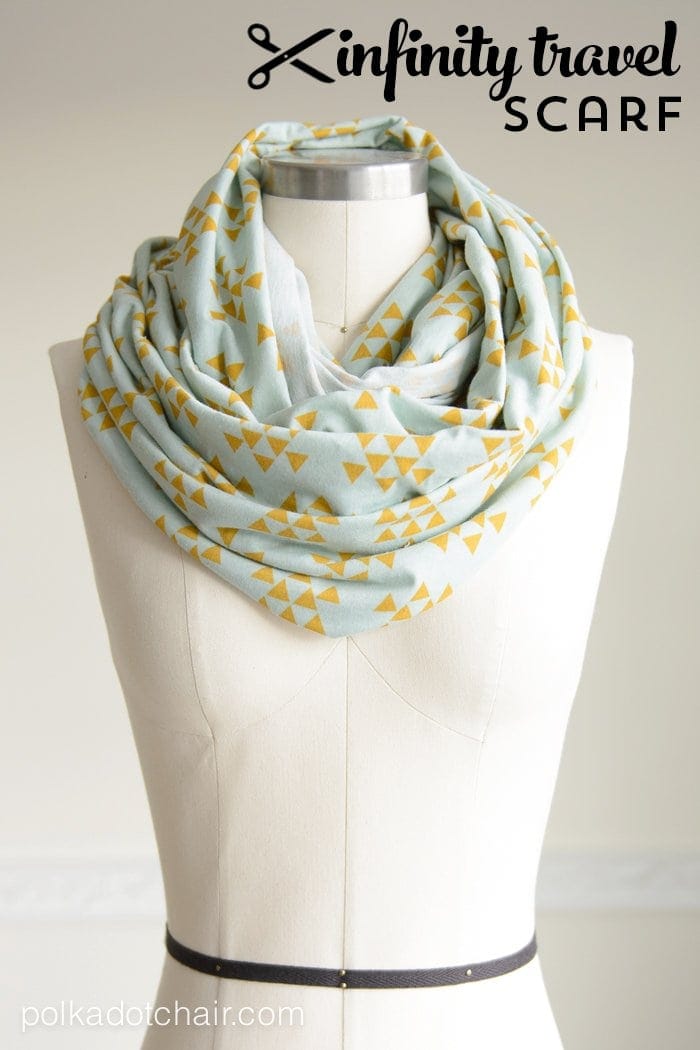
Today, I will share a tutorial on making a snap-up infinity scarf, one of my “go-to” travel items.  I purchased a similar scarf at the Lululemon store a few years ago and dragged it everywhere. I thought it would be fun to try to make scarf similar to the Lulu scarf.

Why I Love This Travel Scarf

I love this scarf because it is perfect for road trips and airplane rides.  When snapped up, the scarf looks like a regular infinity scarf, but unsnap it, and you have a blanket for an airplane or a shawl for long car rides.  Mine goes with me every time I travel.

Woman wrapped in home made scarf

When it was time for a new scarf, I made one instead of purchasing one.

I especially love it when I’m traveling during the summer, and it’s too warm to take a blanket or coat on an airplane. Those planes can get very cold! You can adjust the snaps so they do not fall off you when you move around on the plane.

Blue and yellow scarf on mannequin

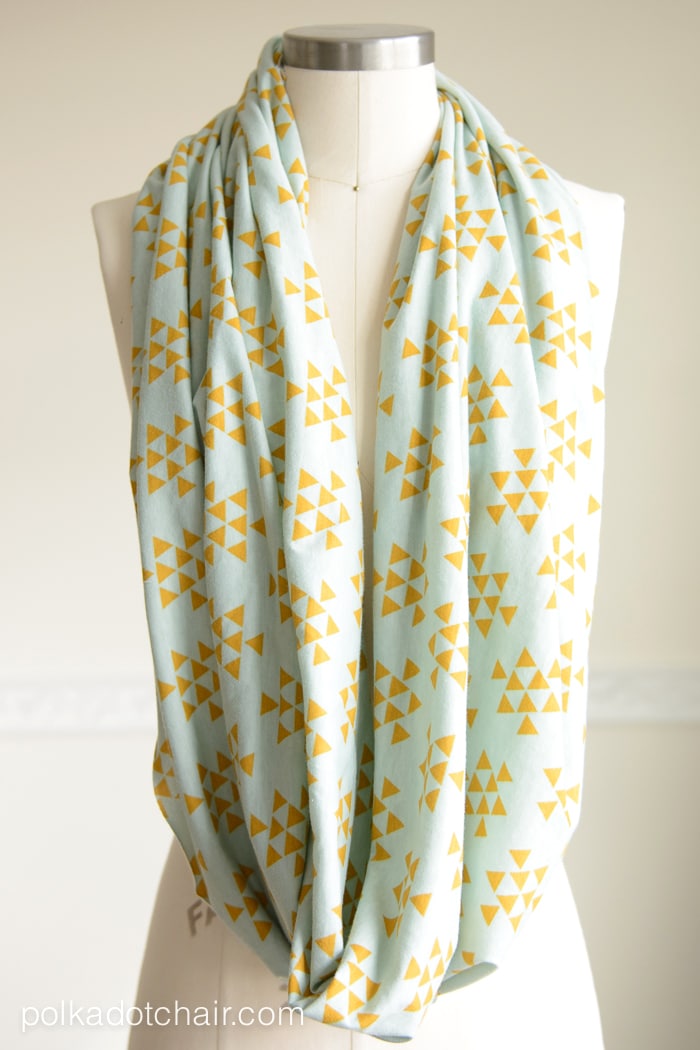
This scarf is made from Jersey Knit fabric. You could also choose a Ponte Knit or a Cotton Lycra Knit. Not sure what I’m talking about?

With all the cute knit fabrics on the market, finding one you love to make this scarf should be easy. It’s so quick to stitch up that you could make a few.

Woman wearing hand made scarf at table

DIY Snap Up Infinity Scarf pattern by Melissa of polkadotchair.com - perfect for traveling

Infinity Travel Scarf Sewing Tutorial

Melissa Mortenson
Learn how to make an infinity scarf with this free sewing pattern! This infinity scarf pattern is unique because it does double duty as a travel scarf.
No ratings yet
Prep Time 30 minutes
Active Time 2 hours
Total Time 2 hours 30 minutes

supplies

  • 1 yard 58-60″ wide knit fabric
  • 1 yard snap tape
  • Thread

Instructions
 

Before you start:

  • This scarf is about 58″ long when finished, which might not be long enough for some. If you’d like to make a longer scarf, sew (with a French seam or a serger) an extra “half” of fabric to one end. To do this, you’ll cut an additional piece of fabric that is 28″ x 26″.

Step One:

  • Wash and dry your fabric. Knit fabrics are different from quilting cotton in that they must be pre-washed and dried before use.
    DIY Snap Up Infinity Scarf pattern by Melissa of polkadotchair.com - perfect for traveling

Step Two:

  • Cut your knit fabric into a rectangle that is 28″ wide by 58″ (or the width of your fabric). Cut the selvage edges off of your fabric.
  • (tip: use a rotary cutter when cutting knit fabrics to get a clean edge)
  • Cut your snap tape to 28″ long.
    DIY Snap Up Infinity Scarf pattern by Melissa of polkadotchair.com - perfect for traveling

Step Three:

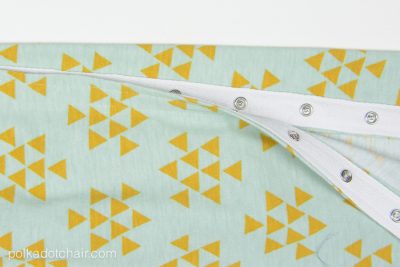
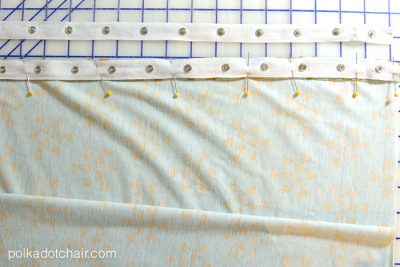
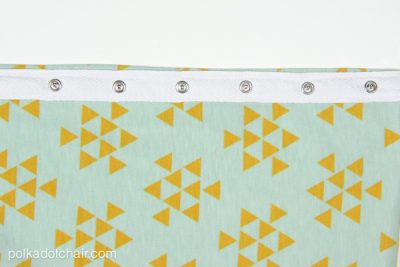
  • Fold under one of the 28″ sides of the fabric 1″. The wrong sides of the fabric should be facing. Separate the snap tape.
  • Pin one side of the snap tape to the fabric on top of the fold. Double-check that you have the correct side of the snap tape facing up. Have the tape about 1/16″ from the fold of the fabric. Pin well.
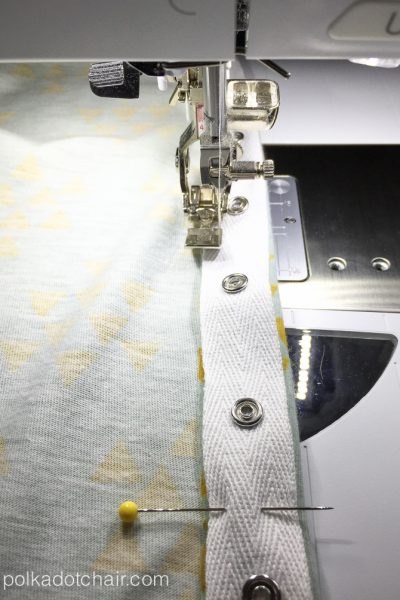
  • Install the zipper foot on your sewing machine.
    DIY Snap Up Infinity Scarf pattern by Melissa of polkadotchair.com - perfect for traveling
  • Stitch the snap tape in place along one edge of the tape. You’ll need your zipper foot to keep the sewing machine’s foot out of the way of the snaps.
  • TIP: If you’re having difficulty stitching the snap tape with your zipper foot, you can use your standard presser foot and sew the tape with a wide zig-zag stitch. Part of the zig-zag will be on the fabric, and part will be on the zipper tape. When you stitch the zig-zag on the folded edge of the fabric, part of the stitch will be off the fabric.
  • Repeat this for the other edge of the snap tape (you may need to move your needle or readjust your foot, depending on your sewing machine).
    DIY Snap Up Infinity Scarf pattern by Melissa of polkadotchair.com - perfect for traveling

Step Four:

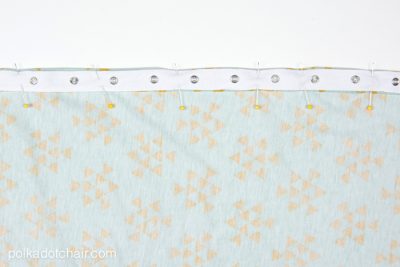
  • Fold the other 28″ side of the fabric down 1″ with the wrong sides of the fabric facing. Pin the other half of the snap tape to the RIGHT side of the scarf on top of the fold. Ensure the correct side of the snap tape is facing up and that it lines up with the snap tape you stitched to the other side.
  • The stitch is in place the same way you did in step 3.

Step Five:

  • Trim edges even. Clip strings, and you’re done! Since the knit fabric does not fray, there is no need to hem the long edges of the scarf!
    DIY Snap Up Infinity Scarf pattern by Melissa of polkadotchair.com - perfect for traveling
PRINT
Love this tutorial? Get the behind the scenes on Instagram
DIY scarf tutorial pinterest post

More Scarf Tutorials That You May Like:

25+ Scarf Sewing Tutorials & Patterns

Learn How to Sew a Scarf

Reversible Plaid Wool Winter Scarf Tutorial

Similar Posts

36 Comments

  1. That is just too cute. I hope I get a chance to make one. I am always a little too chilly by the end of our outdoor theater excursions, and this would be perfect.

  2. This is so cute! And sooo functional! I love it – gotta try it out.
    I do have one question – why one yard of fabric, if the pattern is only 28″?

  3. This is my first project with knits and it was really difficult. I have been quilting for a long time, but found this challenging. I would have appreciated some advice on HOW to square up knit fabric because it acts nothing like quilting cotton.

    1. In clothing class I was taught that you ALWAYS must find the staright of grain before starting any sewing project. On knits you simply hand baste down one of the ribs. On wovens you pull a thread on the cut edge until it runs the width of the fabric.
      I thought every sewer always found the grainline but the more online tutorials I read the less I see grainline mentioned.

  4. I just finished this and wanted to see if you had any advice. The snap tape is much heavier than the knit and I can’t get it to look right when I put it on. The snap tape bunches up and creates a large bump. Any tips on how you should wear this?

    1. Did you steam it with your iron well? Knit has a tendency to bunch up and “ruffle” a bit when you sew it. A good pressing with a steam iron will really help.

      When I wear mine I put it on with the snaps done up and the snaps facing the back of my neck. I then loop it over my head. Hope this helps!

    2. I used Heat’n’Bond, which comes in a 1″ wide roll. It’s a bit too wide so I cut 2 strips the length of the tape, and then trimmed a scant 1/4 or less off of one long side. It comes with ironable paper on one side. Put the fusible side down, iron, then let it cool a few seconds. Then peel off the paper, and lay the tape down on it. I pressed in between the snaps for several second, pressing down. This is just enough to stick it on. Then I put a towel down on the ironing board, and laid the snap tape face down on it, to help pad the snaps. Then I pressed the back of the tape through the knit fabric, longer enough to really seal the bond. This holds it enough to keep it still and not bunching up when I stitched it.

      The fusible heat-n-bond also sealed the cut edge of the knit, so I didn’t actually fold that end over before applying the tape. I’ll see if this lasts looking good enough. Next time I might try the told.

    3. Hi, I used heat-n-bond, which comes in a roll about 1″ wide. I cut two strips the length of the tape. The heat-n-bond, which is fusible, is a bit too wide so then I trimmed a scant 1/4″ from one long edge of the heat-n-bond. It comes with paper on one side. I applied it along the edge where the tape would go, with my iron. Let it cool a few seconds, then peel off the paper. Then I applied the snap tape, pressing in between the snaps for a few seconds. This was just to get it to stick a bit. After that, I turned over the fabric with the tape fused on the ironing board, but on top of a clean bath towel. This was to pad the snaps a bit. From the back of the fabric, I finished fusing the snap tape to the edge of the scarf. Repeat other side. I trimmed off any bit of the fabric that stuck out from the edge of the tape, as I opted not to fold over the fabric as in the tutorial. The heat-n-bond fuses right up to the edge. I’ll have to see if this keeps the edge neat. Next time possibly I would go ahead and fold the fabric first.

  5. This is just like a nursing scarf that costs $55 to buy, but so much cheaper to make yourself, and you can pick such cute fabrics! You can wear it as a scarf, vest, poncho, shrug, tunic.

  6. I haven’t started my scarfs yet but am wondering why bother with the stap tape at all? Can’t you just open the scarf and put it over your shoulders without the snaps? The snap tape is expensive.

    1. The 40% coupon always available at Hobby Lobby makes the snap tape extremely affordable. I folded the 1.5 yard fabric in half lengthwise, sewed around edges, leaving hole for turning then added snap tape to the finished ends. This came out so nicely that I may make some as Christmas gifts!

  7. I saw this and new I wanted to try it (with the help of a talented seamstress). Needless to say I’m thrilled with the result. I can’t wait to travel with it, for now it will keep me cozy while I read.

  8. Hello,
    Thank you for this tuto, I put it in my to do list.
    I wish you a Happy New Year !
    Castafiore (Toulouse, France)

  9. After this is sewn together, how do you twist it? Im not very good at working the infinity scarfs, so I need a little visual.lol thanks!

  10. Out of curiosity why snap tape and not just attach snaps? I think the pearlized snaps would make a pretty accent. I assume they still make them…

  11. I am finding that my snaps are getting in the way of both the pressure foot and zipper foot on my machine. Do you have a different foot recommendation? I have my scarf pinned and ready to go, but I’m practicing on scrap and I can’t seem to get anywhere.

    1. Each machine is a bit different as to the best way to handle this. Try a regular presser foot and a zig zag stitch. It will still look nice. Set the zig zag to the widest setting you can and a longer stitch length. Then stitch it so that one of the stitches catches the snap tape and the other is off of the tape. Try that. If not mess around with you presser feet until you find one that will work.

Leave a Reply

Your email address will not be published. Required fields are marked *

Was this article helpful? We love 5 star ratings!


This site uses Akismet to reduce spam. Learn how your comment data is processed.