• Skip to primary navigation
  • Skip to main content
  • Skip to primary sidebar

The Polka Dot Chair logo

  • SEWING
    • Free Sewing Patterns
    • Bag Patterns
    • Costumes
    • Apparel
    • Learn to Sew
    • Beginner Friendly
    • Embroidery Projects
    • Tips & Techniques
    • All Sewing
  • QUILTING
    • Quilt Blocks
    • Learn to Quilt
    • Free Patterns
    • Quilt Patterns
    • All Quilting
  • CRAFTS
    • Disney
    • Cricut
    • Printables
    • All Crafts
  • HOLIDAYS
    • Seasonal Projects
    • Valentine’s Day
    • Easter
    • 4th of July
    • Halloween
    • Thanksgiving
    • Christmas
    • All Holidays
  • TUTORIALS
  • ABOUT
    • About Me
    • My Fabric Collections
    • Published Books
    • Press
    • FAQ’s
    • Contact
  • SUBSCRIBE
  • SHOP
menu icon
go to homepage
  • SHOP
  • TUTORIALS
  • SEWING
  • QUILTING
  • SUBSCRIBE
  • CRAFTS
  • HOLIDAY PROJECTS
  • ABOUT
    • Published Books
    • My Fabric Collections
  • CONTACT
    • Facebook
    • Instagram
    • YouTube
  • subscribe
    search icon
    Homepage link
    • SHOP
    • TUTORIALS
    • SEWING
    • QUILTING
    • SUBSCRIBE
    • CRAFTS
    • HOLIDAY PROJECTS
    • ABOUT
      • Published Books
      • My Fabric Collections
    • CONTACT
    • Facebook
    • Instagram
    • YouTube
  • ×

    Home » Home

    Dining Room redo using Stencils

    Updated: Feb 3, 2014 by Melissa Mortenson · This post may contain affiliate links · This blog generates income via ads · 9 Comments

    How to stencil a wall.

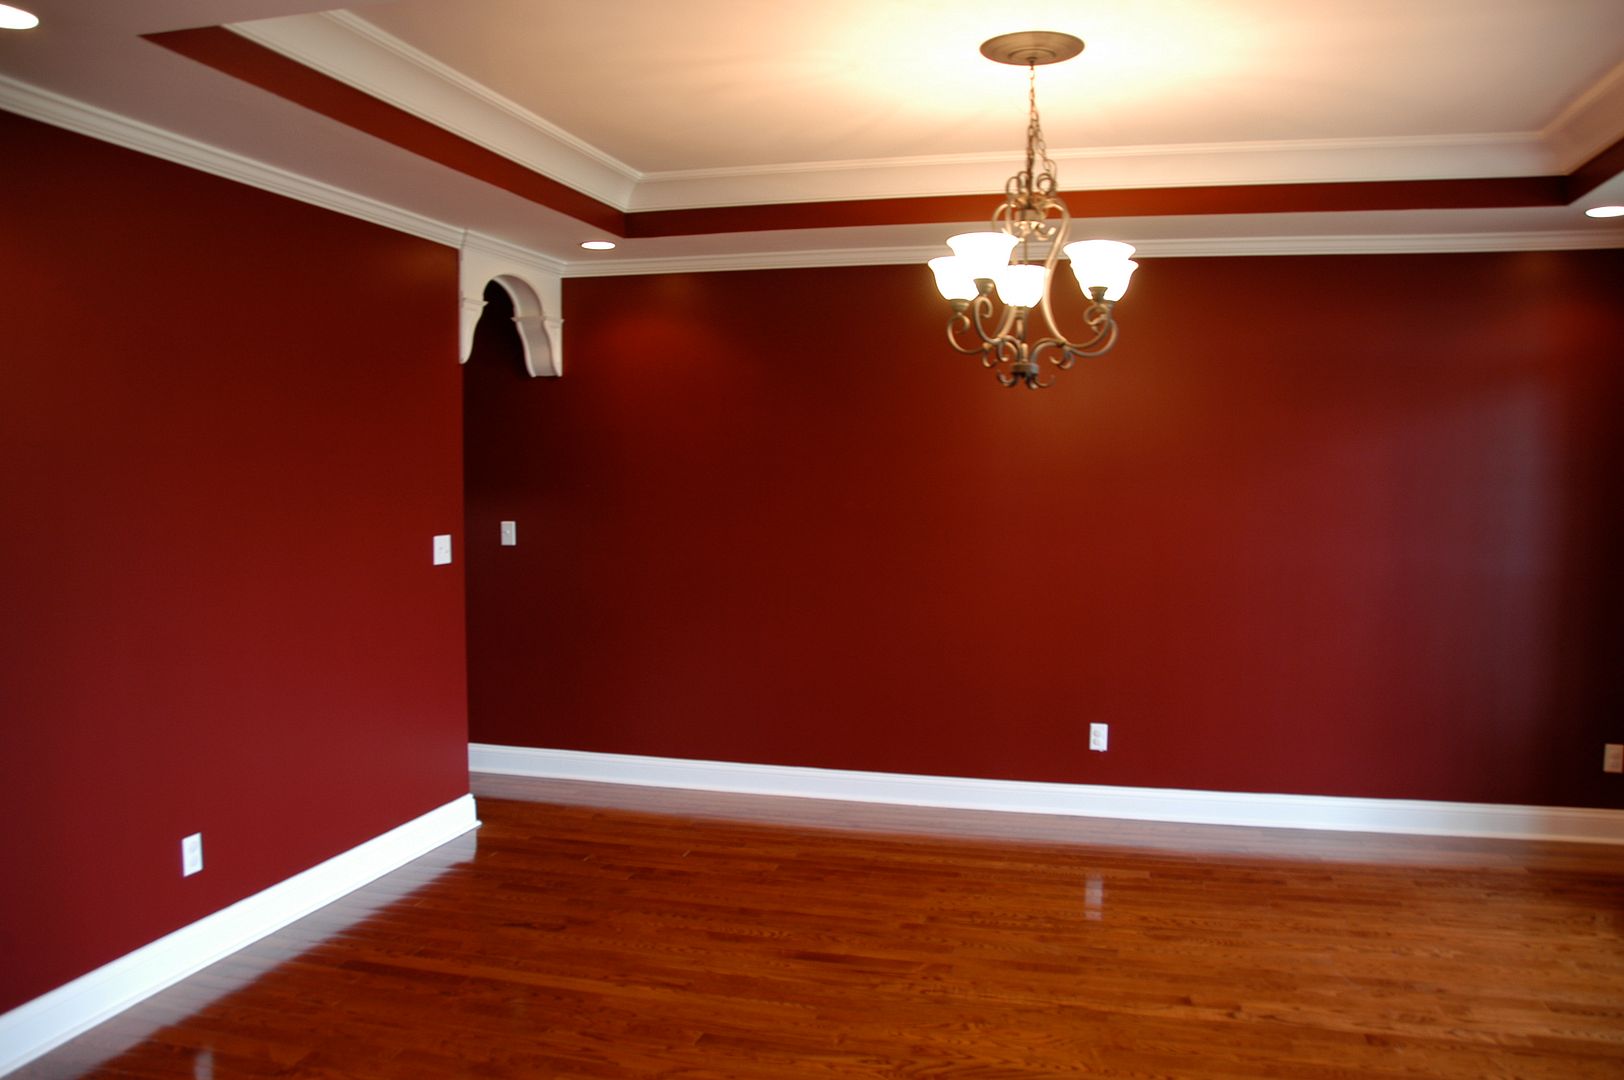
    Four years ago when we moved into this house the dining room was red.  In our house before that our dining room was red.  After 8 years I was sick of the red.

    The problem with repainting it was choosing a color.   I could not bring myself to paint it beige, I thought about blue. But nothing really sat right with me. To be honest I really wanted wallpaper, but was worried that a potential buyer of our home down the road would be scared off by it.

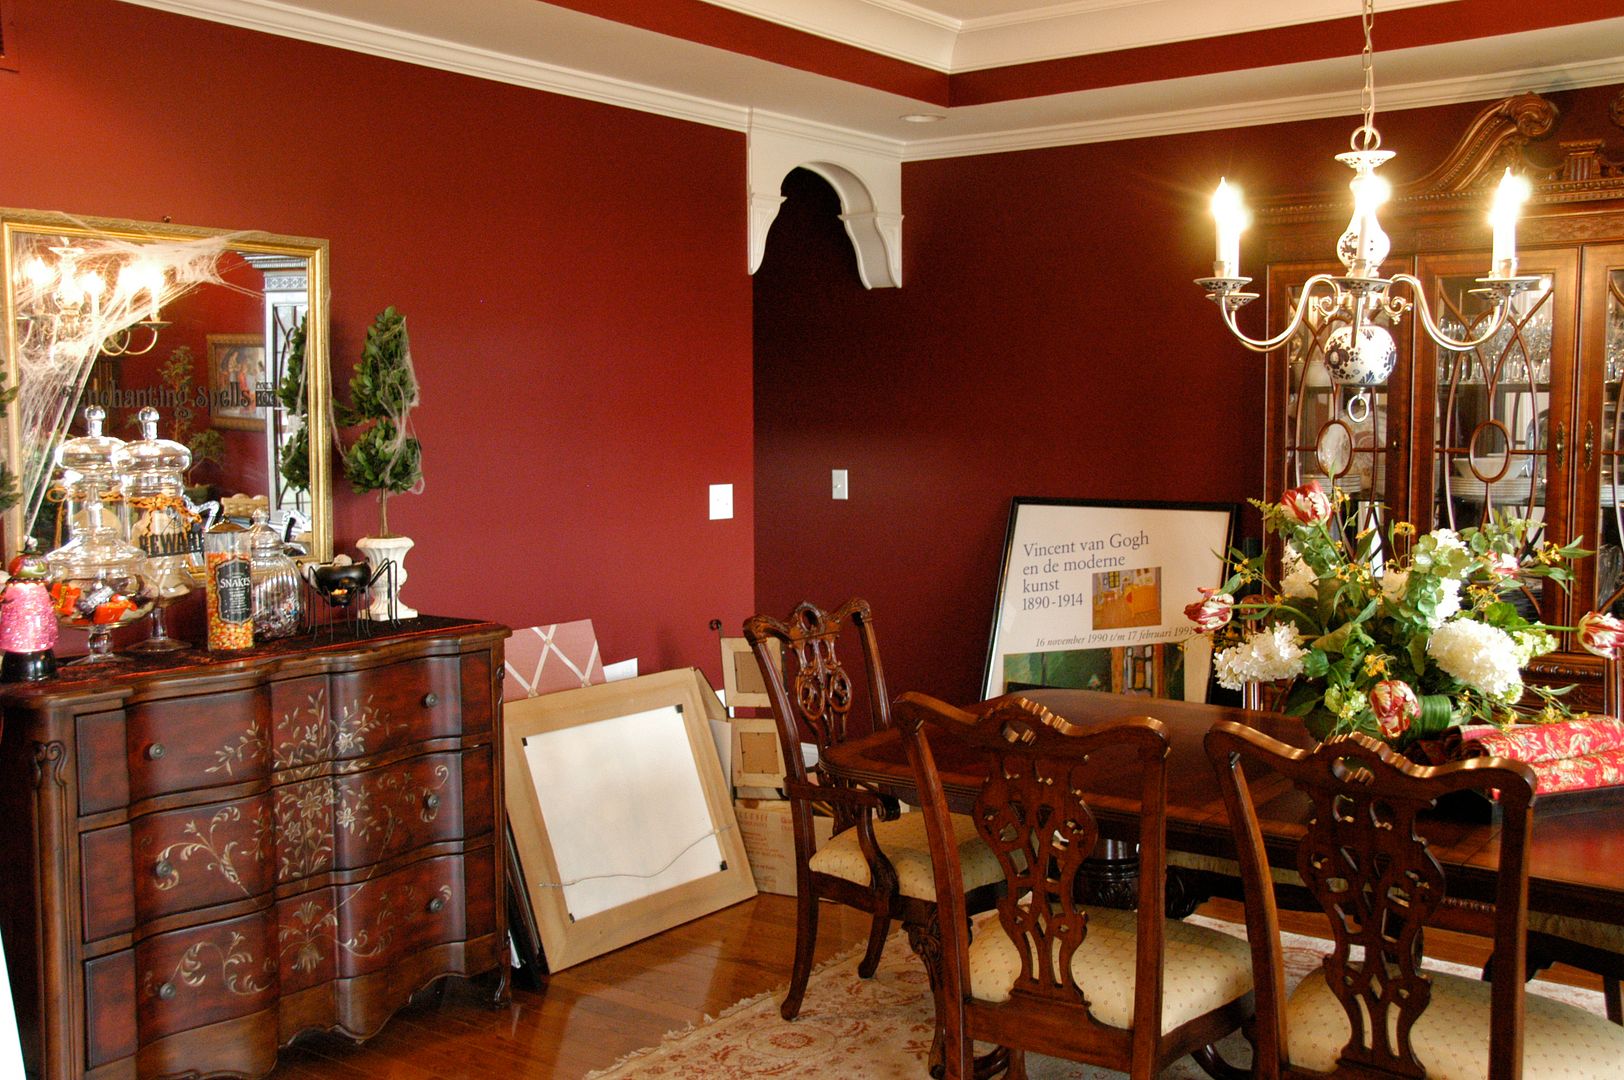
    Eight years ago when I had the first red dining room, I purchased some very “formal” dining room furniture. I’m not sure I’d do it again. Even though it’s beautiful, if I started all over again I’d pick something more modern.

    Also in the room already were red silk drapes and a red oriental rug (that I bought in Turkey, so it wasn’t going anywhere).  When I thought of the room I could not NOT see RED walls.

    Right after we moved in.
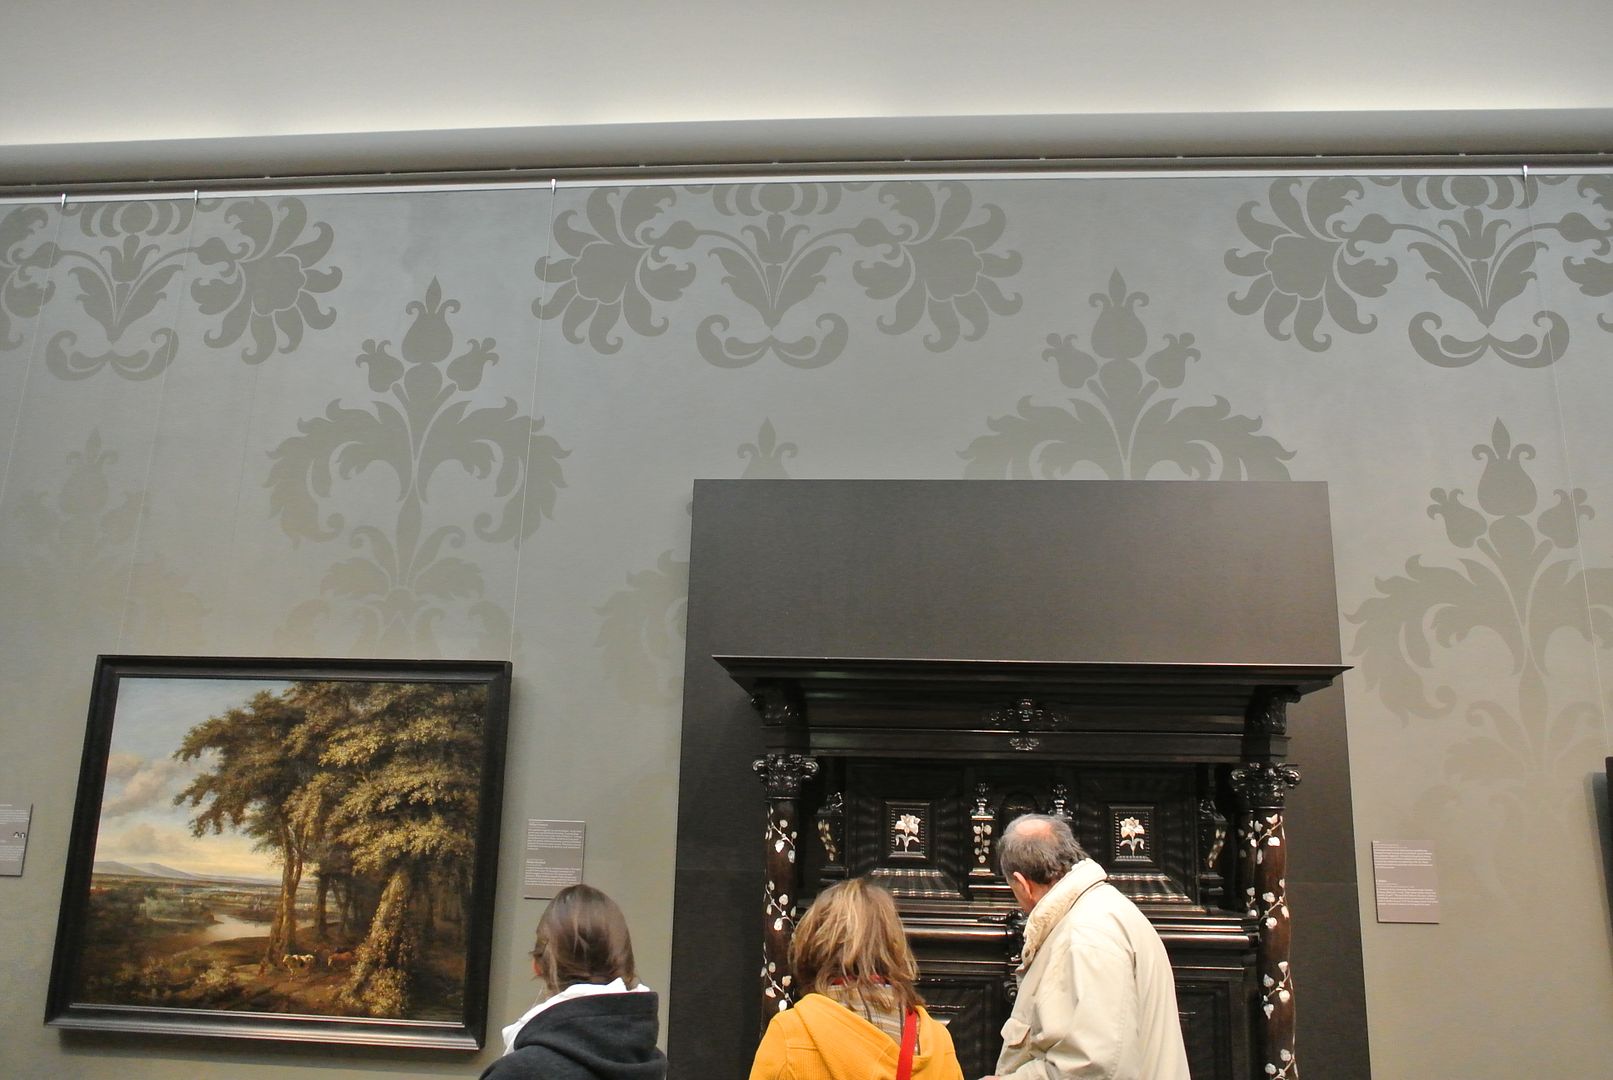
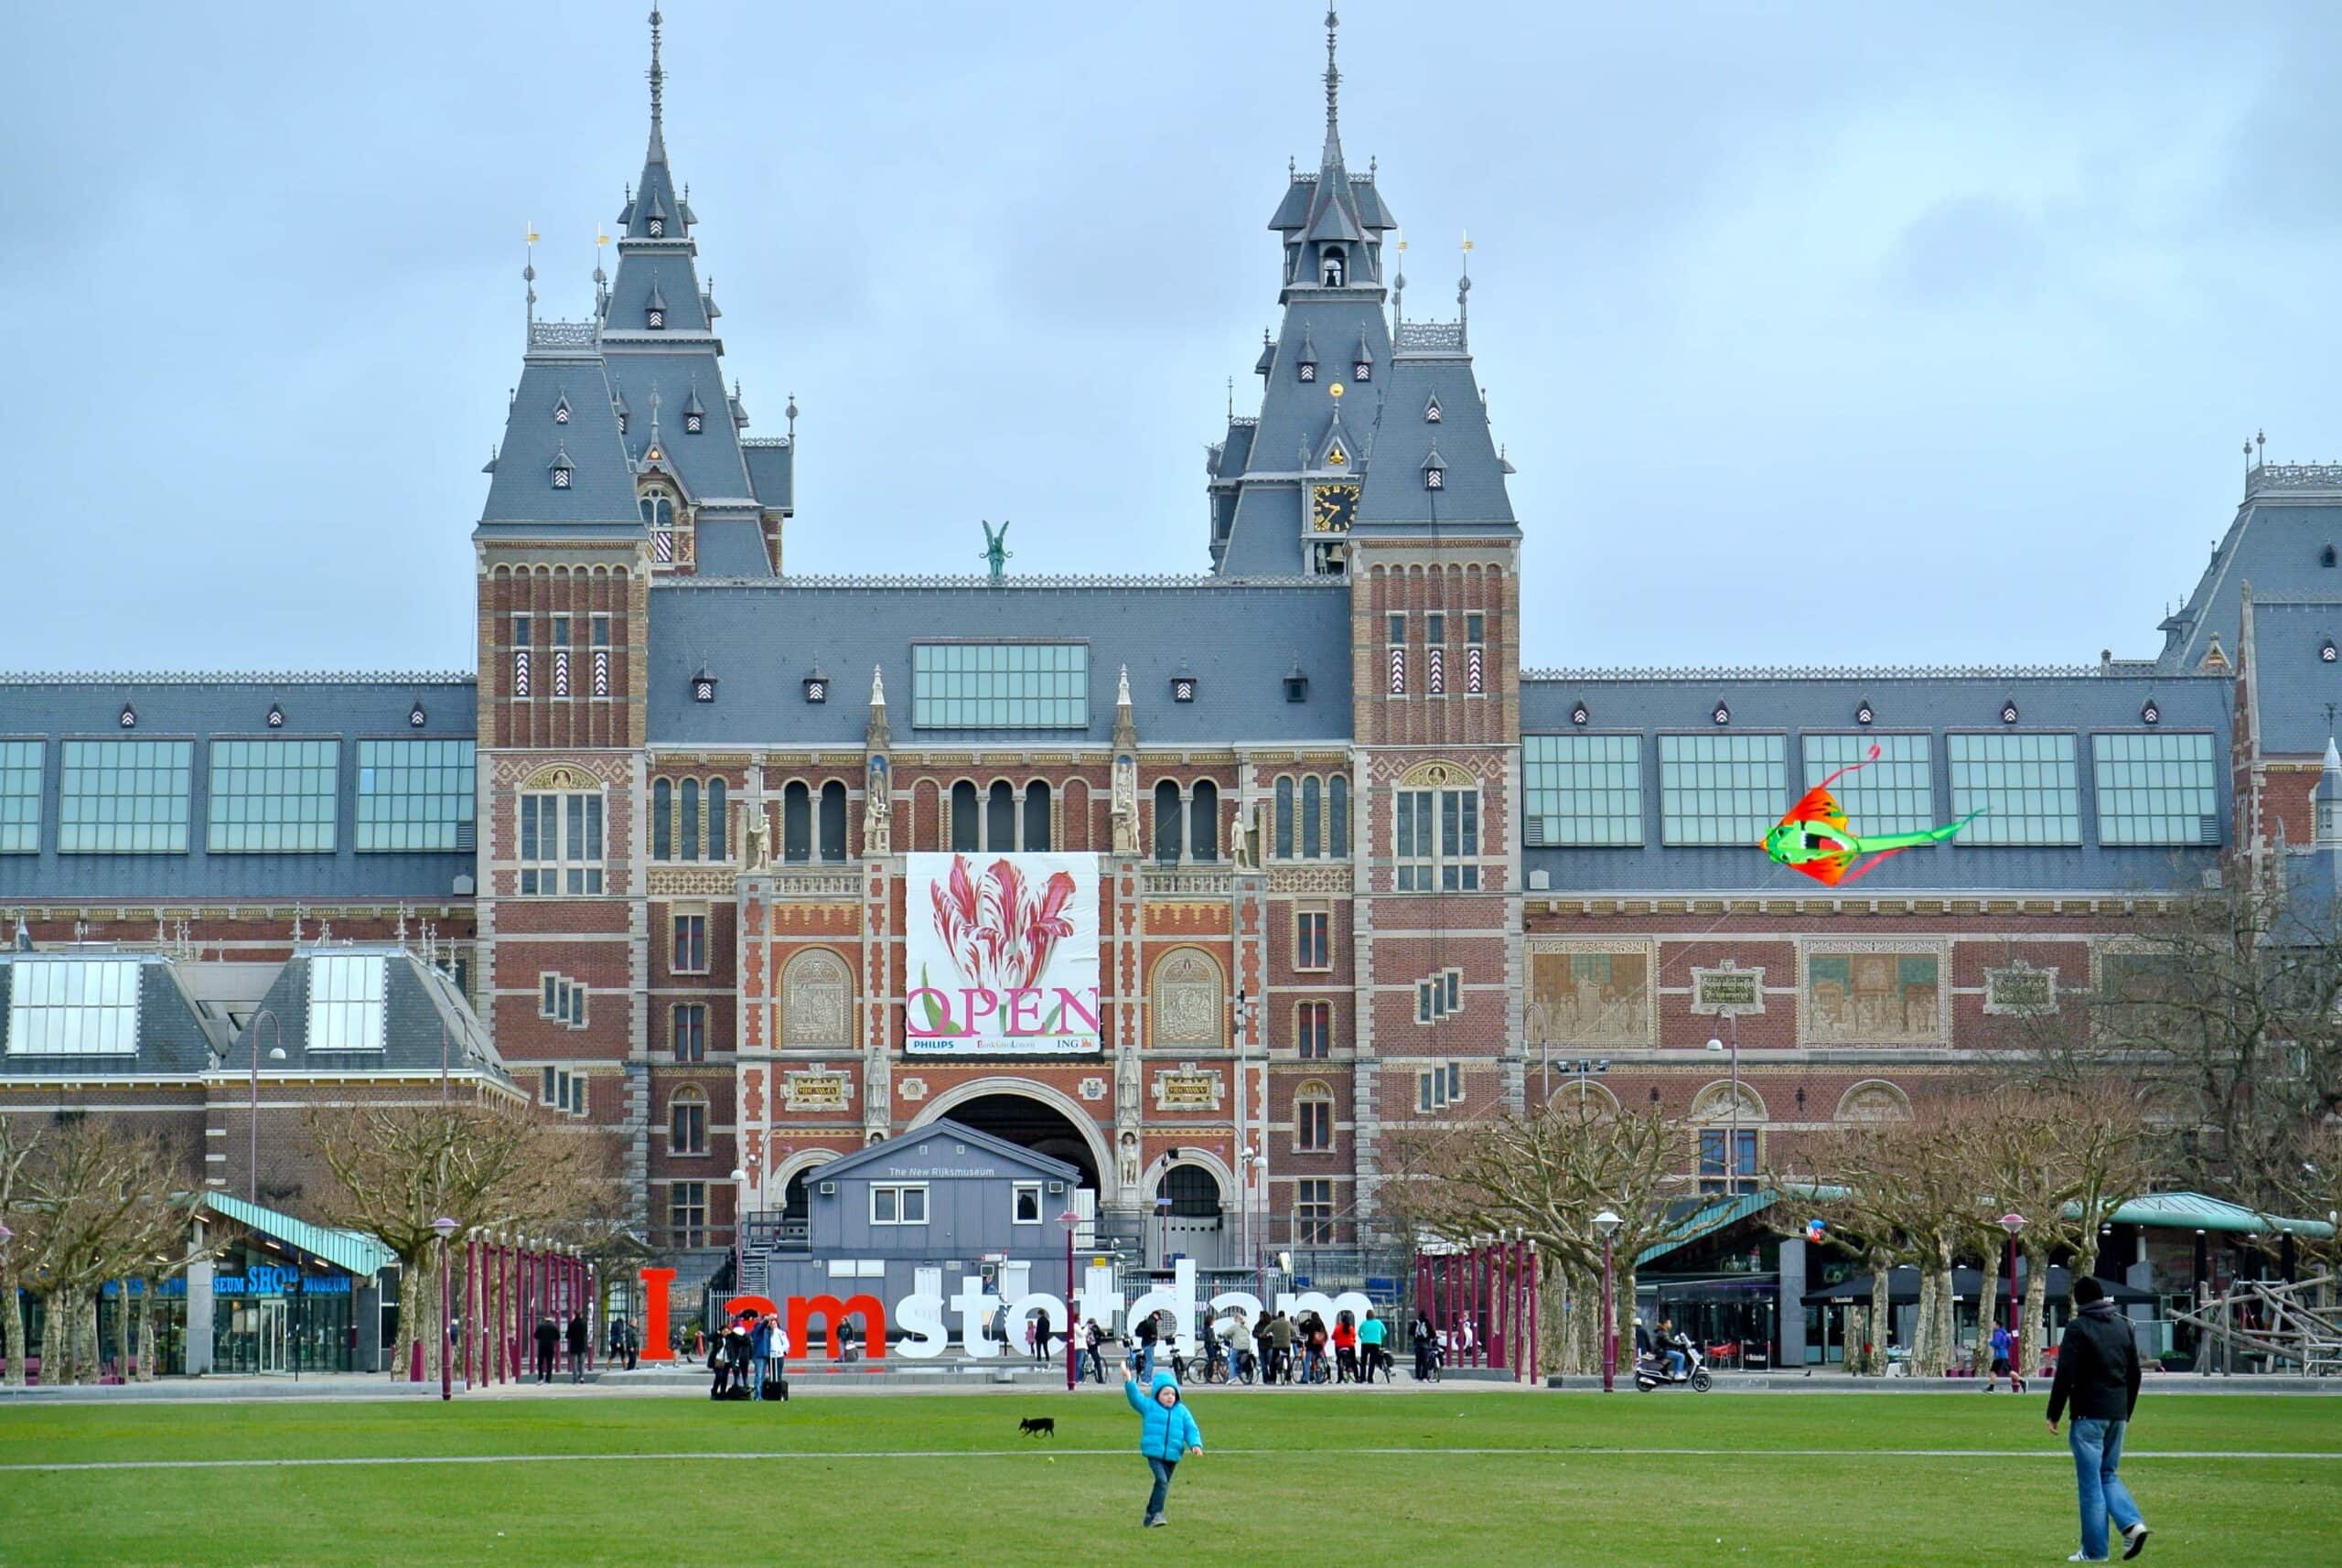
    Then I went to Amsterdam, walked into the Rijks museum and saw this wall and a lightbulb when off in my brain.  – Actually my husband said “why don’t we paint the dining room like this?”  *wink*
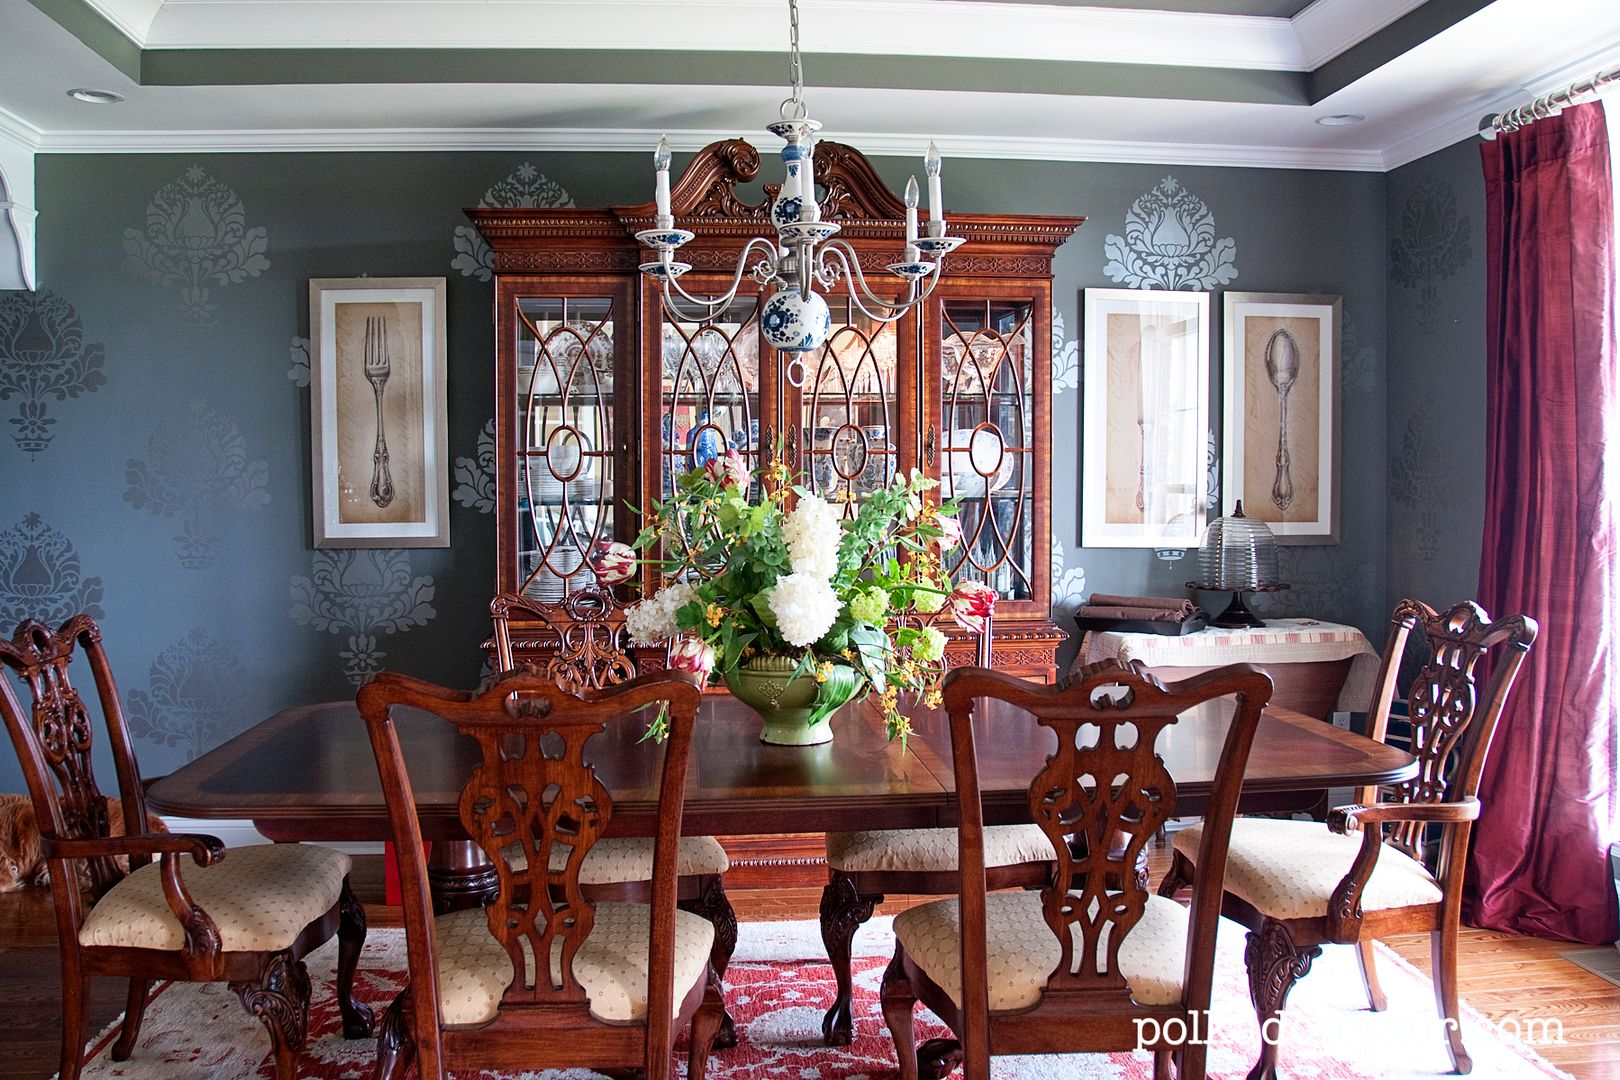
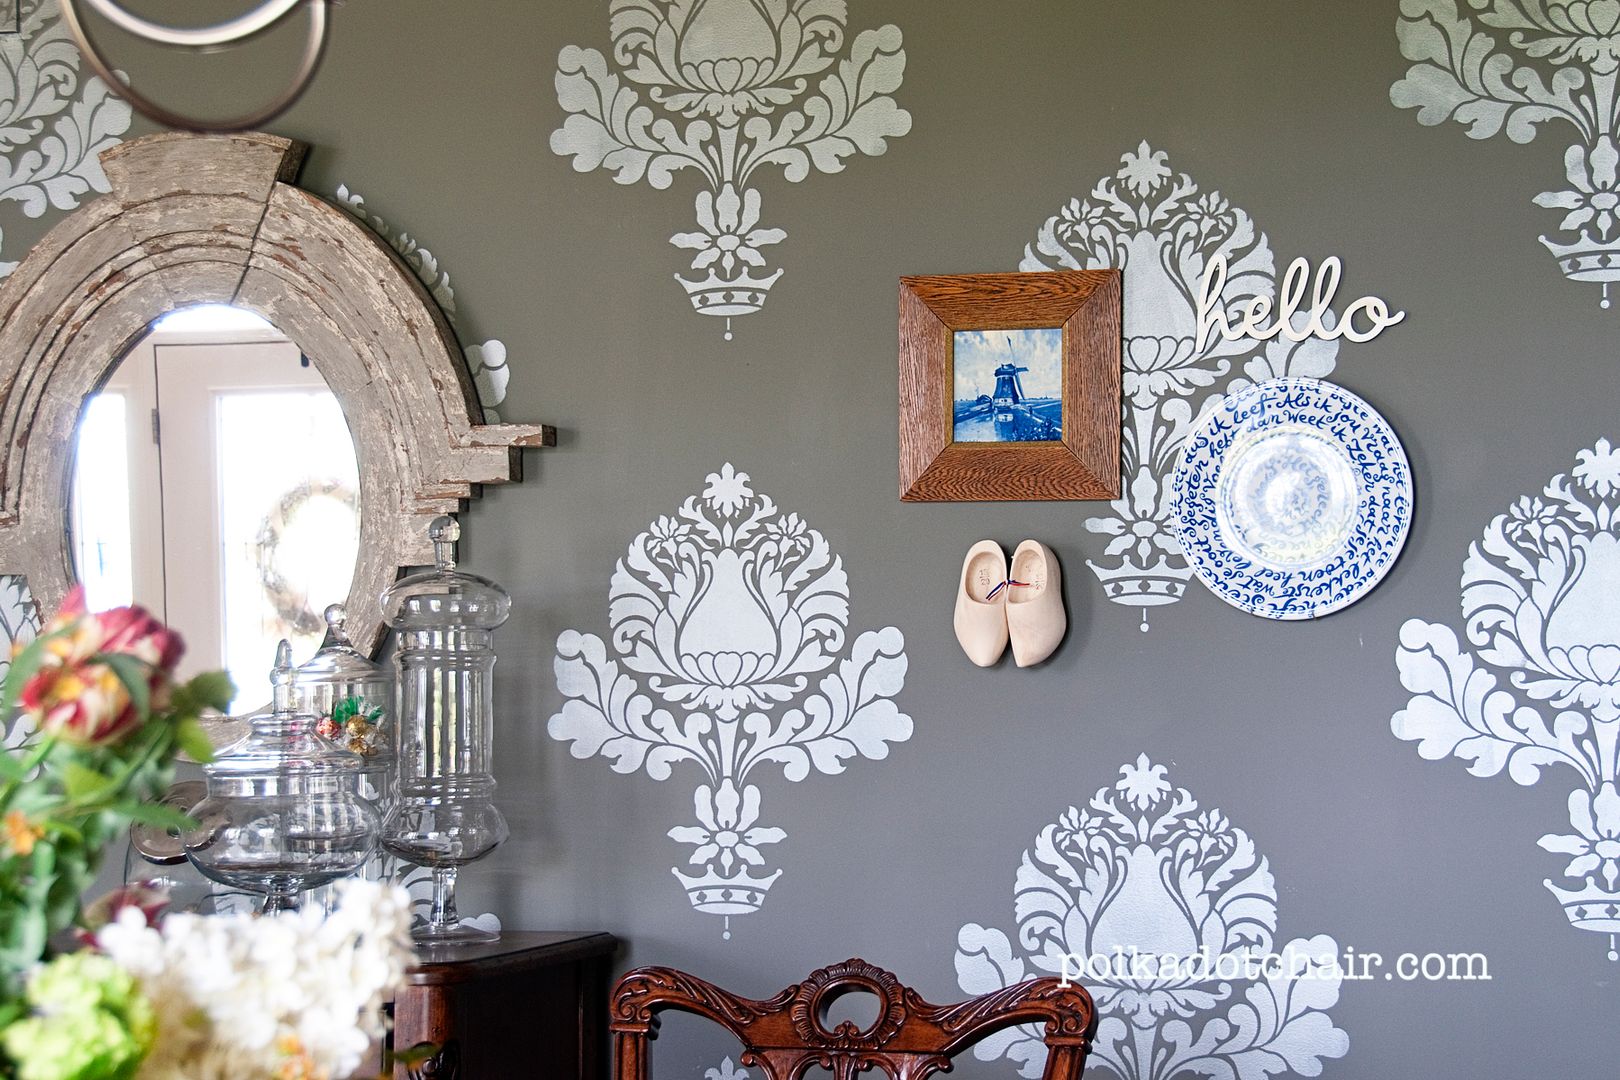
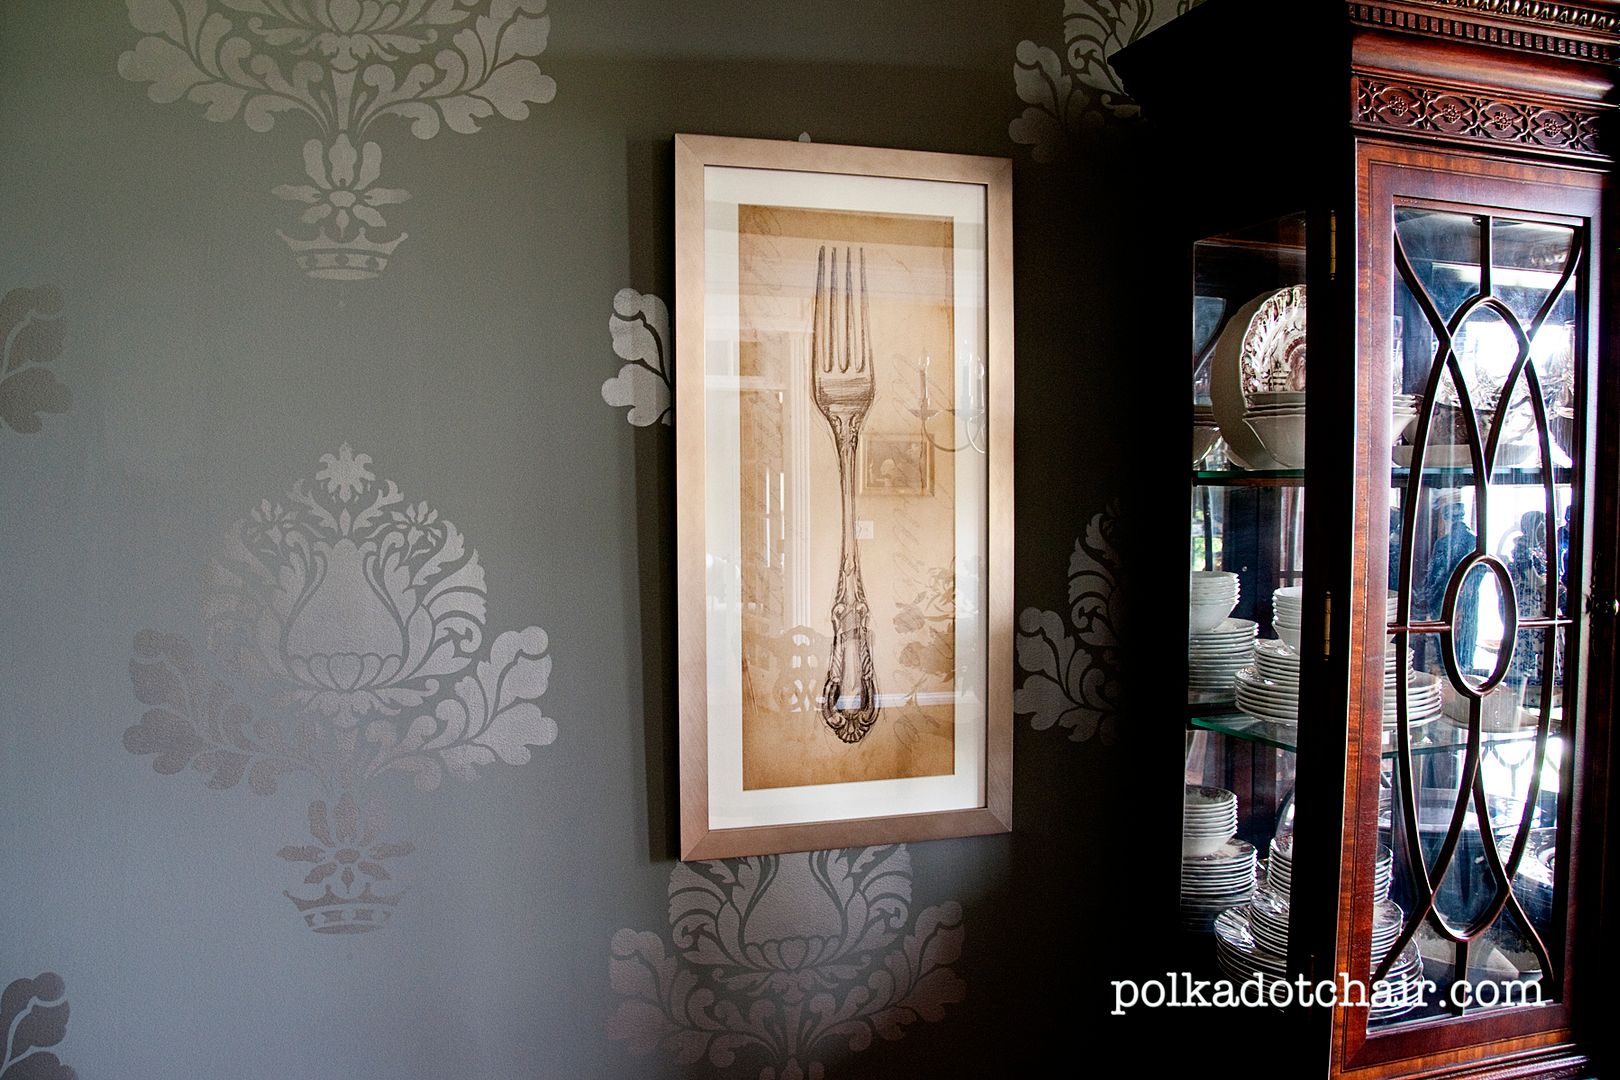
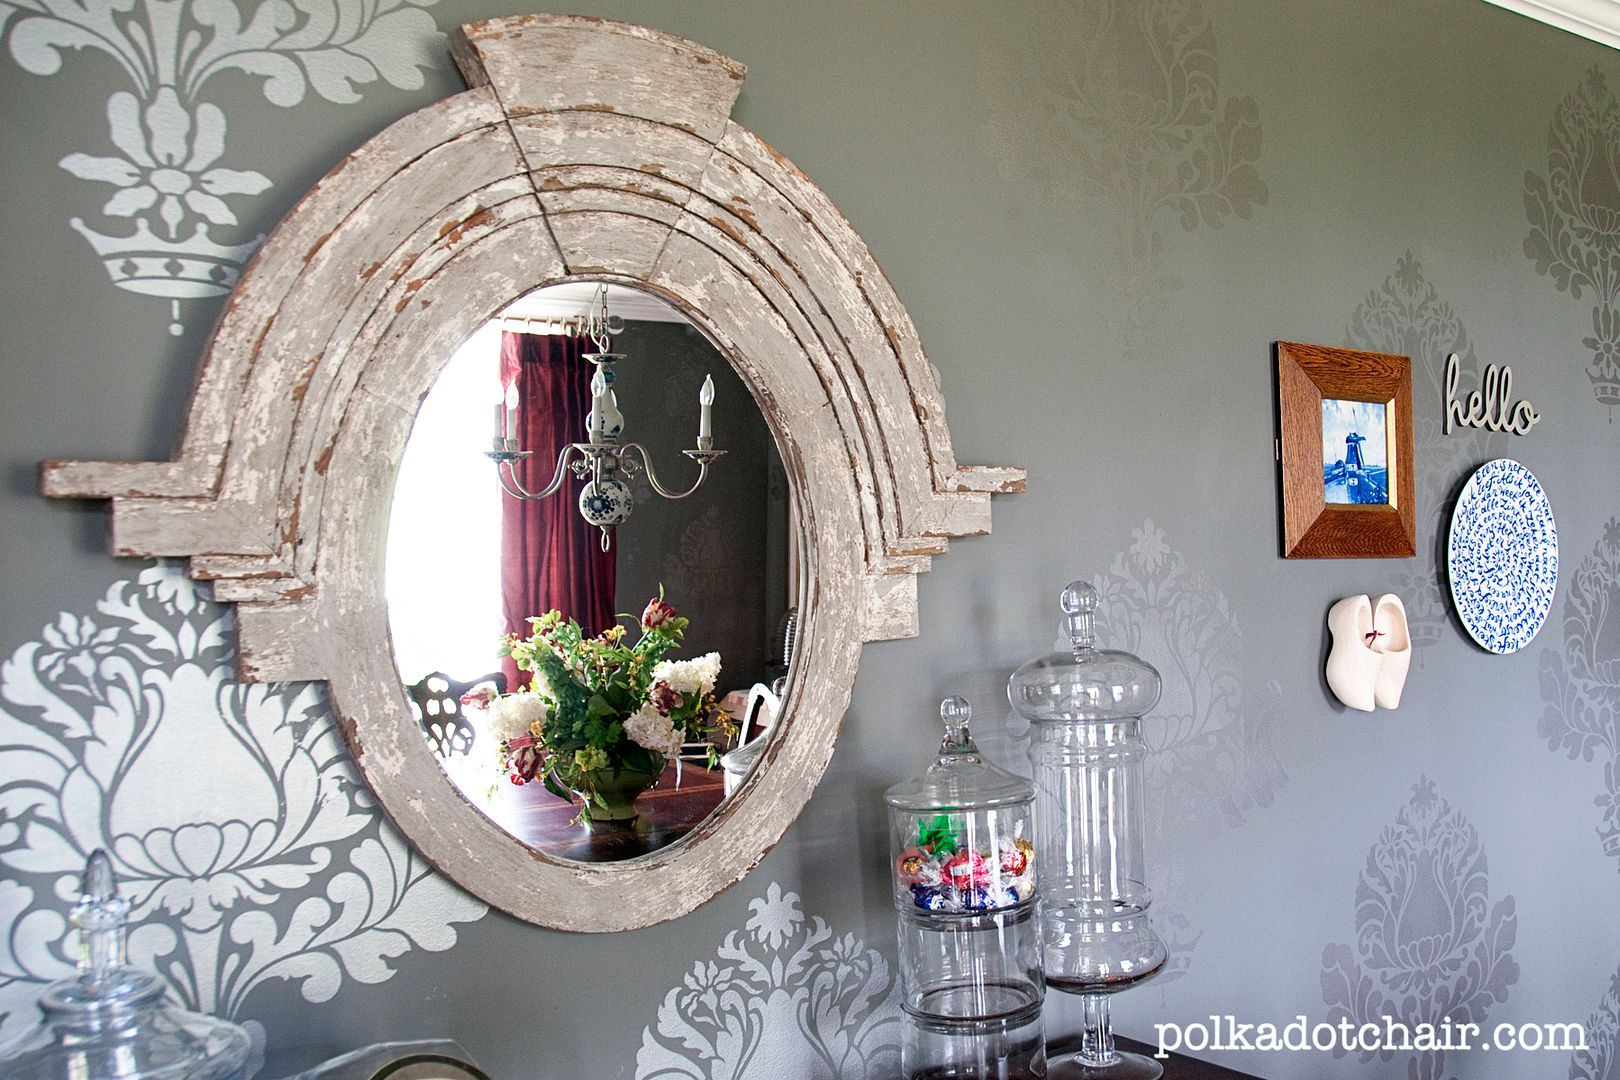
    Gray… I don’t know why I didn’t think of gray before… it’s a great neutral but it’s not beige. Gray would be perfect!
    I didn’t have the budget to totally revamp the room, just chose instead for a few new accessories.
    Wall Stencil with Metallic Paint
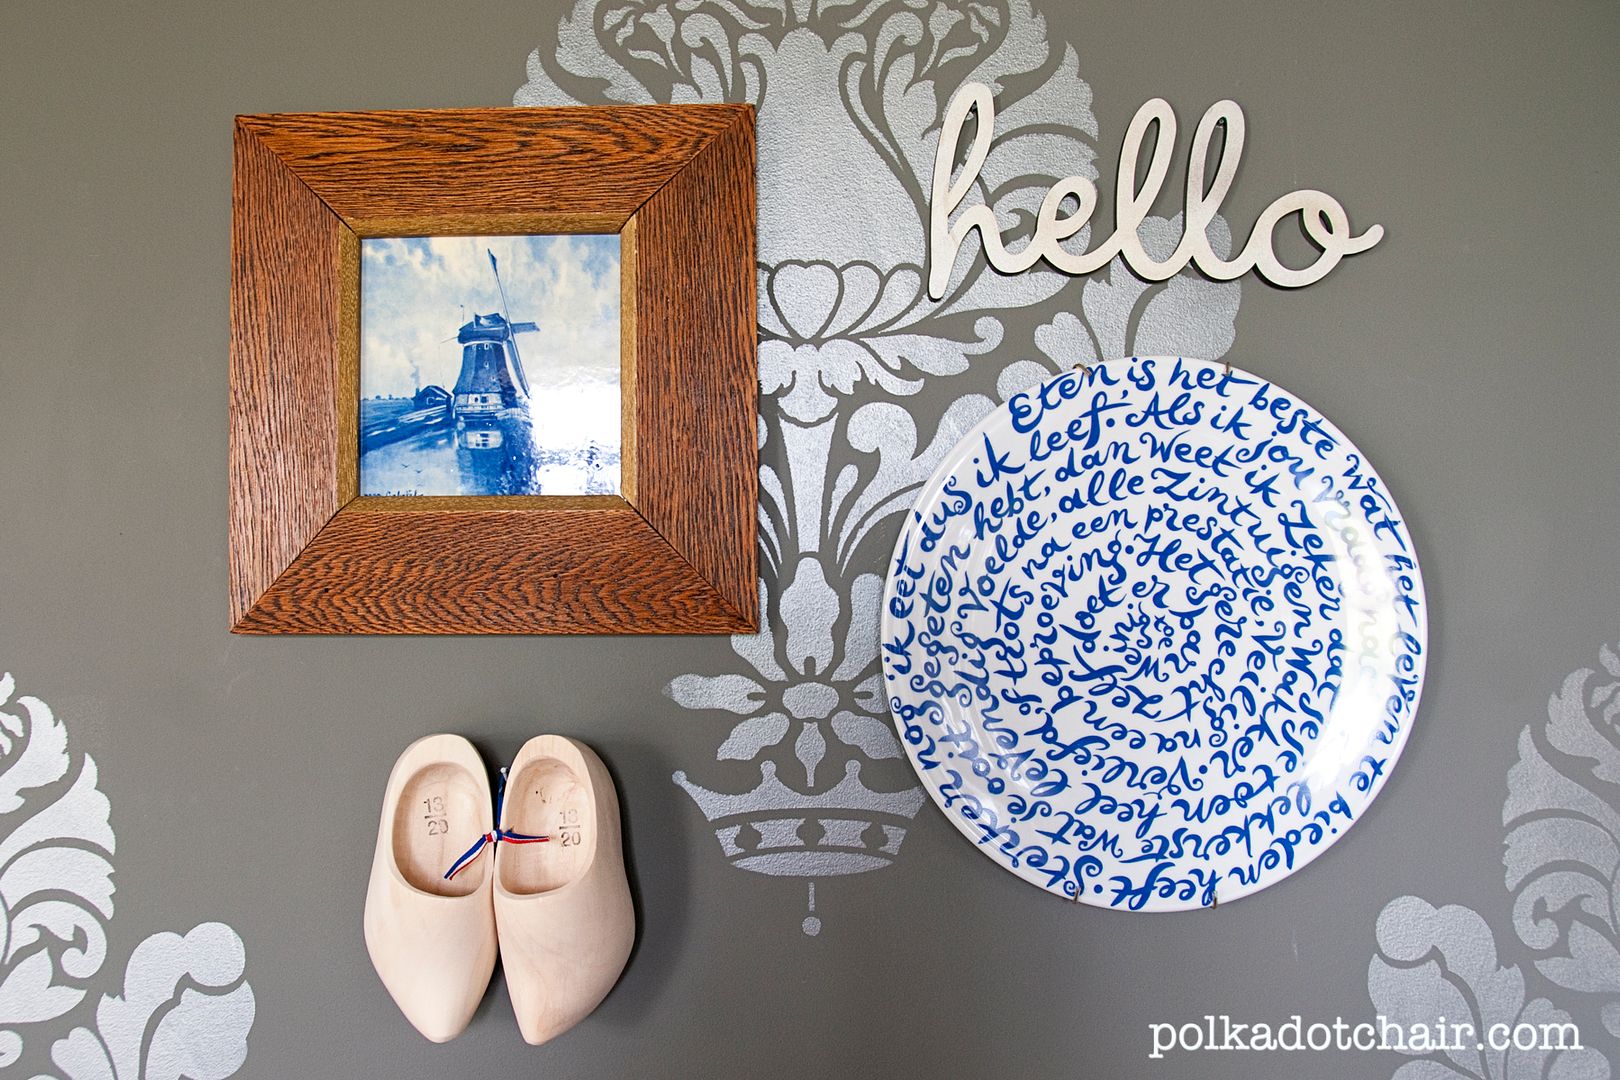
    We’ve managed to collect quite a few Delft and Dutch  items over the years. My husband had some from his time in the Netherlands 20 years ago and I picked up a few on our last trip (the hello is from Queen Bee Market at SNAP).   With this in mind I decided to go for an Old European feel in our dining room.
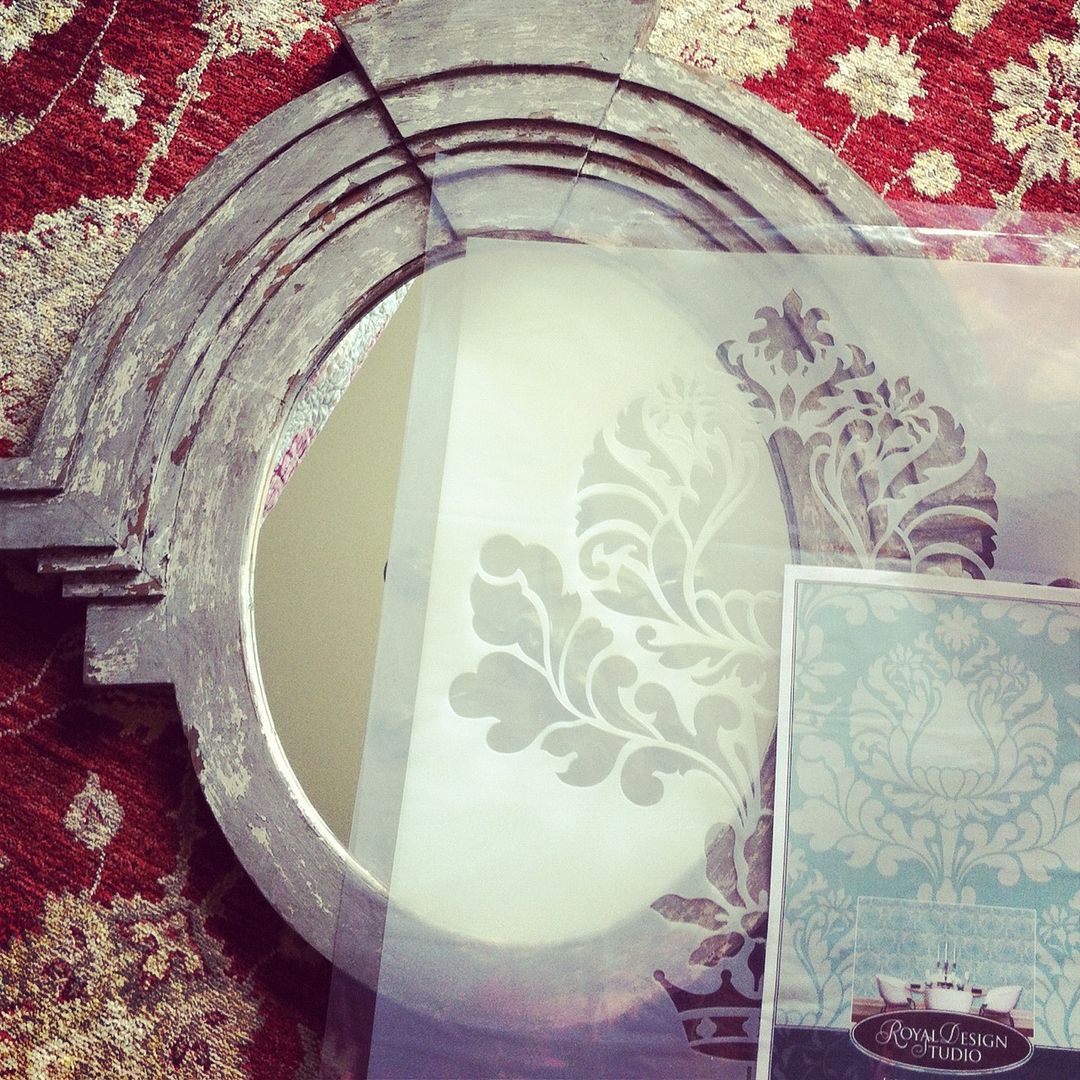
    I picked up this mirror at a local boutique and Royal Design Studio sent me this AWESOME stencil to work with! —  they are going to be giving one away to a lucky reader- (don’t enter on this post, it’s coming soon!)
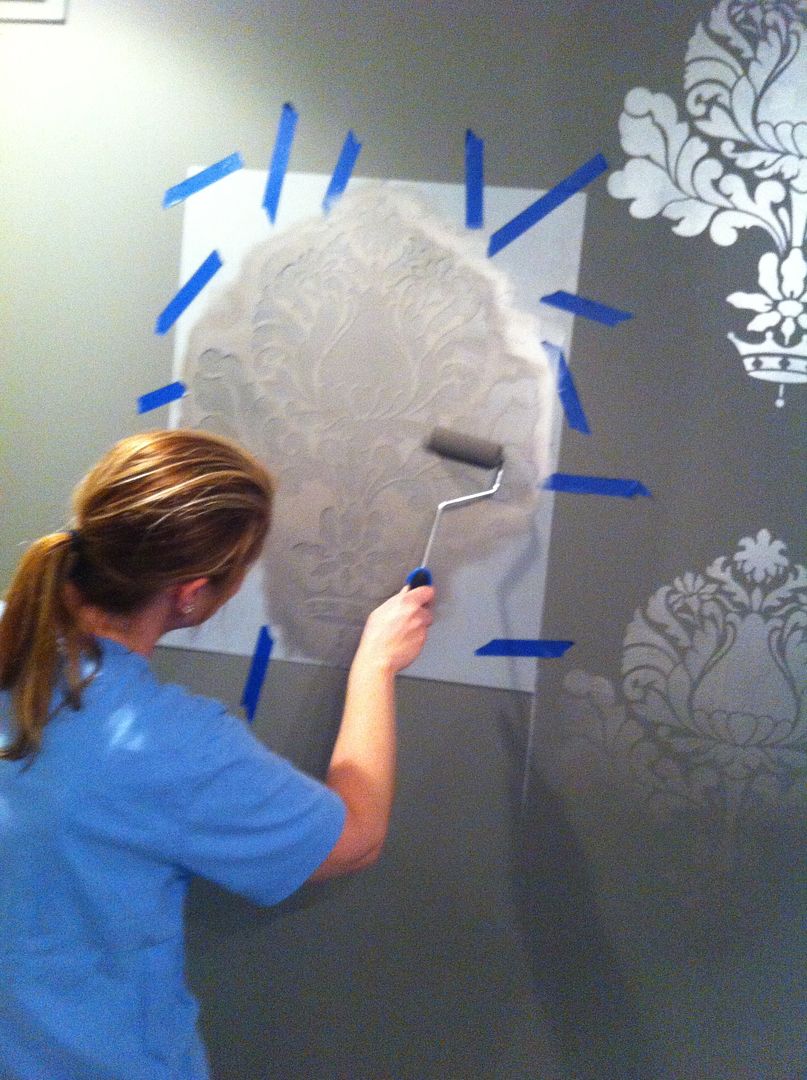
    The stencil was REALLY easy to do.  I was honestly surprised. I thought we’d get ourselves into some kind of hot mess and wish we’d never started this project.  But we didn’t. I took 2 people to do it so we only worked at night.  It ended up taking us 3 evenings to finish our entire dining room. It was not hard. I PROMISE.
    Here’s a few tips I learned:
    1- Paint the base coat in flat paint.  It absorbs the stencil paint rather than letting it just “slip” off the wall.  I’ll admit that flat paint is not my favorite, but it worked very well for this project. The stencil came out crisp and clean almost every time.
    2- Map out how you want the stencil to lay on your wall before you start.   Continue the stencil around and into corners. It will give it a more natural look. You can just bend the stencil in the corners.
    3- Use a foam roller brush.  For some reason I thought I should use a stencil brush, but no… Use a foam roller.
    How to Stencil A Wall
    4- A few MUST HAVE things in my opinion to do this.  Painters tape, a laser level, chalk & a vertical level.  You can use the chalk to mark where to put your next stencil (it will just wipe off your paint later).
    5- Fill up your paint roller with paint, then roll it onto a stack of paper towels to blot it.  (I bought the blue industrial paper towels at Lowes, I thought they worked better than the kitchen ones).  You want the roller to look almost dry. It takes less paint than you think.
    We chose not to paint an overall pattern with the stencil, I wanted to really use that wall at the Rijks museum as inspiration.  So I just figured out how far apart to put each stencil and stuck with that around the room. If you want and overall pattern the stencil comes with guides so that you can line each one up.
    And since I know you’ll ask:
    Paint Base Color:  Amherst Gray from Benjamin Moore
    Stencil Paint: Valspar Brillant Metals in Tempered Pewter
    Stencil:  Large Corsini Damask from Royal Design Studios   (did you notice, it’s a tulip!?)
    Two Tone wall stenciling, uses metallic paint
    I must say that I’m thrilled with how the room came out.  The way the metallic paint changes colors all day is beautiful, and I think the gray looks quite elegant.
    I still need to pick up a few new accessories for that cabinet top in the corner, and my placemats now look all out of place, but I’m not in a rush- I like that part of the design process. I figure I’ll just collect items slowly.

    I added the Fork, Knife and Spoon prints too.  I’m not sure if they are too literal.. but I like them and the gray and the warm tan tones seem to work well in the room.

    I’ve still got quite a few projects left to do in here. Including changing out the fabric on the chairs (it’s yellow and doesn’t match anymore) and making some roman shades for the windows. – I just need to pick some fabric, wonder if that will take me another 4 years to decide?  I also need to refinish that little gate leg table in the photo above. It was my Grandfathers so I need to do it “right”.

    Around the corner is a butler’s pantry. We are still working on that- painting the cabinets and such. I’m going to hang my collection of blue transfer ware plates on the wall over there.  And since the room seemed to be getting a wee bit too serious, I picked up this guy,

    to add a bit of humor. I’ll be sure to share that when I get it done. UPDATED: Click here to see the plate wallhow-to-stencil-a-wall

    TDC Before and After

    post signature

    More Projects You May Enjoy

    • How to Make a Magnolia Wreath
    • How to Make Book Page Wreath that’s Perfect for Fall
    • How to Hang Outdoor Drapes & DIY Outdoor Curtain Rods
    • Kentucky Derby Craft Ideas for Cricut Machines

    • Share
    • Email

    About Author

    Melissa Mortenson

    Melissa Mortenson is a blogger, designer, and content creator. She is the Polka Dot Chair blog founder and has been sharing fresh and creative ideas with readers since 2008. She is the author of “Project Teen, Handmade Gifts your Teen will Actually Love.” Her work and designs have been featured on HuffPost, TODAY, Pioneer Woman, HGTV, BuzzFeed, Better Homes & Gardens, and many other established publications. Her first fabric line, “Derby Style,” debuted in January 2015 through Riley Blake Designs.  Additional fabric collections have followed it in subsequent years. A mom of 3, she considers herself lucky to be living in Kentucky.

    Reader Interactions

    Comments

    1. chris says

      May 25, 2012 at 12:03 pm

      It looks awesome! I am hoping to be able to add a bit of stenciling in our new house.

      Reply
    2. Natalia Bonner says

      May 25, 2012 at 12:07 pm

      i love it! It’s beautiful!! 🙂

      Reply
    3. Melanie says

      May 25, 2012 at 2:48 pm

      Melissa MY DEAR! I have to tell you…I have done a LOT of stenciling and seen a LOT of stenciling, but I think that this is one of the most beautiful and simply elegant stencil projects I’ve ever seen! You totally captured the look and vibe of the museum walls and am so proud to share and shout about this use of our Corsini Damask stencils. Thank you so much for making it look-divine!

      Reply
    4. Shayla Sharp says

      May 25, 2012 at 5:23 pm

      I’ve never really been a fan of the grey wall trend–Oregon is way to overcast for me to want grey inside too–but this really looks nice! The stencils add just the right touch to still accommodate the use of room accessories without becoming visually crowded–well done!

      Reply
    5. Katy Cameron says

      May 26, 2012 at 6:24 am

      It looks fab! Love the deer head too lol

      Reply
    6. Ann says

      June 04, 2012 at 11:00 pm

      Awesome! I love how you “moderned up” and personalized the damask walls with your cute little touches: the clogs, the cheeky cutlery prints. Its great and so meaningful. Love love love it!!

      Reply
    7. Amina Ridge says

      January 31, 2014 at 8:24 am

      What was the name of the red paint? I want it! Thanks in advance.

      Reply
      • Melissa Mortenson says

        January 31, 2014 at 1:19 pm

        I don’t know, I’m sorry! It was there when we built the house.

        Reply

    Leave a Reply Cancel reply

    Your email address will not be published. Required fields are marked *

    This site uses Akismet to reduce spam. Learn how your comment data is processed.

    Primary Sidebar

    Hello! It’s nice to meet you.

    I’m Melissa. I like to design things, like fabric, printables, and projects.

    I’m also a Mom and a Maker. I am like most of you, just trying to do my best every day. Some days I succeed, many days I fail.  I find joy in creating, if you do too, then I hope that you find something here bring a little “happy” to your life.  Find out more about me here.

    COPYRIGHT POLICY

    All my images and text are copyrighted. You may NOT use any images from this site in any kind of Video (this includes YouTube). If you would like to feature my work, you may use ONE (1) NON-COLLAGED image and must “follow” link back to my original blog post. You may NOT edit, crop, or change my images in any way without written permission. You MAY NOT print out or copy and distribute any text, images or patterns from this site. All patterns, content, instructions, and templates are for personal use ONLY! Thank you! Violators will be reported.

    Footer

    ↑ back to top

    About

    • Privacy Policy
    • Disclaimers
    • About Melissa
    • Instagram
    • Facebook
    • YouTube
    • Pinterest

    Newsletter

    • Sign Up! for emails and updates

    Contact

    • Contact
    • FAQ
    • Press
    • Published Books
    • Fabric Collections

    Welcome to the Polka Dot Chair! Here you’ll find easy, step-by-step, sewing, quilting, and crafting projects. We design projects for Makers of all skill levels. Beginners are welcome!

    DISCLAIMER:

    While every effort has been made to ensure the accuracy of the content on this website, the information is made available without warranty of any kind. The Polka Dot Chair accepts no responsibility or liability, whether direct or indirect, as to the currency or accuracy of the information, nor any consequence of its uses. This website is not intended to substitute the advice of a professional.

    Copyright © 2022 Polka Dot Chair

    [ Placeholder content for popup link ] WordPress Download Manager - Best Download Management Plugin