• Skip to primary navigation
  • Skip to main content
  • Skip to primary sidebar

The Polka Dot Chair logo

  • SEWING
    • Free Sewing Patterns
    • Bag Patterns
    • Costumes
    • Apparel
    • Learn to Sew
    • Beginner Friendly
    • Embroidery Projects
    • Tips & Techniques
    • All Sewing
  • QUILTING
    • Quilt Blocks
    • Learn to Quilt
    • Free Patterns
    • Quilt Patterns
    • All Quilting
  • CRAFTS
    • Disney
    • Cricut
    • Printables
    • All Crafts
  • HOLIDAYS
    • Seasonal Projects
    • Valentine’s Day
    • Easter
    • 4th of July
    • Halloween
    • Thanksgiving
    • Christmas
    • All Holidays
  • TUTORIALS
  • ABOUT
    • About Me
    • My Fabric Collections
    • Published Books
    • Press
    • FAQ’s
    • Contact
  • SUBSCRIBE
  • SHOP
menu icon
go to homepage
subscribe
search icon
Homepage link
  • SHOP
  • ALL PROJECTS
  • SEWING
  • QUILTING
  • CRAFTS
  • HOLIDAY PROJECTS
  • ABOUT
    • Published Books
    • My Fabric Collections
    • Facebook
    • Instagram
    • Pinterest
    • YouTube
  • ×

    Home » Sewing » Accessories

    Tutorial Tuesday: Laminated Kids Wallet

    Updated: Oct 9, 2016 by Melissa Mortenson · This post may contain affiliate links · This blog generates income via ads · 20 Comments

    I’m so excited to share with you my first “tutorial tuesday”.   I am going to try my best to give you a new tutorial each week… Just because I’ve started my little shop does not mean that there will still not be  ideas here on my blog!  I’m sure I’ll miss a week or two here or there, but I’m going to try my hardest to get them for you each week.
    I will be doing tutorials for all kinds of things sewing, scrapbooking, crafts, mini books, home decor etc. I will list the products I used for each item with measurements, details and tips… *note: if your a company with a product that you would like me to feature in a tutorial,  contact me I’d be glad to work with you. If I am ever asked by a company to feature a specific project, I’ll be sure to tell you upfornt in the tutorial.*
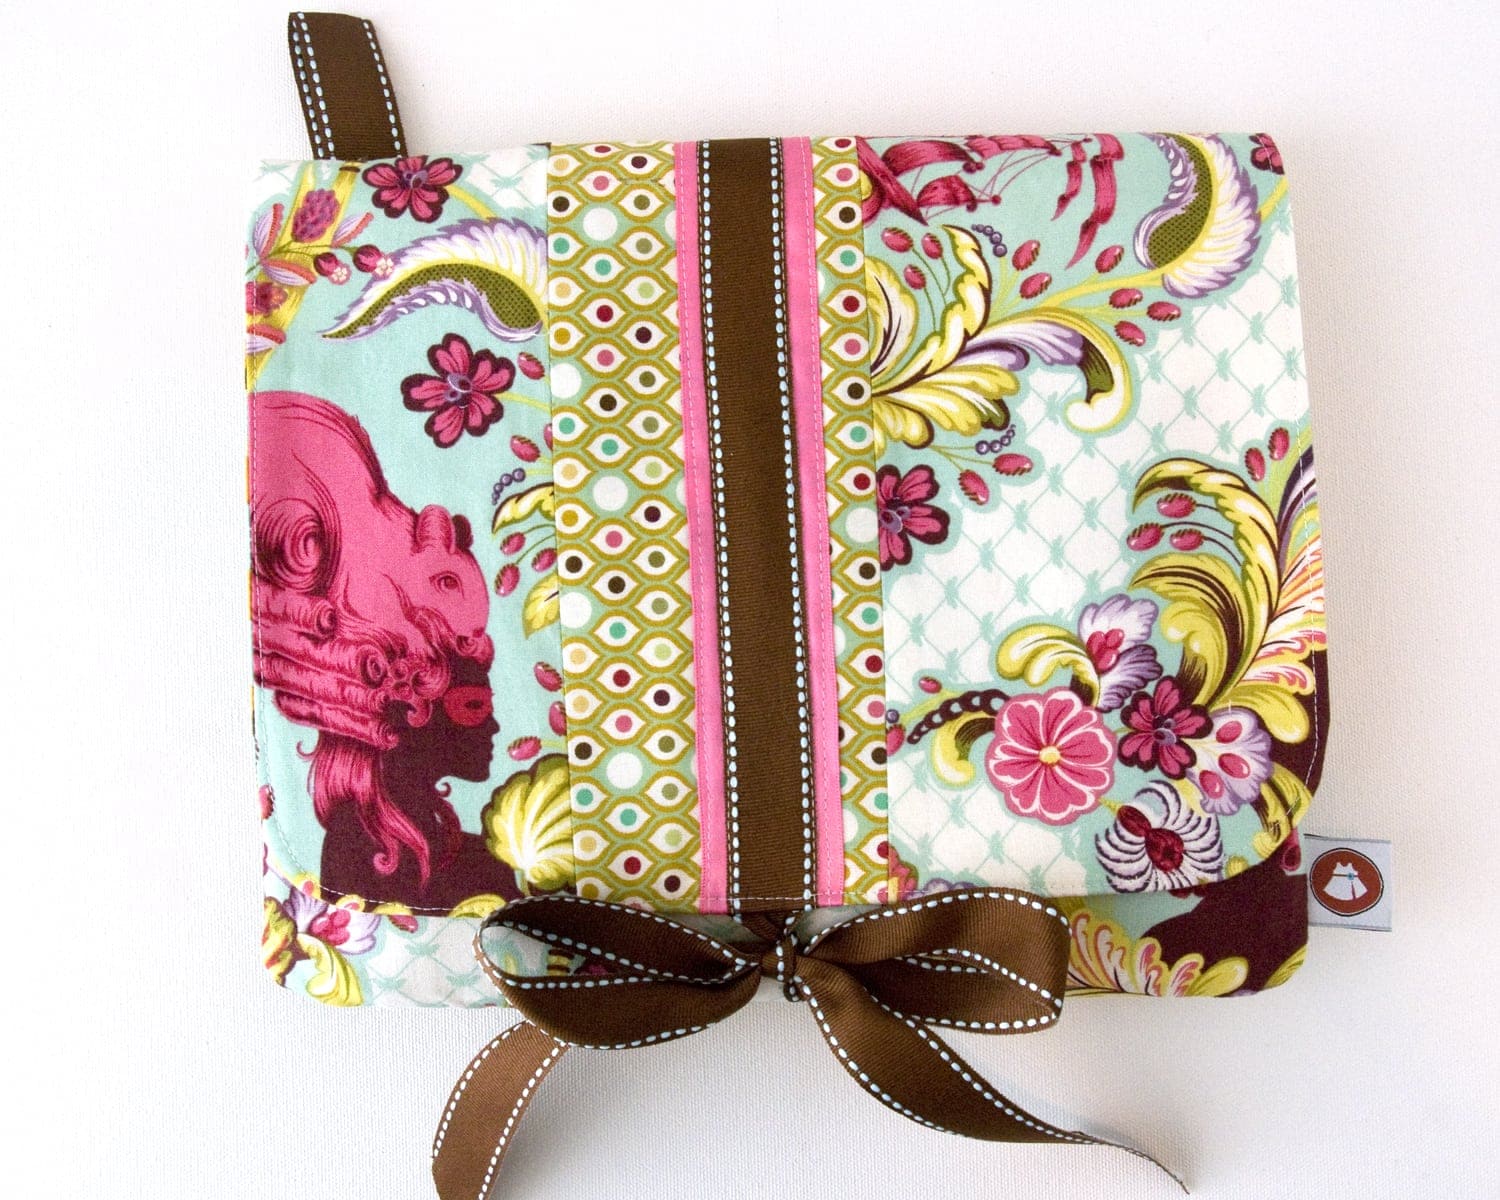
    So for today’s tutorial…. Laminated Kids Wallet
    My son got some money for Valentine’s day from his very sweet Grandma. He promptly put it on his dresser.  We  operate on the “bank of Mom” at our house.. we have a “ledger” listing the money that the kids earn and spend… Mom usually does the spending, then it gets subtracted from the list … they only have cash when we “cash out” for things like tithing, movies with friends, special shopping trips,  etc… I know others have different systems, but after 14 years, this is what works for us.
    Anyway, my point is… Andrew does not usually have much cash on him.  So when I saw the $ sitting on the dresser I knew it was going to get lost.   I decided that he needed a wallet.. I was worried about a little one that fit in his pocket (it would get washed or lost) so I decided to make him a checkbook sized one.
    He had fun picking out the fabric …
    I was very excited with how it turned out… until my husband told me it looked like a girls wallet… I was a bit crushed… but the next morning Andrew woke up and saw it and LOVED it! I still think it makes a good wallet for a boy… we will just have to disagree 🙂
    Okay to begin:
    You will need:
    -Heat N Bond Iron on Vinyl. You buy it in a package on a roll. I got mine at Joann’s… it was hanging on the wall by the other interfacings (like wonder under)
    – scraps of fabric
    -package of ½″ double fold bias tape & matching thread
    – 7″ zipper
    -magnetic snap
    Step 1:
    Cut from your fabric
    2 pieces 8″x8″
    1 piece 3″ x 8″
    1 piece 2″ x 8″
    1 piece 1.5″ x 8″
    Cut the same pieces from your iron on vinyl.
    Peel the vinyl off the sheet and place sticky side down onto the right side of the fabric. Lay the protective sheet over the vinyl and press.  *tip: If you ever use a big piece of vinyl, save the protective layer.. it’s much easier to iron if you have a big sheet to lay over it*
    Do this will all your fabric pieces.
    Take the 1.5″ x 8″ piece of fabric and pin right side down to one side of the zipper (right side of the zipper is up).  Sew.
    Place the 2″ x 8″ piece of fabric on the other side of the zipper (also right side to right side) and sew. You will have to move the zipper pull as you sew to get “around” it…
    Turn to the right side and using a protective sheet press.  (you never want ANY part of your iron to touch the laminated surface of the fabric).

    Cut 2 pieces of bias tape 8″ long.  Place over one side of the 3″ x 8″ fabric and the 1.5″ x 8″ piece of fabric. Sew, using same color thread.

    Lay your zipper piece and your pocket piece on top of one of your 8×8 pieces.  You want the right side of the 8×8 piece to face the wrong side of your zipper/pocket pieces.
    Sew around all 4 sides, close to the edge (so that the stitching will not show after you apply your bias tape).
    On the section with the zipper. Also stitch across the top of the bias tape to make an enclosed space for your coins.
    Place your other 8×8 piece of fabric behind the piece you just sewed.  Wrongs sides together. Pin well
    Place bias tape around the edge.  Stitch in place. When you get ¼″ away from a corner, stop sewing and cut your thread.
    At the corner fold over your bias tape to make a neat corner. Pin in place. Continue sewing down next side. Repeat for other corners.  When you get to the end, cut your bias tape and fold under ¼″.  Sew down.
    Attach magnetic snaps to the inside of the wallet. Make sure you ONLY go though the top layer of fabric!  Attach according to the directions on the package.
    You are done!


    More Projects You'll Love!

    • Bow Pillow Sewing Pattern by Melissa Mortenson of polkadotchair.com
      Bow Pillow Sewing Tutorial
    • Cute ideas for summer journals for kids. Would be great for road trips!
      Kids Summer Journal Ideas
    • Learn how to sew a pillow case dress with this Pillowcase Dress Tutorial. Includes full instructions and a chart to help you resize the dress for various ages. The quickest dress you'll ever sew!
      Free Pillowcase Dress Pattern & Size Chart
    • Tiered Pillowcase Dress Sewing Tutorial by Ameroonie Designs
      Tiered Pillowcase Dress Tutorial
    « How to Make a Book Page Banner
    Tuesday Tutorial: Scripture Case from a pair of Jeans »

    • Share
    • Email

    About Author

    Melissa Mortenson

    Melissa Mortenson is a blogger, designer, and content creator. She is the Polka Dot Chair blog founder and has been sharing fresh and creative ideas with readers since 2008. She is the author of “Project Teen, Handmade Gifts your Teen will Actually Love.” Her work and designs have been featured on HuffPost, TODAY, Pioneer Woman, HGTV, BuzzFeed, Better Homes & Gardens, and many other established publications. Her first fabric line, “Derby Style,” debuted in January 2015 through Riley Blake Designs.  Additional fabric collections have followed it in subsequent years. A mom of 3, she considers herself lucky to be living in Kentucky.

    Reader Interactions

    Comments

    1. Anna says

      February 23, 2010 at 9:16 am

      way cute and I think I’m definitely going to have to try the iron on vinyl 🙂

      Reply
    2. Sharon -- The OKI Stampqueen says

      February 23, 2010 at 9:19 am

      Very cute—and it’s “boyish”! Don’t worry-my husband tells me anything that isn’t camaflage is “girly” looking! Men! Lol. Blessings, Sharon

      Reply
    3. Purple Quilter Queen says

      February 23, 2010 at 11:26 am

      That is so cute! Jenn

      Reply
    4. Kitschalicious says

      February 23, 2010 at 12:30 pm

      My son has a Mickey Mouse Clubhouse wallet he doesn’t use anymore because it’s for “babies”! LOL! This will be a perfect project to remedy “lost” money. I love the idea having your son pick out the fabric. Awesome!

      Reply
    5. Marg says

      February 23, 2010 at 4:25 pm

      Fabulous, and thanks for the tutorial.

      Reply
    6. PHARES CAUSEY says

      February 23, 2010 at 5:19 pm

      So cute! I have not tried the iron on vinyl! Can’t wait to get some!

      Reply
    7. Kimbo West says

      February 23, 2010 at 6:42 pm

      I love it. Like LOVE IT. THanks so much for the great idea!

      Reply
    8. KristinTheLockstar says

      February 23, 2010 at 7:15 pm

      I LOVE the fabric! What is it/Who makes it/Where did you find it?

      Reply
    9. Jess says

      February 24, 2010 at 2:50 am

      ooooh! Love it! I will make one for me, i think!

      Reply
    10. casserole says

      February 24, 2010 at 10:43 am

      Love it!! The laminated fabric is awesomeness!!

      I blogged about your tutorial on Craft Gossip Sewing:
      http://sewing.craftgossip.com/tutorial-laminated-fabric-wallet-for-kids/2010/02/24/

      –Anne

      Reply
    11. luvinthemommyhood says

      February 24, 2010 at 12:08 pm

      Such a great and fun idea! Love it! I added this to our “link luv roundup” today!
      http://www.luvinthemommyhood.com/2010/02/link-luv-roundup_24.html Come by for a peek 🙂

      Reply
    12. Rachel@oneprettything.com says

      February 24, 2010 at 2:19 pm

      I love that laminated fabric. What a great idea. Thanks so much for this, I’ll be linking.

      Reply
    13. Skebba says

      February 25, 2010 at 8:06 pm

      Sa-weet! I’ll have to keep my eyes out for that vinyl stuff, how neat is that!

      Reply
    14. Kim @ Everything Etsy says

      February 26, 2010 at 1:38 am

      This is so cute. I just did a post about oilcloth. I love the bright colors! Thanks for the inspiration.

      ~Kim

      Reply
    15. jaya pratheesh says

      March 23, 2010 at 10:14 am

      i made a mini wallet using the same idea… you can see it here: http://www.burdastyle.com/projects/spring-mini-wallet

      i used normal contact paper to make the plastic layer. yours is very cute, i will link to it!

      Reply
    16. Jackie says

      November 30, 2010 at 3:49 pm

      Thanks for the tutorial. I made three of these over the weekend as Christmas presents for my boys.

      Reply
    17. Tracy King says

      March 21, 2011 at 6:45 pm

      Why do men always have to say the wrong thing? Sometimes I think they are just jealous because we thought of it first!!!

      Great tutorial which will make my son very happy some day soon.

      Thank you so very much!

      Reply
    18. notcathy says

      June 11, 2011 at 11:09 pm

      Great tutorial.. this wallet is perfect for kids.. 🙂

      Reply
    19. jennifer says

      May 24, 2015 at 4:29 pm

      I just had a question. When attaching the pieces to the zipper do you sell them wrong side to right side and then fold it over? I’m just having a little trouble with this step if you could please just give me a little more information. I’m a first time sewer and I’m really excited about this project

      Reply
    20. baby shower invi says

      April 07, 2017 at 10:24 am

      Wait isn’t there an episode of The Simpsons when Homer gets his old concert jacket out when he’s taking Bart and Milhouse to the Spinal Tap concert and he finds a can of Billy Beer in the inside pocket?

      Reply

    Leave a Reply Cancel reply

    Your email address will not be published. Required fields are marked *

    This site uses Akismet to reduce spam. Learn how your comment data is processed.

    Primary Sidebar

    Hello! It’s nice to meet you.

    I’m Melissa. I like to design things, like fabric, printables, and projects.

    I’m also a Mom and a Maker. I am like most of you, just trying to do my best every day. Some days I succeed, many days I fail.  I find joy in creating, if you do too, then I hope that you find something here bring a little “happy” to your life.  Find out more about me here.

    COPYRIGHT POLICY

    All my images and text are copyrighted. You may NOT use any images from this site in any kind of Video (this includes YouTube). If you would like to feature my work, you may use ONE (1) NON-COLLAGED image and must “follow” link back to my original blog post. You may NOT edit, crop, or change my images in any way without written permission. You MAY NOT print out or copy and distribute any text, images or patterns from this site. All patterns, content, instructions, and templates are for personal use ONLY! Thank you! Violators will be reported.

    Footer

    ↑ back to top

    About

    • Privacy Policy
    • Disclaimers
    • About Melissa

    Newsletter

    • Sign Up! for emails and updates

    Contact

    • Contact
    • FAQ
    • Press
    • Fabric Collections

    Welcome to the Polka Dot Chair! Here you’ll find easy, step-by-step, sewing, quilting, and crafting projects. We design projects for Makers of all skill levels. Beginners are welcome!

    DISCLAIMER:

    While every effort has been made to ensure the accuracy of the content on this website, the information is made available without warranty of any kind. The Polka Dot Chair accepts no responsibility or liability, whether direct or indirect, as to the currency or accuracy of the information, nor any consequence of its uses. This website is not intended to substitute the advice of a professional.

    Copyright © 2020 Polka Dot Chair

    [ Placeholder content for popup link ] WordPress Download Manager - Best Download Management Plugin