• Skip to primary navigation
  • Skip to main content
  • Skip to primary sidebar

The Polka Dot Chair logo

  • SEWING
    • Free Sewing Patterns
    • Bag Patterns
    • Costumes
    • Apparel
    • Learn to Sew
    • Beginner Friendly
    • Embroidery Projects
    • Tips & Techniques
    • All Sewing
  • QUILTING
    • Quilt Blocks
    • Learn to Quilt
    • Free Patterns
    • Quilt Patterns
    • All Quilting
  • CRAFTS
    • Disney
    • Cricut
    • Printables
    • All Crafts
  • HOLIDAYS
    • Seasonal Projects
    • Valentine’s Day
    • Easter
    • 4th of July
    • Halloween
    • Thanksgiving
    • Christmas
    • All Holidays
  • TUTORIALS
  • ABOUT
    • About Me
    • My Fabric Collections
    • Published Books
    • Press
    • FAQ’s
    • Contact
  • SUBSCRIBE
  • SHOP
menu icon
go to homepage
  • SHOP
  • TUTORIALS
  • SEWING
  • QUILTING
  • SUBSCRIBE
  • CRAFTS
  • HOLIDAY PROJECTS
  • ABOUT
    • Published Books
    • My Fabric Collections
  • CONTACT
    • Facebook
    • Instagram
    • Pinterest
    • YouTube
  • subscribe
    search icon
    Homepage link
    • SHOP
    • TUTORIALS
    • SEWING
    • QUILTING
    • SUBSCRIBE
    • CRAFTS
    • HOLIDAY PROJECTS
    • ABOUT
      • Published Books
      • My Fabric Collections
    • CONTACT
    • Facebook
    • Instagram
    • Pinterest
    • YouTube
  • ×

    Home » Holidays » Valentine's Day

    Kids Freezer Paper Stenciled DIY Valentine’s Day Shirt Ideas

    Updated: Sep 19, 2020 by Melissa Mortenson · This post may contain affiliate links · This blog generates income via ads · 17 Comments

    DIY Valentine's Day T-shirt Freezer Paper Stenciling Technique

    Mallory’s cute fairy shirt, got to Traci’s blog to see photos of the other shirts she made. fairy image from A Childs Year cartridge

    So let’s continue the Valentine’s day crafts with a quick and easy freezer paper stencil tutorial.

    OH!!! Remember this year’s  Valentines Banner? A tutorial is coming and ONE  will be given away next week, and will only be open for 24 hrs (you’ve got to get it BEFORE the big day right??) so keep your eyes peeled…

    Now onto our craft!

    Yesterday, Traci of Amazing Mae and our friend Vicki came over to “play”…Grown up’s can have play dates right?  I mean we all need to have something to do to chase away those long winter days right???


    The “project of the day” started because I could not find any Valentines shirt’s for my 8 yr old son… Traci has been freezer paper stenciling for a while now and always told me how easy it was, so I thought I’d give it a try.

    With Traci’s experience and my Cricut we were able to knock out a few really cute t-shirts today for the kids. I know there are a lot of freezer paper stencil tutorials out there, but I thought I’d share how we did ours today.


    DIY Valentine's Day T-shirt Freezer Paper Stenciling Technique
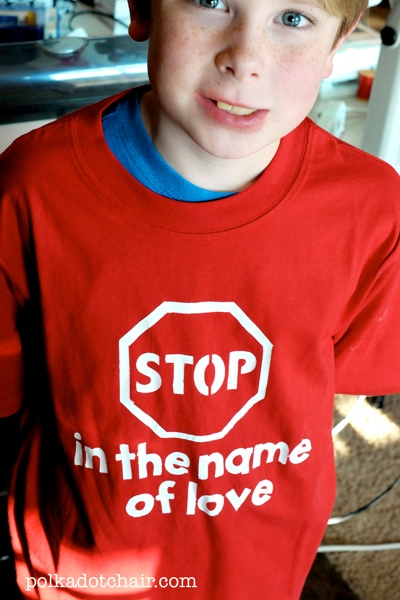
what I came up with for Andrew, I’m still trying to think of something more “clever” for him for Valentines Day. But he seems to like “Stop, in the name of love” even if he doesn’t “get it”. Stop sign from Going places cartridge

     
    DIY Valentine's Day T-shirt Freezer Paper Stenciling Technique
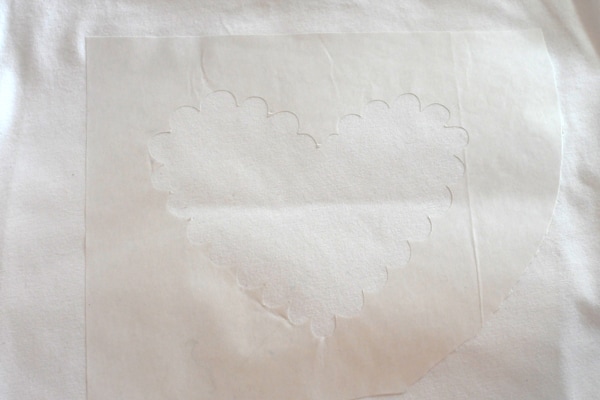
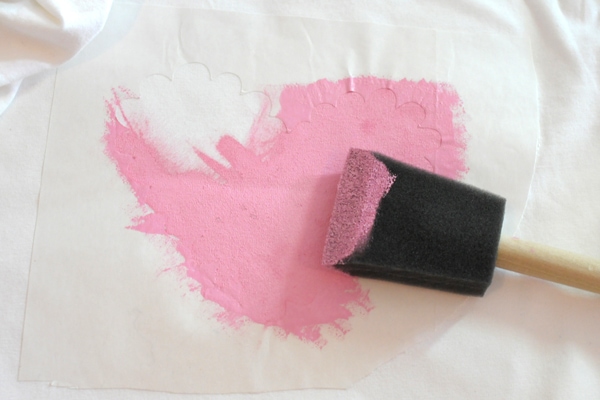
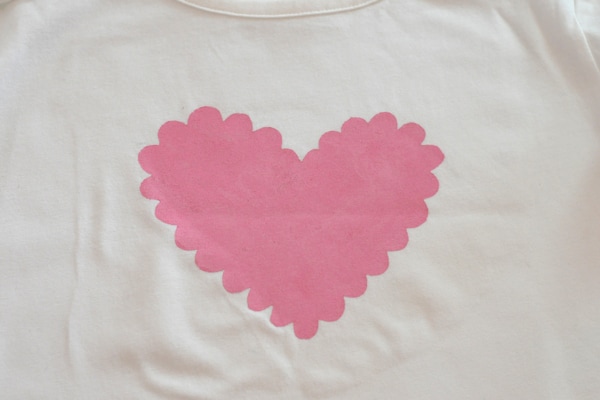
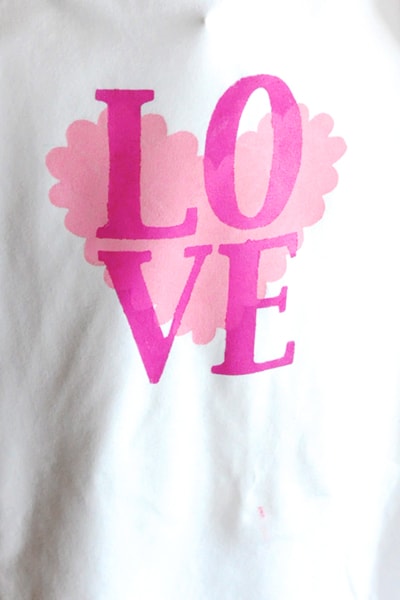
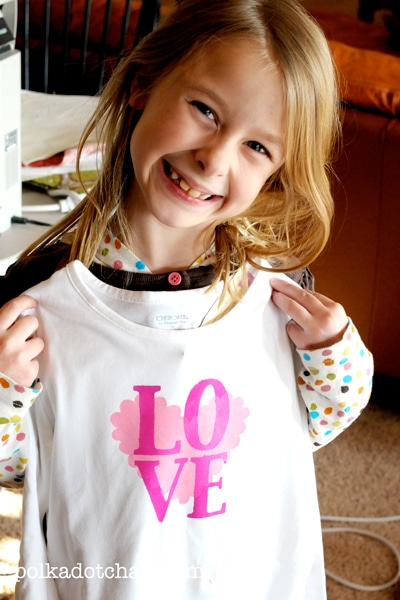
heart from doodlecharms cartridge

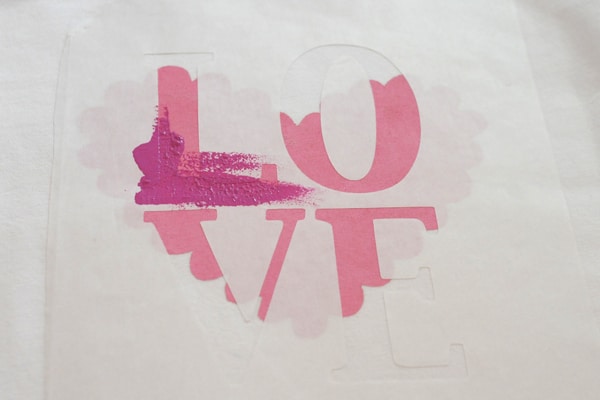
    Okay… Take your freezer paper and cut it to 12×12 (or 12×6 if you have the earlier cricut).

    Adhere it shiny side down to your cricut mat.

    Cut out your design.

    sorry white is not the easiest to photograph
     
    DIY Valentine's Day T-shirt Freezer Paper Stenciling Technique
     
     
    Peel off freezer paper and cut around design leaving 3″ around as a border. Iron shiny side down onto your t-shirt.
     
    Cut another piece of freezer paper in a rectangle the same size as your design. Iron this to the INSIDE of the t-shirt. You will have a little t-shirt sandwich with a piece of freezer paper ironed onto both sides.
     
    DIY Valentine's Day T-shirt Freezer Paper Stenciling Technique
     
    Dab your fabric paint onto your design.
     
    Let dry COMPLETELYDIY Valentine's Day T-shirt Freezer Paper Stenciling Technique
     
     
    Peel off freezer paper.
     
    Iron part 2 of your design (the 2nd color) onto your shirt.
     
     
    DIY Valentine's Day T-shirt Freezer Paper Stenciling Technique
    Dab paint on and let dry.
     
    Peel off and you are done!
     
     
    DIY Valentine's Day T-shirt Freezer Paper Stenciling Technique


    More Projects You May Enjoy

    • DIY Splatter Paint Christmas Ornaments
    • How to Make a Retro Diorama Ornament
    • How to Make String Christmas Ornaments
    • How to Make a Halloween Potions Centerpiece & Free Printable Potions Jar Labels

    • Share
    • Email

    About Author

    Melissa Mortenson

    Melissa Mortenson is a blogger, designer, and content creator. She is the Polka Dot Chair blog founder and has been sharing fresh and creative ideas with readers since 2008. She is the author of “Project Teen, Handmade Gifts your Teen will Actually Love.” Her work and designs have been featured on HuffPost, TODAY, Pioneer Woman, HGTV, BuzzFeed, Better Homes & Gardens, and many other established publications. Her first fabric line, “Derby Style,” debuted in January 2015 through Riley Blake Designs.  Additional fabric collections have followed it in subsequent years. A mom of 3, she considers herself lucky to be living in Kentucky.

    Reader Interactions

    Comments

    1. Lori says

      February 04, 2010 at 9:35 am

      Love the shirt for Andrew! (and Sydney’s too!) It is SO hard to come up with things to sew/ make for our boys. This is really cute! Also, love the Sunday bag in your shop. Will definitely be ordering the pattern! And I already have the same fabric too! I love the fabric combination you used. And, you’re right. It is really practical for Sunday. I carry at least 2 bags to church every week! Congrats on all your recent ‘stuff’!

      Reply
    2. Stephanie says

      February 04, 2010 at 9:57 am

      Those are adorable! And it’s just another reason why I absolutely NEED a Cricut.

      Reply
    3. Andrea says

      February 04, 2010 at 11:14 am

      Those shirts are really cute! I wish I had a Cricut.

      I am excited about the Sunday bag pattern. I will need to get over there and order it!

      btw, there is a place in Houston where you can order fabric by the bolt at wholesale prices. They have a website and you can call them with your order! It’s called Glick Textiles. Someone told me about it last year, so I thought I’d share the love. There are no minimum bolt requirements!

      Reply
    4. Kitschalicious says

      February 04, 2010 at 11:35 am

      It’s so hard to find cute boy shirts for Valentine’s. This would be perfect for my son!

      Reply
    5. Stacey says

      February 04, 2010 at 2:00 pm

      where did you find the fairy silohette? Could you post it for us? It’s adorable!

      Reply
    6. Nielson Shmielson says

      February 04, 2010 at 3:08 pm

      Love that idea! So fun!

      Reply
    7. The Cottage Mama says

      February 04, 2010 at 5:10 pm

      I was going to try freezer paper stenciling for the first time today so thank you SO much for this simple tutorial. I was wondering if it would work with the cricut and I am so thrilled that it does!!

      Thanks! Lindsay

      Reply
    8. Laurel @ Ducks in a Row says

      February 04, 2010 at 11:09 pm

      Gotta love Freezer Paper – you make it looks SO cool!

      Reply
    9. Angie - treasuresfortots@gmail.com says

      February 05, 2010 at 7:51 am

      Your designs are so cute! Come link your tute at my party: Thursday’s Treasures!!
      http://treasuresfortots.blogspot.com/2010/02/thursdays-treasures-week-8.html

      Reply
    10. Kathryn-nannygoat says

      February 05, 2010 at 1:57 pm

      Love ALL of them. Now I just need to keep my eyes open for cute plain shirts.

      Reply
    11. Songbird Lane says

      February 05, 2010 at 4:56 pm

      This is one of the best tutorials for freezer paper t-shirt painting. I haven’t tried this yet, but I want to. Still trying to think of a cute pic!

      Linked to your blog on my blog! Nice projects.

      Reply
    12. shannonmvt says

      February 05, 2010 at 5:01 pm

      OMG! I just arrived to your blog from, honestly i don’t remember from who, but you were featured and then i went from one post to the other to see all your fantastics ideas. WOWZERS Girl, amazing and thanks for sharing! Got you on my favorites list and can’t wait to see more!

      Reply
    13. Ashlee says

      February 08, 2010 at 1:29 pm

      Okay, now I am determined to try freezer paper stenciling, which I had avoided because I am a messy painter. Thank you for the lovely tutorial and inspiration.

      Reply
    14. Céline says

      March 16, 2010 at 5:44 am

      Hello,
      These T-shirts are really very nice.
      What do you call “freezer paper”?
      I don’t know this in France…

      Reply
    15. Ambrosia says

      January 18, 2011 at 5:37 pm

      Love these shirts! I featured your Stop In the Name Of Love shirt and linked back to you! http://fortheluvofboys.blogspot.com

      Reply
    16. Shantel says

      February 02, 2013 at 12:30 pm

      I love the ideas you have! I will be featuring on my blog!
      seemesew.blogspot.com

      Reply

    Leave a Reply Cancel reply

    Your email address will not be published. Required fields are marked *

    This site uses Akismet to reduce spam. Learn how your comment data is processed.

    Primary Sidebar

    Hello! It’s nice to meet you.

    I’m Melissa. I like to design things, like fabric, printables, and projects.

    I’m also a Mom and a Maker. I am like most of you, just trying to do my best every day. Some days I succeed, many days I fail.  I find joy in creating, if you do too, then I hope that you find something here bring a little “happy” to your life.  Find out more about me here.

    COPYRIGHT POLICY

    All my images and text are copyrighted. You may NOT use any images from this site in any kind of Video (this includes YouTube). If you would like to feature my work, you may use ONE (1) NON-COLLAGED image and must “follow” link back to my original blog post. You may NOT edit, crop, or change my images in any way without written permission. You MAY NOT print out or copy and distribute any text, images or patterns from this site. All patterns, content, instructions, and templates are for personal use ONLY! Thank you! Violators will be reported.

    Footer

    ↑ back to top

    About

    • Privacy Policy
    • Disclaimers
    • About Melissa
    • Instagram
    • Facebook
    • YouTube
    • Pinterest

    Newsletter

    • Sign Up! for emails and updates

    Contact

    • Contact
    • FAQ
    • Press
    • Published Books
    • Fabric Collections

    Welcome to the Polka Dot Chair! Here you’ll find easy, step-by-step, sewing, quilting, and crafting projects. We design projects for Makers of all skill levels. Beginners are welcome!

    DISCLAIMER:

    While every effort has been made to ensure the accuracy of the content on this website, the information is made available without warranty of any kind. The Polka Dot Chair accepts no responsibility or liability, whether direct or indirect, as to the currency or accuracy of the information, nor any consequence of its uses. This website is not intended to substitute the advice of a professional.

    Copyright © 2022 Polka Dot Chair

    [ Placeholder content for popup link ] WordPress Download Manager - Best Download Management Plugin