DIY Kids Robot Halloween Costumes
Hello all! My name is Emily and I am Melissa’s little sister. Melissa has asked me to share a little bit about myself and tell you all the secrets of my kid’s quirky Halloween costumes.
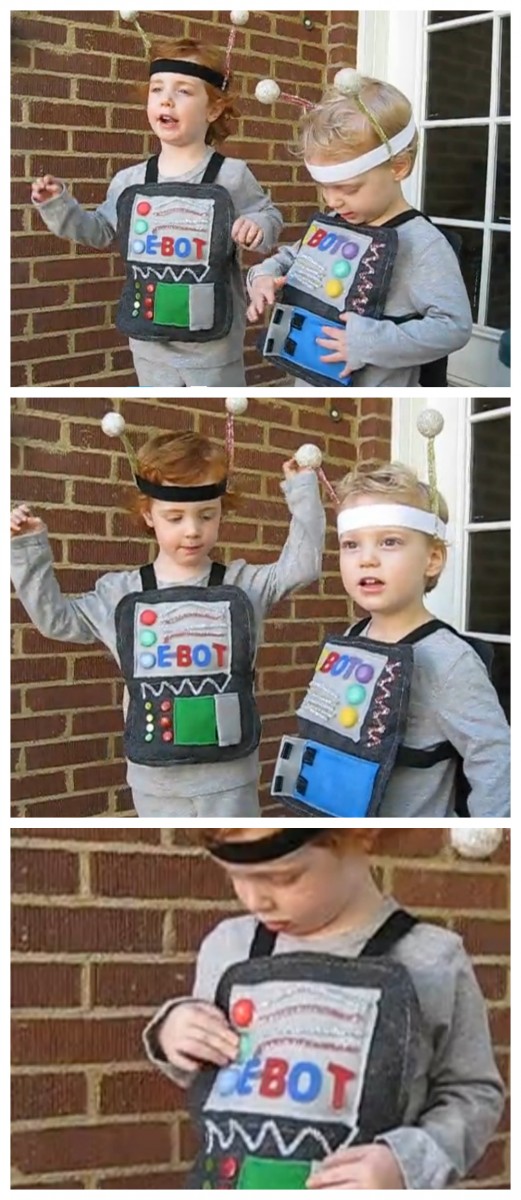
Before we begin, take a moment to see them in action for the full effect:
A little about me:
Melissa is the crafty one, I am the Internet nut. I design websites, Need one? (emilymillard at gmail dot com) I am wife to Ethan and mother to Bubby and the Weeb (pronounced like weed, with a b at the end = Weeeeeeeeb). Bubby is four and the Weeb is two. My Ethan likes to talk a lot and KSL pays him to do it. He is obsessed with Eastern Europe and is currently working on a documentary about the Romanian revolution of 1989 (yes, there was a revolution in 1989, who knew, hence the documentary). He changes most of the diapers, sometimes cleans the TV and frequently makes me eggs for breakfast. If you think you can make eggs better than Ethan you’re totally wrong.
Bubby adores trains, likes to sing and refuses to watch TV as much as his mother lets him. I’m so proud. He has gorgeous red hair and huge blue eyes like daddy. The Weeb is crazy, non-stop and always hungry. He likes cookies, his froggy, cookies, cookies and sometimes cookies. He has curly blonde hair and half blue half brown eyes. It’s true. His eyes just started to change a few months ago.
We live in Utah, I have never lived anywhere else. Whatever you are assuming about me after reading that sentence is totally and completely wrong. 🙂
Onto the costumes!
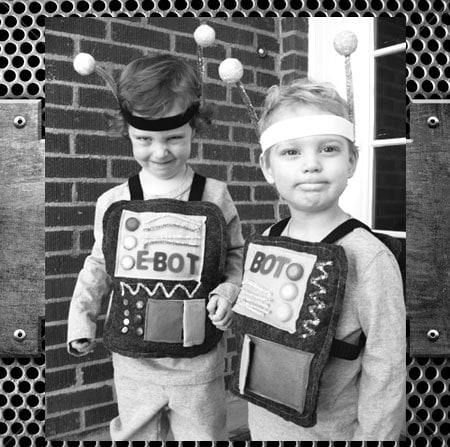
Meet C-BOT and E-BOT. My little (as they would say) wo-bots.
Elliott wanted to be a robot but we were concerned about him sitting through 3 hours of preschool in a large cardboard box. So I simplified the traditional robot costume.
I used felt for the whole costume. I found a perfect grey felt at our local fabric store. I used simple polyester felt because I found some that was nice and thick. If you want the costume to last years, I’d suggest using wool felt.
All in all the costume was pretty simple.
- Cut 4 rectangles out of felt. Measure your child, make sure they can sit down without squishing anything
- Make 4 marks on one of the rectangles. Two on each side of the neck, and two on the sides. Pin elastic waistband to each mark on the wrong side of the felt.
- Lay the felt down with the wrong side facing up. Stuff lightly with fluff. Lay the next rectangle on top, right side up. Sew around the entire rectangle.
- Once you have decided what elements you’d like on the front, lay them out and machine quilt around all edges.
- Embellishments I used
-
-
- Buttons. The ones with no showing buttonholes are the best
- Metallic pipe cleaners. I zigzag sewed them on
- Lights! I used these. If you search for LED lights on amazon you’ll find tons of options. I used fabric glue to attach them.
- Music! Thank goodness for Hallmark. I used an Indiana Jones card for one and a Scooby Doo card for another. They had a lot of options in the store and I liked the ones I picked but they weren’t perfect. If you are planning on making these start looking for cards a few months early. We’ve had a lot of these cards in our house and the batteries last a lot longer than you want them too! Once you find the card you want, carefully cut the card around the speaker inside. Then (and I wish I had a better way to explain this) make a nice little pocket with a flap to slide the card into. BEFORE you sew the card in, sew the Velcro on the flap. One costume just had glue attaching the Velcro, it barely lasted.
-
- Mark the elastic waistband spots on the two remaining felt rectangles, stuff lightly again and sew the back same as the front. I did not quilt the back but it would have looked great with a nice zigzag stitch across the back.
- The headpiece was dead simple. Just an elastic headband with pipe cleaners sewn on the side. Then pop on a glittered Styrofoam ball.
- If I had more time I would have made some knee pads and maybe some shoe covers. Maybe next year! They were a huge hit with the boys.
That’s it! These would make great birthday presents or just something for the toy room, year round.


thanks for all the nice comments! and courtney thanks for listening to my husband- i hope he doesn’t offend!
i just found your blog through another one that i follow & i love i, how cute! i was born and raised in KY and a few years ago my faily & i moved to UT. And i love the comment that you made about being from UT 🙂
These are adorable costumes. Thanks for the fun idea. And just so you know, my husband and I love listening to your husband on the nightside project. We were working on a quilt last night together (yes my husband helps me quilt, it is my first one and he is lots smarter at the math portion of it than I am) and were listening to his show. He always makes us laugh.
I love using the greeting cards for sound! What a great idea, what adorable robots. How fun!
These are awesome! And your little robots are adorable.
I love the ROBOTS! I think my little ones, 1 and 2, will be robots next year at, 2 and 3, for Halloween. SEW CUTE! I have printed the directions and plan to add it to my to do list for next year (that makes it sound like I actually have a to do list for next year, I’m not that organized. I do have a to do board that I will post it to and it will probably be there under the busy papers for next year.) Enough about that, you are super creative, WHAT A GREAT IDEA! I love the video, I’m wanting to start some video stuff on my blog! Looking into it right now! Have a great day!