• Skip to primary navigation
  • Skip to main content
  • Skip to primary sidebar

The Polka Dot Chair logo

  • SEWING
    • Free Sewing Patterns
    • Bag Sewing Patterns
    • Costumes Sewing Tutorials
    • Apparel Sewing Patterns
    • Learn to Sew
    • Beginner Friendly Sewing Projects
    • Hand Embroidery Patterns
    • Tips & Techniques
    • All Sewing
  • QUILTING
    • Quilt Block Patterns
    • Learn to Quilt
    • Free Quilt Patterns
    • Quilt Patterns
    • All Quilting
  • CRAFTS
    • Disney
    • Cricut
    • Printables
    • All Crafts
  • HOLIDAYS
    • Seasonal Projects
    • Valentine’s Day
    • Easter
    • 4th of July
    • Halloween
    • Thanksgiving
    • Christmas
    • All Holidays
  • TUTORIALS
  • ABOUT
    • About Me
    • My Fabric Collections
    • Published Books
    • Press
    • FAQ’s
    • Contact
  • SUBSCRIBE
  • SHOP
menu icon
go to homepage
  • SHOP
  • TUTORIALS
  • SEWING
  • QUILTING
  • SUBSCRIBE
  • CRAFTS
  • HOLIDAY PROJECTS
  • ABOUT
    • Published Books
    • My Fabric Collections
  • CONTACT
    • Facebook
    • Instagram
    • YouTube
  • subscribe
    search icon
    Homepage link
    • SHOP
    • TUTORIALS
    • SEWING
    • QUILTING
    • SUBSCRIBE
    • CRAFTS
    • HOLIDAY PROJECTS
    • ABOUT
      • Published Books
      • My Fabric Collections
    • CONTACT
    • Facebook
    • Instagram
    • YouTube
  • ×

    Home » Sewing » Free Sewing Patterns- Accessories

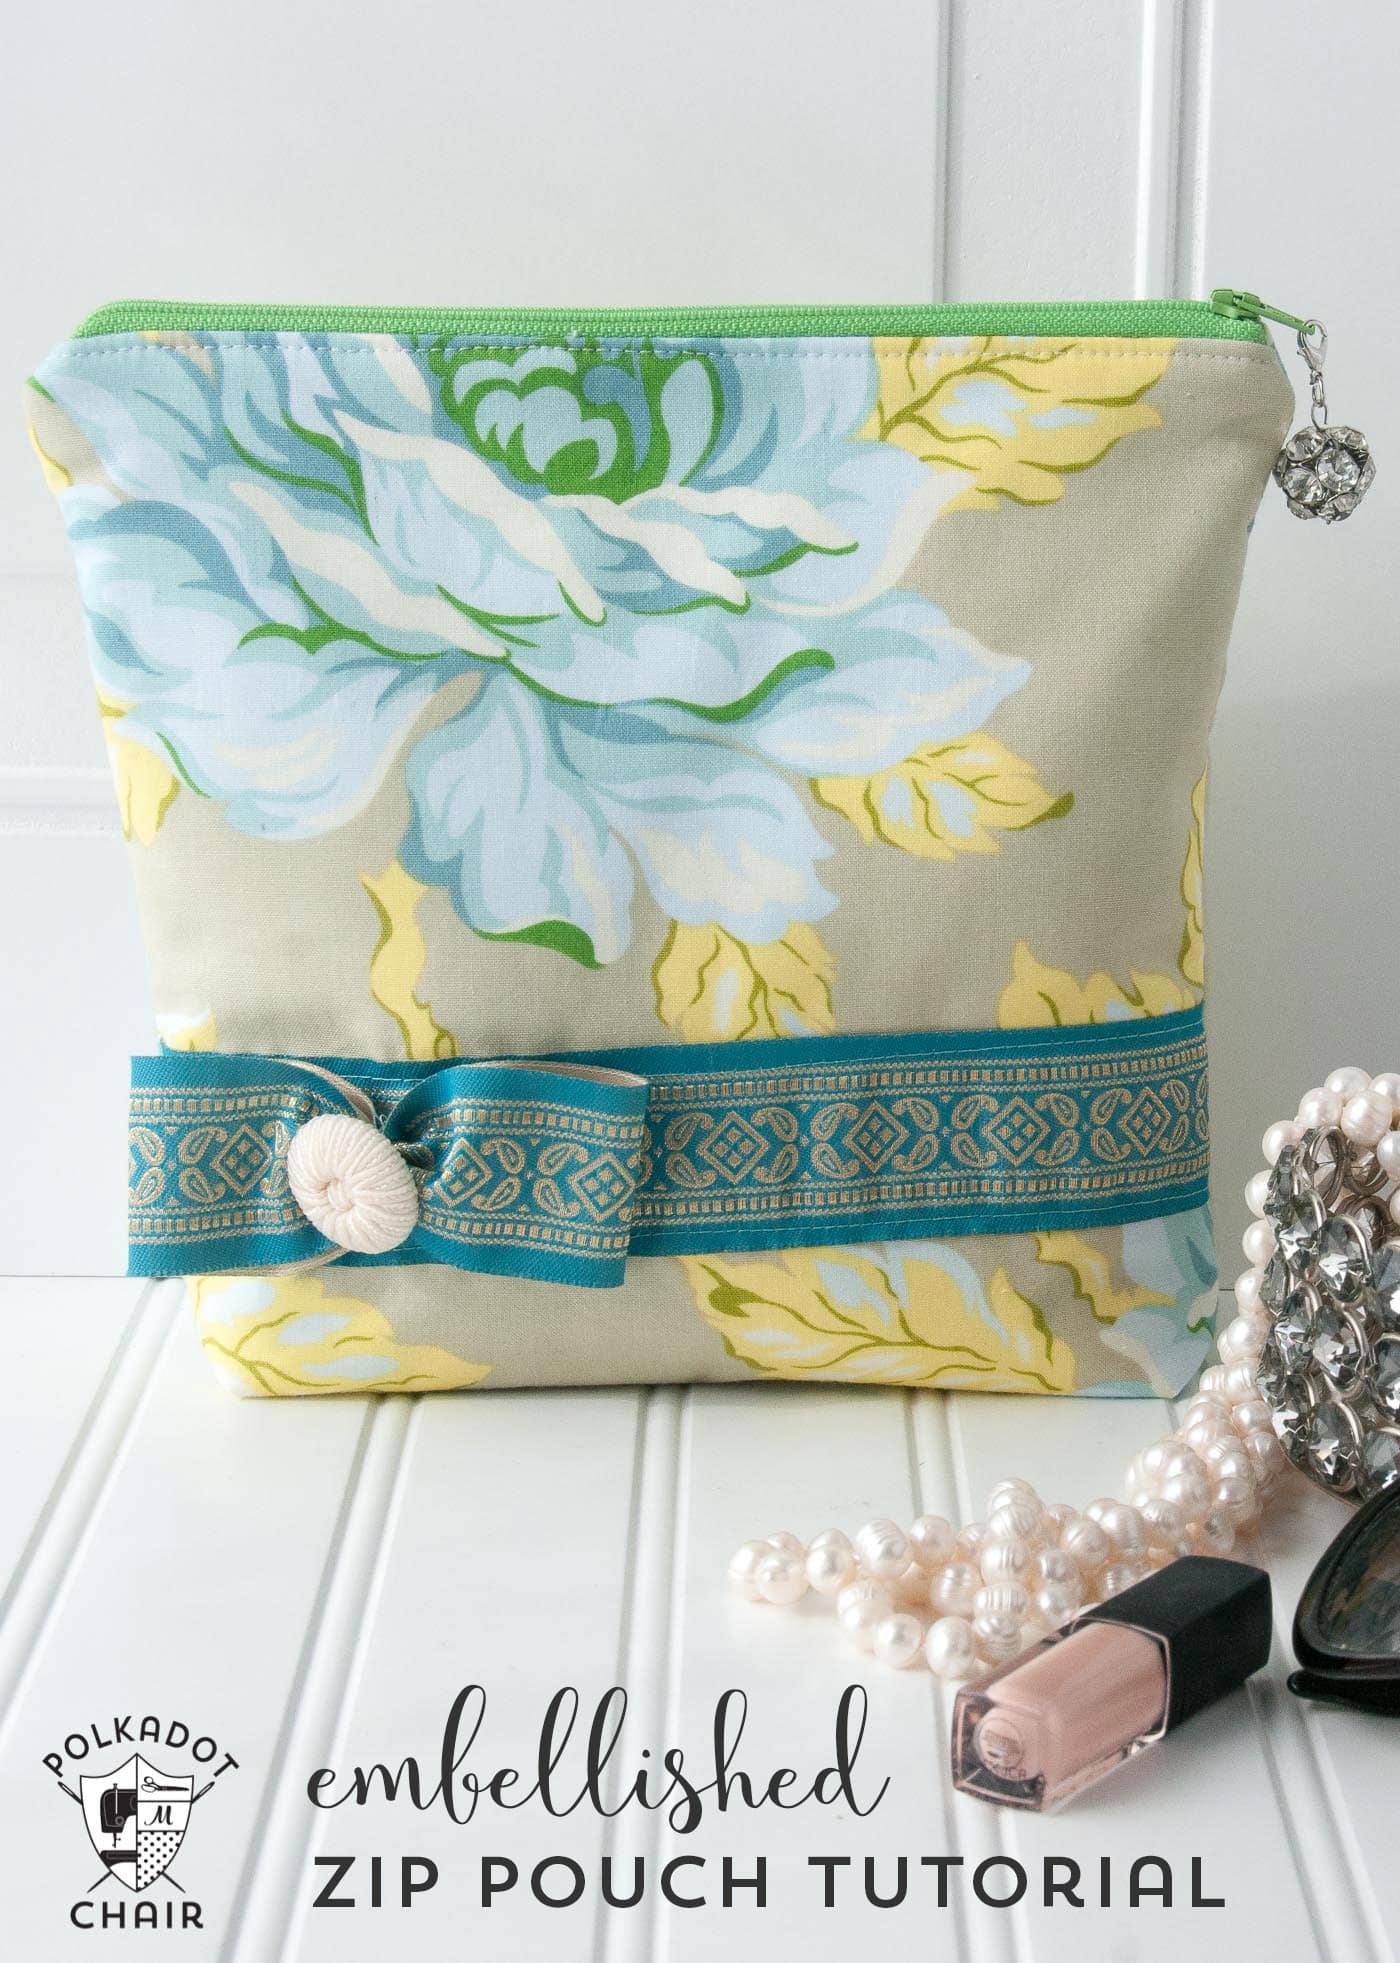
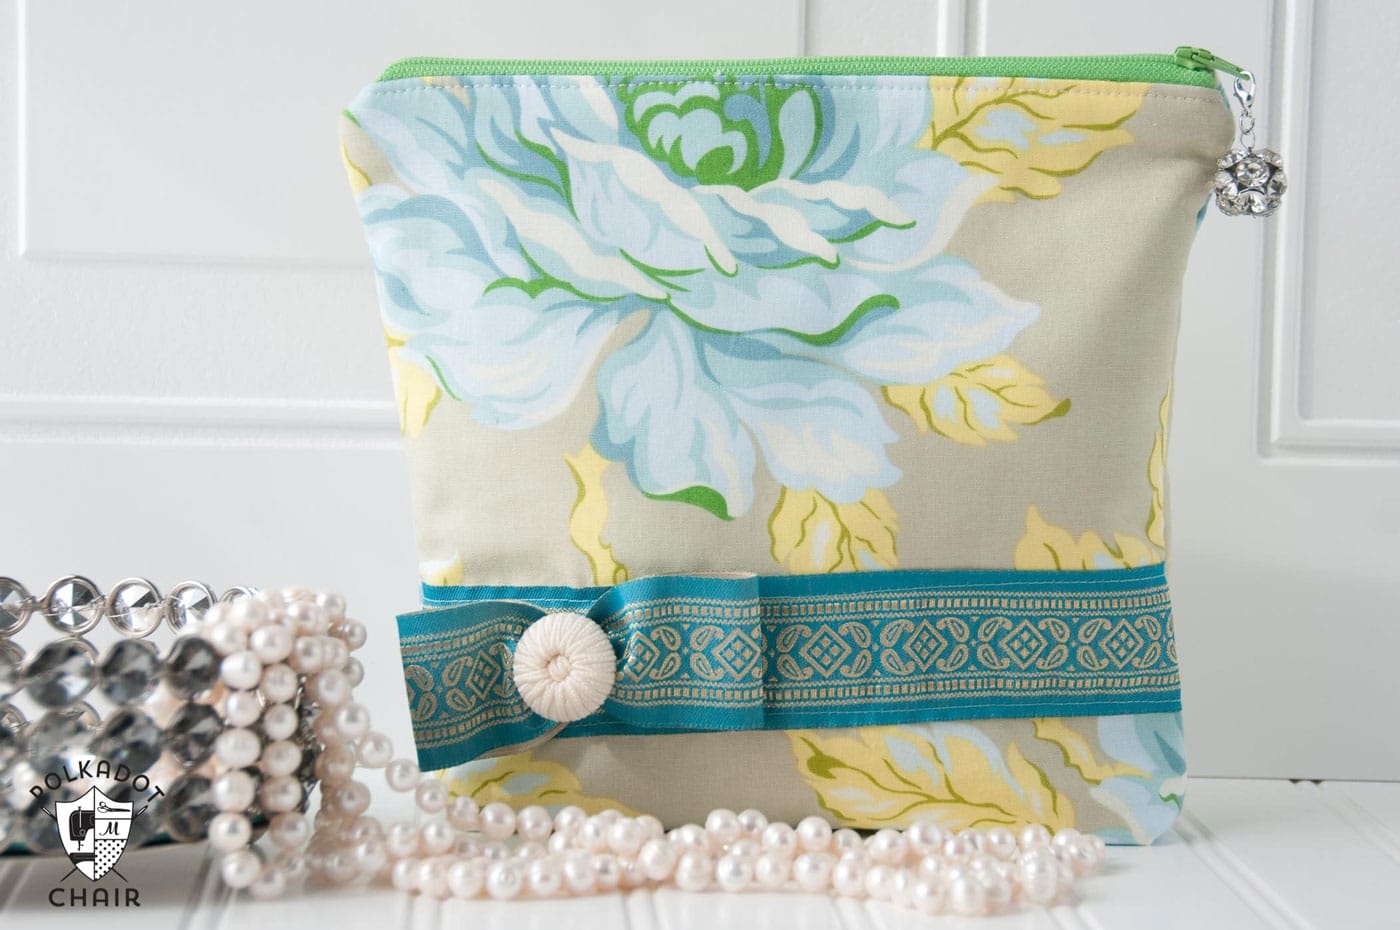
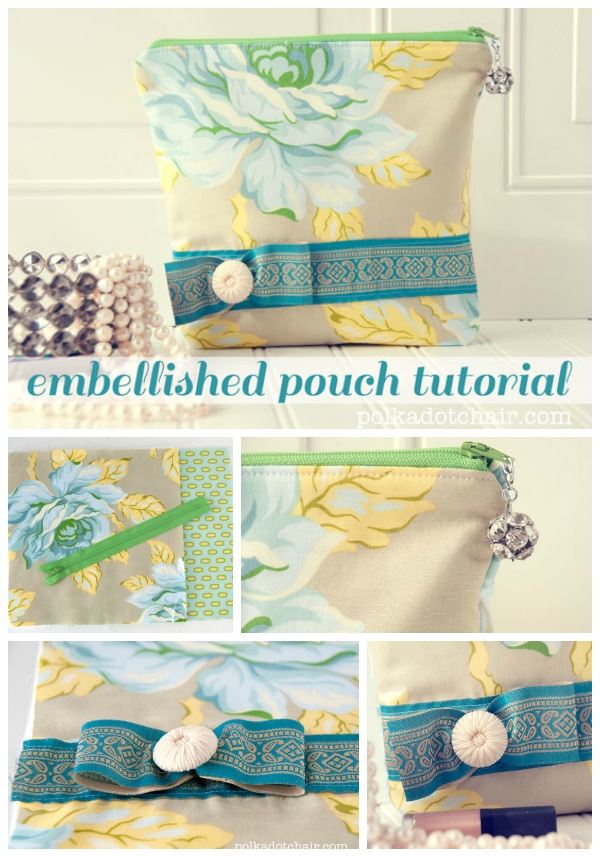
    Embellished Zip Pouch Tutorial

    Updated: Dec 14, 2015 by Melissa Mortenson · This post may contain affiliate links · This blog generates income via ads · 10 Comments

    I hope you enjoy this free zippered pouch tutorial & sewing pattern. If you like this post you may also like this leather trimmed zip pouch tutorial. 


    Free Sewing Pattern for an embellished stand up zippered pouch - fun little sewing tutorial

    Zippered pouches are my “go to” item when I need a gift that is both cute and easy to make.  They are simple to construct and can be filled with all kinds of wonderful things to make the recipient feel special.

    I’ve posted several zippered pouches here before but never a tutorial,  mostly assuming that people already had a favorite method of making zip pouches.  What I’ve learned (from your emails) is that not everybody does,  and that some of you might appreciate a full tutorial on how to make one of these fun bags.  The tutorial I’m sharing with you today is how I make a zip pouch.  There are lots of other great tutorials out there if you’d like more ideas on how to make one.

    Free Sewing Pattern for an embellished stand up zippered pouch - fun little sewing tutorial


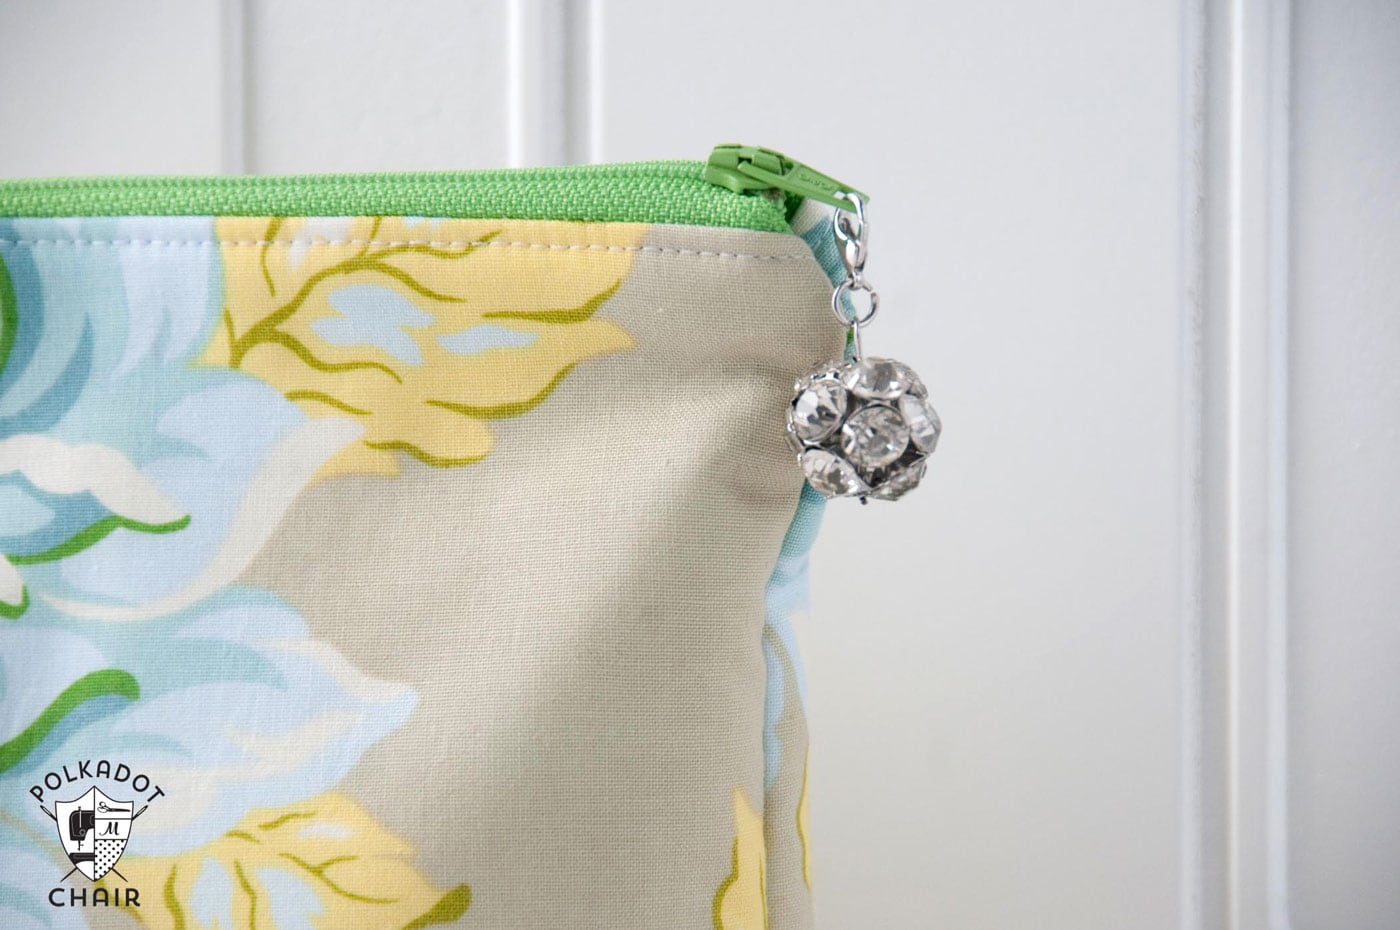
    This pouch has has few extra little details, like the addition a sparkly zipper pull,

    Free Sewing Pattern for an embellished stand up zippered pouch

    and a bow made from purchased trim.

    The tutorial that I’m sharing with you today is for a zippered pouch that has a bottom gusset and measures approximately 8″ tall x 9 ½″ wide.  You can change the dimensions of this to whatever YOU like.   The only thing you need to keep the same is the width of your bag and the length of your zipper.  They should both be the same. For example, if you are using a 12″ zipper, make your pouch piece 13″ wide (12″ zipper is longer than 12″ in reality)…. but the height of the pouch can be anything you like.

    Play around with the pattern and make it your own.  Add trims or buttons or sparkly things… You can see a few other zip pouches I’ve made in the past here and here and here if you need more ideas.

    To begin you’ll need:

    • 9″ zipper
    • 2 pieces fabric 10″x10″ for pouch
    • 2 pieces fabric 10″x10″ for pouch lining
    • 2 pieces fusible fleece 10″x10″
    • ½ – ¾ yd of decorative trim
    • decorative button

    Sewing Instructions:

    Begin by pressing the fusible fleece to the wrong side of both of the pouch pieces.

    Now lay your pouch front piece right side up and place your zipper on top of it, zipper right side down.

    Lay your pouch lining piece on top of this right side down.  Pin the whole length.

    Using the zipper foot on your machine, stitch through all layers, going slowly. I find it easiset to sew with the lining side towards my feed dogs on my machine.

    Next  repeat with the other pouch and pouch lining pieces.  In this photo, the zipper is in the middle, the pouch lining piece is on the bottom (right side up) and the pouch front piece is on the top right side down.

    Press pouch along the zipper.   Top stitch.

    Next embellish your pouch.  Sew a piece of trim approx. 2 ½″ up from the bottom of the pouch front piece.  To sew it on you’ll simply top stitch along each side of the trim.

    To make the bow. Fold 2 raw ends of a piece of trim towards the center.  Over lap them a bit.  Just play around with it until it’s the size you want.

    Now take a needle and thread and run a stitch up the center of the bow. Pull tight to cinch the bow.  Loop the thread around the center of the bow several times and secure with a stitch. Don’t cut your thread.

    Free Sewing Pattern for an embellished stand up zippered pouch

    Sew your button to the center of your bow.  Now stitch the bow/button to your pouch front, on top of the trim.  Place the edge of the bow about 1 ½″ in from the side of the pouch.

    Unzip the zipper (DO NOT FORGET this step).

    Lay the pouch with right sides together.  The right sides of the lining pieces together and the right sides of the pouch together.  Fold the zipper towards the lining when you pin it.

    Stitch around the circumference of the pouch leaving a 3″ opening in the lining piece.

    Next take one of the corners and pinch it so that the 2 seams are sitting on top of each other and the corner comes to a point. Measure in 1″ from the tip of the point and draw a line. Stitch along this line, making sure to back stitch.

    Repeat for all 4 corners.  Trim off triangular shaped pieces of fabric.

    To finish. Turn the pouch right side out and press.  Slip stitch the opening in the lining closed.

    To finish off my pouch I added a charm as a zipper pull.  You can get them in the craft section at most stores.

    Free Sewing Pattern for an embellished stand up zippered pouch - fun little sewing tutorial


    Free Sewing Pattern for an embellished stand up zippered pouch

    More Projects You May Enjoy

    • profile view of girl wearing headband outdoors
      How to Make a Braided Padded Headband
    • Quilted Toy Storage Bag Tutorial
    • striped pencil pouch on white wood grain table with school supplies
      Striped Pencil Pouch Sewing Pattern
    • nesting fabric baskets on white marble table
      Nesting Fabric Baskets Sewing Pattern

    • Share
    • Email

    About Author

    Melissa Mortenson

    Melissa Mortenson is a blogger, designer, and content creator. She is the Polka Dot Chair blog founder and has been sharing fresh and creative ideas with readers since 2008. She is the author of “Project Teen, Handmade Gifts your Teen will Actually Love.” Her work and designs have been featured on HuffPost, TODAY, Pioneer Woman, HGTV, BuzzFeed, Better Homes & Gardens, and many other established publications. Her first fabric line, “Derby Style,” debuted in January 2015 through Riley Blake Designs.  Additional fabric collections have followed it in subsequent years. A mom of 3, she considers herself lucky to be living in Kentucky.

    Reader Interactions

    Comments

    1. Linda says

      February 20, 2013 at 1:12 pm

      That is so beautiful! Thank you for the tutorial. I think I have found a new “favorite thing…”

      Reply
      • Melissa Mortenson says

        February 20, 2013 at 3:13 pm

        I’m so glad you like it!

        Reply
    2. Jan says

      February 20, 2013 at 6:12 pm

      Thanks for the tutorial, it seems fairly easy. I have never put a zip into anything before but am keen to give it a go. I would like to make one each for my 5 adult daughters.

      Reply
    3. Laura reid says

      February 20, 2013 at 6:20 pm

      Darling zipper pouch! I will give one a try. Only wish I was on your gift list….. 🙂

      Reply
    4. Melissa K. says

      February 21, 2013 at 11:59 am

      This is lovely! I like the addition of the charm and bow; perfect details!

      Reply
    5. Kay says

      February 21, 2013 at 1:24 pm

      Thank you so much for this. Learning to put a zip into something is one of my goals for the year.

      Reply
      • Melissa Mortenson says

        February 22, 2013 at 3:24 pm

        Zippers aren’t hard once you know the trick– just do a few then you’ll be a pro!

        Reply

    Leave a Reply Cancel reply

    Your email address will not be published. Required fields are marked *

    This site uses Akismet to reduce spam. Learn how your comment data is processed.

    Primary Sidebar

    Hello! It’s nice to meet you.

    I’m Melissa. I like to design things, like fabric, printables, and projects.

    I’m also a Mom and a Maker. I am like most of you, just trying to do my best every day. Some days I succeed, many days I fail.  I find joy in creating, if you do too, then I hope that you find something here bring a little “happy” to your life.  Find out more about me here.

    COPYRIGHT POLICY

    All my images and text are copyrighted. You may NOT use any images from this site in any kind of Video (this includes YouTube). If you would like to feature my work, you may use ONE (1) NON-COLLAGED image and must “follow” link back to my original blog post. You may NOT edit, crop, or change my images in any way without written permission. You MAY NOT print out or copy and distribute any text, images or patterns from this site. All patterns, content, instructions, and templates are for personal use ONLY! Thank you! Violators will be reported.

    Footer

    ↑ back to top

    About

    • Privacy Policy
    • Disclaimers
    • About Melissa
    • Instagram
    • Facebook
    • YouTube
    • Pinterest

    Newsletter

    • Sign Up! for emails and updates

    Contact

    • Contact
    • FAQ
    • Press
    • Published Books
    • Fabric Collections

    Welcome to the Polka Dot Chair! Here you’ll find easy, step-by-step, sewing, quilting, and crafting projects. We design projects for Makers of all skill levels. Beginners are welcome!

    DISCLAIMER:

    While every effort has been made to ensure the accuracy of the content on this website, the information is made available without warranty of any kind. The Polka Dot Chair accepts no responsibility or liability, whether direct or indirect, as to the currency or accuracy of the information, nor any consequence of its uses. This website is not intended to substitute the advice of a professional.

    Copyright © 2022 Polka Dot Chair

    [ Placeholder content for popup link ] WordPress Download Manager - Best Download Management Plugin