Our Best Tips for Cleaning Your Sewing Machine
Sewing machine maintenance is really important, not just to keep your machine running smoothly but to help avoid issues with your sewing projects too. In this article, we’ll provide you with a simple step-by-step guide to effectively clean your sewing machine.
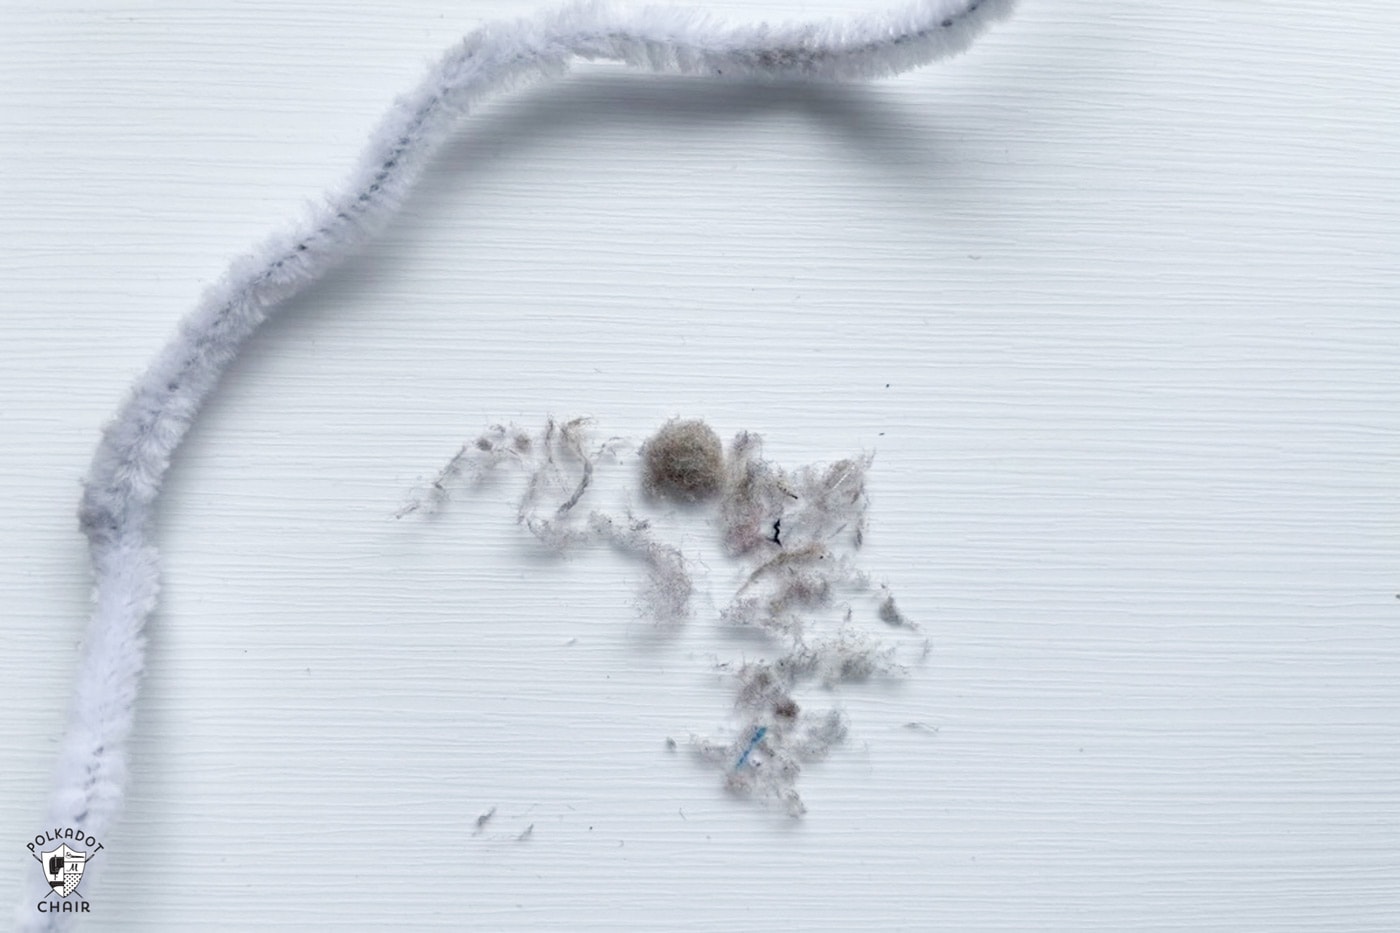
Our machines don’t really get “dirty,” just fluffy! The main things you’ll be cleaning out of your sewing machine are tiny thread off-cuts and fluff.
The fluff comes from the fabric and thread used during sewing projects…different types and brands will produce more or less fluff, but they all create some, which gradually builds up inside your sewing machine.
So what issues can all this fluff cause? It can throw off your tension which can cause all sorts of issues, such as creating those not-so-lovely thread bird nests (where the thread all snags and bundles up under your fabric) and getting fluff into your project.
Check Your Sewing Machine Manual
Before you start cleaning your machine, always check the manual first in case your machine has any specific dos and don’ts. And always remember that regular cleaning does not replace proper servicing.
Tools for Cleaning Your Machine
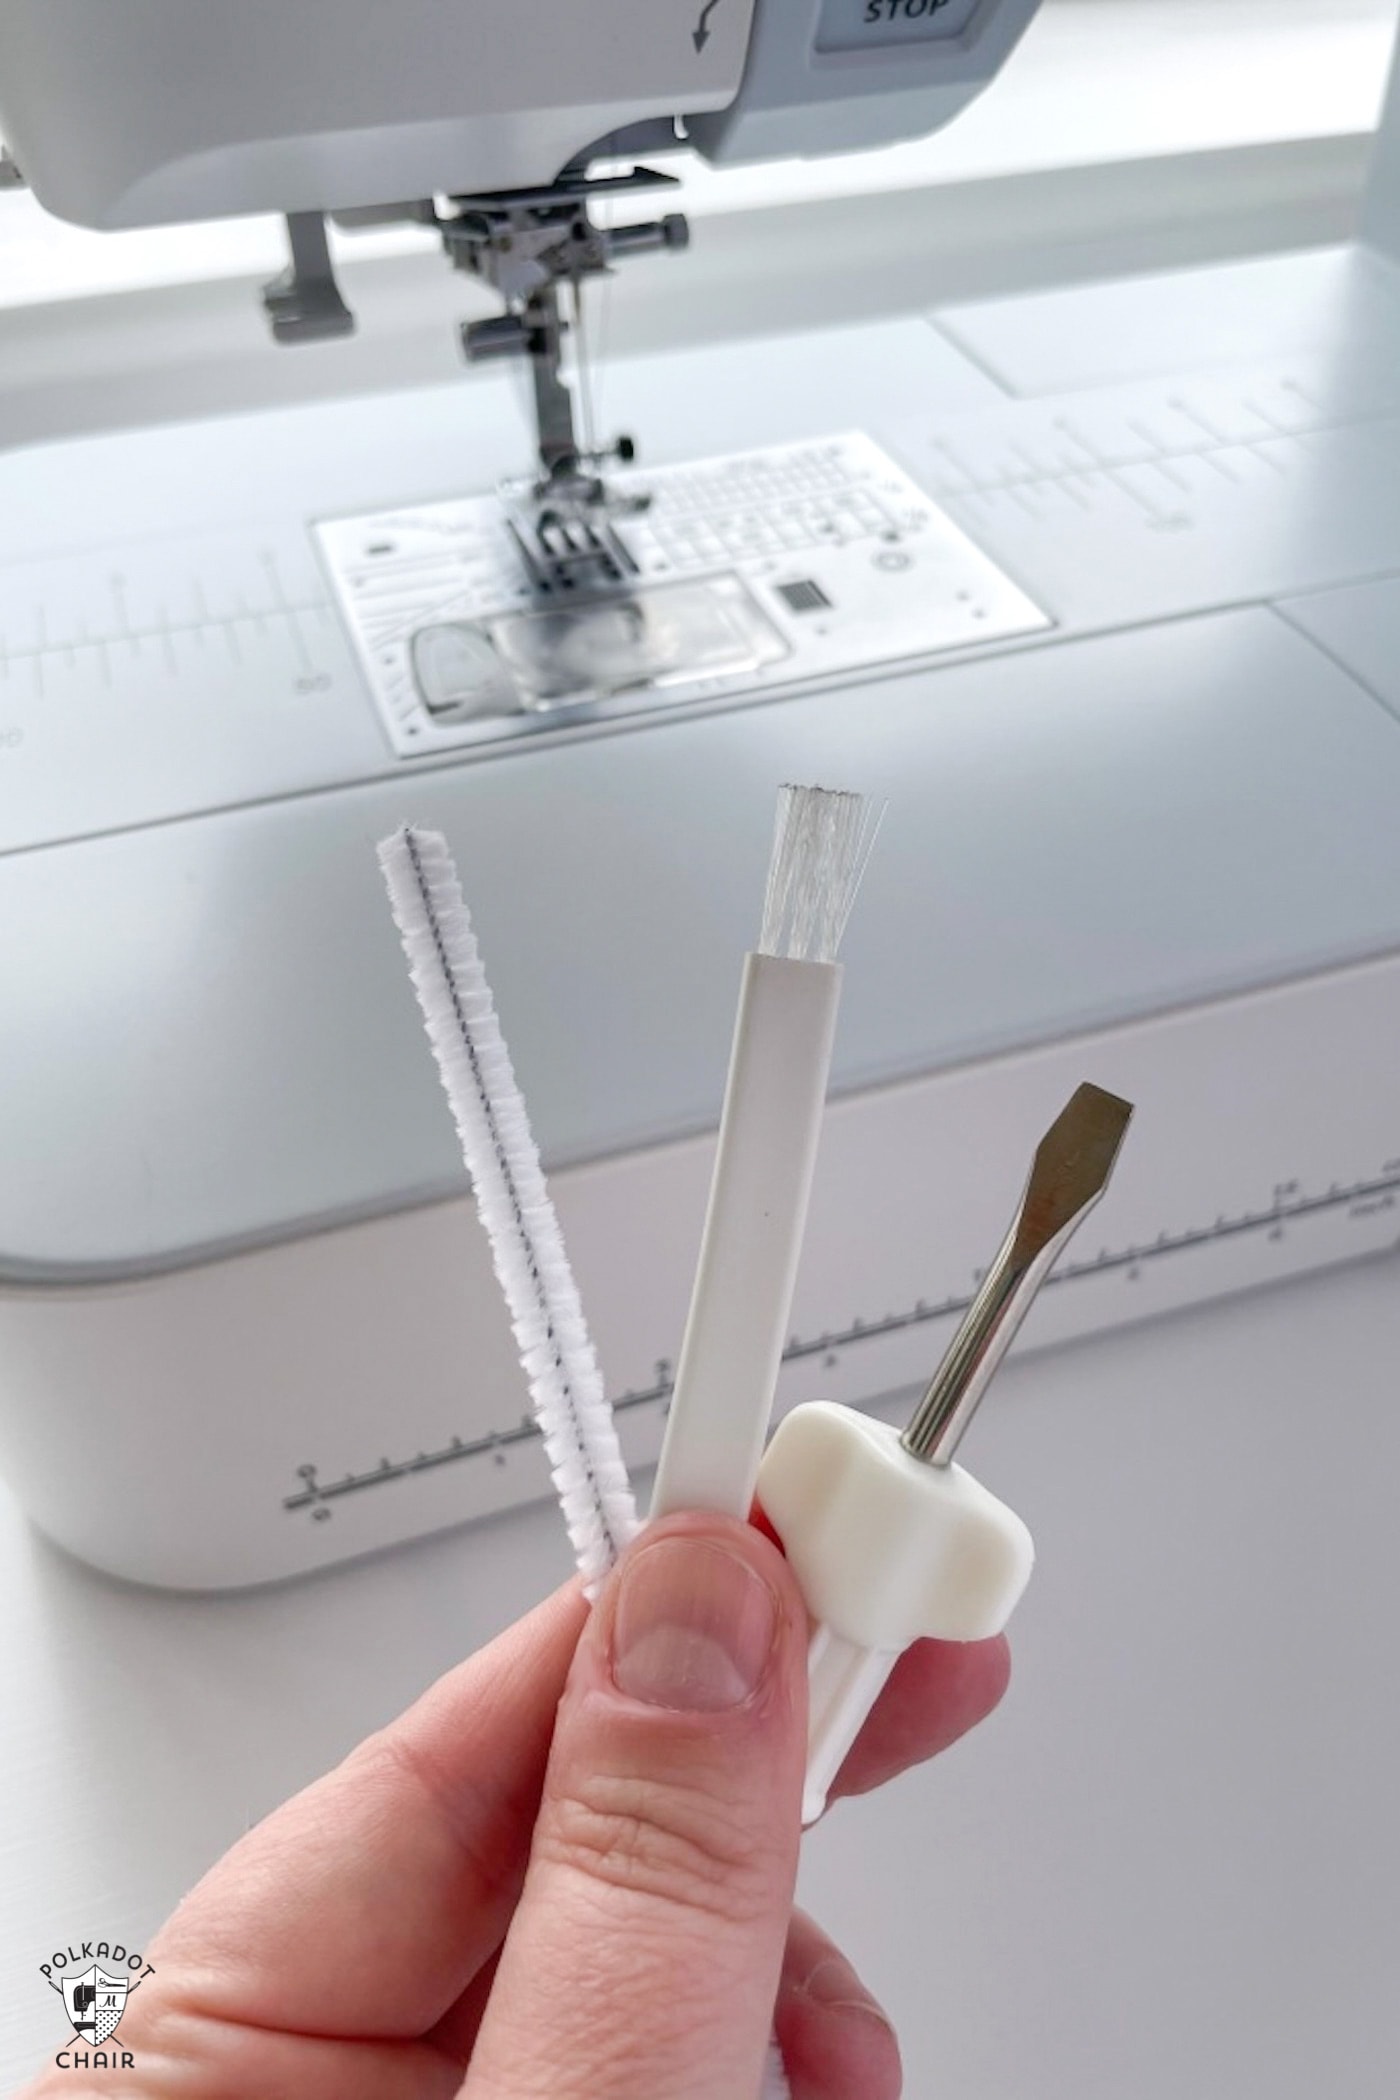
Materials You’ll Need
- Soft lint-free cloth – Swiffer cloth works great
- A small brush (a makeup brush or a dedicated sewing machine brush works well, your sewing machine probably came with one)
- Sewing machine oil (if your machine requires oil)
- Screwdriver (if needed, again, one probably came in your sewing machine kit)
- Tweezers
- Lint roller
- Pipe cleaner
If your machine came with a cleaning tool, then that is a great starting point (and may be all you need!).
Mine came with a little brush which is great for getting fluff out of most areas of the machine, but it doesn’t reach everywhere, so I like to use a fluffy pipe cleaner.
These are great because they are cheap, their flexibility means they can bend round corners, and fluff clings really well to them.
Step-by-Step Sewing Machine Cleaning Process
- Gather Supplies: Before you begin, make sure you have all the necessary cleaning materials at hand. This will help you complete the process smoothly.
- Turn Off and Unplug: For safety reasons, ensure your sewing machine is turned off and unplugged from the power source before you start cleaning.
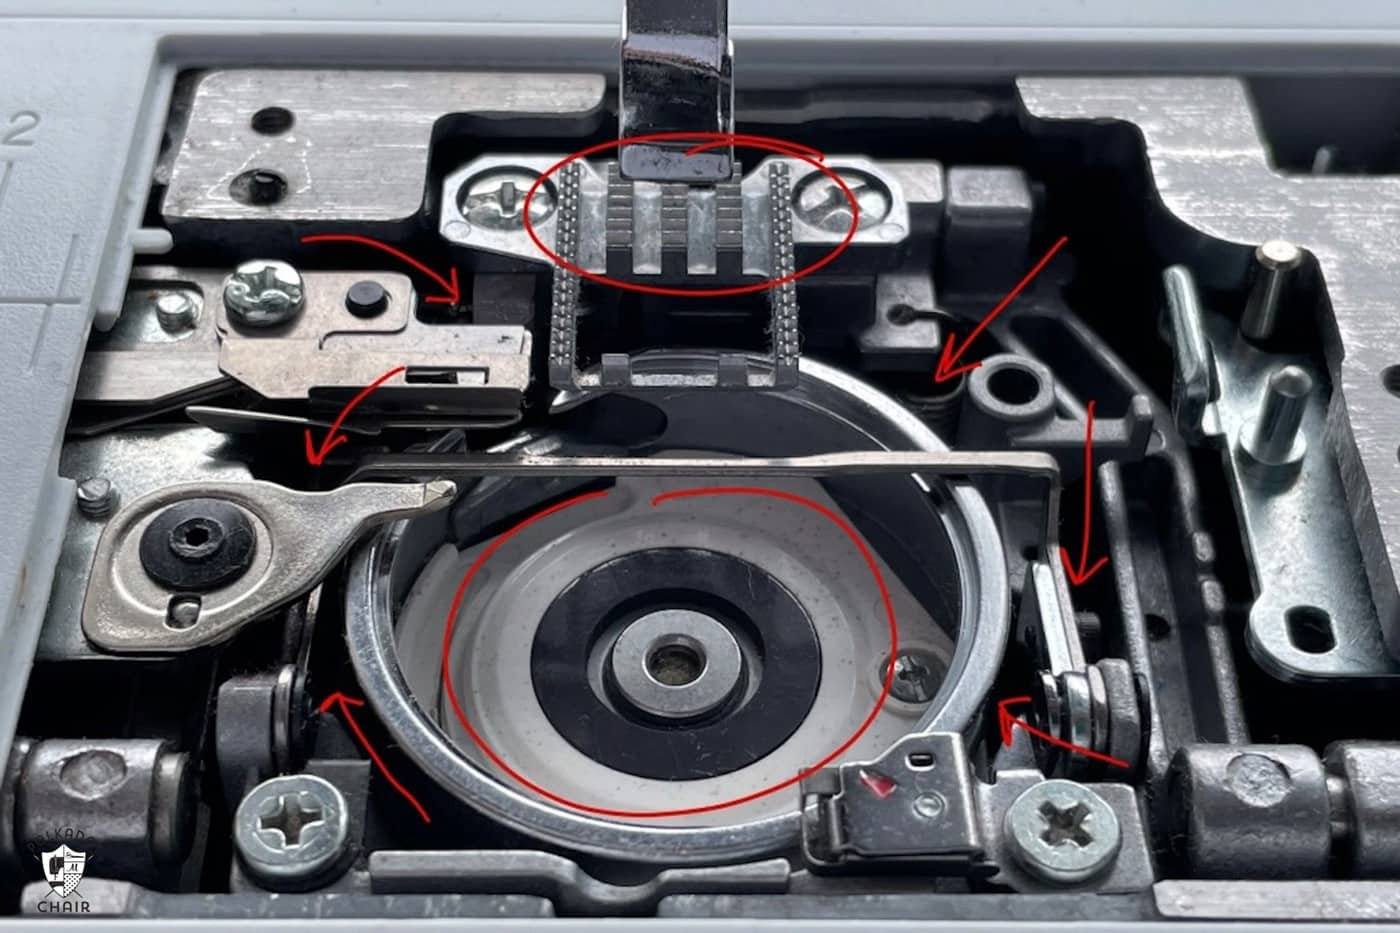
- Remove the Needle and Bobbin: Take out the sewing machine needle and the bobbin from the sewing machine. This will give you better access to clean the parts inside.
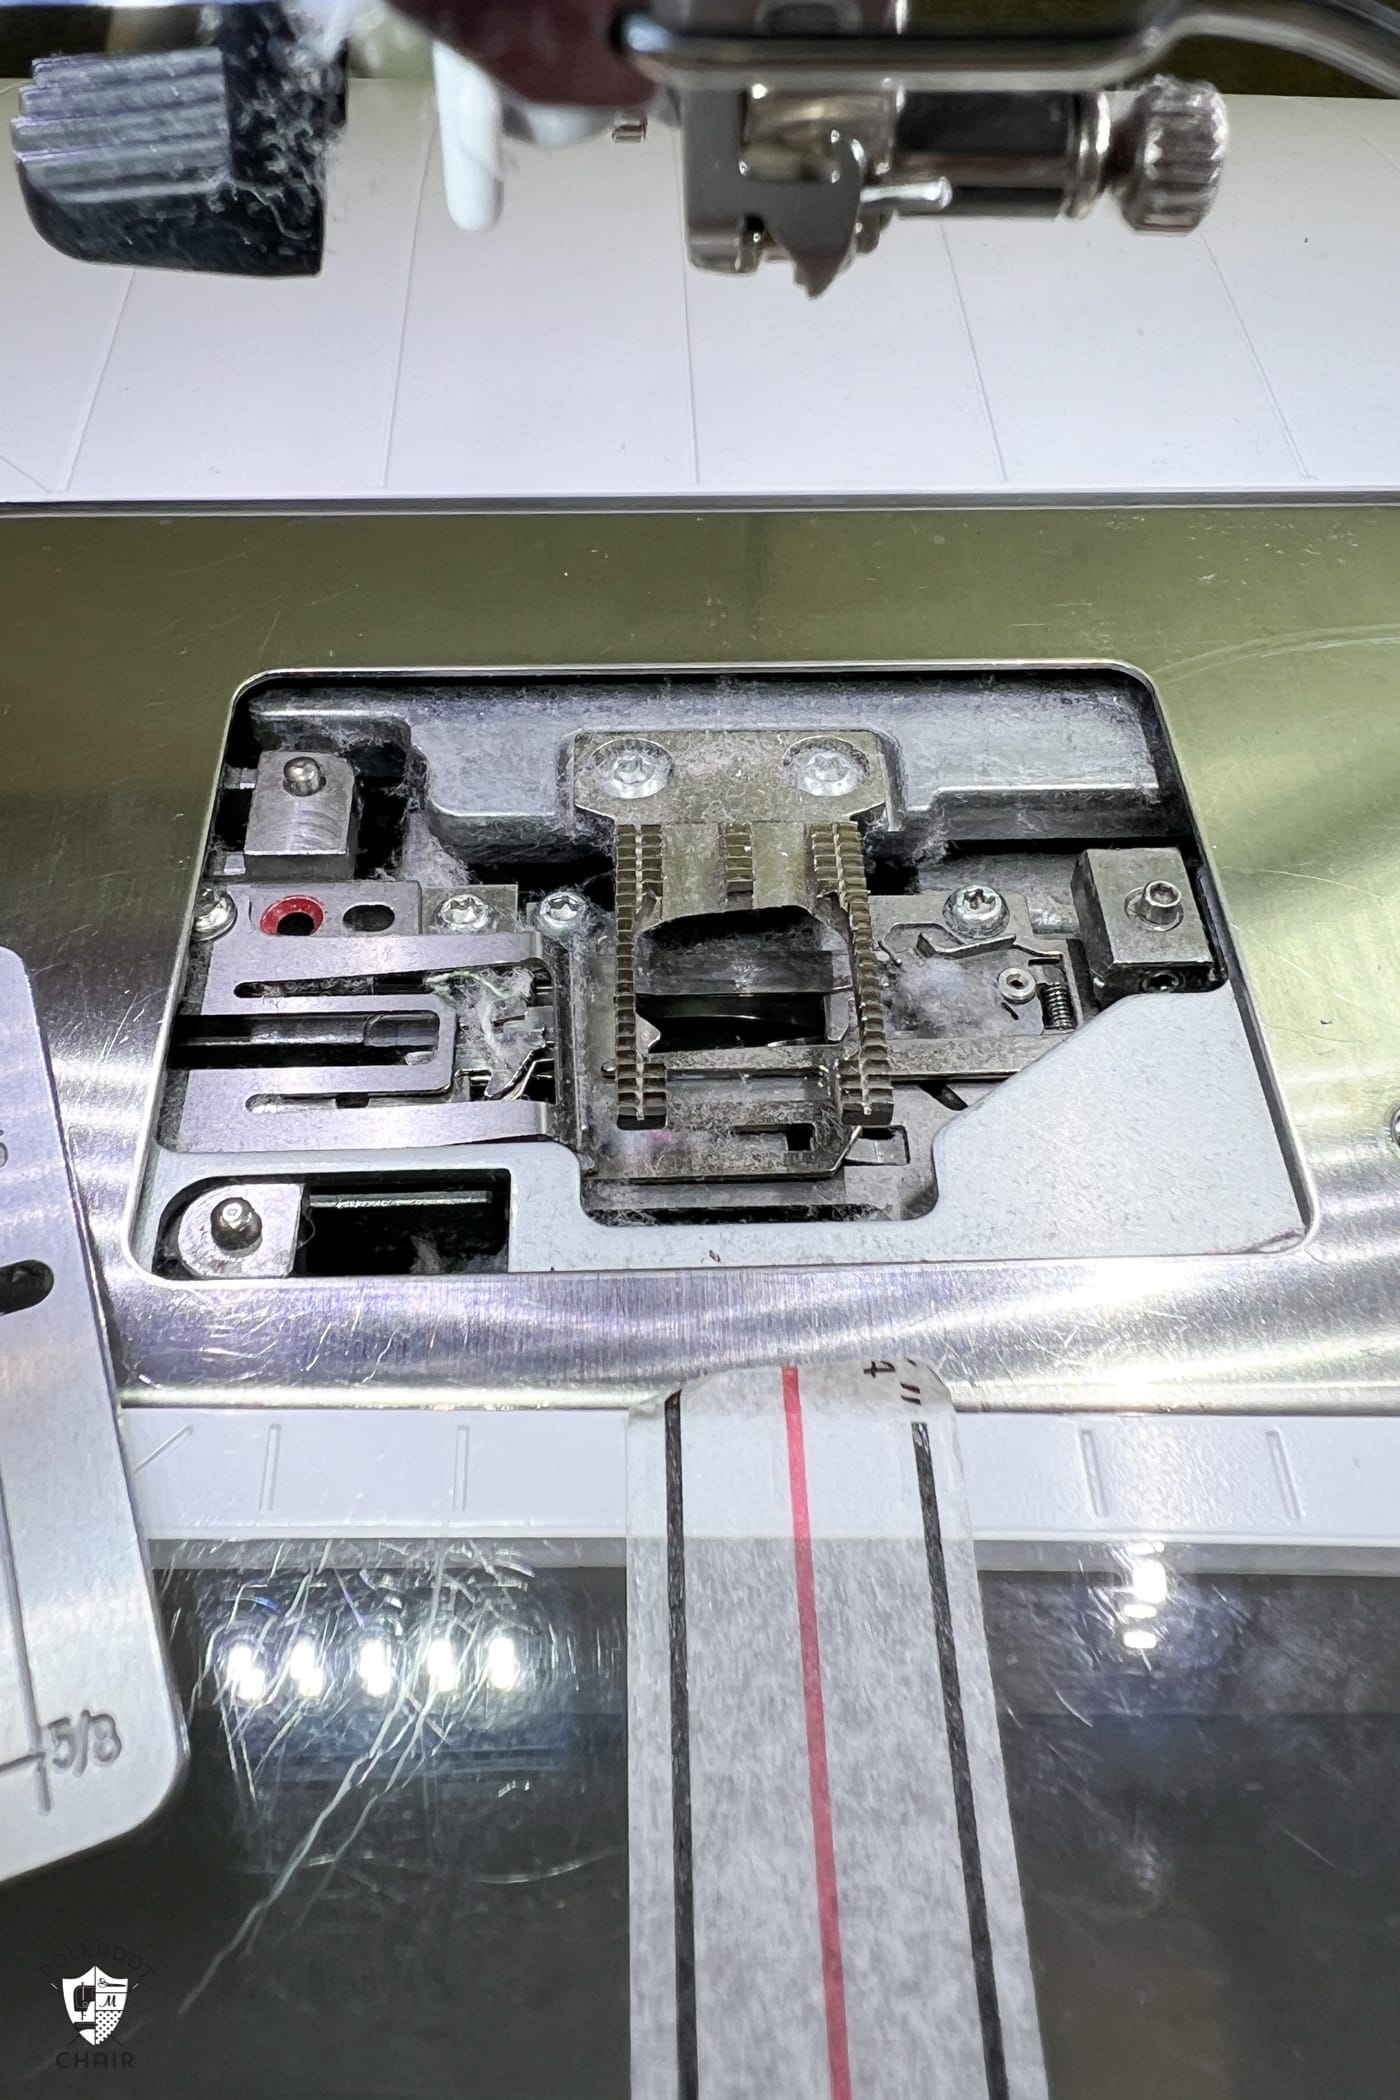
- Remove the Presser Foot and Needle Plate: Depending on your machine model, you may need to remove the presser foot and needle plate. Consult your machine’s manual for guidance.
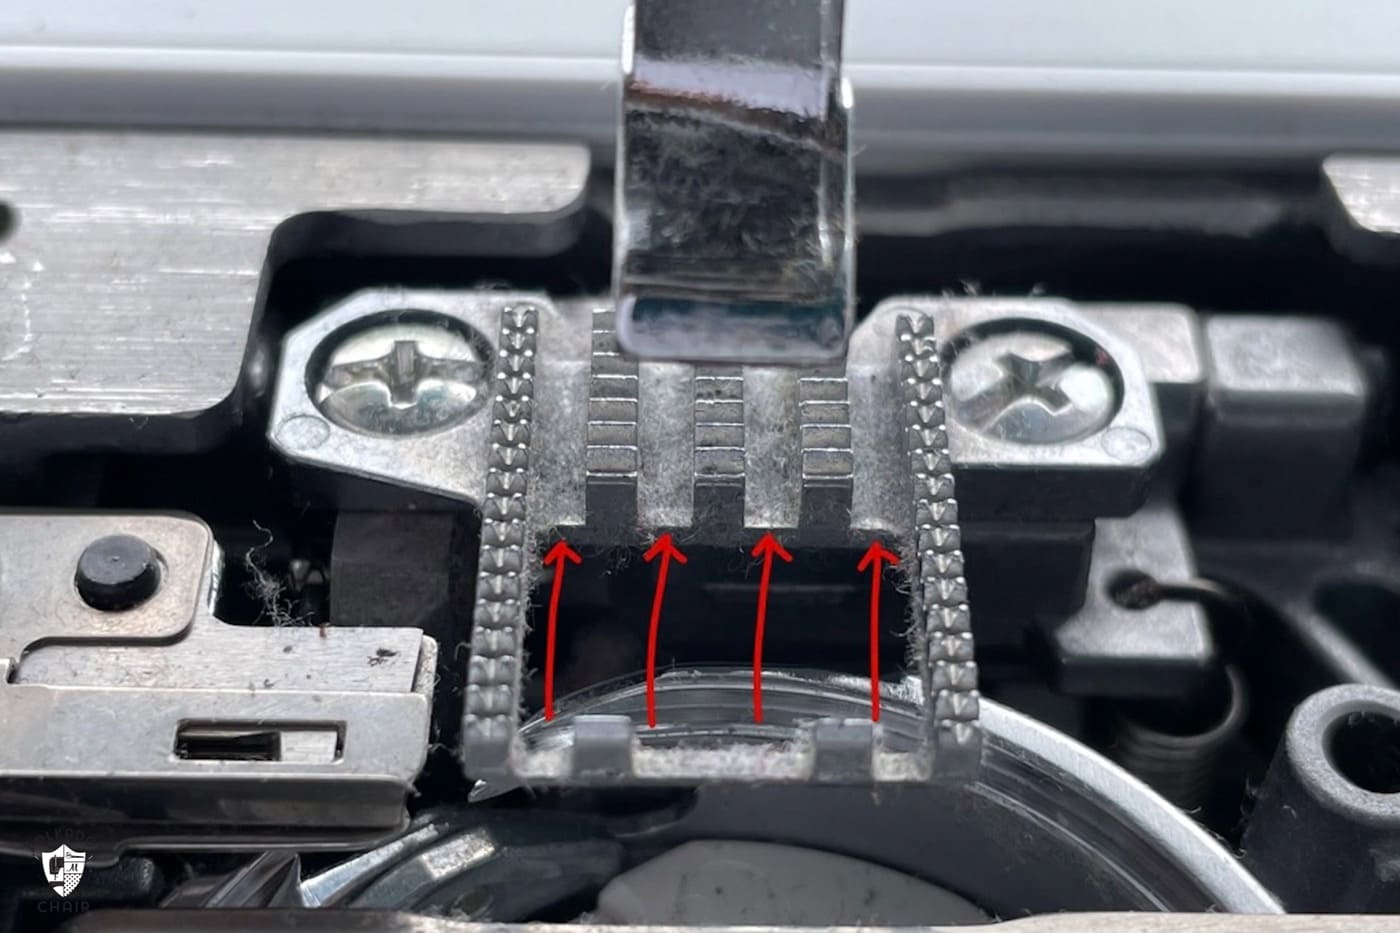
- Brush Away Loose Debris: Use a small brush to gently remove any loose debris, lint, or dust from the nooks and crannies of your machine. Pay close attention to areas around the feed dogs, tension disks, and bobbin case.
- Clean the Needle Plate and Feed Dogs: Use a lint roller or a brush to clean the needle plate and feed dogs thoroughly. These components often accumulate lint, which can affect the fabric feeding process.
- Clean the Bobbin Area: Remove the bobbin case and clean it using a soft, lint-free cloth. Gently wipe away any lint or thread residue. You can also use tweezers to remove any small bits that might be stuck.
- Oil Moving Parts: NOT ALL machines require oil. Consult your sewing machine’s manual to identify if it needs oil and if it does, the points that require oiling. Apply small drop of sewing machine oil to these areas to ensure smooth movement. Wipe off any excess oil to prevent staining fabrics.
- Reassemble the Machine: Put back the bobbin case, needle plate, presser foot, needle, and bobbin. Make sure all parts are properly aligned and secured.
- Test the Machine: Before you start sewing, manually turn the handwheel a few times to ensure that all parts move smoothly. This will help distribute the oil evenly. I also recommend sewing a few lines of stitches with a piece of scrap fabric to make sure there is no oil left on the machine that could transfer to your project.
If you have a small handheld vacuum cleaner, you may want to keep it close by to vacuum up the lint that comes out of the machine.
3 Sewing Machine Cleaning Tips
One: Clean Regularly
I aim to clean every time I start a new project, especially after I’ve been quilting (I find when working with batting/wadding too, that adds to the fluff inside the machine).
But cleaning would also be my first “go-to” any time I have an issue when sewing.
Two: Clean Gently
There are a lot of different elements inside a sewing machine (even the most basic models), so you need to be careful that nothing gets pushed out of place or damaged…this will cause far more problems than a little bit of fluff! This is one of the reasons that I like using a pipe cleaner.
Three: Clean Thoroughly
Fluff can get anywhere and everywhere inside a sewing machine, so you must ensure you clean every nook and cranny.
Does My Sewing Machine Need Oil?
I have sewn with a few different sewing machine brands over the years and have had machines that do and do not require oil. The type of oil that you use to oil your sewing machine may vary by manufacturer. That’s why it’s always best to check your manual before you clean and oil your machine.
My BERNINA machines do require oil.
To oil a BERNINA:
One:
Pop off the thread plate, needle and presser foot.
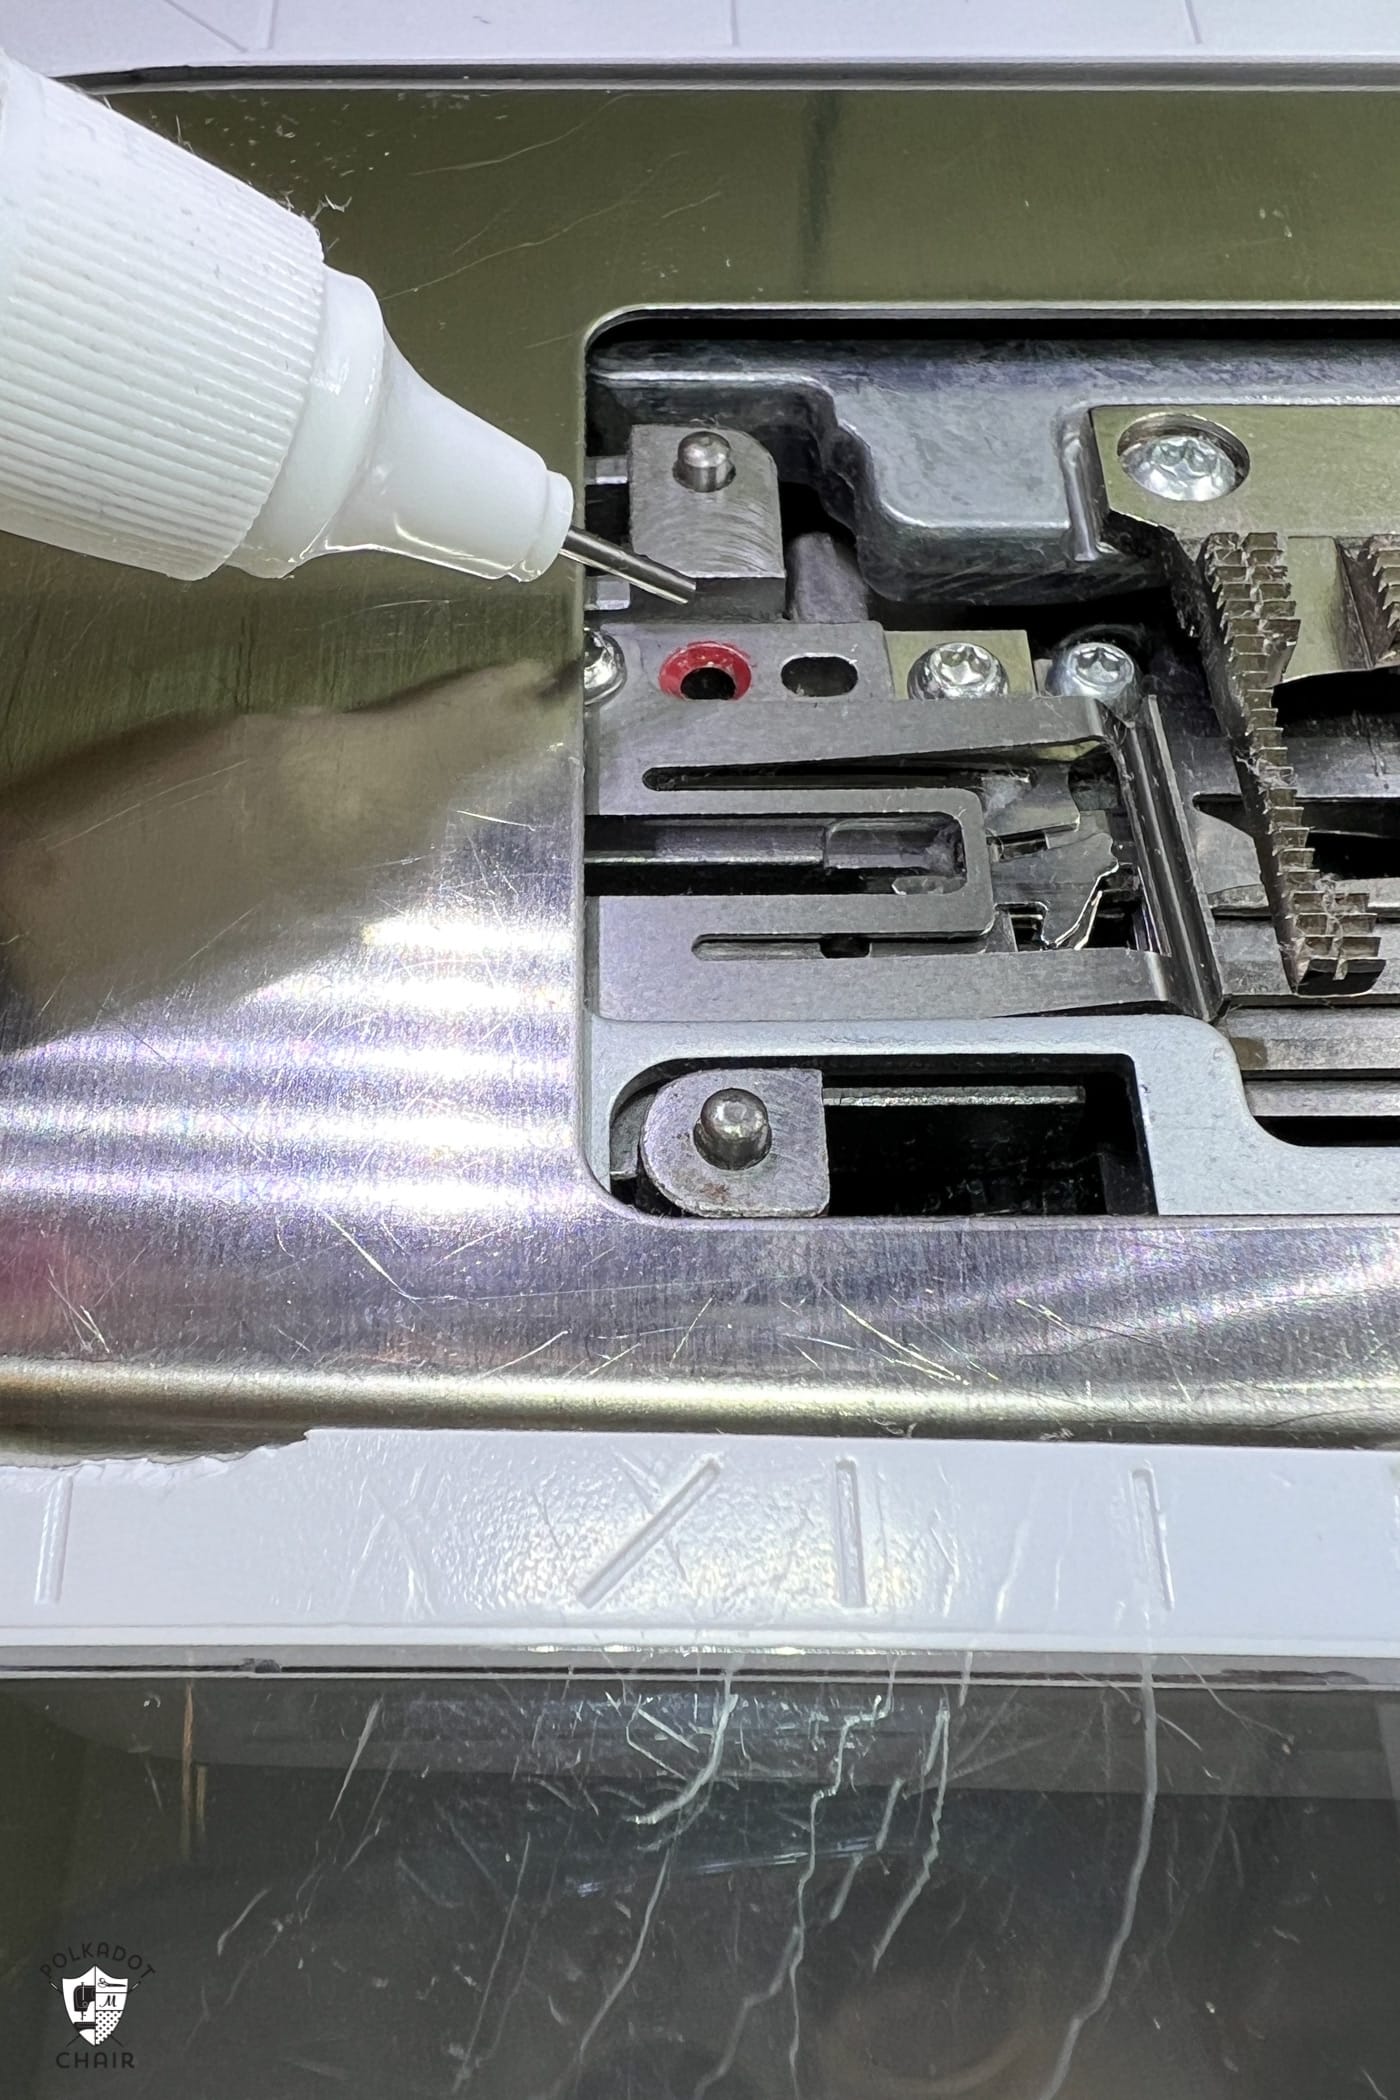
Two: Place a drop of oil in the hole with the red dot
Three: Remove the bobbin and case
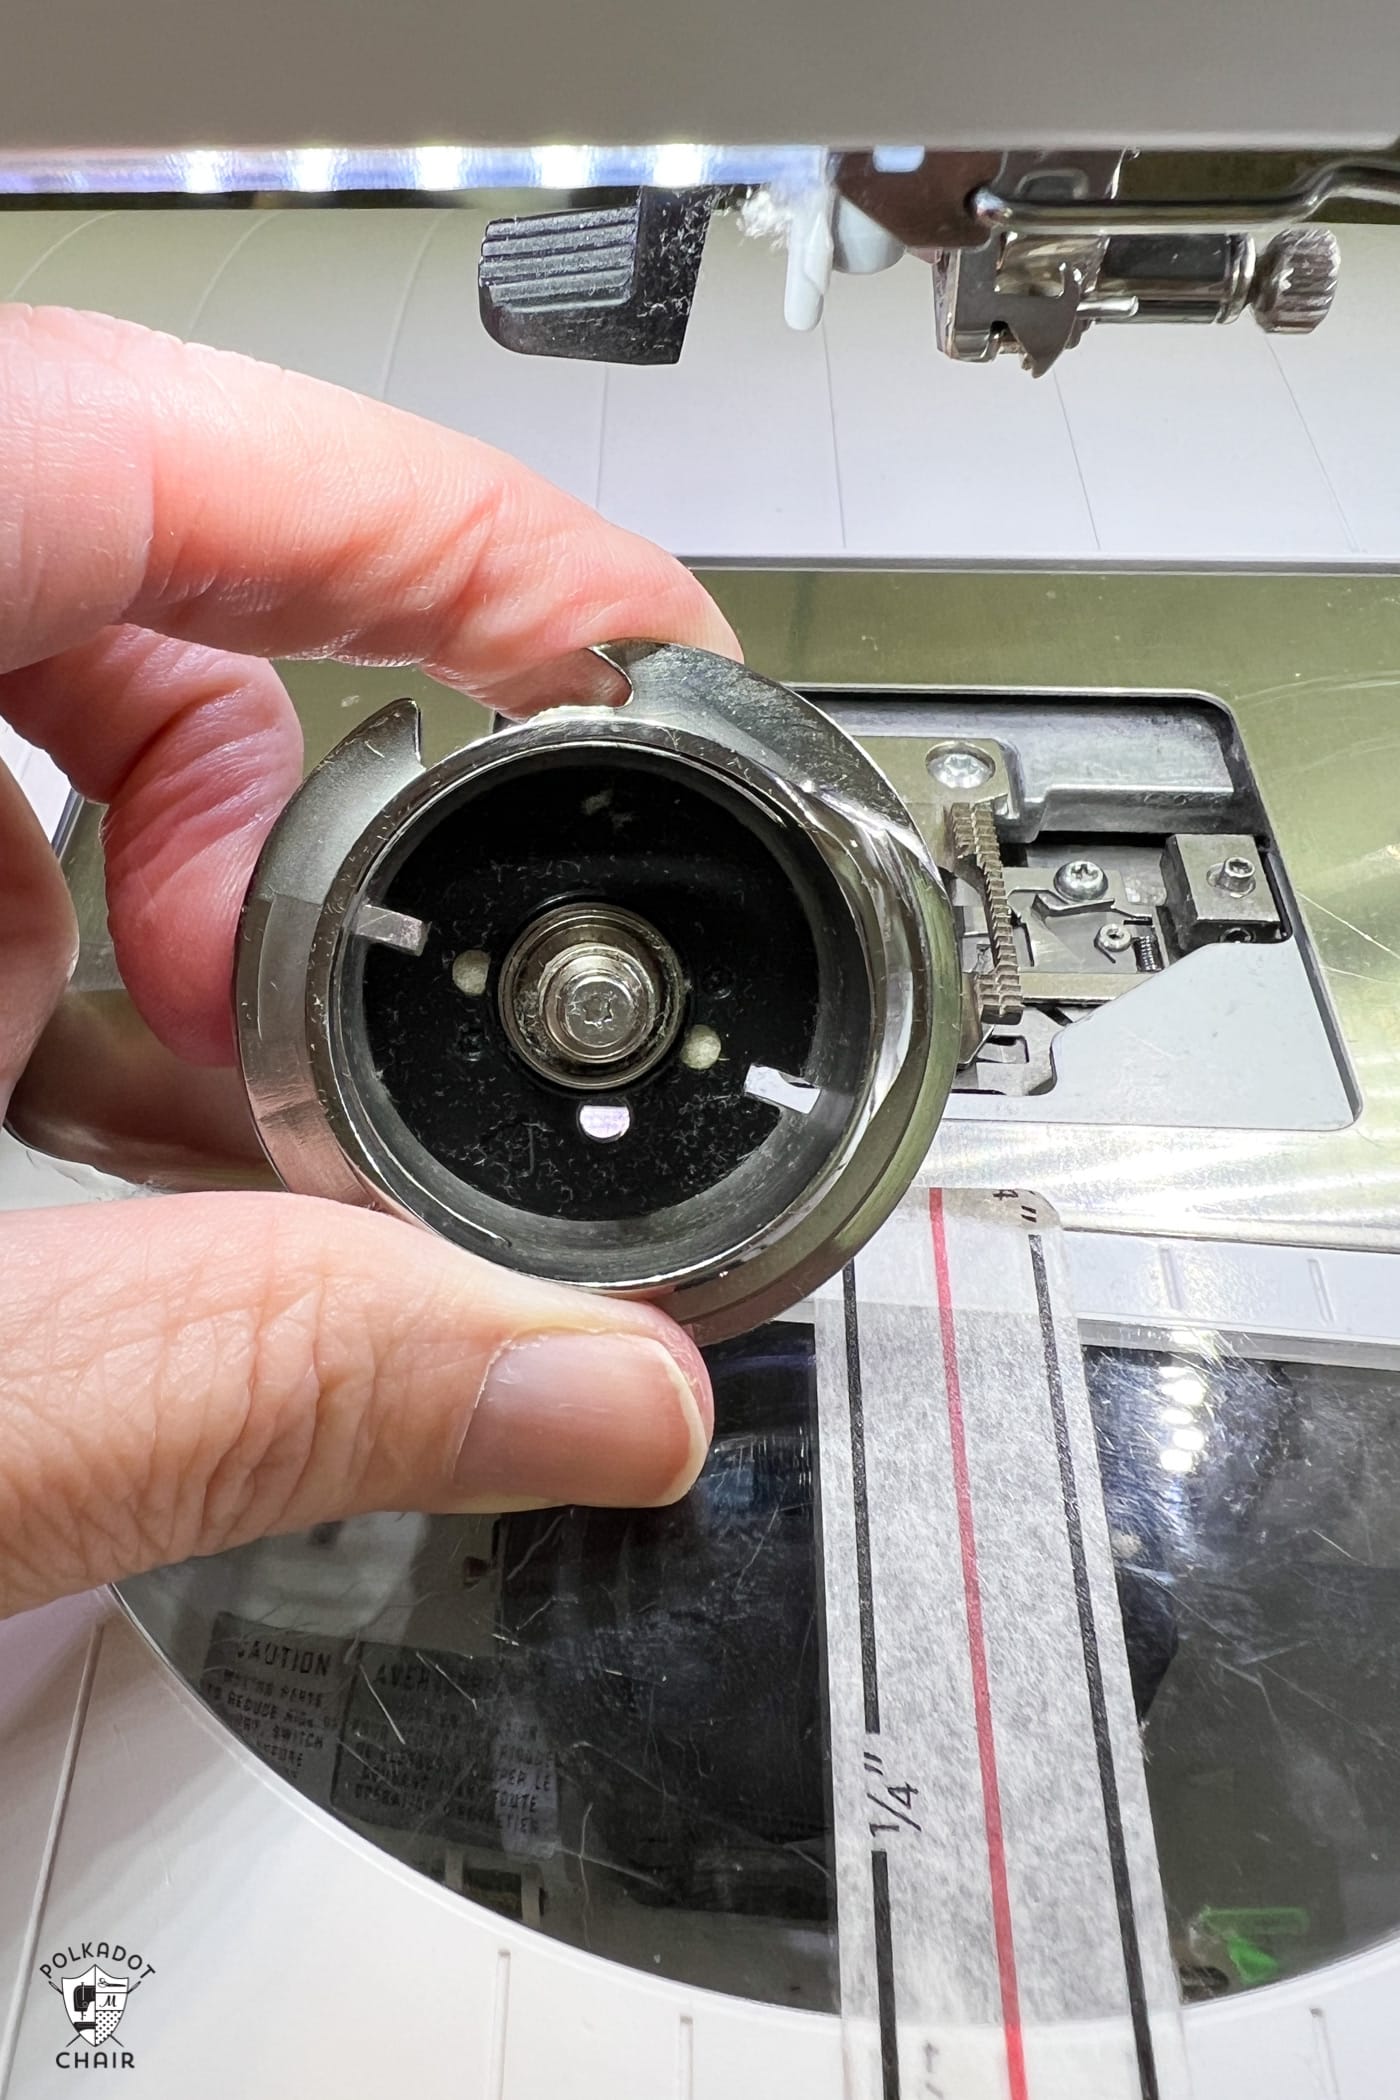
Four: Place a drop of oil on each dot in the bobbin assembly
Five: Reassemble.
The best way to determine if your sewing machine needs oil is to check your owner’s manual. If it does need oil, make sure you do it at the recommended intervals.
Things Not To Do
Don’t use an air blower; these can be too powerful and move the workings inside your machine (this might only be a tiny amount, but it could have a big effect).
Don’t blow to remove fluff; although blowing with your mouth is much more gentle than compressed air, you will get moisture inside your machine (again, this will only be the tiniest amount, but over time this could cause parts of your machine to rust).
Don’t forget where all the pieces go! If you are new to opening up your machine for cleaning, then you need to be careful; you know where to put all the pieces when you have finished.
TIP: Take a photo before you remove every piece so you remember the order to replace them and exactly where they go.
Regular cleaning of your sewing machine is a simple yet crucial task that can greatly impact your sewing experience. By following the steps outlined in this guide, you can maintain a clean and well-functioning sewing machine that produces high-quality stitches and lasts for years to come.
Remember to consult your machine’s manual for specific cleaning instructions tailored to your model!

I was just reading in a Facebook group about someone cleaning their machine for the first time and the huge difference it made. It made me realize I’ve never cleaned mine but had no idea what to do. This came at exactly the right time. Thank you so much!
yeah, it’s crazy how much it makes a difference. it’s always the first thing I check when my machine starts acting wonky.
My dealer told me not to oil in the red dot. is this a change?
Mine told me to! Best to check your owners manual I think!
I needed that lesson…..GREAT ideas…..especially the one to take a pic so you will know where everything goes back!!!
Love you ideas……thank you so much!
Your Jeffersonville, IN fan
Pat Raines
Melissa, this is one of the most comprehensive articles on cleaning your machine that I have read. Thank you!
Thanks for the kind words!
As far as I know Bernina does NOT want oil in the red hole. Only oil the hook where you indicated. I have a B770
I have a 770 also, and the Guide on the machine still has me drop the oil in the top spot. It’s so weird, I checked it today. There seems to be a lot of confusion about it!