• Skip to primary navigation
  • Skip to main content
  • Skip to primary sidebar

The Polka Dot Chair logo

  • SEWING
    • Free Sewing Patterns
    • Bag Patterns
    • Costumes
    • Apparel
    • Learn to Sew
    • Beginner Friendly
    • Embroidery Projects
    • Tips & Techniques
    • All Sewing
  • QUILTING
    • Quilt Blocks
    • Learn to Quilt
    • Free Patterns
    • Quilt Patterns
    • All Quilting
  • CRAFTS
    • Disney
    • Cricut
    • Printables
    • All Crafts
  • HOLIDAYS
    • Seasonal Projects
    • Valentine’s Day
    • Easter
    • 4th of July
    • Halloween
    • Thanksgiving
    • Christmas
    • All Holidays
  • TUTORIALS
  • ABOUT
    • About Me
    • My Fabric Collections
    • Published Books
    • Press
    • FAQ’s
    • Contact
  • SUBSCRIBE
  • SHOP
menu icon
go to homepage
  • SHOP
  • TUTORIALS
  • SEWING
  • QUILTING
  • SUBSCRIBE
  • CRAFTS
  • HOLIDAY PROJECTS
  • ABOUT
    • Published Books
    • My Fabric Collections
  • CONTACT
    • Facebook
    • Instagram
    • Pinterest
    • YouTube
  • subscribe
    search icon
    Homepage link
    • SHOP
    • TUTORIALS
    • SEWING
    • QUILTING
    • SUBSCRIBE
    • CRAFTS
    • HOLIDAY PROJECTS
    • ABOUT
      • Published Books
      • My Fabric Collections
    • CONTACT
    • Facebook
    • Instagram
    • Pinterest
    • YouTube
  • ×

    Home » Sewing

    Pillowcase Shirt Tutorial

    Updated: Apr 19, 2018 by Melissa Mortenson · This post may contain affiliate links · This blog generates income via ads · 13 Comments

    Today I’m very excited to be guest blogging as part of Sew Chic and Unique’s “Inspire to Create Series”.  Mayya of Sew Chic lives in Oman! How cool is that!! I love how blogging helps me meet and share ideas with people all over the world!

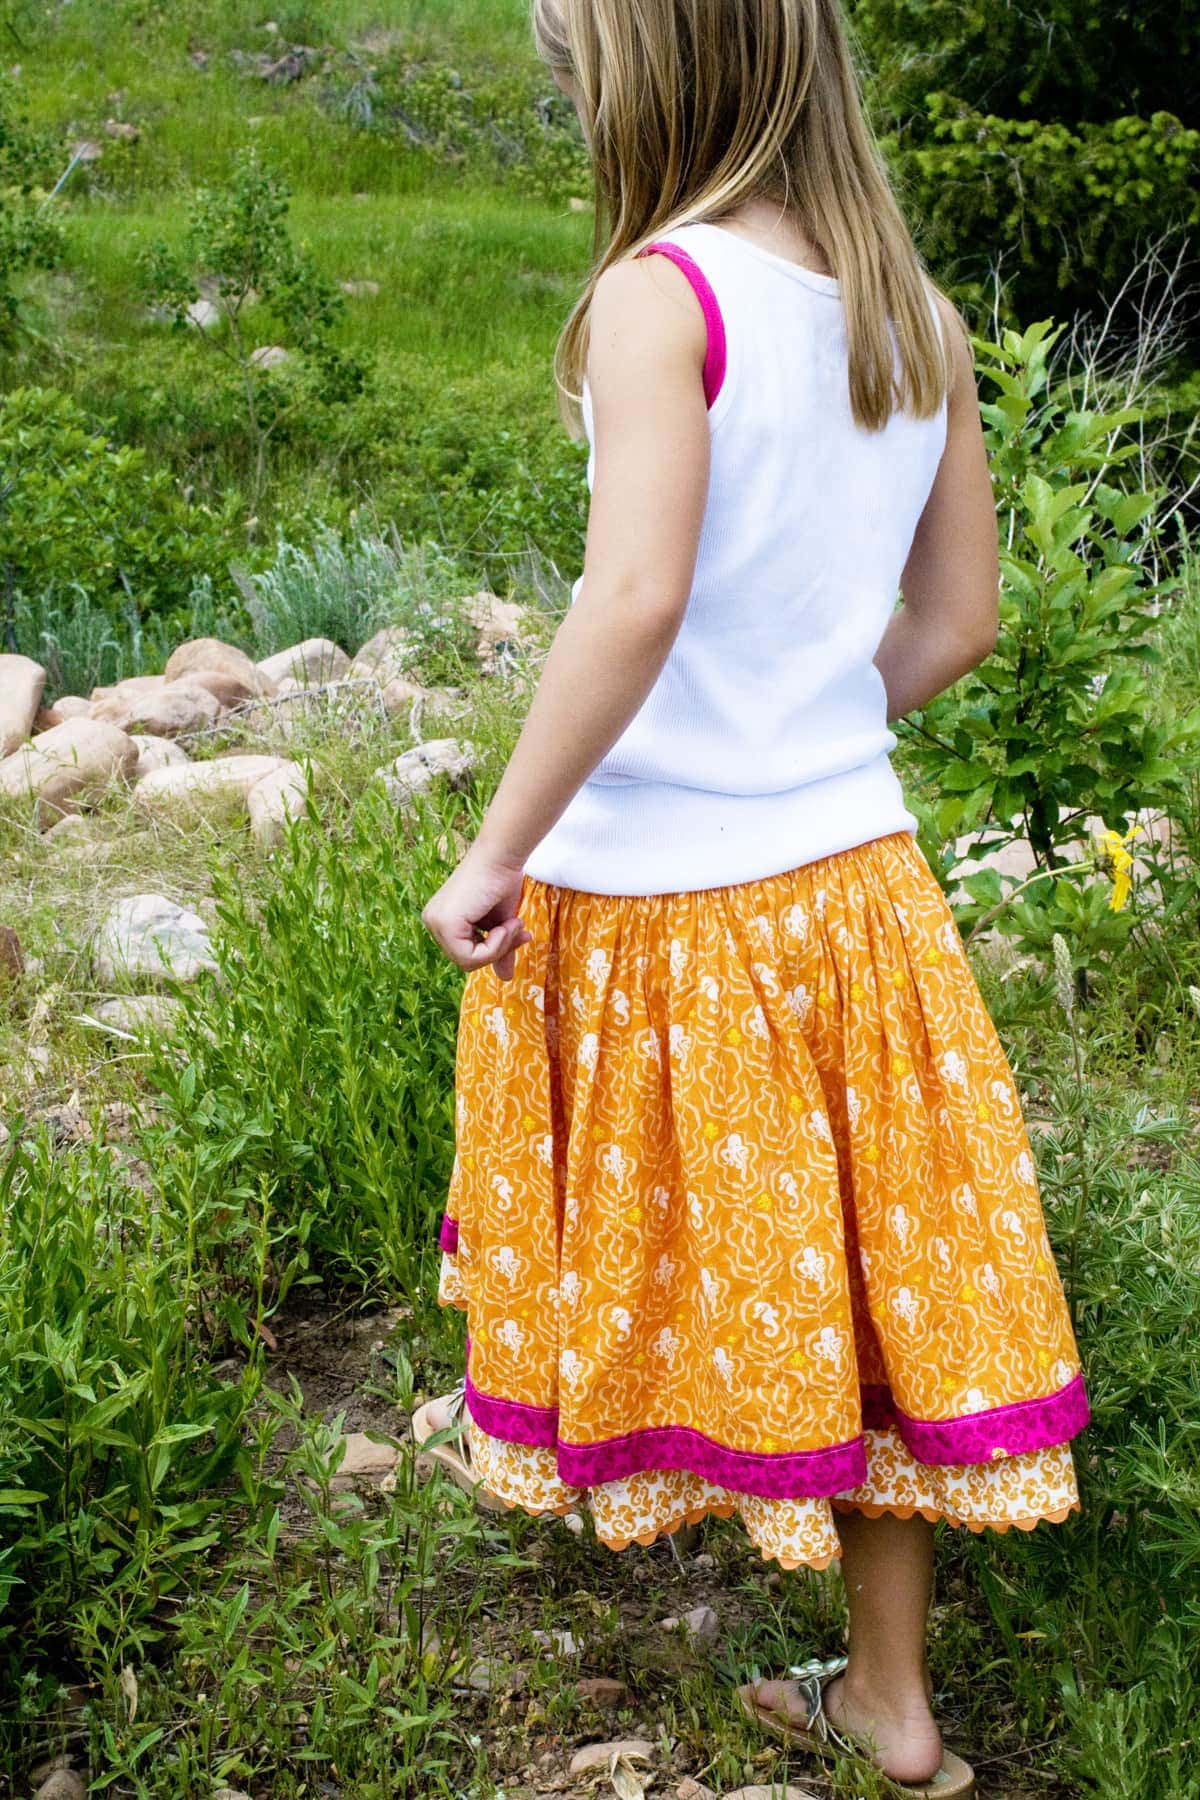
    Today I’m sharing a tutorial for a little girls pillowcase shirt.

    Those of you that have been following my blog this summer may know that I’ve been experimenting with sewing pillowcase dresses.  The pillowcase dress is not a new thing and I’m sure there are a lot of different ways to make one, I’ve just been sharing a few ways that I’ve figured out to make them.
    After I made the first pillowcase dress I got a lot of questions wondering if there was a way to make it in a shirt size instead of a dress. This week I sat down and decided to see if I could figure it out. I’m happy with how this one turned out. I think it looks adorable with skinny jeans and could easily be layered under a long sleeved t-shirt so that it could be worn into the winter.
    This shirt is EASY to make. It is made using ONLY 3 fat quarters.  2 for the front and back and 1 for the trim. This one fits my daughter who is about a size 8. My guess is that this shirt would fit from size 5-8. You can shorten it if needed.
    For this project you will need:
    -3 fat quarters
    -½″ wide elastic
    -2″ wide ribbon
    To begin, take your fat quarters for the front and back and square up any uneven edges and cut off the selvages. You want to leave the fat quarters as close to their original size as possible.

    On the 18″ side of the 2 fat quarters measure down 5″ and over 2″. Cut a J shaped hole out of both sides of both pieces of fabric.

    From your 3rd fat quarter cut 2 pieces 4″x 18″. Stitch to the uncut 18″ side of your other 2 fat quarters. Press seam towards 4″ piece of fabric.

    Place shirt front and back pieces together and stitch 2 side seams of shirt with ¼″ seam. Zigzag or serge.

    Turn under raw edge of shirt band ¼″ press. Fold over so that folded edge of fabric is even with the seam of the shirt/shirt band. Stitch in place. Press.

    Cut 2 pieces, 2″ wide on the bias from your 3rd fat quarter.

    Pin right side of bias pieces to right side of underarm seams. Stitch with ¼″ seam.

    Fold under raw edge ¼″ and press. Fold again and pin in place. Stitch & press.

    Turn under top edges of shirt ¼″ and press. Turn under again ¾″ and stitch close to folded edge. This will create the elastic casing.

    Thread your ½″ elastic  through the front shirt casing.  Adjust the width of the elastic based on the size of the shirt you are making. The smaller the size the more gathering,  the larger the size the less gathering. Feed end of ribbon into the casing, it will only go in about ½″.  Stitch so that the elastic and ribbon both stay in place.  Repeat for other side of shirt.

    Enjoy!

    also I just wanted to say THANK YOU to everyone who gave me suggestions this summer for the pillowcase dress construction!  That’s where I got the idea to use elastic in the top instead of ribbon!!

    linking up to these fab parties!!

    More Projects You May Enjoy

    • 25 Free Patchwork Quilted Pillow Patterns
    • Mini Fabric Envelope Sewing Pattern
    • Meet My Valentine’s Day Fabric Collection
    • 40 Valentine’s Day Projects to Sew

    • Share
    • Email

    About Author

    Melissa Mortenson

    Melissa Mortenson is a blogger, designer, and content creator. She is the Polka Dot Chair blog founder and has been sharing fresh and creative ideas with readers since 2008. She is the author of “Project Teen, Handmade Gifts your Teen will Actually Love.” Her work and designs have been featured on HuffPost, TODAY, Pioneer Woman, HGTV, BuzzFeed, Better Homes & Gardens, and many other established publications. Her first fabric line, “Derby Style,” debuted in January 2015 through Riley Blake Designs.  Additional fabric collections have followed it in subsequent years. A mom of 3, she considers herself lucky to be living in Kentucky.

    Reader Interactions

    Comments

    1. The Sewist says

      September 20, 2010 at 2:00 am

      Thank you Melissa for guest blogging for Sew Chic and Unique it is an absolute honor to have you.

      This pillowcase shirt is beautiful cant wait to make them for my girls!

      Mayya @ Sew Chic and Unique

      Reply
    2. casserole says

      September 20, 2010 at 9:20 am

      What a cute top!! I linked to your tutorial over at Craft Gossip Sewing:
      http://sewing.craftgossip.com/tutorial-girls-pillowcase-shirt-from-three-fat-quarters/2010/09/20/

      –Anne

      Reply
    3. Melissa says

      September 20, 2010 at 10:57 pm

      The j-shape for the armpit is a great tip. I made a shirt similar to this for my daughter but didn’t do the j-shape. I think it would help the fit of the arms.

      Thanks!!

      PS yours is very cute.

      Reply
    4. Amnah says

      September 21, 2010 at 2:35 pm

      Saw this on Sew Chic and Unique and on Today’s Creative Blog. Can’t wait to try this.

      Reply
    5. Heather says

      September 21, 2010 at 9:46 pm

      Great job on the pillowcase top. I always hated when the ribbons never held the top together right. The elastic is a great idea.
      I linked up your post on my blog.

      Reply
    6. Rachel@oneprettything.com says

      September 25, 2010 at 10:35 pm

      Super cute! I love it with the jeans! Thanks so much, I’ll be linking.

      Reply
    7. Tiffany says

      September 27, 2010 at 1:14 pm

      Hi, new sewer here and I luv this. Cute yet simple.

      Reply
    8. Lelan @ Good Gravy! says

      September 27, 2010 at 9:39 pm

      You make it look so easy! 🙂

      Reply
    9. Dawn says

      October 21, 2010 at 9:08 am

      Love this shirt-so cute! I just used your tutorial to make a lady bug shirt for my daughter’s Halloween costume-blogged about it here http://7alltogether.blogspot.com/2010/10/super-easy-ladybug-costume.html can’t wait to make a cute shirt for her to wear all the time!

      Reply
    10. Dawn Ludwig says

      November 05, 2010 at 11:18 pm

      How do you know how long to make your ribbon ties? I have had a hard time guestimating these.

      Reply
    11. Amanda says

      March 17, 2013 at 1:24 am

      Thank you soooo much for the pillowcase shirt tutorial!! I absolutely LOVE it! In fact, I made one as a gift a few weeks ago for a friend of my daughter’s birthday. It was a huge hit with all the girls and parents!

      This particular shirt pattern is now my daughter’s favorite and she wants me to make each guest one for her birthday sleepover and one for their 18″ doll. I’m super excited to tackle the challenge (and flattered that my daughter actually likes my sewing), but the party is in exactly one week…EEEKKKK!!!! Talk about cutting it short!! She has 6 guests and their dolls coming to this party.

      Question: Two of the guests are older girls, more like a 10/12, the rest are size 7/8 so the pattern will work fine for them. How on earth can I make this work for these two older girls? I’m not pattern savvy at all. I do have access to bigger cuts of fabric, if I need them, but I love the simplicity of your design.

      Thanks in advance!

      Reply
      • Melissa Mortenson says

        March 17, 2013 at 10:36 pm

        Hi!!
        I’m so glad you enjoy the tutorial… My daughter is 11 now and think it’s time to make her another shirt.

        What I do for sizing is look at sizing guides for stores online… For example Gap. (the link to their size charts is at the bottom of their main page).

        According to them a size 10 girls shirt (their Large) would fit a girl with a chest circumference of 28 1/2 ” This shirt is made for a size 6 (or their size S) and a chest measurement of 25″ -26″… a difference of 3 1/2″ (round up). I would add 3 1/2″ width to the front and the back pieces. Then also add to the length based on sizing on the chart I would guess 8″.

        Another trick.. (might be easier) go buy a VERY cheap t-shirt in the size you want. Just use that as a rough guide for the shirt. Remember a good rule of thumb for gathers (like this shirt) is to double your width… so if the store bought shirt is 10″ wide cut your front and back pieces 20″ wide (that’s just a guess).

        Have fun, pillowcase dresses are very forgiving, just play around a bit!

        Melissa

        Reply
        • Amanda says

          March 19, 2013 at 2:20 pm

          Melissa,

          Thank you sooo much for the help and great advice! I’ve got my pieces cut now and I’m ready to sew as soon as the babies go down for a nap. I will let you know how it turns out. Hopefully, the weather will hold here for this sleepover on Friday and they won’t cancel school. I’ll get a pic of the girls and dolls in their outfits to share with you. I’m so excited!

          Thanks again!

          Reply

    Leave a Reply Cancel reply

    Your email address will not be published. Required fields are marked *

    This site uses Akismet to reduce spam. Learn how your comment data is processed.

    Primary Sidebar

    Hello! It’s nice to meet you.

    I’m Melissa. I like to design things, like fabric, printables, and projects.

    I’m also a Mom and a Maker. I am like most of you, just trying to do my best every day. Some days I succeed, many days I fail.  I find joy in creating, if you do too, then I hope that you find something here bring a little “happy” to your life.  Find out more about me here.

    COPYRIGHT POLICY

    All my images and text are copyrighted. You may NOT use any images from this site in any kind of Video (this includes YouTube). If you would like to feature my work, you may use ONE (1) NON-COLLAGED image and must “follow” link back to my original blog post. You may NOT edit, crop, or change my images in any way without written permission. You MAY NOT print out or copy and distribute any text, images or patterns from this site. All patterns, content, instructions, and templates are for personal use ONLY! Thank you! Violators will be reported.

    Footer

    ↑ back to top

    About

    • Privacy Policy
    • Disclaimers
    • About Melissa
    • Instagram
    • Facebook
    • YouTube
    • Pinterest

    Newsletter

    • Sign Up! for emails and updates

    Contact

    • Contact
    • FAQ
    • Press
    • Published Books
    • Fabric Collections

    Welcome to the Polka Dot Chair! Here you’ll find easy, step-by-step, sewing, quilting, and crafting projects. We design projects for Makers of all skill levels. Beginners are welcome!

    DISCLAIMER:

    While every effort has been made to ensure the accuracy of the content on this website, the information is made available without warranty of any kind. The Polka Dot Chair accepts no responsibility or liability, whether direct or indirect, as to the currency or accuracy of the information, nor any consequence of its uses. This website is not intended to substitute the advice of a professional.

    Copyright © 2022 Polka Dot Chair

    [ Placeholder content for popup link ] WordPress Download Manager - Best Download Management Plugin