• Skip to primary navigation
  • Skip to main content
  • Skip to primary sidebar

The Polka Dot Chair logo

  • SEWING
    • Free Sewing Patterns
    • Bag Patterns
    • Costumes
    • Apparel
    • Learn to Sew
    • Beginner Friendly
    • Embroidery Projects
    • Tips & Techniques
    • All Sewing
  • QUILTING
    • Quilt Blocks
    • Learn to Quilt
    • Free Patterns
    • Quilt Patterns
    • All Quilting
  • CRAFTS
    • Disney
    • Cricut
    • Printables
    • All Crafts
  • HOLIDAYS
    • Seasonal Projects
    • Valentine’s Day
    • Easter
    • 4th of July
    • Halloween
    • Thanksgiving
    • Christmas
    • All Holidays
  • TUTORIALS
  • ABOUT
    • About Me
    • My Fabric Collections
    • Published Books
    • Press
    • FAQ’s
    • Contact
  • SUBSCRIBE
  • SHOP
menu icon
go to homepage
subscribe
search icon
Homepage link
  • SHOP
  • ALL PROJECTS
  • SEWING
  • QUILTING
  • CRAFTS
  • HOLIDAY PROJECTS
  • ABOUT
    • Published Books
    • My Fabric Collections
    • Facebook
    • Instagram
    • Pinterest
    • YouTube
  • ×

    Home » Quilts

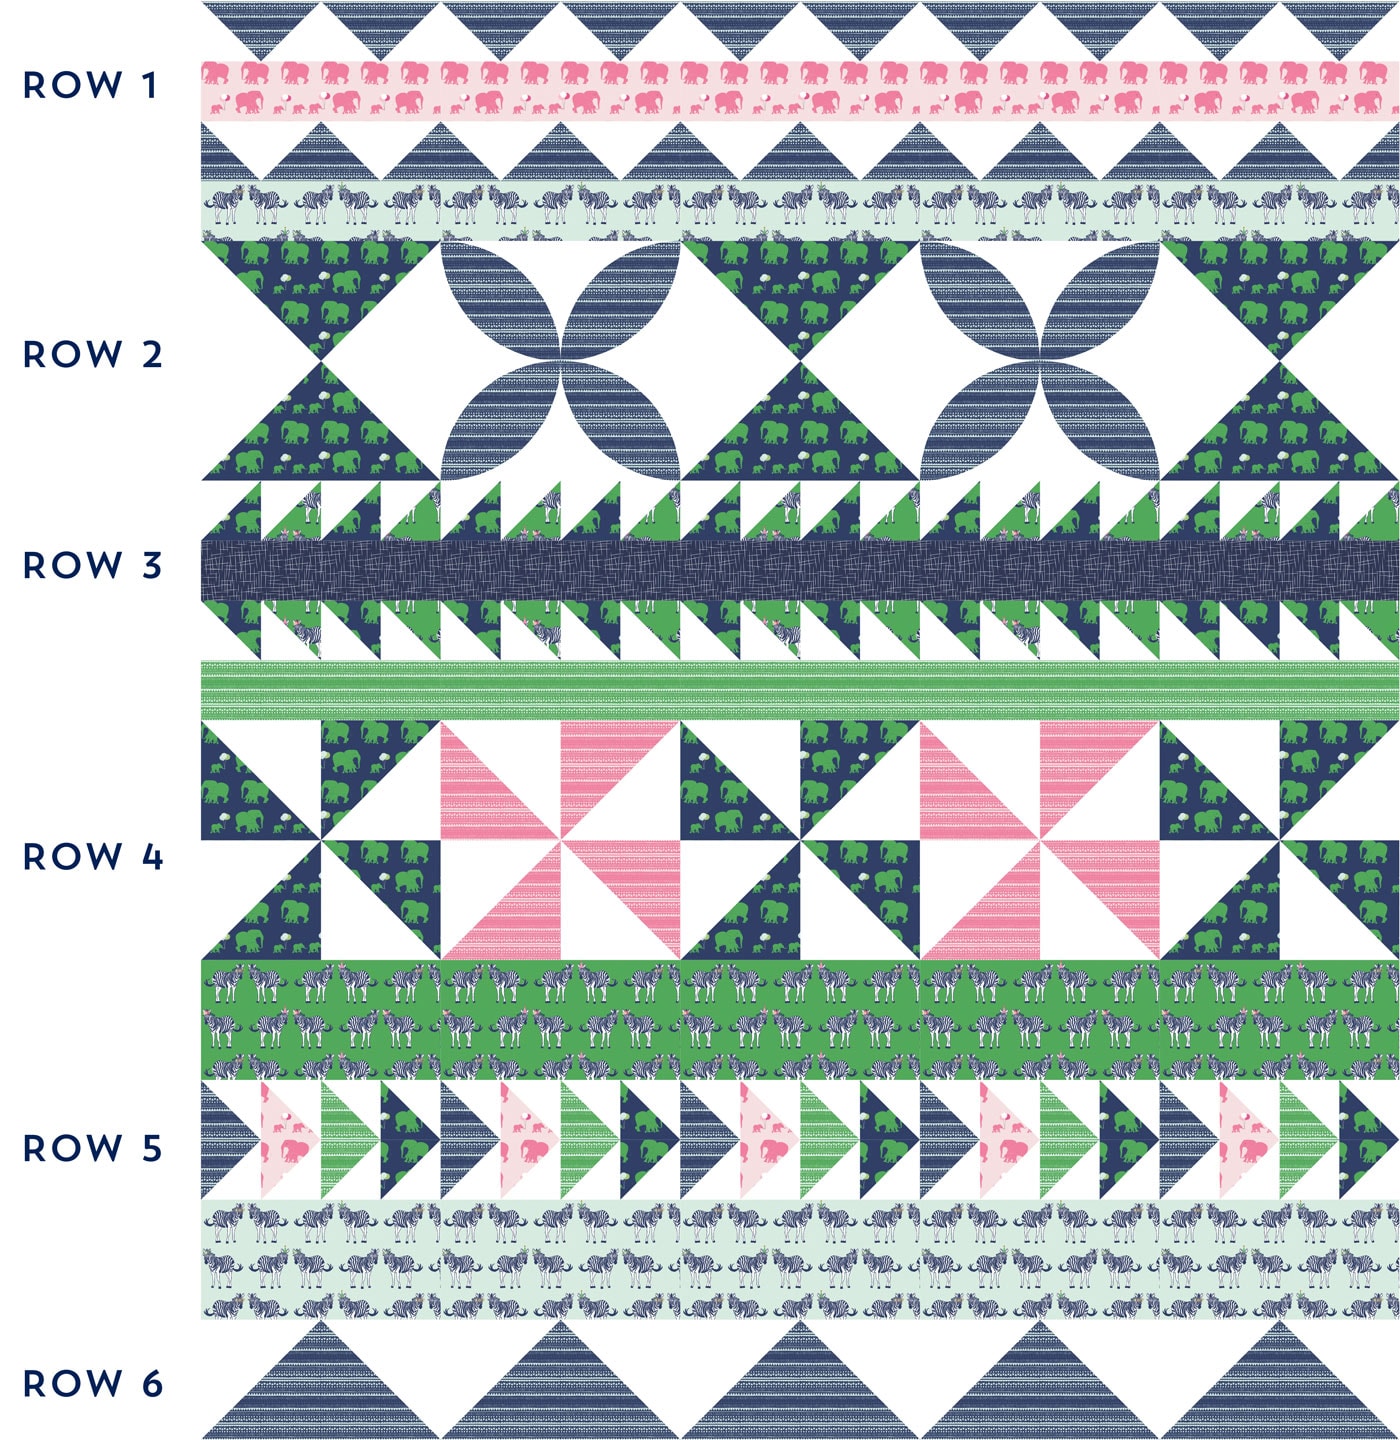
    Seasonal Safari Row Along; Row 2

    Updated: Nov 17, 2017 by Melissa Mortenson · This post may contain affiliate links · This blog generates income via ads · 2 Comments

    Welcome to Row 2 of our Seasonal Safari row along. If you’d like to see all of the posts in this series as of today, you can CLICK HERE. 

    Seasonal Safari Quilt Pattern - offered as a free quilt along this Fall from the polkadotchair.com blog! #quiltalong #freequiltpatterns #rowquilt #quiltingtutorials #quilts #safariparty #rileyblake #melissamortenson #polkadotchair #howtoquilt #learntoquilt

    We have made it to the last row in our row along! Which is row 2. I saved it for last simply because it builds on some of the skills we learned in previous weeks (like making half square triangles). If you’re joining us just this week. Let me “sum up”

    • This Row along is offered for free and is posted across many blog posts over a 3 month period, it began in September 2017.
    • This is the last of the rows.
    • We are not going in order by numerical row, we are going in order by the difficulty of the rows.
    • This is row 2 of 6 rows.
    • To see all of the rows posted AS OF TODAY you can click here.
    • We will talk about finishing in an upcoming blog post.
    • This is not the last post
    • The fabrics used are from my Safari Party line with Riley Blake Designs. 

    Seasonal Safari Quilt Pattern - offered as a free quilt along this Fall from the polkadotchair.com blog!

    Row 2 of the quilt consists of two different block types. If you want, you can simplify it and only make one block type, it’s up to you. The blocks in the row are pieced Quarter Square Triangle blocks and appliqued Joesphs Coat blocks. The appliqued blocks are raw edge appliqued with a fusbile web. If you would like to hand applique them you can, I just can’t tell you how to do that, since I don’t know how myself! LOL!

    Cutting Directions:

    From White Fabric Cut:

    2 pieces 13 ½″ x 13 ½″

    2 pieces 12 ½″ x 12 ½″

    From Navy Elephant Fabric Cut:

    2 pieces 13 ½″ x 13 ½″

    Do not cut the Navy Geometric Fabric yet.

    In addition to your regular quilting supplies, you will need a package of Heat n Bond lite for the applique blocks.

    First Create your Quarter Square Triangle Blocks

    How to Quick Piece Half Square Triangles


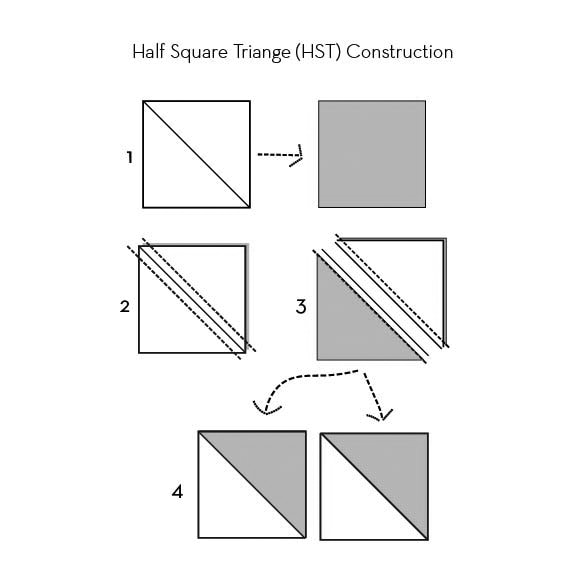
    Begin by creating Half Square Triangles from the navy fabric (A),  and your background fabric (B).

    To do this, layer one 13 ½″ square of fabric B on top of one 13 ½″  square of fabric A, right sides facing.   Draw a diagonal line down the center of one piece and stitch ¼″ on each side of the line.  Cut pieces apart, press seam to the dark side.

    Repeat with other 13 ½″ squares. You should now have 4 Half Square Triangles.

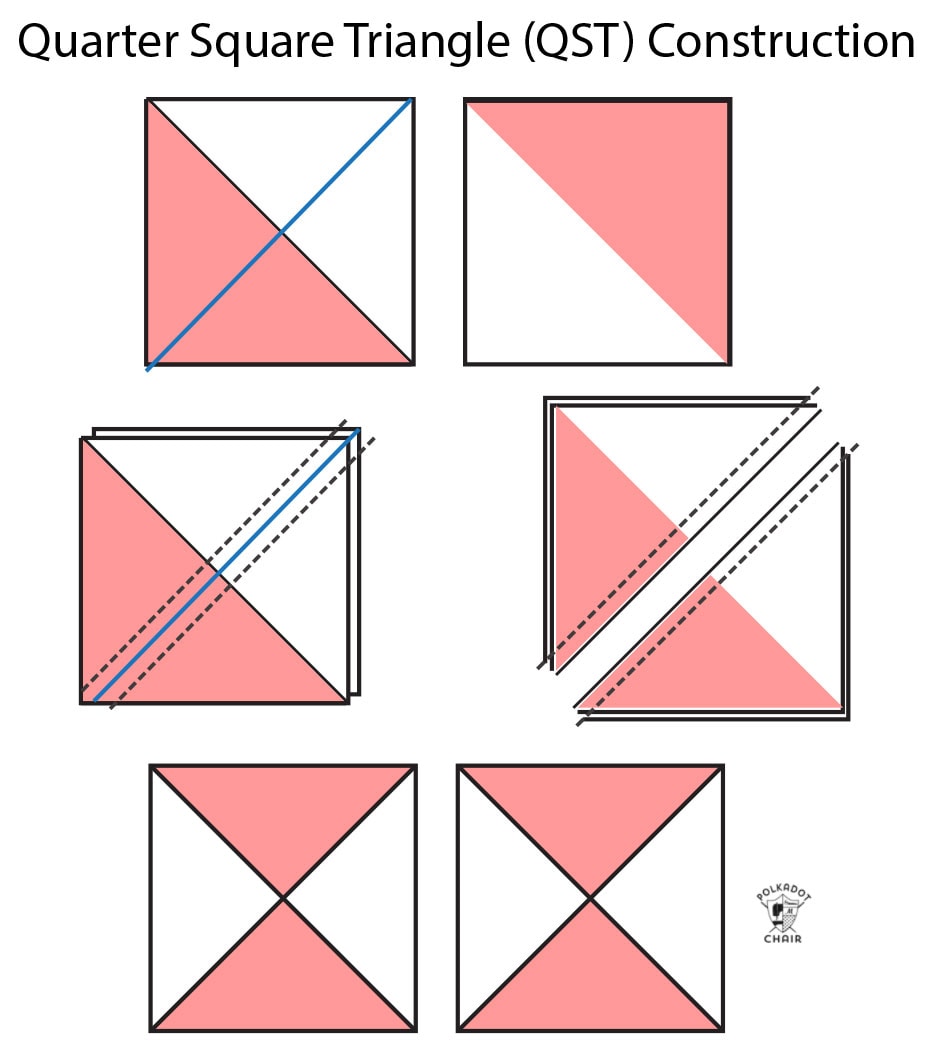
    Now you are going to take those 4 Half Square Triangle pieces and create Quarter Square Triangles.

    Layer two Half Square Triangles on top of each other so that the diagonal seams are “nesting” into each other and the two pieces with print A are not on the same side.

    Draw a line down the center of one of the HST pieces going in the opposite direction of the existing sewn line. Stitch ¼″ on each side of the line. Cut apart and press.

    Trim down to a 12 ½″ x 12 ½″. Make sure it remains “square” as you trim. If you need help with trimming, check out this post on Quilt Block Construction Tips. 

    Using this method you will end up with one extra block. Save it and make a matching pillow!

    Next, create your Joseph’s Coat Blocks

    Trace the template for the curve onto a piece of heat n bond lite. You can download it by CLICKING here.

    Cut the pattern out loosely and press it onto the wrong side of your navy geometric fabric. Cut out precisely.

    Repeat until you have cut out 8 pieces.

    Note: if your fabric is directional you’ll want to take note of how the shapes are laying on the fabric. If you don’t care which way the fabric faces, don’t worry. If you do, I recommend cutting your shape from clear template plastic so you can double check how the pattern lays on the block. I have also noted the grain line on the block. If you line this mark up with the grain of your fabric, then your fabric will be facing the right direction on the block.
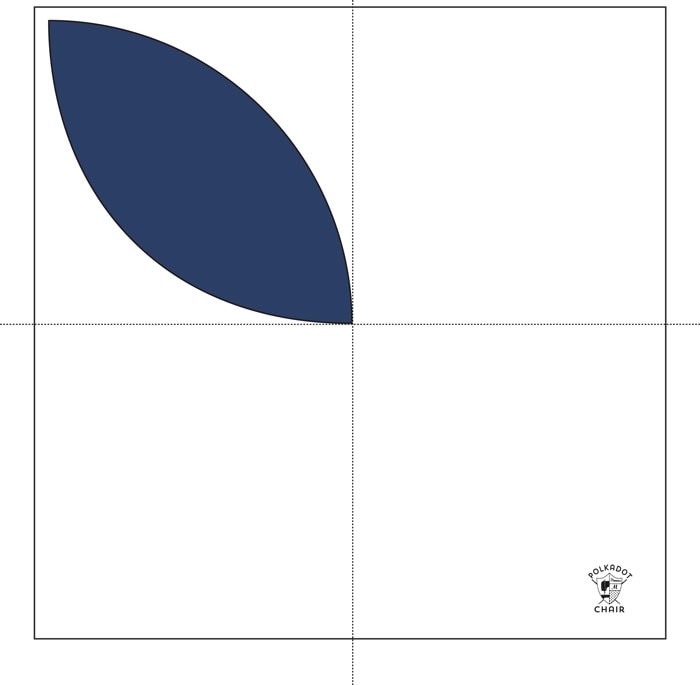
    Fold one of your 12 ½″ white squares in half, and in half again. Press so that you can see the center marks of the block (the dashed lines on the diagram above represent the folds in the fabric).

    Peel off the paper from the back of the shape and apply it to the block as shown.  Make sure it’s running exactly diagonal across the block and in a quadrant. The tip of the piece should be in the center of the block. Remember you will stitch around this block and need to leave a ¼″ seam allowance around all of the sides.

    Press it in place. Repeat until you have 4 shapes on your block.  Repeat for the other block.

    On your machine, using a simple applique stitch, stitch around the perimeter of the shape.

    Next, stitch your row together alternating Quarter Square Triangle blocks and Josephs Coat blocks.  Press seams to one side. Note: I put my quarter square triangle blocks facing a different direction than in the diagram. Place them however you’d like.

    Whew! That’s it, you now have instructions for all of the rows in your quilt. Next time we will chat about assembling the rows!


    More Projects You'll Love!

    • Seasonal Safari Quilt Pattern - offered as a free quilt along this Fall from the polkadotchair.com blog!
      Seasonal Safari; a Free Quilt Row Along
    • Seasonal Safari Quilt Pattern - offered as a free quilt along this Fall from the polkadotchair.com blog! #quiltalong #freequiltpatterns #rowquilt #quiltingtutorials #quilts #safariparty #rileyblake #melissamortenson #polkadotchair #howtoquilt #learntoquilt
      Seasonal Safari Quilt Row Along; Row 5
    • Seasonal Safari Quilt Pattern - offered as a free quilt along this Fall from the polkadotchair.com blog!
      Seasonal Safari Quilt Row Along; Row 4
    • Seasonal Safari Quilt Pattern - offered as a free quilt along this Fall from the polkadotchair.com blog! #quiltalong #freequiltpatterns #rowquilt #quiltingtutorials #quilts #safariparty #rileyblake #melissamortenson #polkadotchair #howtoquilt #learntoquilt
      Seasonal Safari Row Along; Row 3
    « Metal Frame Purse Tutorial
    Reverse Applique Christmas Table Runner Tutorial »

    • Share
    • Email

    About Author

    Melissa Mortenson

    Melissa Mortenson is a blogger, designer, and content creator. She is the Polka Dot Chair blog founder and has been sharing fresh and creative ideas with readers since 2008. She is the author of “Project Teen, Handmade Gifts your Teen will Actually Love.” Her work and designs have been featured on HuffPost, TODAY, Pioneer Woman, HGTV, BuzzFeed, Better Homes & Gardens, and many other established publications. Her first fabric line, “Derby Style,” debuted in January 2015 through Riley Blake Designs.  Additional fabric collections have followed it in subsequent years. A mom of 3, she considers herself lucky to be living in Kentucky.

    Reader Interactions

    Comments

    1. Sandra York says

      November 24, 2017 at 11:24 am

      Row 2 instructions has a mistake. It states cut 2 12 1/2 in. squares out of color A, and 2 13 1/2 in squares out of color B. Well you can’t make a 12 1/2 in. hst out of these two. You need 13 1/2 in squares out of A and B. Found out the hard way about the mistake.

      Thank you
      Sandra

      Reply
    2. Margaret Reid says

      November 29, 2017 at 9:07 am

      Thank you so much for this pattern. I did mine in Christmas colours, oh my, how beautiful it is. Thanks again.

      Reply

    Leave a Reply Cancel reply

    Your email address will not be published. Required fields are marked *

    This site uses Akismet to reduce spam. Learn how your comment data is processed.

    Primary Sidebar

    Hello! It’s nice to meet you.

    I’m Melissa. I like to design things, like fabric, printables, and projects.

    I’m also a Mom and a Maker. I am like most of you, just trying to do my best every day. Some days I succeed, many days I fail.  I find joy in creating, if you do too, then I hope that you find something here bring a little “happy” to your life.  Find out more about me here.

    COPYRIGHT POLICY

    All my images and text are copyrighted. You may NOT use any images from this site in any kind of Video (this includes YouTube). If you would like to feature my work, you may use ONE (1) NON-COLLAGED image and must “follow” link back to my original blog post. You may NOT edit, crop, or change my images in any way without written permission. You MAY NOT print out or copy and distribute any text, images or patterns from this site. All patterns, content, instructions, and templates are for personal use ONLY! Thank you! Violators will be reported.

    Footer

    ↑ back to top

    About

    • Privacy Policy
    • Disclaimers
    • About Melissa

    Newsletter

    • Sign Up! for emails and updates

    Contact

    • Contact
    • FAQ
    • Press
    • Fabric Collections

    Welcome to the Polka Dot Chair! Here you’ll find easy, step-by-step, sewing, quilting, and crafting projects. We design projects for Makers of all skill levels. Beginners are welcome!

    DISCLAIMER:

    While every effort has been made to ensure the accuracy of the content on this website, the information is made available without warranty of any kind. The Polka Dot Chair accepts no responsibility or liability, whether direct or indirect, as to the currency or accuracy of the information, nor any consequence of its uses. This website is not intended to substitute the advice of a professional.

    Copyright © 2020 Polka Dot Chair

    [ Placeholder content for popup link ] WordPress Download Manager - Best Download Management Plugin