
Baby Doll Self-Binding Blanket Pattern
Sew a soft baby doll blanket with two squares of flannel and a simple self-binding technique. This free sewing tutorial makes a sweet handmade gift and is a fun project for practicing straight seams and mitered corners.
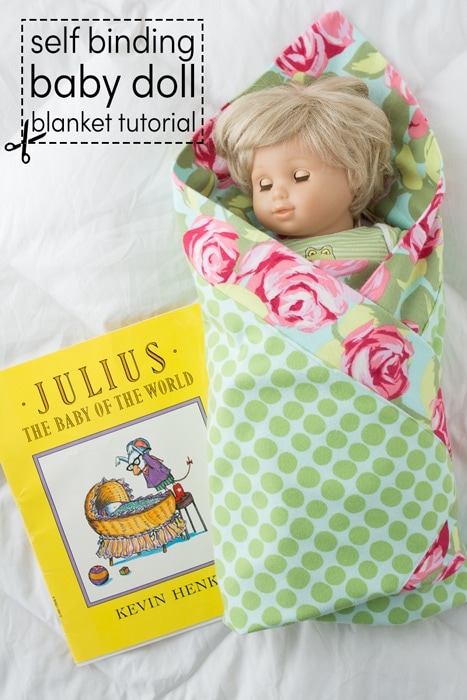
I love giving handmade baby gifts, but sometimes it’s fun to make something for the new baby’s older sibling, too! A doll-sized receiving blanket gives them something to wrap around their own “baby” while everyone is busy with the newest family member.
Of course, you don’t need a new baby in the family to make one. These little blankets also make cute birthday gifts, add to a doll’s bedding, or serve as a project for a child learning to use a sewing machine.
Free Self-Binding Blanket Pattern

What Is a Self-Binding Blanket?
A self-binding blanket uses the backing fabric to create the border around the front. Instead of adding separate binding strips, you start with two fabric squares in different sizes. The larger square wraps around the smaller one, creating a contrasting edge with mitered corners.
This blanket has no batting, so it stays soft and easy to fold around a doll. It’s also a nice project when you want to sew something small without making an entire quilt.
The corners might look a little unusual while you’re sewing, but stick with it. Once you turn the blanket right side out, the construction makes much more sense!
Choosing Fabric for Your Doll Blanket
For this version, use two coordinating flannel fabrics. Flannel is soft, has a little body, and makes a cozy blanket for pretend play.
The smaller square will be the blanket’s center. The larger square will become both the back and the border, so choose a print you’d like to see on both sides.
A few combinations to try:
- A small floral print with a gingham backing.
- Animals or storybook characters with a coordinating dot.
- Two colors of the same print for a simple, coordinated look.
- A novelty print featuring the recipient’s favorite colors or interests.
- A soft pastel center with a brighter border.
Small-scale prints work especially well on doll projects because you can see more of the design in a small piece of fabric. If you choose a directional print, check which way it faces before you begin sewing.
Tip: Prewash and dry both fabrics before cutting. Flannel can shrink, and washing first helps prevent the two layers from shrinking differently later. Press the fabric, then cut your squares.
Supply List
To make the blanket, you’ll need:
- 1, 20″ x 20″ square of flannel
- 1, 30″ x 30″ square of flannel
- Sewing Machine
- Scissors
- Pins
- Fabric Safe Marking Pen
Cut both pieces as accurately as possible. Straight edges and square corners make it easier to match the layers and sew an even border.
Self Binding Baby Doll Blanket Tutorial
Equipment
supplies
- 1 piece 20″ × 20″ square of flannel for the center.
- 1 piece 30″ × 30″ square of flannel for the backing and border.
Instructions
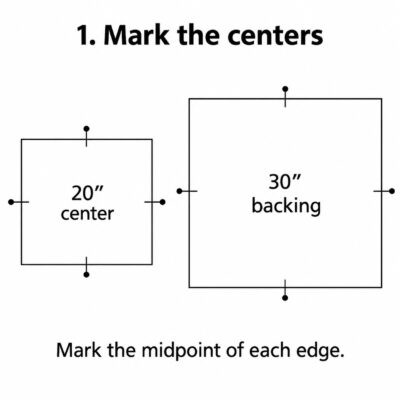
Step One: Mark the Centers
- Find the midpoint of each side of both fabric squares. You can do this by folding each piece in half and marking the folds with pins or a removable fabric marker.You should have a center mark on all four sides of each square.These marks are key to joining two pieces of different sizes. You’ll match the centers of the edges rather than the corners.

Step Two: Pin the First Side
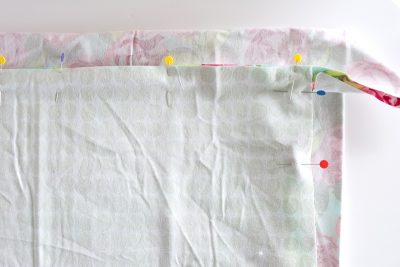
- Place the fabrics right sides together.Match the center of one edge of the smaller square to the center of the corresponding edge of the larger square. Align the raw edges and pin outward from the center.The larger square will extend beyond the smaller square at both ends. This extra fabric is what creates the border and mitered corners.Tip: Work on a flat surface so the fabric's weight doesn’t pull the layers out of position.

Step Three: Sew the Sides
- Using a ½″ seam allowance, sew the first side. Begin ½″ from the corner of the smaller square and stop ½″ before its opposite corner. Backstitch at the beginning and end.Repeat for the remaining three sides, matching the center marks and aligning the raw edges each time.On one side, leave an opening approximately 4″ long for turning the blanket right side out. Place the opening toward the middle of the side, away from the corners.Keep the extra backing fabric out of each seam. You’ll have loose folds of fabric at the corners, which is exactly what you want at this stage.Since the pieces aren't the same size, you'll end up with a funny bunny ear-looking thing at the end- don't worry, this is correct.Tip: Mark your starting and stopping points before sewing. It’s much easier to make the corners when all four seams stop at consistent points.
Step Four: Sew the Mitered Corners
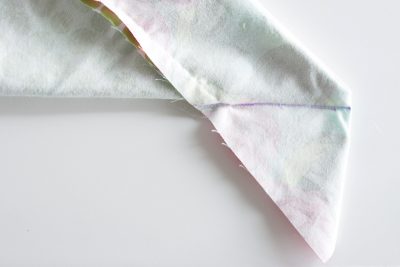
- Fold the blanket diagonally, bringing the seams of two adjacent sides together. Smooth the layers so the excess backing fabric at the corner lies flat.Using a ruler, draw a line through the point where the side stitching stops, perpendicular to the folded edge. This line creates the corner seam.Sew along the marked line, keeping the center fabric clear of the stitching.Repeat for the other corners, refolding the blanket as needed. Use the corner photos as a guide for positioning the fabric.Don’t trim the corners yet! Checking the blanket first gives you a chance to correct a corner without losing the fabric you need.
Step Five: Check
- Turn the blanket right side out through the opening.Spread it flat and check all four corners. The blanket should lie smoothly, with an even border and corners that form neat diagonal seams.If a corner pulls inward, twists, or won’t lie flat, turn the blanket inside out again and check that seam. Make sure you haven’t caught any center fabric in the corner stitching.Once you’re happy with the shape, turn it inside out and trim the excess corner fabric, leaving approximately a ¼″ seam allowance beyond the corner stitching.
Step Six: Trim and Press
- Turn the blanket right side out again. Gently shape the corners with a blunt turning tool.Press the blanket so the border lies flat. At the turning opening, fold the raw edges inward to match the surrounding seam and pin them in place.Take a little time with this step. Pressing helps define the border and makes the final stitching much easier.
Step Seven: Topstitch
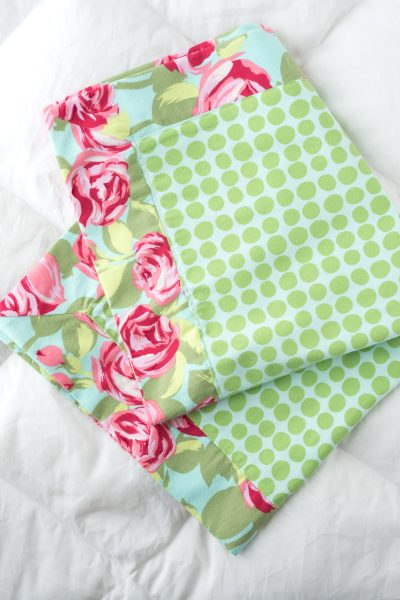
- Topstitch close to the seam where the center fabric meets the border, catching the folded edges of the turning opening as you sew.You can use a straight stitch or a simple decorative stitch. Try the stitch on a scrap of your flannel first to check the appearance and tension.Give the finished blanket one final press, and it’s ready for its doll!

Tips for Sewing with Flannel
Handle the edges gently. Flannel can stretch as you pin, sew, and press. Guide the fabric through the machine without pulling it.
Use enough pins. Pin at regular intervals to keep the layers aligned, especially near the beginning and end of each seam.
Try a slightly longer stitch. A straight stitch around 2.5–3 mm is a useful starting point. Test on scraps and adjust for your fabric and machine.
Use a walking foot if the layers shift. It helps feed both layers evenly, especially during topstitching.
Press instead of sliding the iron. Lift and lower the iron to avoid stretching the fabric out of shape.
Check every corner before trimming. This is the step I wouldn’t rush. A misplaced seam is much easier to fix while the extra fabric is still attached.
Why won’t my blanket lie flat?
Check that the centers were matched accurately, the side seams start and stop at the correct points, and the corner seams were sewn in the right direction. Also look for a fold of center fabric accidentally caught in a corner seam.
If you haven’t trimmed the corners yet, you can unpick and resew the affected seam.
More Cute Things to Sew for a Baby:
Soft N Snuggly Sensory Blanket Pattern

Can you make these using fat quarters or do they have to be square?
It does need to be a square so you’ll need to square up the Fat Quarter before you sew.
Thanks for the tut, I have two granddaughters that will love this.
This is lovely! Thank you for the tutorial, will come in handy!
Hi! Your blog post was featured in our website! 🙂 Please do check it out! Thanks! 🙂 http://www.plushiepatterns.com/baby-doll-receiving-blanket-pattern/
Thanks for the feature!
Should this say 12″ and 13″ rather than 120″ and 130″?
No, It actually says ONE 20″ piece not 120– I added a comma to make it more clear
Thank you for this tutorial, my mother made these binded blankets back in the 70’s and 80’s and I have been searching for instructions on them! You are correct, this idea has been around for a long time!
Love that book! I still remember laughing uncontrollably as I read it to my daughter the first time..Classic!
Wow!!! It’s really cute!!! But…. It looks just like the tutorial for self binding baby blanket from Missouri Star Quilt Co on you tube??? Same one??
I was thinking the same thing…. I love that tutorial and it makes an awesome sized receiving blanket….. I like the dollie sized dimensions ……..but you might want to give credit where credit is due….
Hi!
I learned how to make self binding receiving blankets years ago (before the days of blogs) from a friend of mine. I don’t know who came up with the idea originally, but they have been around for years.
I don’t know. I haven’t seen that video. I’ve been making these for about 10 years- There are several tutorials online for self binding blankets. I have no idea who came up with the idea in the first place. I learned how to make them from a friend.
So cute!! Just pinned;)
So sweet! I’ve got a Craft Gossip post scheduled for tomorrow that links to your tutorial:
http://sewing.craftgossip.com/tutorial-baby-doll-receiving-blanket/2014/08/26/
–Anne