
Santa’s Steps Quilt Pattern; A Quick & Easy Courthouse Steps Quilt Pattern Using 2 1/2″ Precut Fabric Roll
If you’re looking for a quick and easy Christmas quilt to sew, the Santa’s Steps Quilt Pattern is a great place to start. This free Courthouse Steps quilt pattern combines a festive Christmas fabric panel with a single 2 1/2″ precut fabric roll to create a beautiful quilt with minimal cutting and straightforward piecing.

I have another fun Christmas in July project for you guys today using my Claus & Co fabric collection. This time it’s a free quilt pattern (you can print it at home; just look for the big green print button at the bottom).
Christmas Fabric Panel
One of my favorite prints in the collection is this fabric panel! I designed it to be used either as one piece (just quilt it and you’re done) or cut up for smaller projects.

The rows of Christmas stockings at the top and bottom are perfect for my mini Christmas stocking tutorial, and the squares inside the panel can be turned into quilt blocks, table runners, pot holders, and more!

My Pot Holder Parade pattern sewn with sections of the Claus & Co panel and Fat Quarters of fabric.
What Makes this Pattern Unique
The quilt pattern I’m sharing today is so FAST to make because it’s constructed with a 2 1/2″ precut roll of fabric and the panel (You’ll also need some fabric for the sashing). I was able to construct all of the blocks for this quilt in one afternoon (and that included doing the math for you guys).

I’m not quite done with the quilt top yet, but I was too excited to wait to share this pattern with you, so you get it today! I’ll be sure to pop back in when it’s done and share detailed photos of the finished quilt.

Supplies Required
- Claus & Co Fabric Panel or enough fabric to cut out twelve 8 1/2″ x 8 1/2″ squares.
- One Claus & Co Rolie Polie Strip
- 1 1/4 Yards Fabric for Sashing
- 1/2 Yard Fabric for Binding (or use leftover fabric strips if you want it scrappy)

Santa’s Steps Quilt Pattern
Equipment
supplies
- 1 Claus & Co Panel
- 1 Rolie Polie of Claus and Co. fabric
- 1 1/4 Yards Fabric for Sashing
- 1/2 Yard Binding Binding can also be made from the leftover scraps from blocks.
Instructions
- Size: 56" x 74"
Cut:
- From Panel (or other fabric): 12 pieces, 8 1/2” x 8 1/2”
Prep:
- Before you begin, you need to sort your precut fabric roll. I’ll share how I sorted mine.

- You can mix and match the colors on your quilt as you like; I found the quilt looked best when the A/B and C/D fabrics were the same color or tone.
- For example, all of my A/B fabrics were aqua, pink, or white, and all of my C/D fabrics were Red or Green.
- On each block, I matched the colors (but varied the prints) of my A/B and C/D pieces.
- If you want to cut your 2 1/2” roll the same way I did here’s how I sorted my roll:
- Note: When I say strip i mean one of the 2 1/2” x WOF strips in the precut roll.


White Fabrics:
- 3 strips for the A cuts4 strips for the B cuts
Pink Fabrics:
- 2 strips for the A cuts2 strips for the B cuts
Aqua Fabrics:
- 2 strips for the A cuts2 strips for the B cuts
Green Fabrics:
- 4 strips for the C cuts6 strips for the D cuts
Red Fabrics:
- 4 strips for the C cuts6 strips for the D cuts
- Your exact sorting may vary depending on the fabric collection and color combination in your precut roll.
Cutting:
- Cutting Directions are listed PER BLOCK; there are 12 blocks in the example quilt:
- A Cuts:2 pieces 2 1/2” x 8 1/2”
- B Cuts:2 pieces 2 1/2” x 12 1/2”
- C Cuts:2 pieces 2 1/2” x 12 1/2”
- D Cuts:2 pieces 2 1/2” x 16 1/2”
- Sashing Cut:17 strips 2 1/2” x WOFSubcut into 28 pieces 2 1/2” x 16 1/2”
- Cornerstones Cut:20 pieces 2 1/2” x 2 1/2” from the leftover pieces of your precut roll.

Block Construction:
Step One:
- Sew one A strip (2 1/2” x 8 1/2”) to top and bottom of the 8 1/2” x 8 1/2” square of fabric.


Step Two:
- Sew one B strip (2 1/2” x 12 1/2”) to each side of the Step One Unit

Step Three:
- Sew one C strip (2 1/2” x 12 1/2”) to each side of the Step Two Unit

Step Four:
- Sew one D strip (2 1/2” x 16 1/2”) to each side of the Step Three Unit
- The completed block should be 16 1/2” x 16 1/2”.

Quilt Assembly:
Sashing Construction
- Sew four 2 1/2” x 2 1/2” cornerstones to three 2 1/2” x 16 1/2” sashing strips as shown.

- Repeat 4 more times to have 5 sewn units.

Sew the Rows:
- Sew four 2 1/2” x 16 1/2” sashing strips and three completed blocks together as shown. (see diagram in sashing construction step)
- Repeat three more times to have four completed rows.
Final Assembly:
- Sew the sashing strips and complete rows together as shown.


Binding Tip:
- If you’re making your binding scrappy, I recommend cutting your remaining 2 1/2” strips in half or even smaller, then sewing them back together in a random layout.
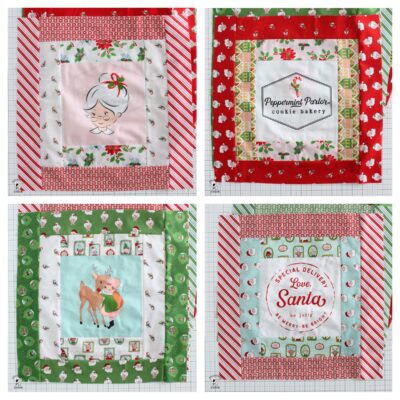
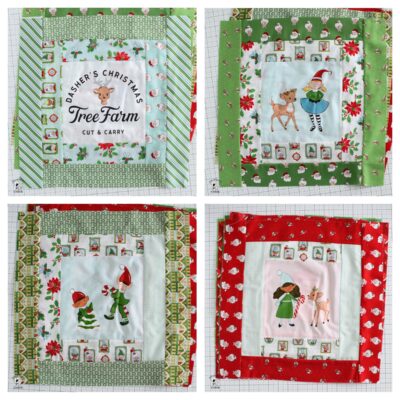
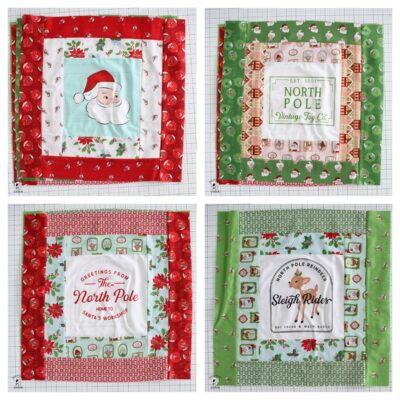
- Each actual block in my quilt:


I live the pattern! I’m making one currently and plan on making several more as gifts. Thank you for the pattern!!
I thought this was so super cute that I bought two of everything and some extra fabric in case I wanted to switch some strips out. I was going to make the second one for my sister. But, I had so many issues making the first one: jelly roll was cut very poorly, most of it was 2 1/4”-2 3/8” wide. The blocks were off sized and I spent hours re-doing them. Plus most of the fabrics are directional and don’t look like the image above. Had I known, I would have just bought the fabric. I had to piece several of the steps together to have enough fabric of the right colors. I spent two full days and another half day on one of these. Yikes
I’m sorry you had trouble. If you had just emailed me, I would have been happy to walk you through the steps if you had questions.
1- Make sure you measure from the outside of the “v” on the precut strips, not the inside of the “v”. They come that way from the manufacturer; we didn’t cut them.
2- I’ve attached a copy of each of my 12 sewn quilt blocks to the “recipe” card so you can see that the pattern does indeed work.
3- Yes, the fabrics are directional. I did not try to make everything “right side up” in my quilt; rather, I chose the placement of the directional fabric carefully so that it mirrored out from the center blocks.
I did NOT use any other fabric in my quilt blocks. Just the jelly roll strip and the panel, and I am very happy with how the blocks turned out.
Hi Melissa,
I love the panel and all of your ideas. I’d like to make everything! (Haha)
I’ve always wanted to make a throw with the courthouse steps pattern, so I will try and figure out what I need for that.
Thank you again for the beautiful fabric and ideas for this season!
Have a wonderful day!
Connie W.
Melissa you did it again. This is such a wonderful fun festive Christmas Quilt and sew easy! Thank you so very much for always providing such creative things to sew. You truly are the very best! 🥰
Adorable but what is needed is one that is more for adults, please.
Sure do like your idea and would definitely make one if it weren’t for little people.
What about one with trees, holly & berries, poinsettias, pretty baubles on a Christmas tree, add one of a wreath, fireplace, etc? If it was more adult-like, I’d make several and give as a gift for friends/family…as long as there was plenty of time to make them.
TIA.
Just choose another fabric collection, the pattern will still work.
Where’s a picture. As a visual person seeing the quilt would be a great help. Can’t make it if I can’t see it.
There’s a full color diagram of the finished quilt on the post and in the printable directions.
I can’t thank you enough for sharing this sweet pattern!