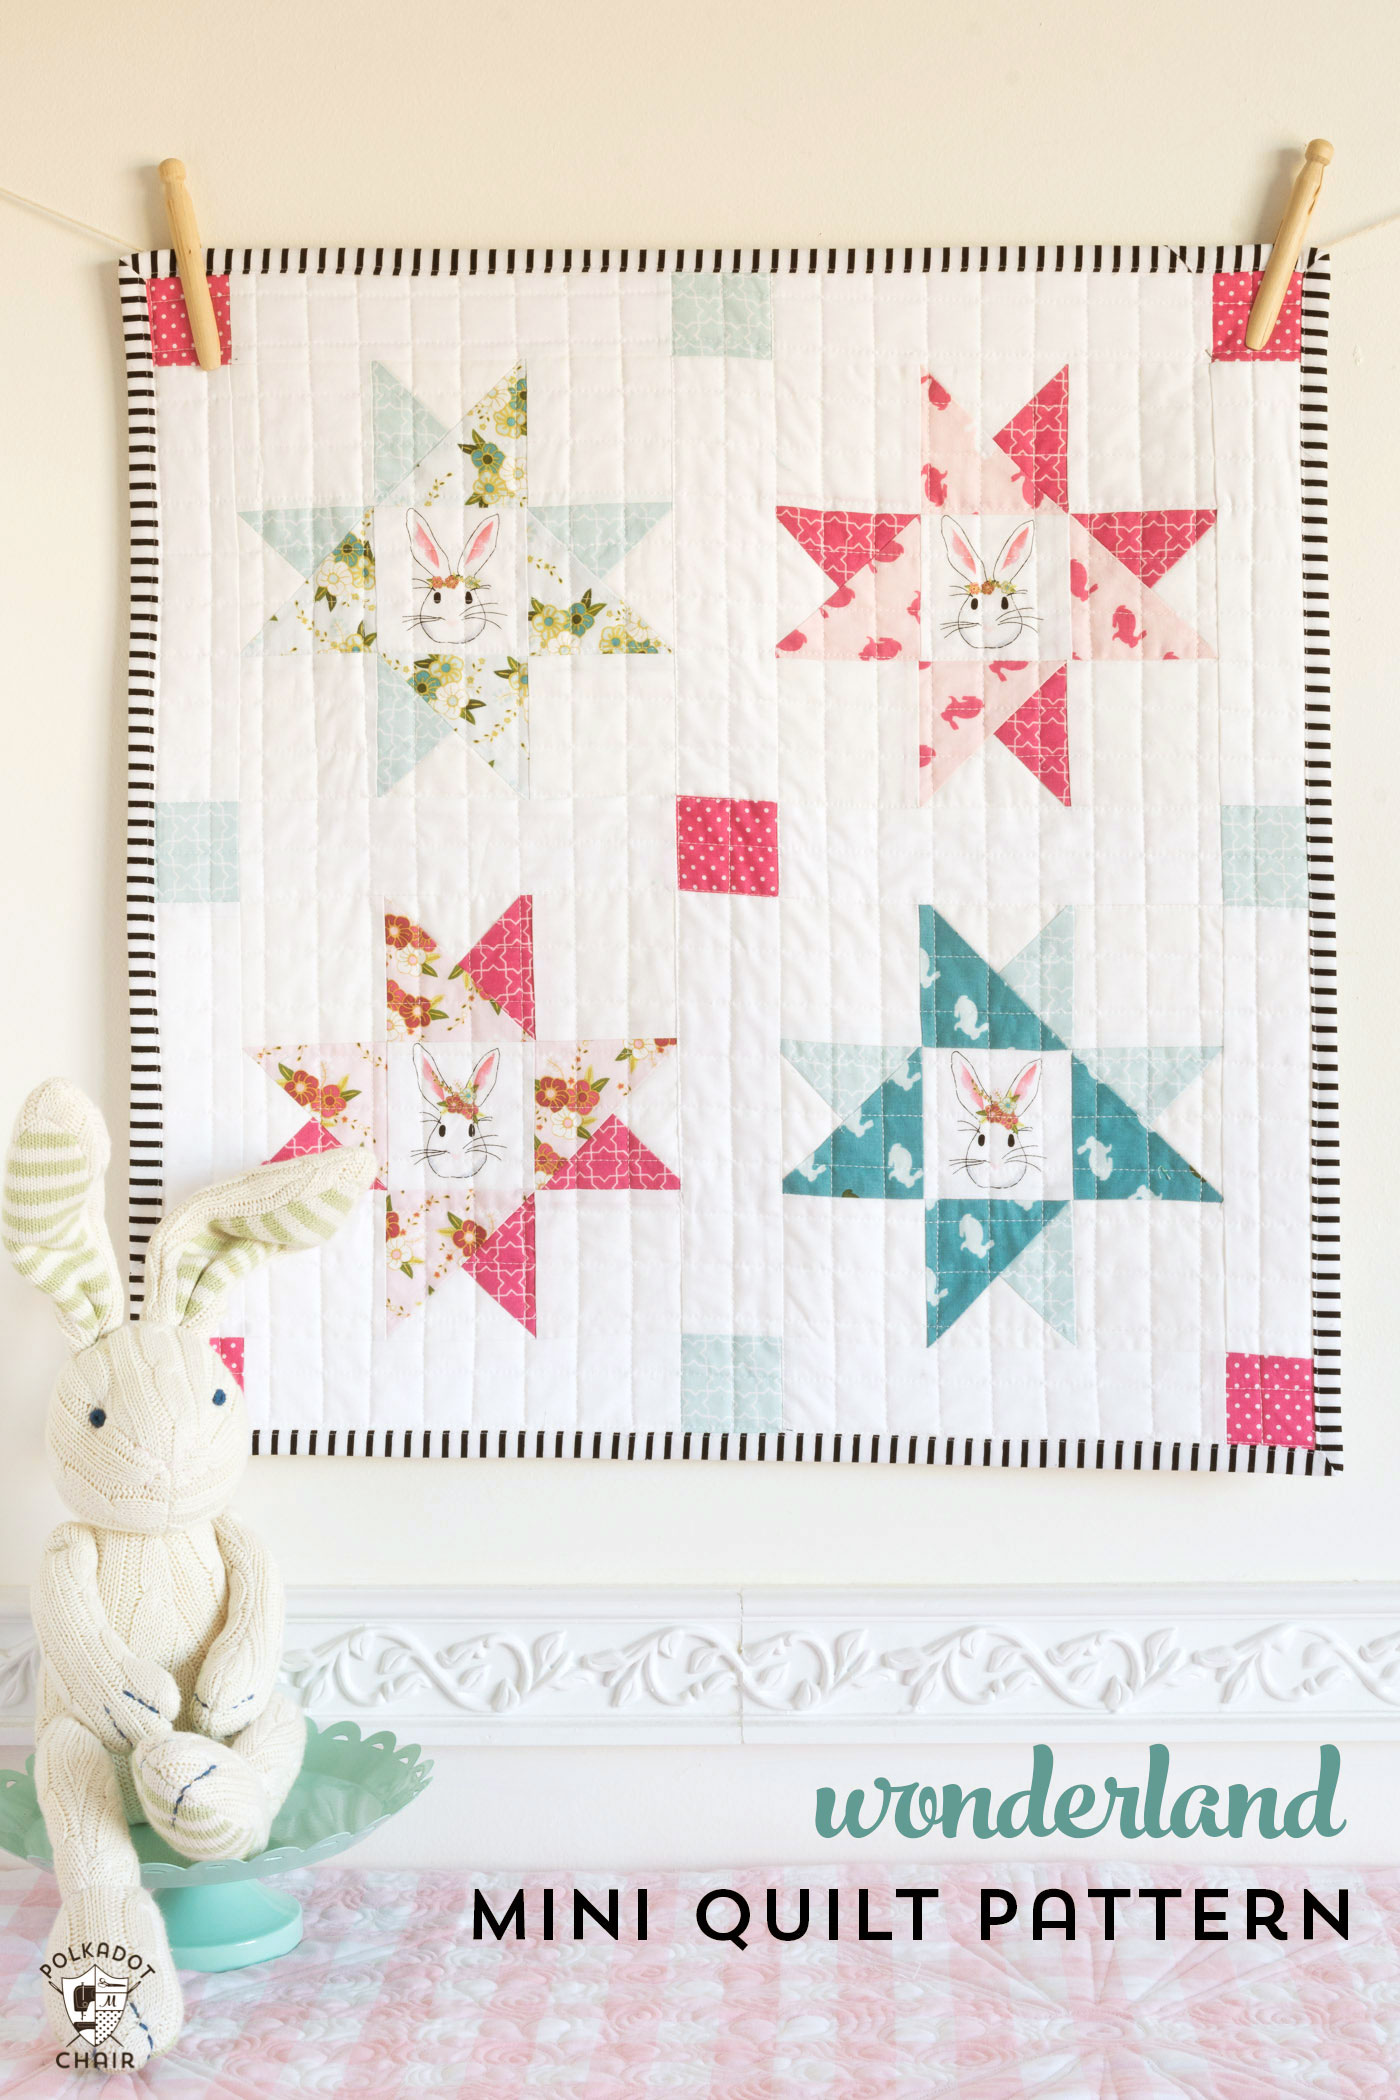
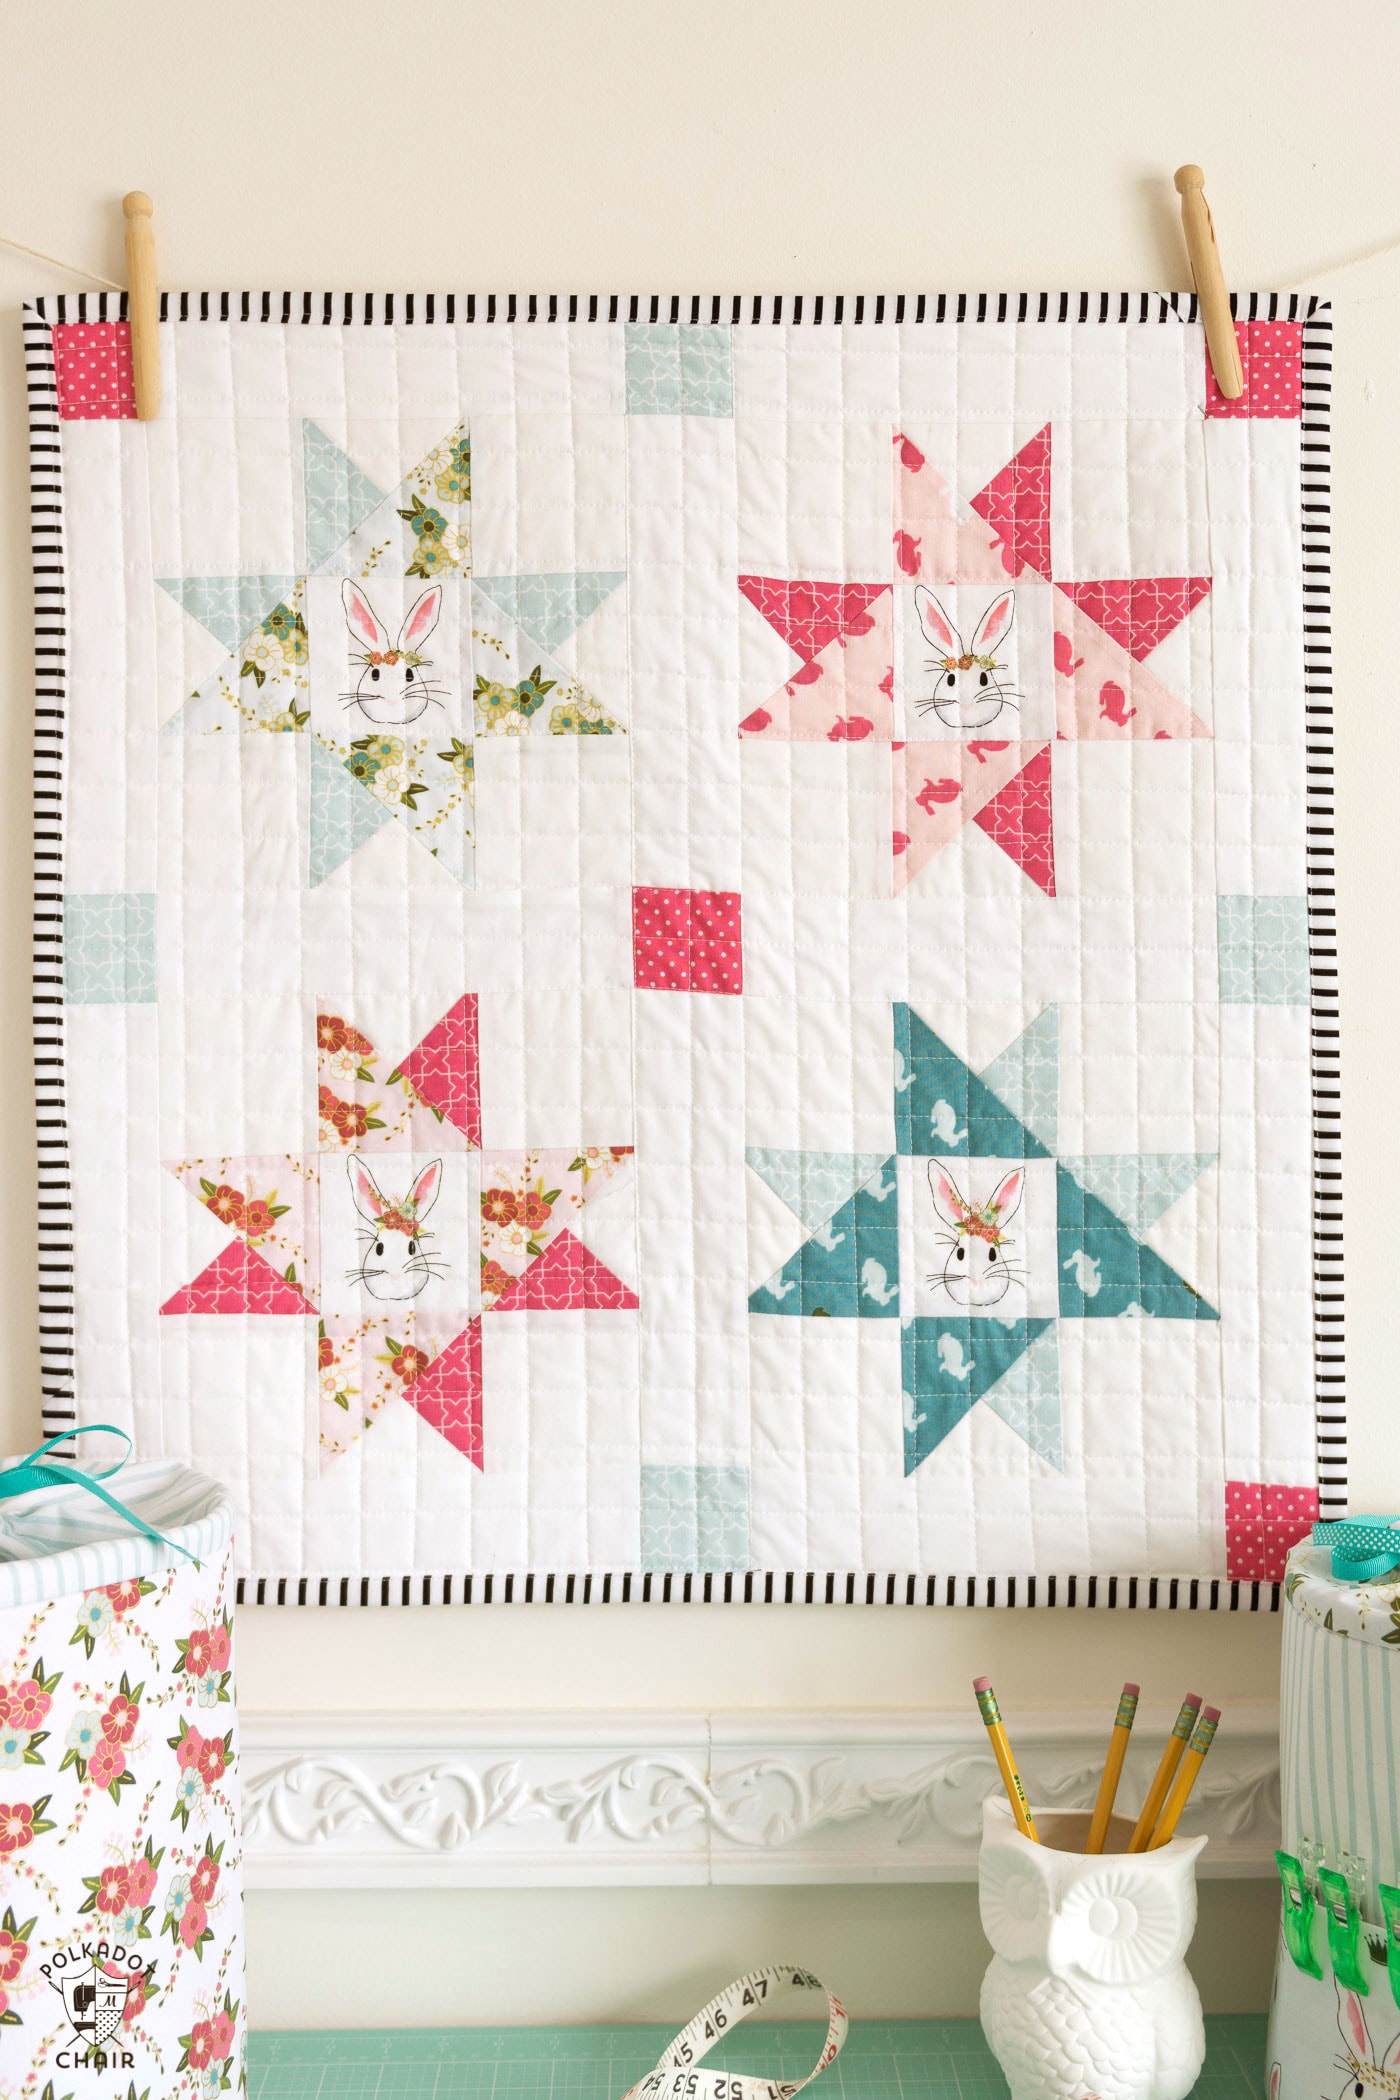
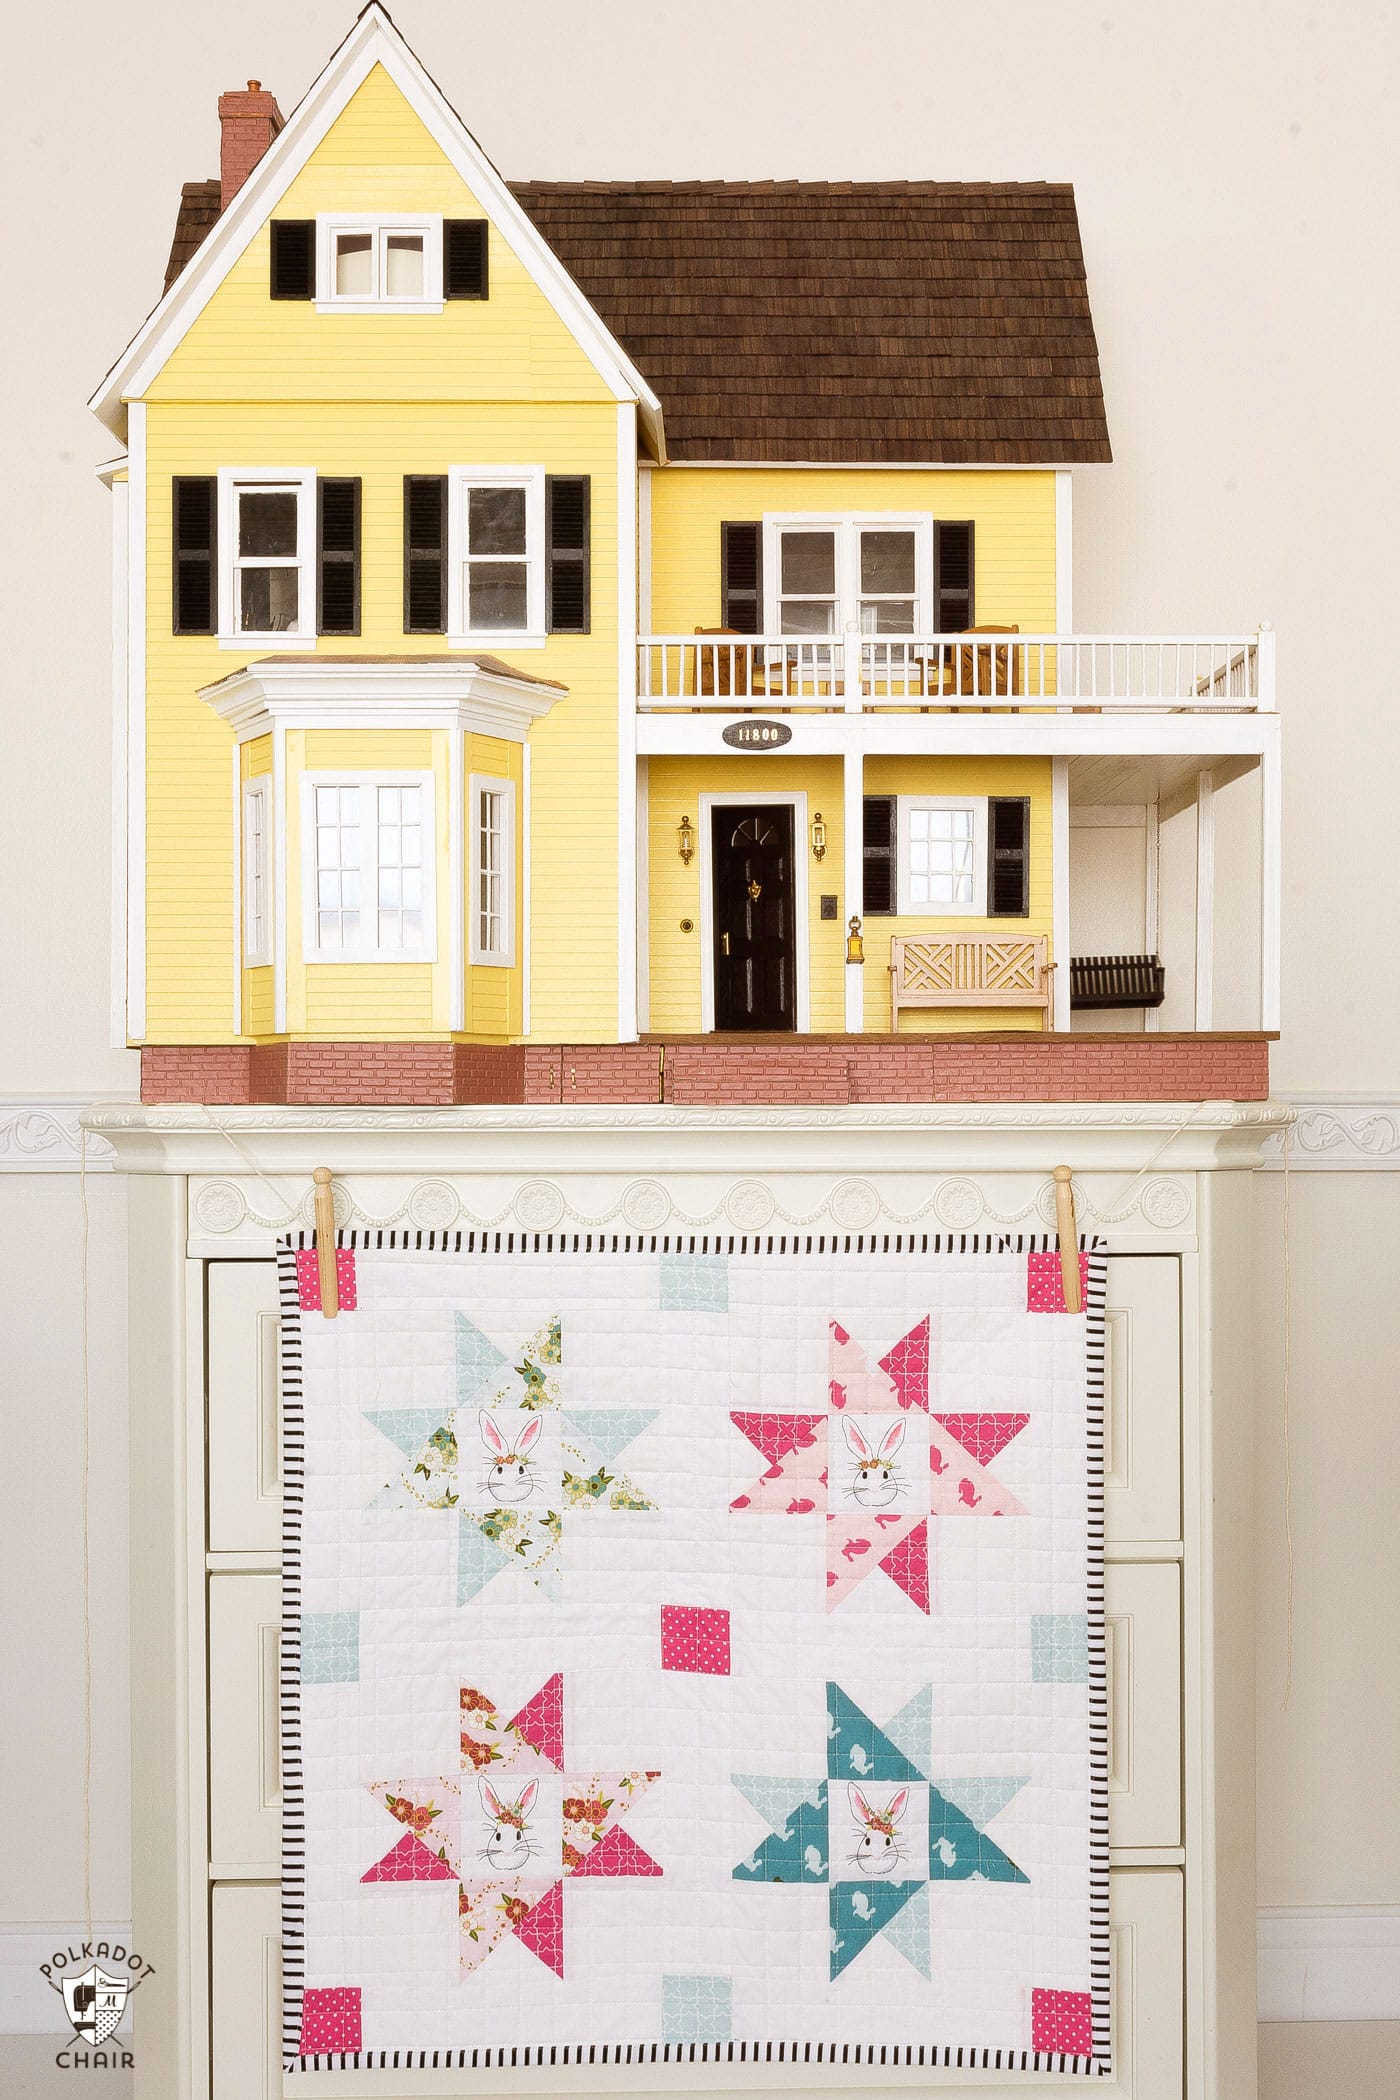
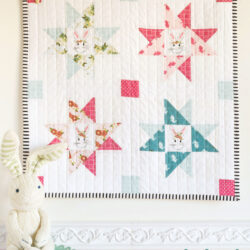
Tiny Wonderland; a Free Mini Quilt Pattern
Don’t have the time to commit to making a full-size quilt? Have you ever made a mini quilt? I made my first one a few years ago and am hooked now. They are fun, simple to create, and great for hanging on your wall! Today, I have a fun, free mini quilt pattern for you!
Many people may not know this, but when you design fabric, you don’t get your fabric until just a bit before the shops do. This makes you scramble a bit to get ideas out to readers before they get your fabric.
I think it’s exciting how the whole process works. You create the files in Illustrator, which are then sent to the mill.
The mill then makes “mock-ups” of the fabric and sends them back to you for approval. These are called strike-offs.
Strike-offs are usually relatively small, just large enough to see the fabric’s color and pattern. Sometimes, the strike-offs come back perfect, and sometimes, they are far from ideal.
When I was working on my first Wonderland line, I was anxious to get stitching, but I only had these small strike-offs to work with. It was then that I decided to try making a mini quilt.
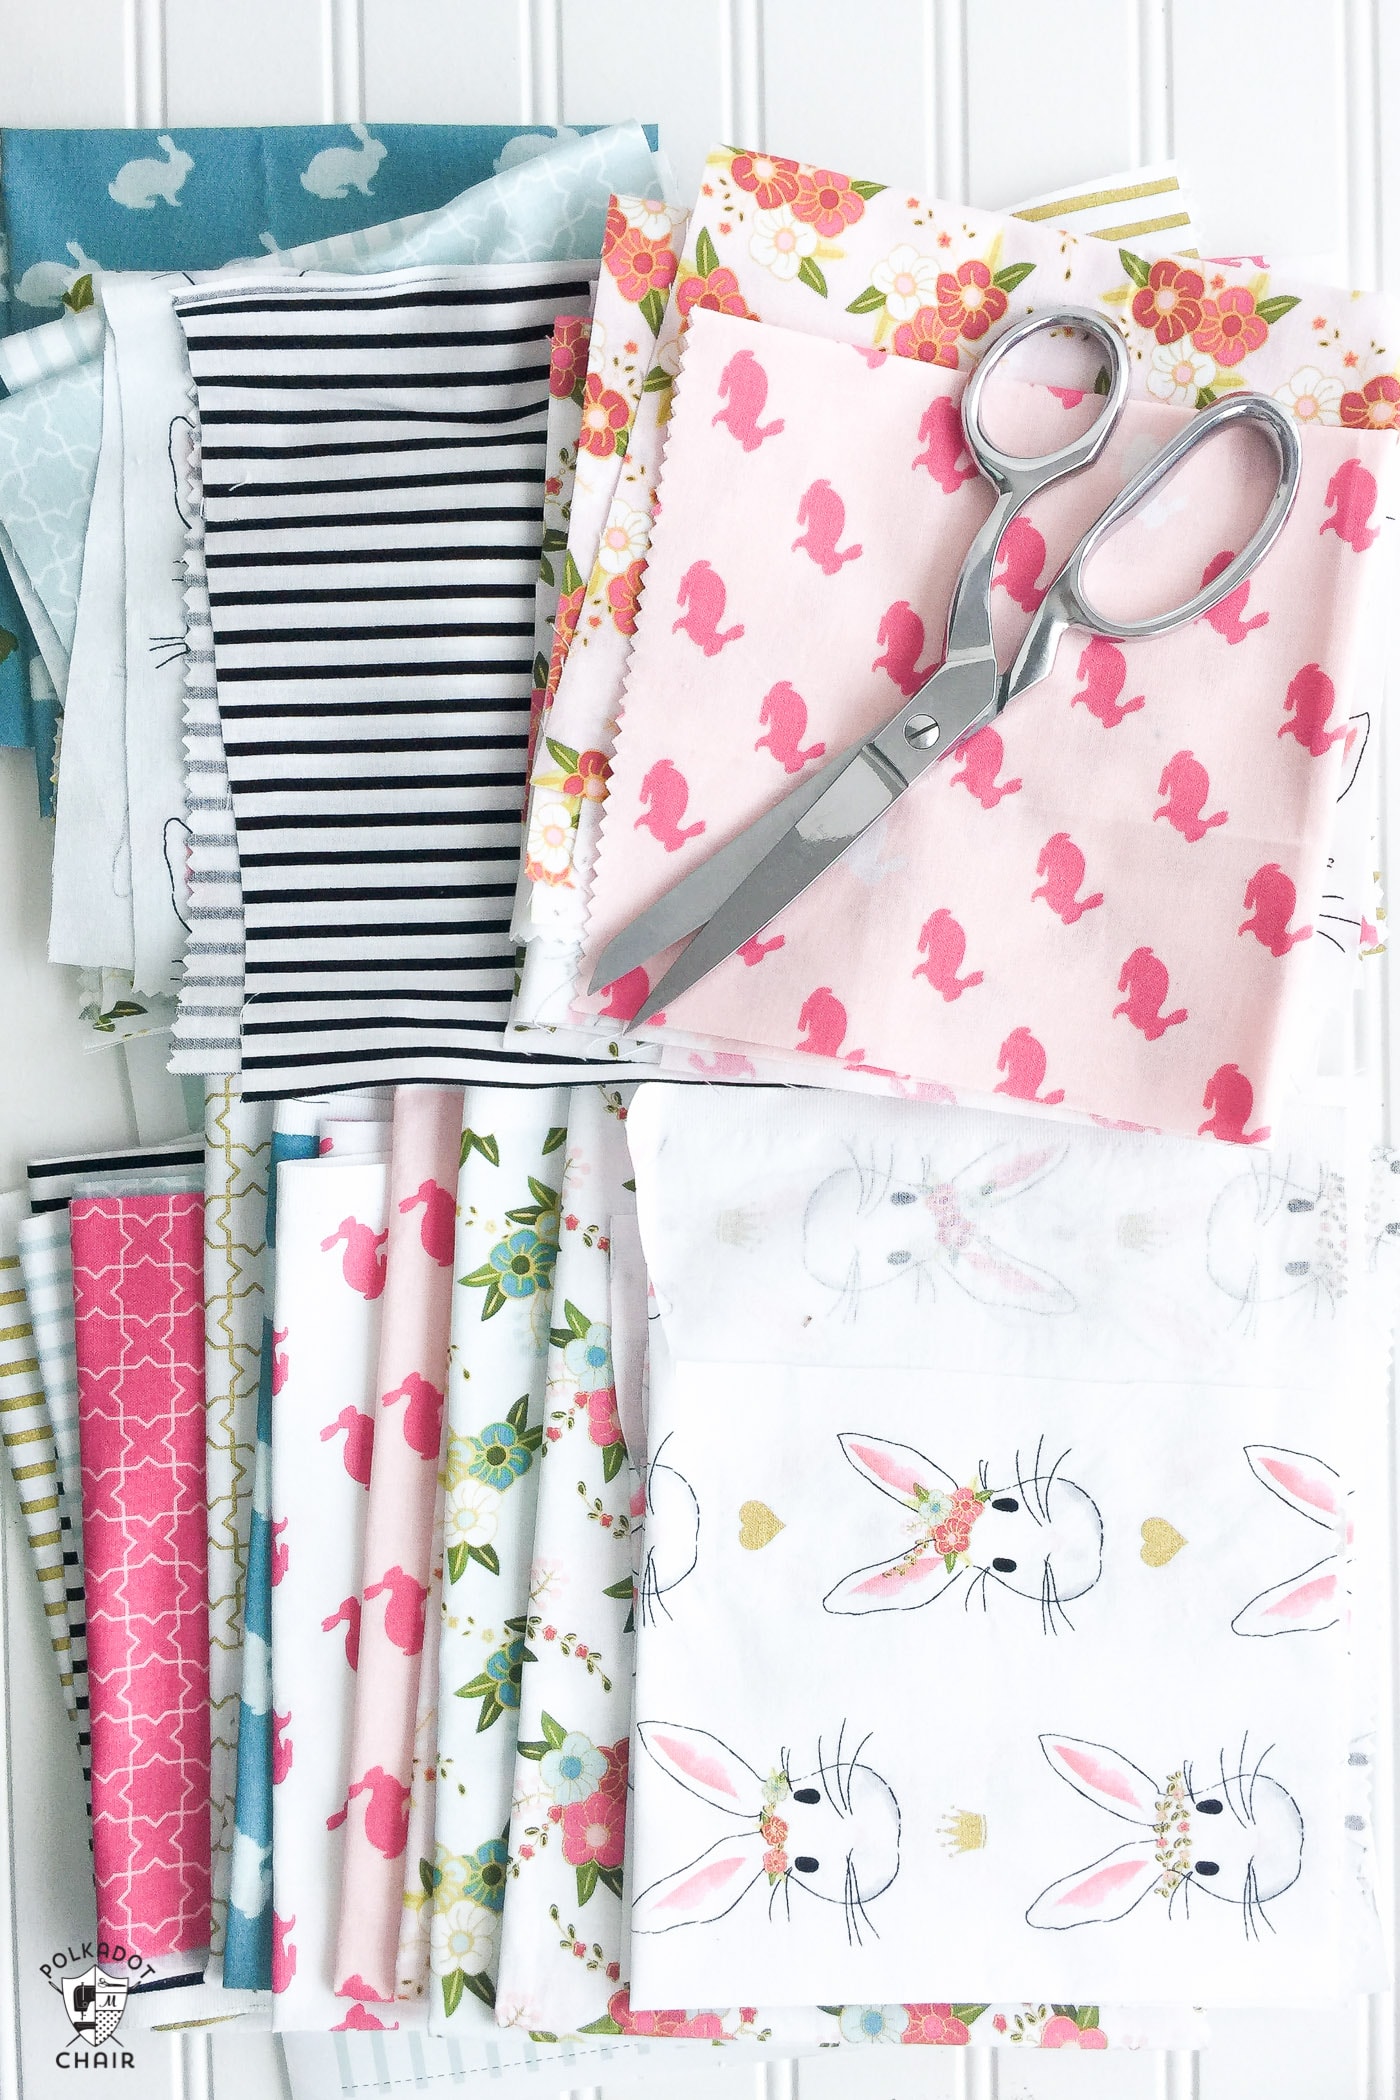
This quilt features “fussy” cut centers that show off each bunny in the line.
(also shown in photo: Padded Storage Bins Sewing Pattern; available HERE)
How to Get the Pattern: Option One
Update: This pattern and two other Mini Quilt Patterns are now available in our Wonderland Mini Quilt Bundle.
Pattern includes a broken dishes mini quilt, a dollhouse mini quilt, and this star mini quilt—purchase using the link below.
How to Get the Pattern: Option Two
If you don’t want the PDF version above, you can print the pattern right here from this blog post. Just use the PRINT button at the bottom of the directions.
Tiny Wonderland: a Free Mini Quilt Pattern
Equipment
supplies
- 4 pieces 3 1/2” x 3 1/2″ fabric for center of block This is the fussy cut fabric, and is referred to as Fabric A in the instructions even if you use four different fabric prints.
- 16 pieces 3 1/2″ x 3 1/2″ background fabric; white Fabric B
- 2 pieces 4 1/2″ x 4 1/2″ background fabric; white Fabric B
- 12 strips 2 1/2″ x 9 1/2″ fabric for sashing; white Fabric B
- 2 pieces 4″ x 4″ fabric for larger points in blocks; Color #1 Fabric C
- 2 pieces 4" x 4" fabric for larger points in blocks; Color #2 Fabric D
- 1 piece 4 1/2″ x 4 1/2″ fabric for smaller points in blocks – Color #1 Fabric E
- 1 piece 4 1/2" x 4 1/2" fabric for smaller points in blocks- Color #2 Fabric F
- 9 pieces 2 1/2″ x 2 1/2″ squares of fabric for cornerstones mine are in two different colors
- 1/4 yard fabric for binding
- 1 yard fabric for backing
Instructions
- Size: 24" x 24"
Step One:
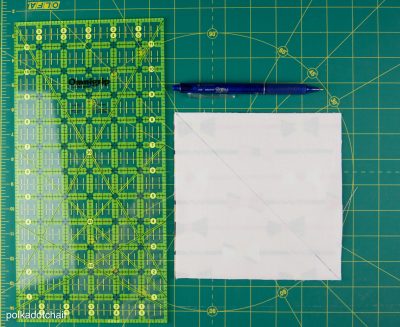
- Note: Photos are from a previous project, and the technique is the same.
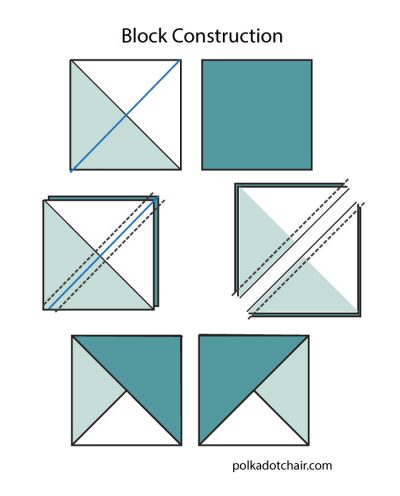
- Layer one 4 1/2″ x 4 1/2″ pieces of Fabric B and one 4 1/2" x 4 1/2" Fabric E pieces on top of each other, right sides facing. Draw a line down the center diagonally on one of the pieces of fabric on the wrong side of the fabric.

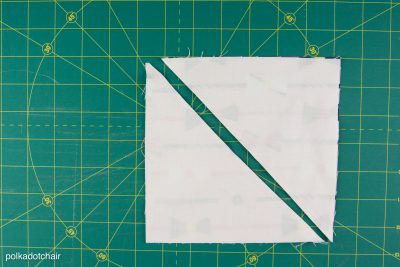
- Stitch 1/4″ on each side of the line.

- Cut in half along the line.

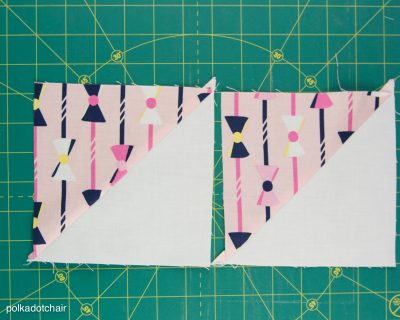
- Press open, pressing the seam towards the dark side; you now have 2 Half Square Triangles.
- Trim to a 4″ x 4″ square.
- Repeat Step One with the 4 1/2" x 4 1/2" Fabric E and Fabric B Pieces.
- You should now have four sewn Half Square Triangles (HST's) made with two different fabric prints.

Step Two:
- Layer one of your sewn HST on top of one of your 4″ pieces of fabric C, right sides facing. Draw a diagonal line opposite the sewn seam on the half-square triangle created in Step One.

- Stitch 1/4″ on each side of the line you drew. Cut into two pieces along the line. Press. Trim to 3 1/2″ x 3 1/2″
- Repeat the steps to have four identical units.
- Repeat steps one more time using the Fabric D pieces instead of Fabric C.
Step Three:
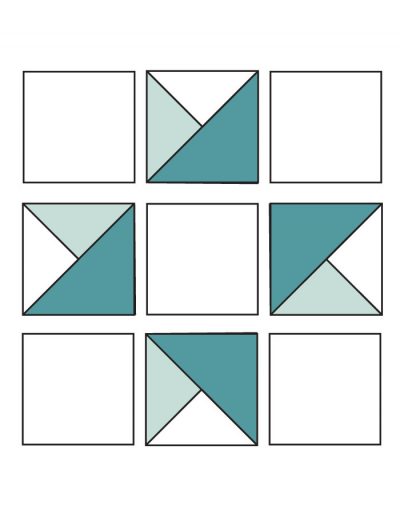
- Using four of the 3 1/2" x 3 1/2" Fabric B pieces, the Fabric A piece and the units created in this step. Assemble your block according to the diagram.

- Repeat until you have four sewn blocks.
- A note about the direction of the larger point pieces: I, on purpose, had my points facing different directions; you can assemble yours as you like. Since two of my blocks had the same fabrics, I could “move” them around a bit.
Step Four:
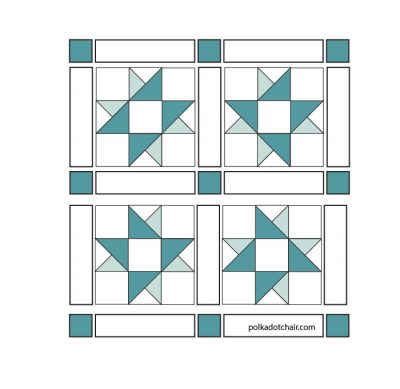
- You are now ready to assemble your quilt.

- It is easiest to stitch it together one row at a time.
- The first row will have one corner piece, a sashing strip, a corner piece, a sashing strip, and a corner piece.
- The second row will have one sashing strip, one block, one sashing strip, one block, and one sashing strip.
- And so on.
- Press your seams to one side in alternating directions. For example, press the odd rows to the right and the even rows to the left.
- Then, stitch your rows together.
- Refer to the diagram as necessary to assemble your quilt.
- Quilt and bind as desired.


I could not get the pattern to show up.
It’s here: https://shop.polkadotchair.com/collections/pdf-sewing-patterns/products/wonderland-mini-quilts-pdf-pattern
WHERE can i buy your first line of Wonderland????? I’ve researched the internet and all i can find is Wonderland 2! I want the bunny heads on white background……..at least one yard.
Beautiful mini quilt… Can you tell me what Bloc Loc size ruler you are using to trim the square triangle to 4X4? Thanks, Trudy
So cute will want to try this one
You do beautiful. Work. I love this quilt.