• Skip to primary navigation
  • Skip to main content
  • Skip to primary sidebar

The Polka Dot Chair logo

  • SEWING
    • Free Sewing Patterns
    • Bag Patterns
    • Costumes
    • Apparel
    • Learn to Sew
    • Beginner Friendly
    • Embroidery Projects
    • Tips & Techniques
    • All Sewing
  • QUILTING
    • Quilt Blocks
    • Learn to Quilt
    • Free Patterns
    • Quilt Patterns
    • All Quilting
  • CRAFTS
    • Disney
    • Cricut
    • Printables
    • All Crafts
  • HOLIDAYS
    • Seasonal Projects
    • Valentine’s Day
    • Easter
    • 4th of July
    • Halloween
    • Thanksgiving
    • Christmas
    • All Holidays
  • TUTORIALS
  • ABOUT
    • About Me
    • My Fabric Collections
    • Published Books
    • Press
    • FAQ’s
    • Contact
  • SUBSCRIBE
  • SHOP
menu icon
go to homepage
  • SHOP
  • TUTORIALS
  • SEWING
  • QUILTING
  • SUBSCRIBE
  • CRAFTS
  • HOLIDAY PROJECTS
  • ABOUT
    • Published Books
    • My Fabric Collections
  • CONTACT
    • Facebook
    • Instagram
    • Pinterest
    • YouTube
  • subscribe
    search icon
    Homepage link
    • SHOP
    • TUTORIALS
    • SEWING
    • QUILTING
    • SUBSCRIBE
    • CRAFTS
    • HOLIDAY PROJECTS
    • ABOUT
      • Published Books
      • My Fabric Collections
    • CONTACT
    • Facebook
    • Instagram
    • Pinterest
    • YouTube
  • ×

    Home » Crafts

    How to Make an Adorable Christmas Card Holder

    Updated: Oct 23, 2019 by Melissa Mortenson · This post may contain affiliate links · This blog generates income via ads · 6 Comments

    Today I’m going to show you how to make a DIY Christmas Card Holder.  It’s a really simple and cute Christmas Card Display idea. Plus it’s no-sew and easy to make!  If you like this project you may also like this Christmas Home Tour. 

    DIY Christmas Card Holder.... no sew!

    In my opinion, one of the very best things about December is the beautiful holiday cards that show up in the mail all month. Living in an era where actual mail is pretty scarce, receiving that kind of personal correspondence is pretty great.

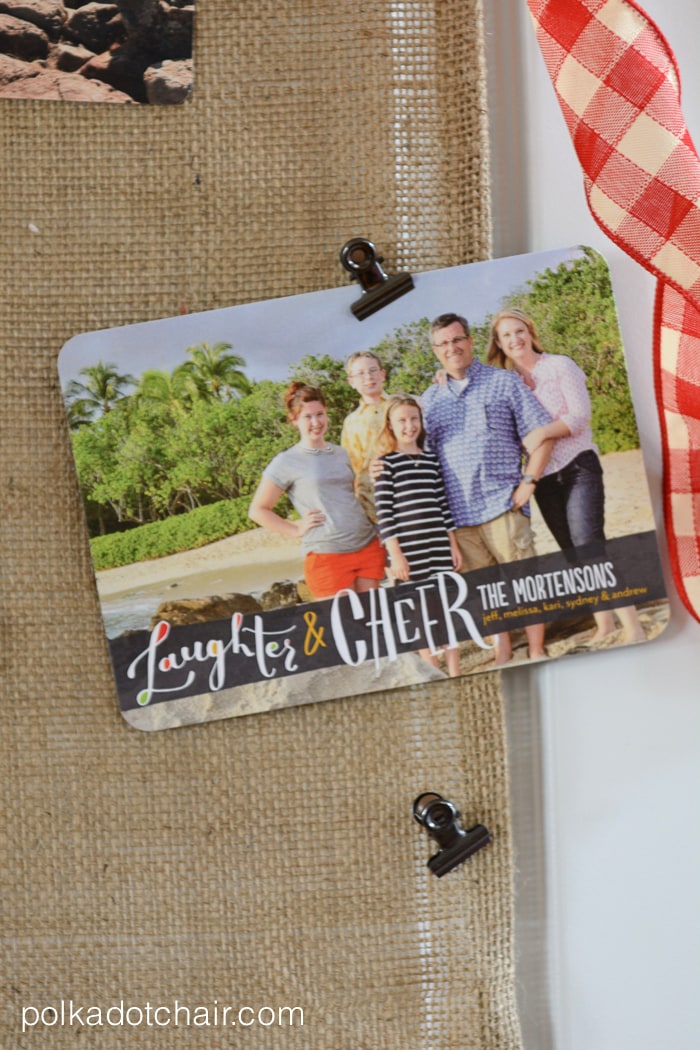
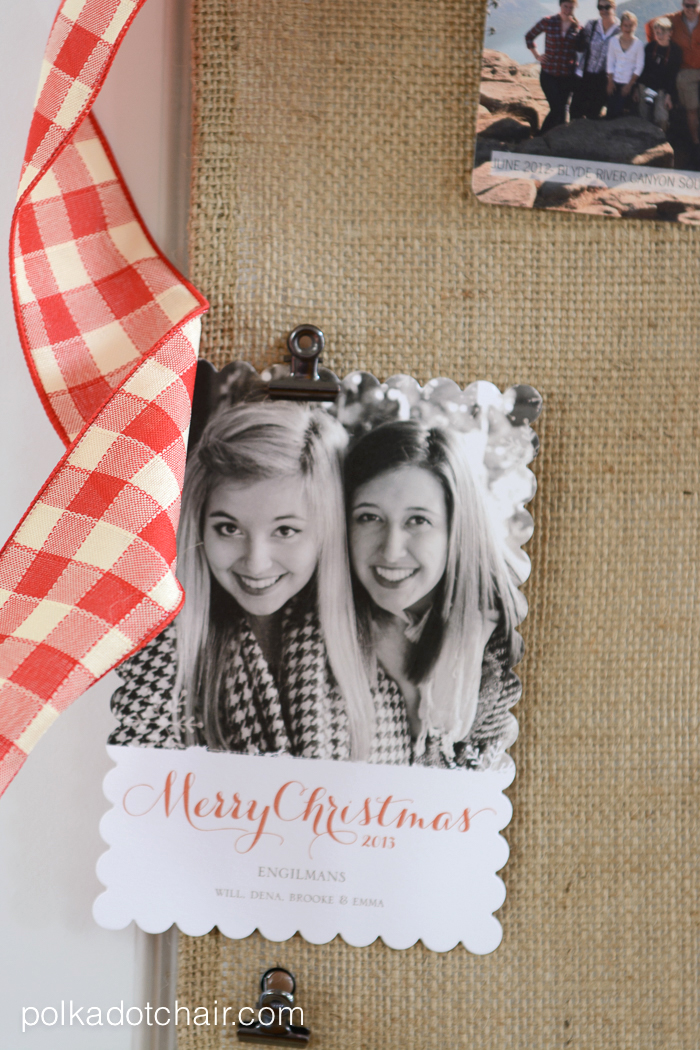
    I also love that most Christmas cards come with family photos. It’s so fun to see how all of our friends have changed over the years and see their families grow even though they are far away.

    How to Make a DIY Christmas Card Holder:

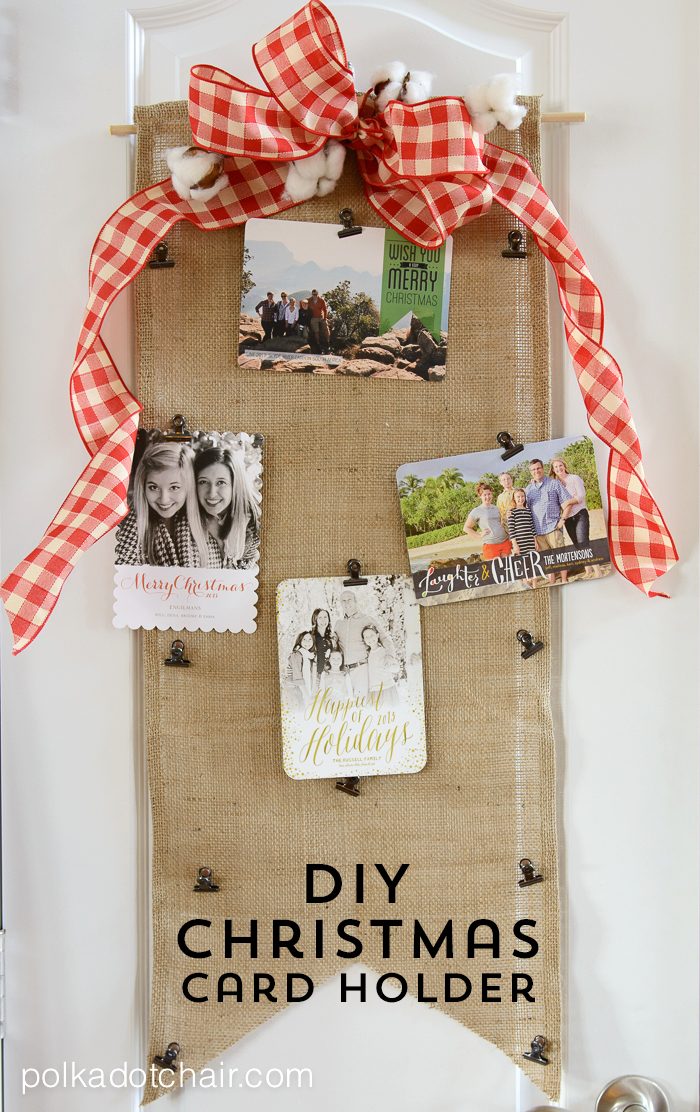
    I’ve wanted a good way to display my Christmas Cards for a few years now. Usually, we just throw them in a bowl on the kitchen table, but this year I decided that I wanted to create a hanging cards display.

    DIY Christmas Card Holder.... no sew!

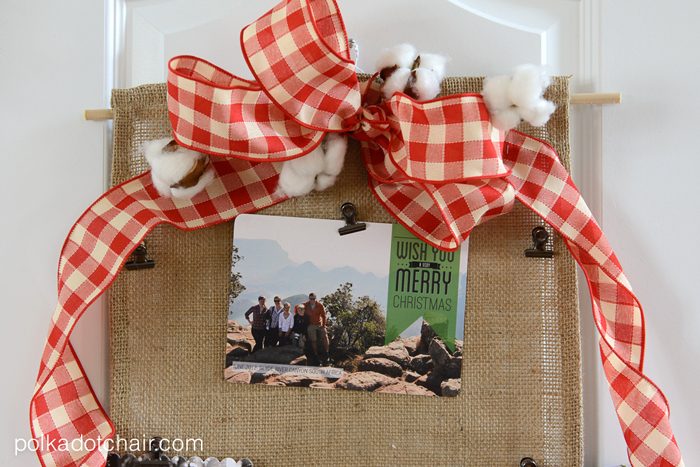
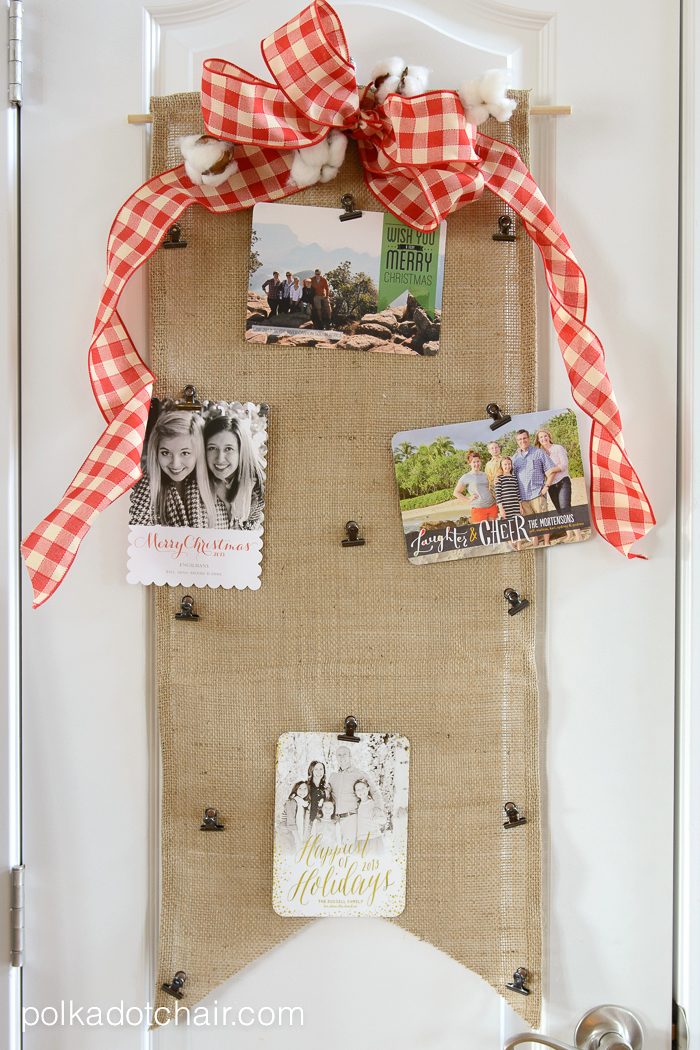
    I designed this Christmas Card holder that just hangs on a door. It has clips that can hold and display the cards, and the holiday cards can be moved around as necessary.  My holder is about 3 ft long but you can make one any length you’d like, wouldn’t it be cute the entire length of a door?

    If you are looking for ideas to display your Christmas and Holiday cards but want something different than this tutorial, you can check out this round-up of 10+ ways to Display Christmas cards.

    DIY Christmas Card Holder.... no sew!
    DIY Christmas Card Holder.... no sew!

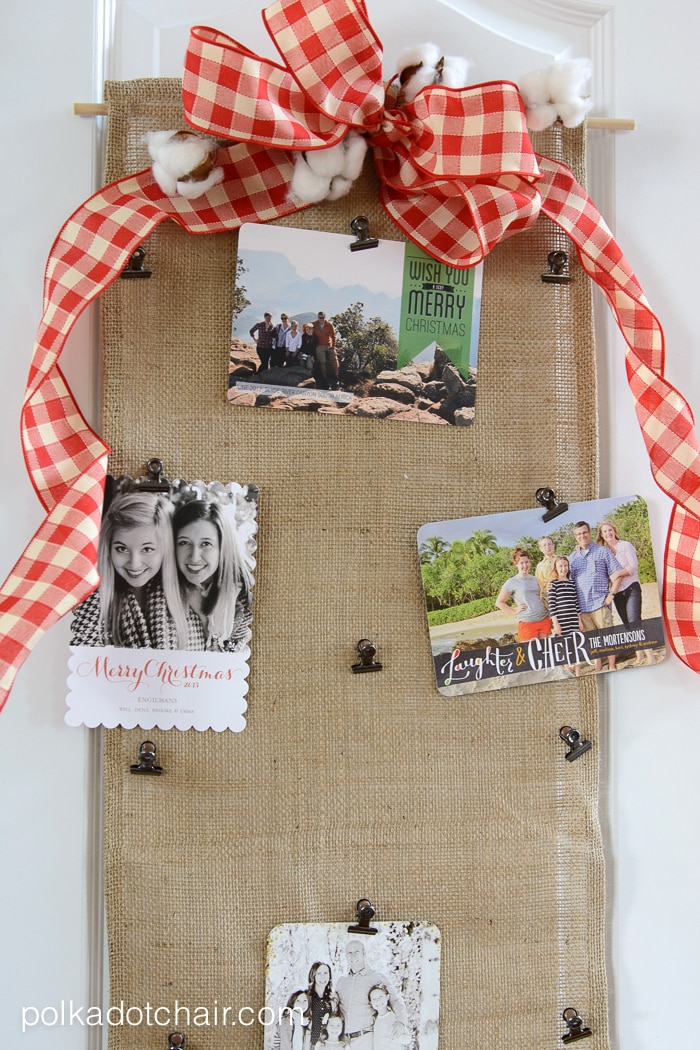
    Making one is very simple (it’s no-sew) and you can customize it as you like to match your decor.

    This project uses a “cheater” method of a burlap table runner to start. It’s a great way to save some time and not have to deal with the messy burlap fraying as you work. However, if you can’t find a burlap table runner, you can use burlap by the yard and simply tape the edges down on the back.

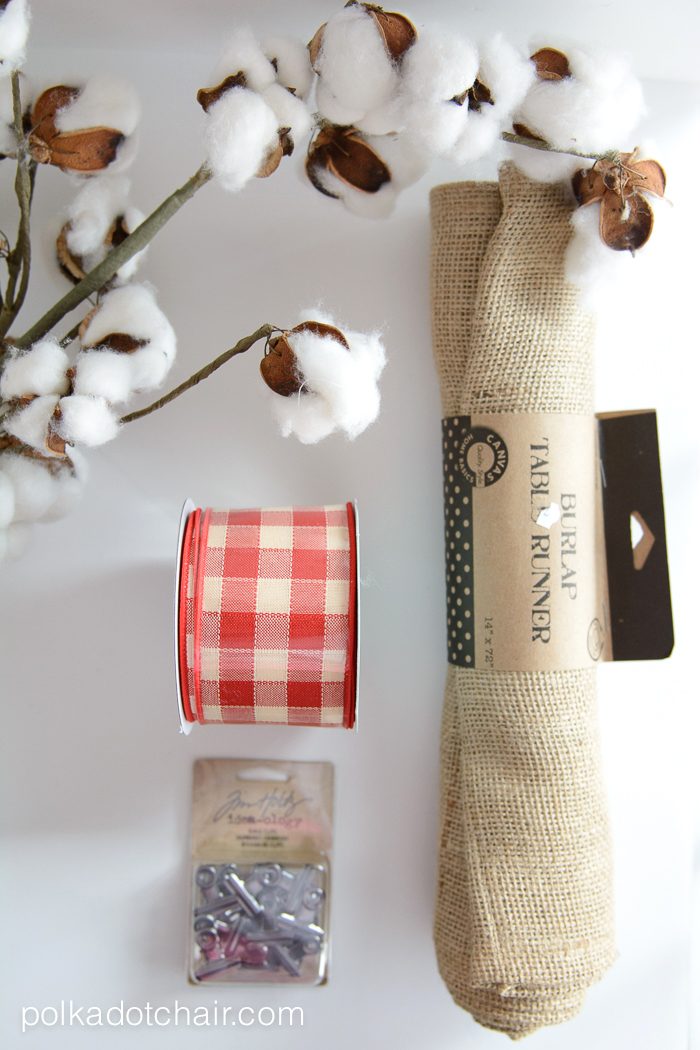
    Supplies Needed for the Christmas Card Holder:

    -Burlap Table Runner

    -Small Clips (the ones I used are made by Tim Holtz and are no longer sold. You can get silver ones here)

    –Large Brads

    -Dowel Rod

    –Floral Wire

    -Bow/Ribbon/Embellishments

    -Fray Check

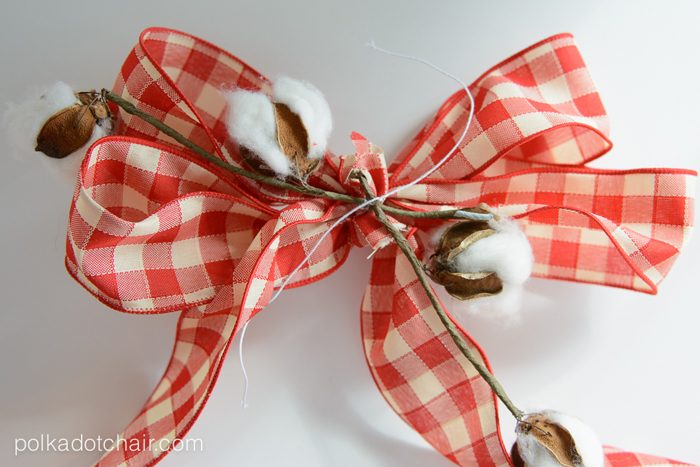
    Step One: Make the Ribbon Bow

    DIY Christmas Card Holder.... no sew!

    Begin by making your bow.

    How to Make a Christmas Bow:

    To make the bow don’t “tie” it like you normally would. Instead, form loops with the ribbon and secure with a piece of floral wire. Keep making loops until the bow is the size you want (I did 4 loops). You are just going to use 1 piece of floral wire for all the loops.

    After you get the bow the way you like, attach some embellishments (in my case cotton, but you could use Holly Sprigs too) using the wire. Do not cut the wire.

    DIY Christmas Card Holder.... no sew!

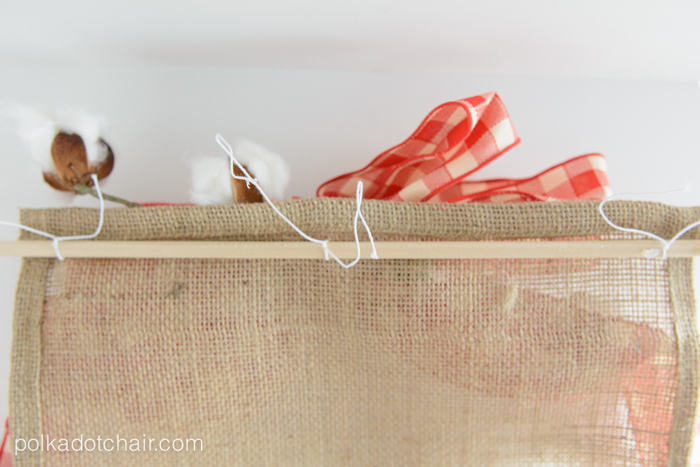
    Step Two: Cut the Burlap Table Runner

    Cut the burlap table runner in half lengthwise (you can make 2 hangers from one table runner).  Cut a V shape in the side of the runner that is not finished (leave the top as is). Apply fray check along the V you just cut to keep the burlap from unraveling.

    Step Three: Add the Dowel Rod

    Cut a dowel rod to about 4″ longer than your burlap table runner.

    Feed a piece of floral wire through the top of the table runner and attach it to the dowel rod.  Attach the bow also in the same way.

    DIY Christmas Card Holder.... no sew!
    DIY Christmas Card Holder.... no sew!

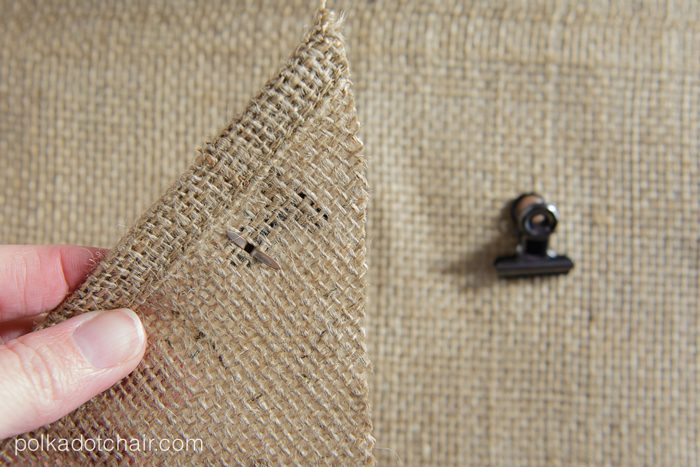
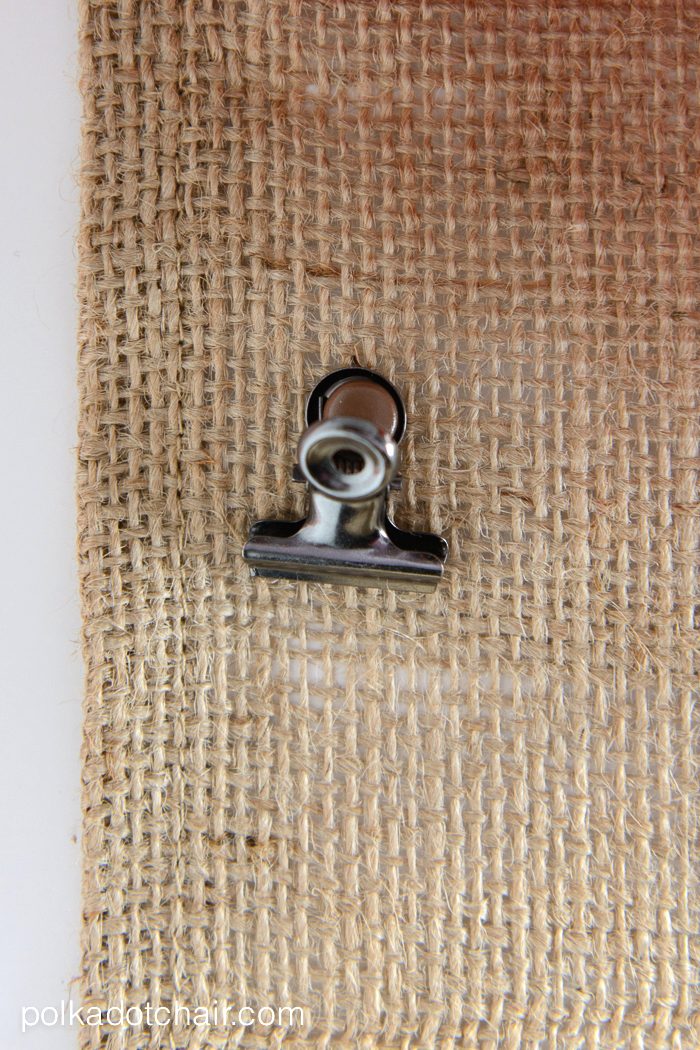
    Step Four: Add the Clips

    Next place the clips where you like on the hanger. To attach the clips use ¼″ brads. Just feed the brads through the burlap.

    DIY Christmas Card Holder.... no sew!

    That’s it! Now all you need to do is fill it up with pretty Christmas Cards.

    DIY Christmas Card Holder.... no sew!
    DIY Christmas Card Holder.... no sew!

    More Projects You May Enjoy

    • How to Make a Retro Diorama Ornament
    • How to Make String Christmas Ornaments
    • How to Make a Halloween Potions Centerpiece & Free Printable Potions Jar Labels
    • How to Make Fabric Kimekomi Christmas Ornaments

    • Share
    • Email

    About Author

    Melissa Mortenson

    Melissa Mortenson is a blogger, designer, and content creator. She is the Polka Dot Chair blog founder and has been sharing fresh and creative ideas with readers since 2008. She is the author of “Project Teen, Handmade Gifts your Teen will Actually Love.” Her work and designs have been featured on HuffPost, TODAY, Pioneer Woman, HGTV, BuzzFeed, Better Homes & Gardens, and many other established publications. Her first fabric line, “Derby Style,” debuted in January 2015 through Riley Blake Designs.  Additional fabric collections have followed it in subsequent years. A mom of 3, she considers herself lucky to be living in Kentucky.

    Reader Interactions

    Comments

    1. erin says

      December 09, 2014 at 8:27 am

      super cute!!!

      Reply
    2. Kate says

      December 09, 2014 at 9:58 am

      Splendid idea! Thanks for your how-to. Sadly, postage has increased to much this year that I think there will be few Christmas cards being exchanged. 🙁

      Reply
    3. Sarah C says

      December 09, 2014 at 11:55 am

      Love it! Last year I covered my utility door with wrapping paper and a bow and attached the cards to the ribbon. I need to get on it and do it again this year before the cards start coming in! I really like this, maybe I’ll do this next year. Very cute.

      Reply
    4. Alison Malone says

      December 09, 2014 at 11:08 pm

      Adorable Melissa!

      Reply
    5. Erica Green says

      December 19, 2016 at 11:24 am

      So cute. I have a roll of plaid ribbon. Think I’ll use that. Great way to display cards. Very clever idea. Thank you!

      Reply

    Leave a Reply Cancel reply

    Your email address will not be published. Required fields are marked *

    This site uses Akismet to reduce spam. Learn how your comment data is processed.

    Primary Sidebar

    Hello! It’s nice to meet you.

    I’m Melissa. I like to design things, like fabric, printables, and projects.

    I’m also a Mom and a Maker. I am like most of you, just trying to do my best every day. Some days I succeed, many days I fail.  I find joy in creating, if you do too, then I hope that you find something here bring a little “happy” to your life.  Find out more about me here.

    COPYRIGHT POLICY

    All my images and text are copyrighted. You may NOT use any images from this site in any kind of Video (this includes YouTube). If you would like to feature my work, you may use ONE (1) NON-COLLAGED image and must “follow” link back to my original blog post. You may NOT edit, crop, or change my images in any way without written permission. You MAY NOT print out or copy and distribute any text, images or patterns from this site. All patterns, content, instructions, and templates are for personal use ONLY! Thank you! Violators will be reported.

    Footer

    ↑ back to top

    About

    • Privacy Policy
    • Disclaimers
    • About Melissa
    • Instagram
    • Facebook
    • YouTube
    • Pinterest

    Newsletter

    • Sign Up! for emails and updates

    Contact

    • Contact
    • FAQ
    • Press
    • Published Books
    • Fabric Collections

    Welcome to the Polka Dot Chair! Here you’ll find easy, step-by-step, sewing, quilting, and crafting projects. We design projects for Makers of all skill levels. Beginners are welcome!

    DISCLAIMER:

    While every effort has been made to ensure the accuracy of the content on this website, the information is made available without warranty of any kind. The Polka Dot Chair accepts no responsibility or liability, whether direct or indirect, as to the currency or accuracy of the information, nor any consequence of its uses. This website is not intended to substitute the advice of a professional.

    Copyright © 2022 Polka Dot Chair

    [ Placeholder content for popup link ] WordPress Download Manager - Best Download Management Plugin