DIY Travel Jewelry Roll | A Cricut Maker Project
If you’re looking for a simple yet elegant gift that you can DIY this Holiday season, then I think you may love today’s DIY Travel Jewelry Roll Tutorial!
It’s no-sew and easily made using a single piece of leather and a Cricut Maker Machine! I work as a Brand Ambassador for Cricut, and am thrilled to be working with a company I love so much. This is sponsored content.
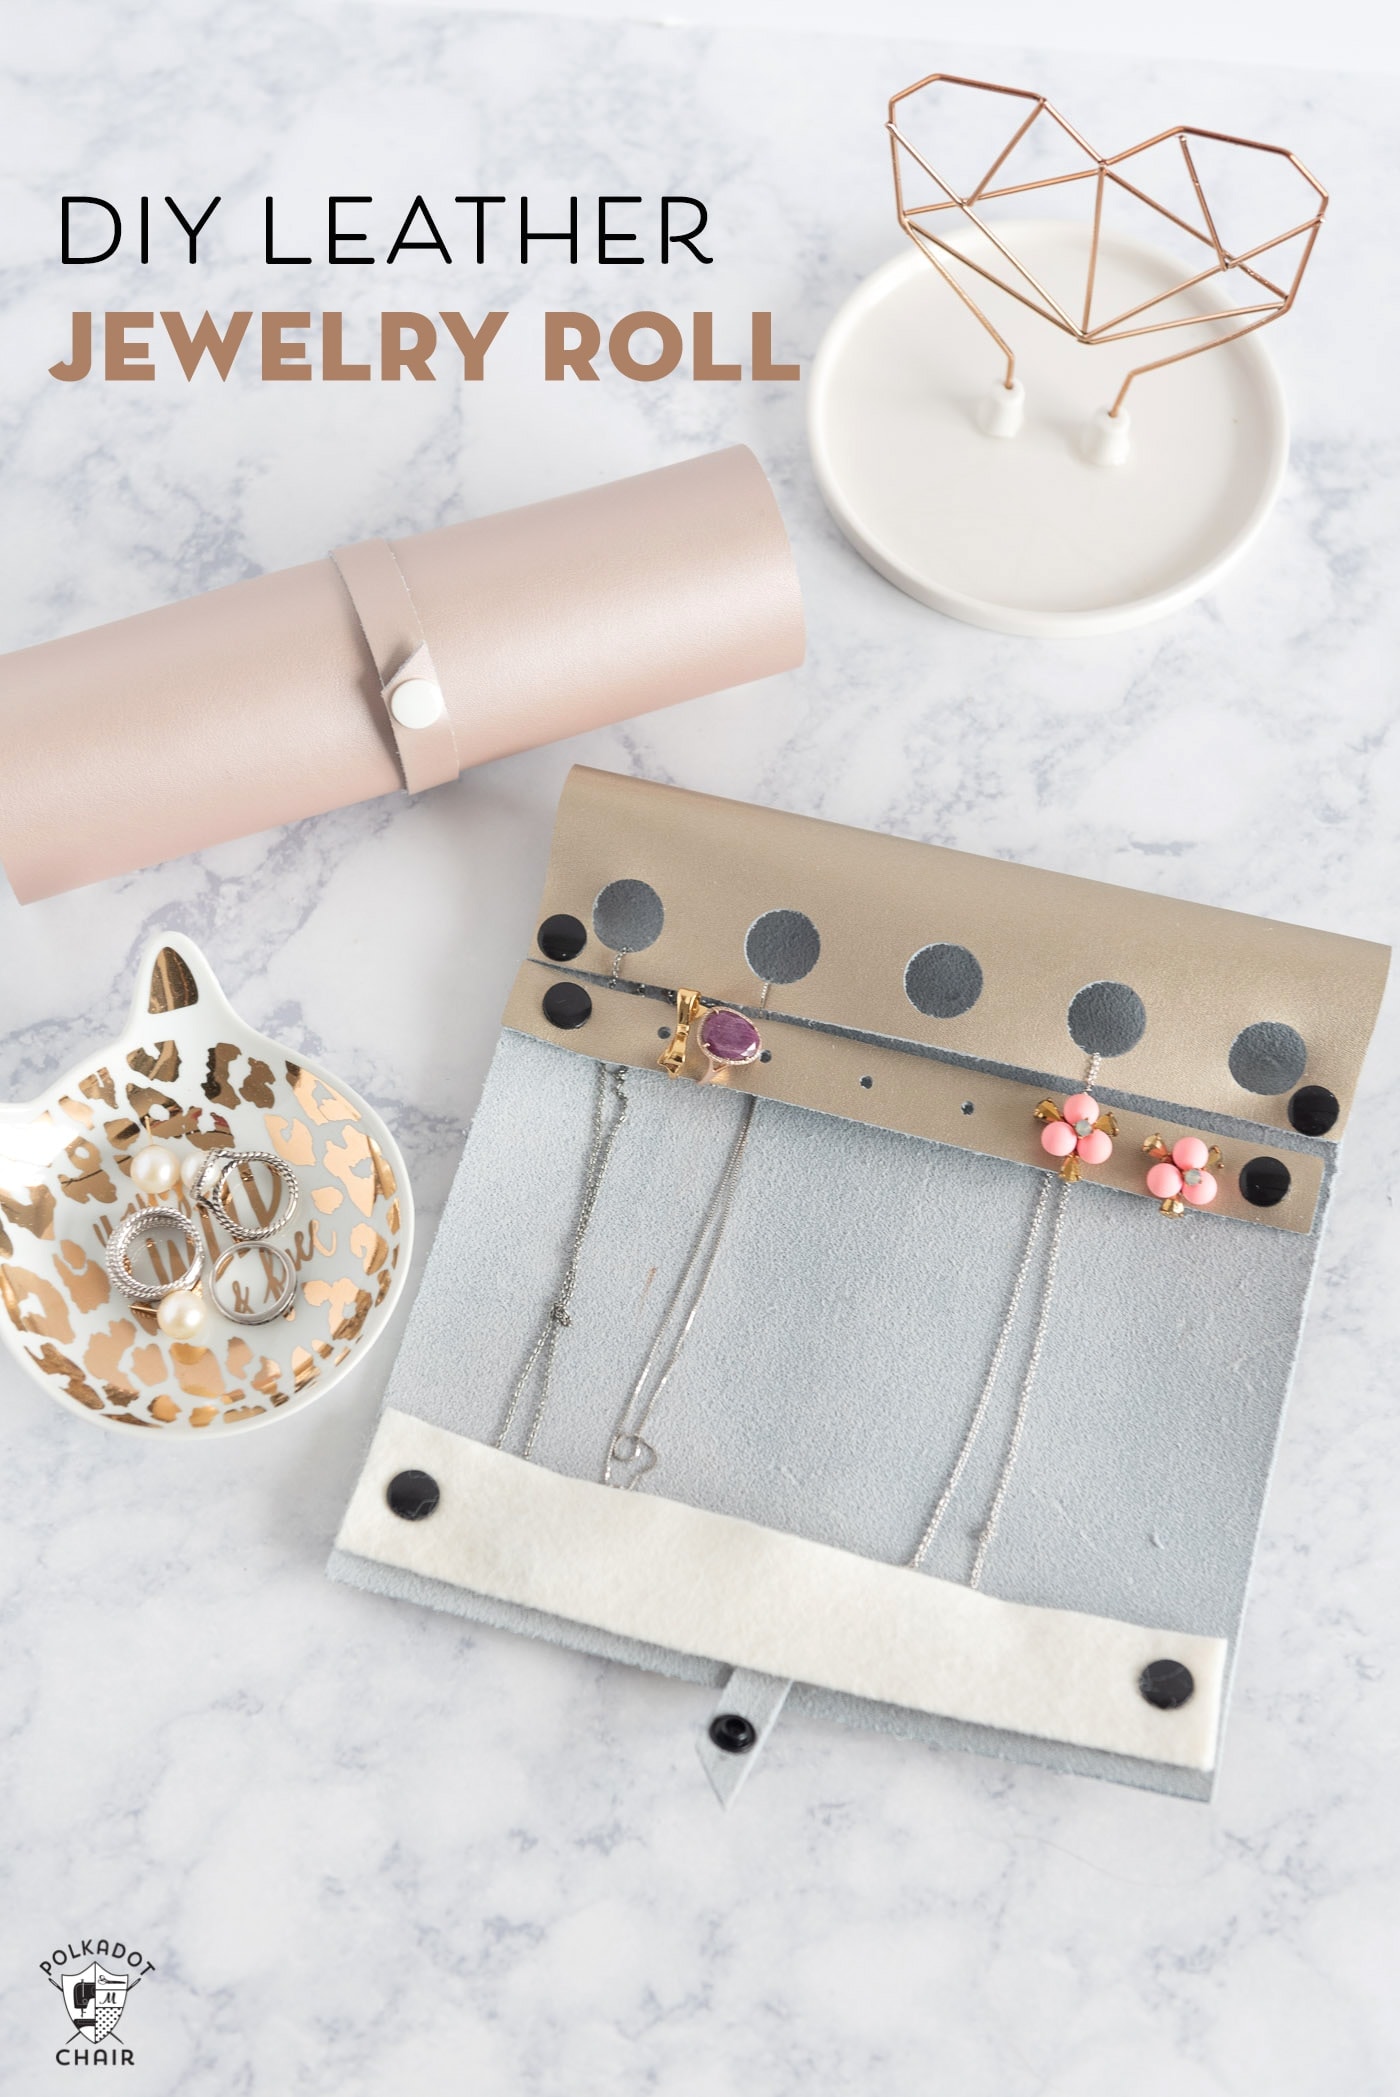
As much as I love to sew, sometimes I don’t have the time to sew multiple gifts during the Holidays. This year, Cricut asked me to come up with a simple holiday gift idea. I had lots of project ideas floating around in my head, but in the end, I decided to make a travel jewelry roll.
I like this project as a Holiday gift because it’s cut all at once and requires minimal assembly after it’s cut. You cut it out, add a few snaps, and you’re done—easy peasy!!
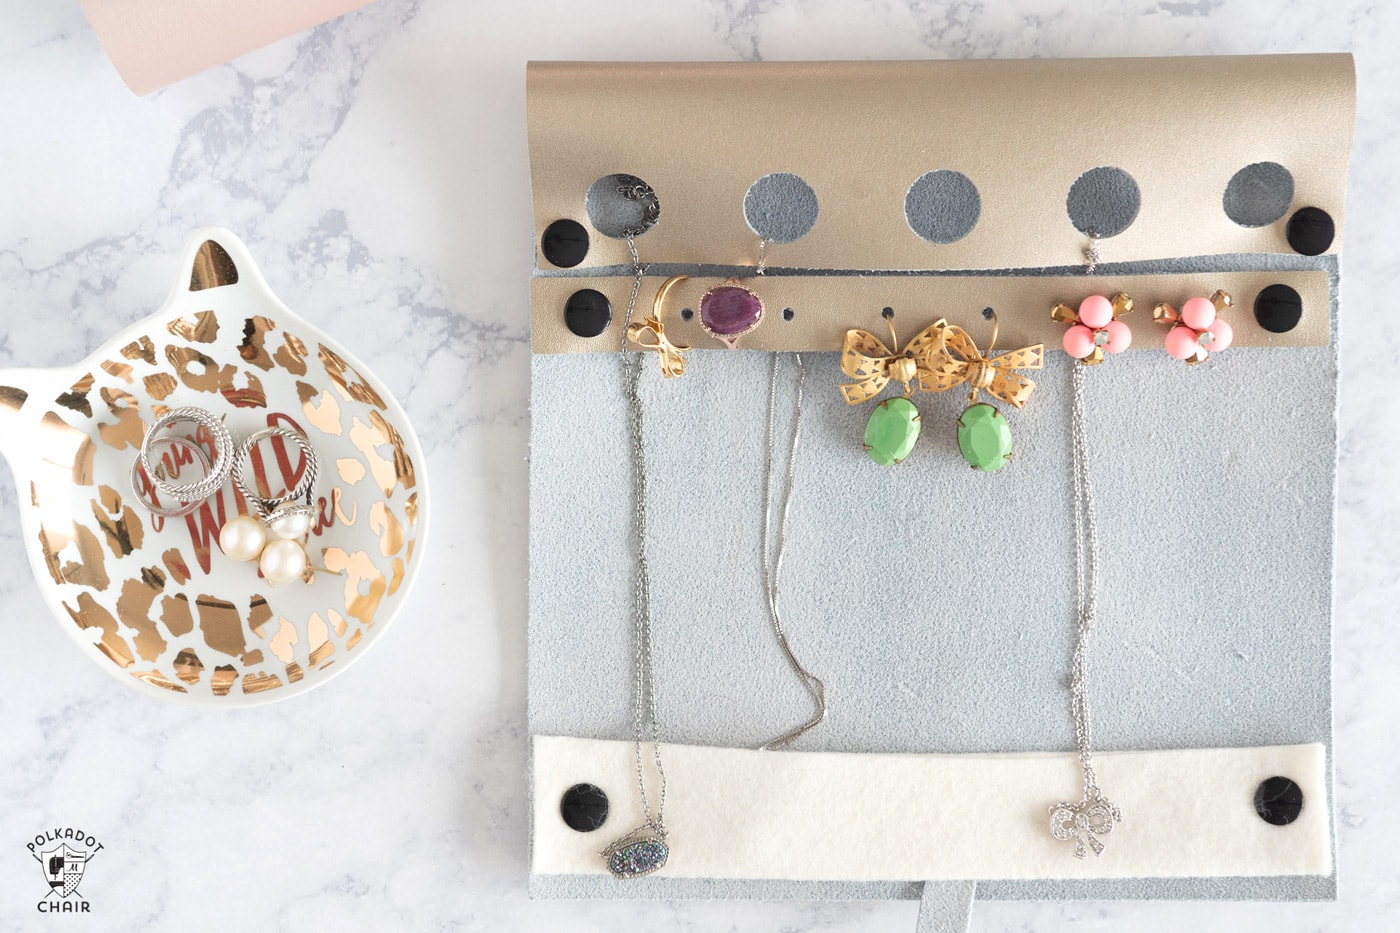
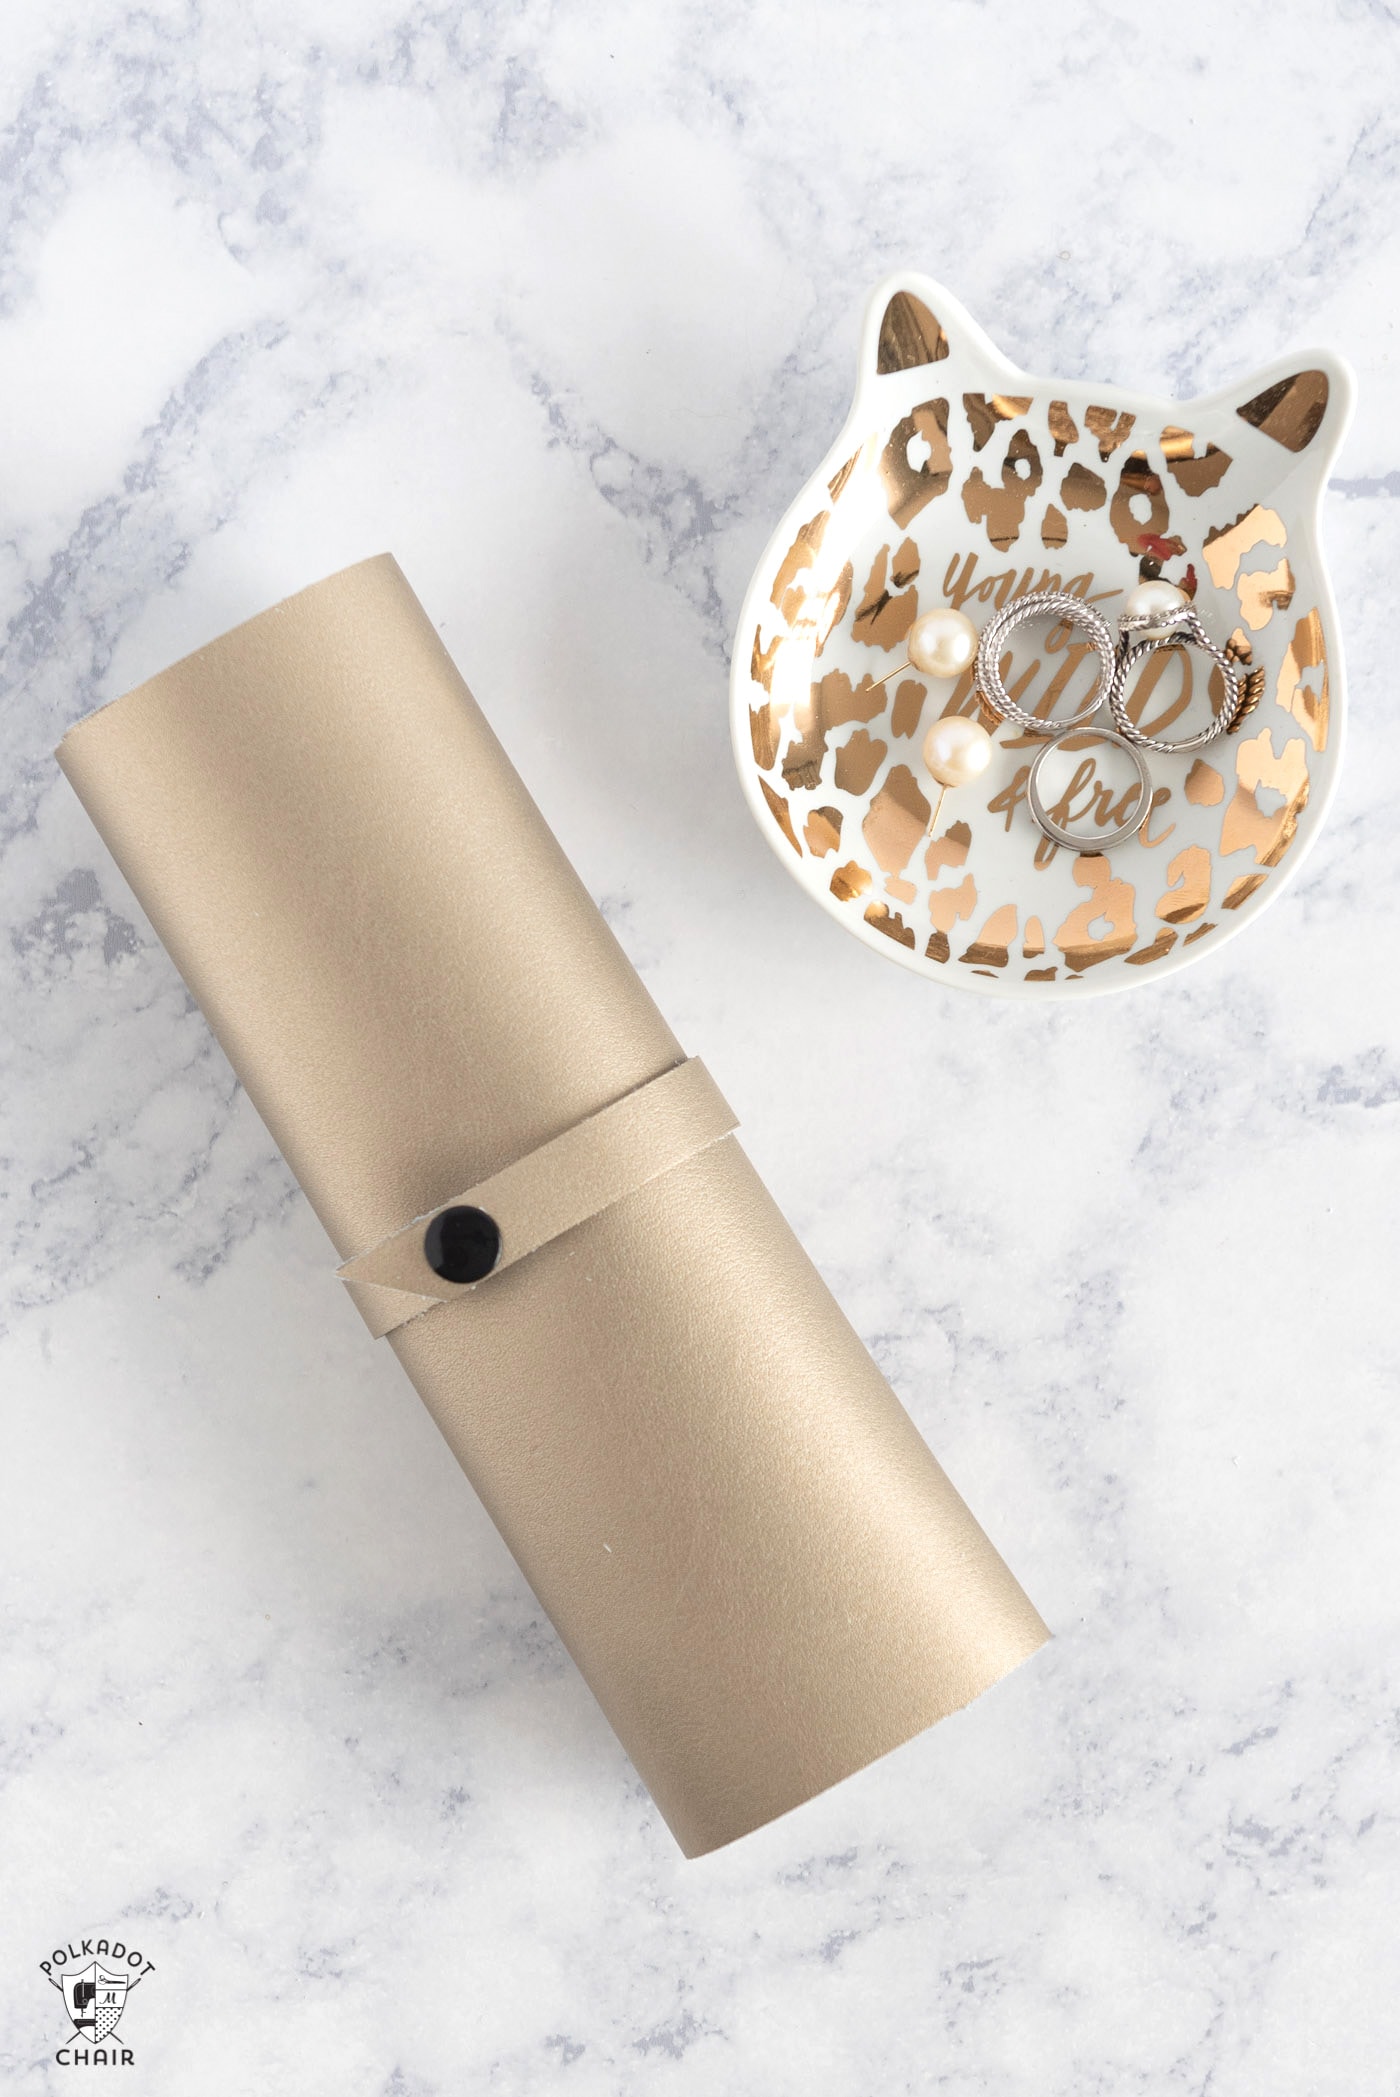
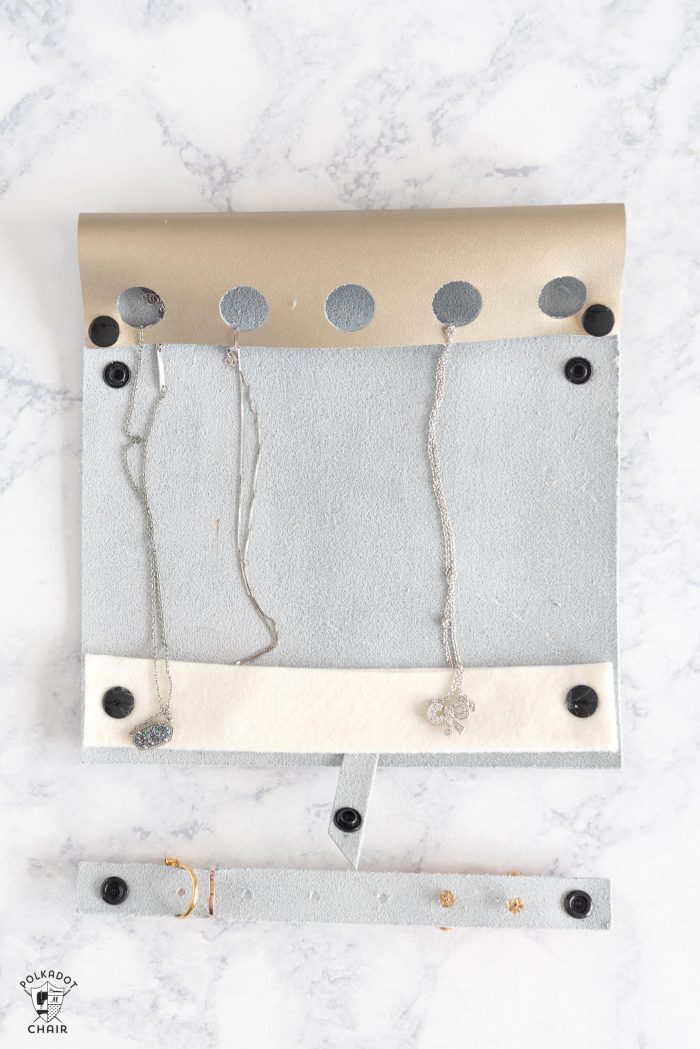
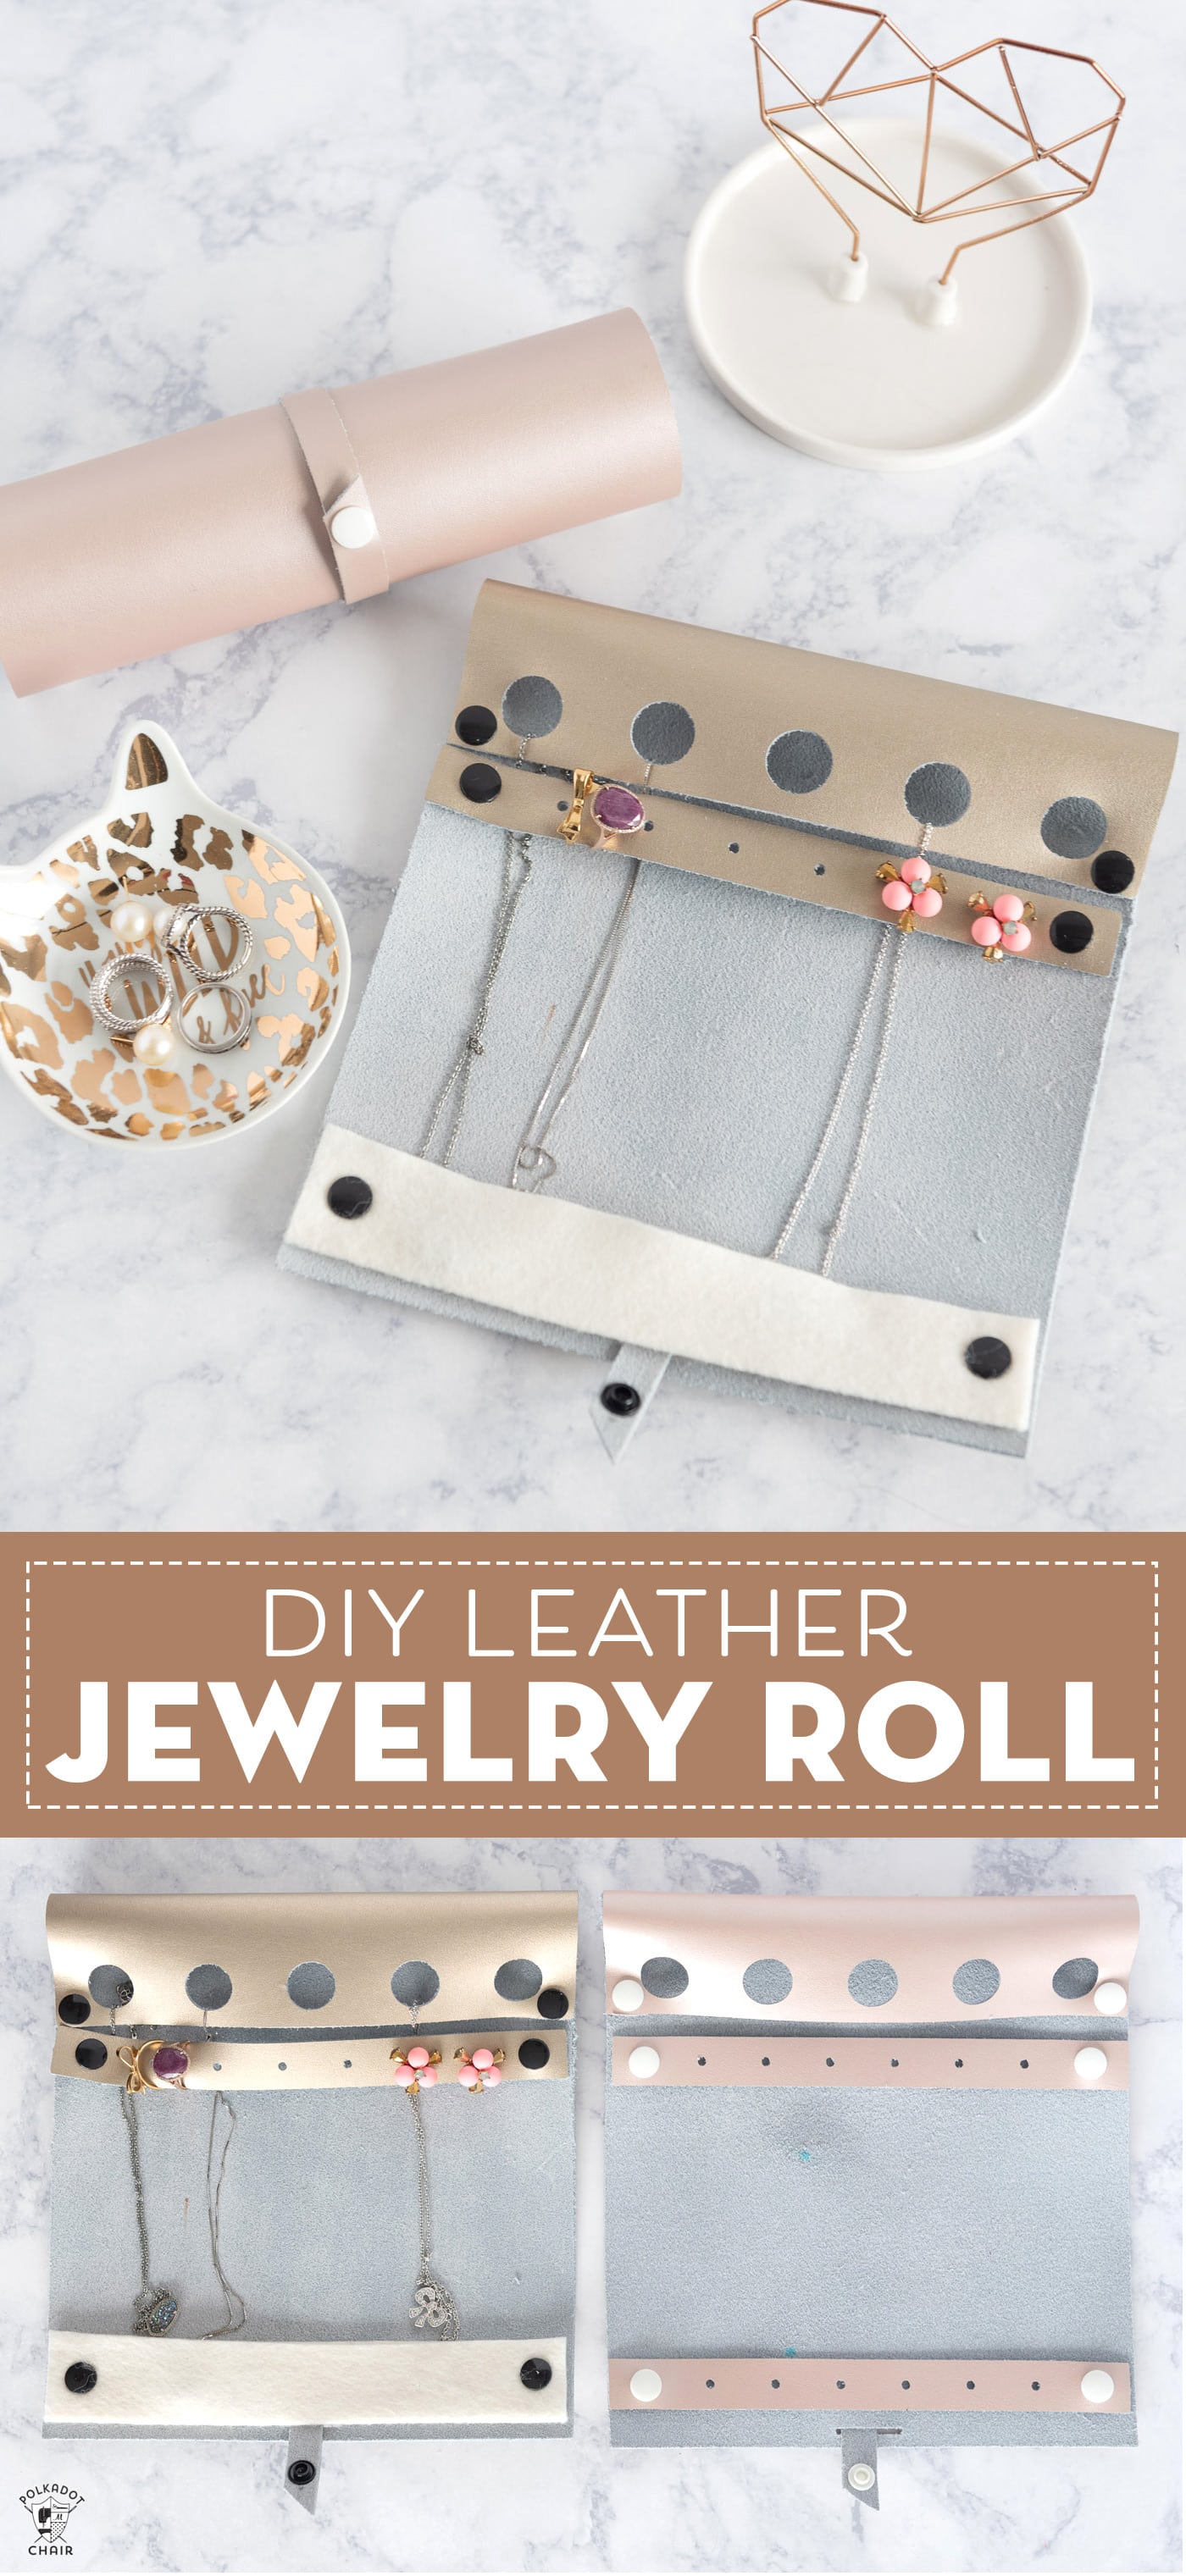
This jewelry roll features a row of circles at the top for stringing your necklaces through and 1 or two earring holder rows. You can also fit your rings on the row for the earrings. The whole thing is designed to roll up so that you’re jewelry travel with you without getting tangled!
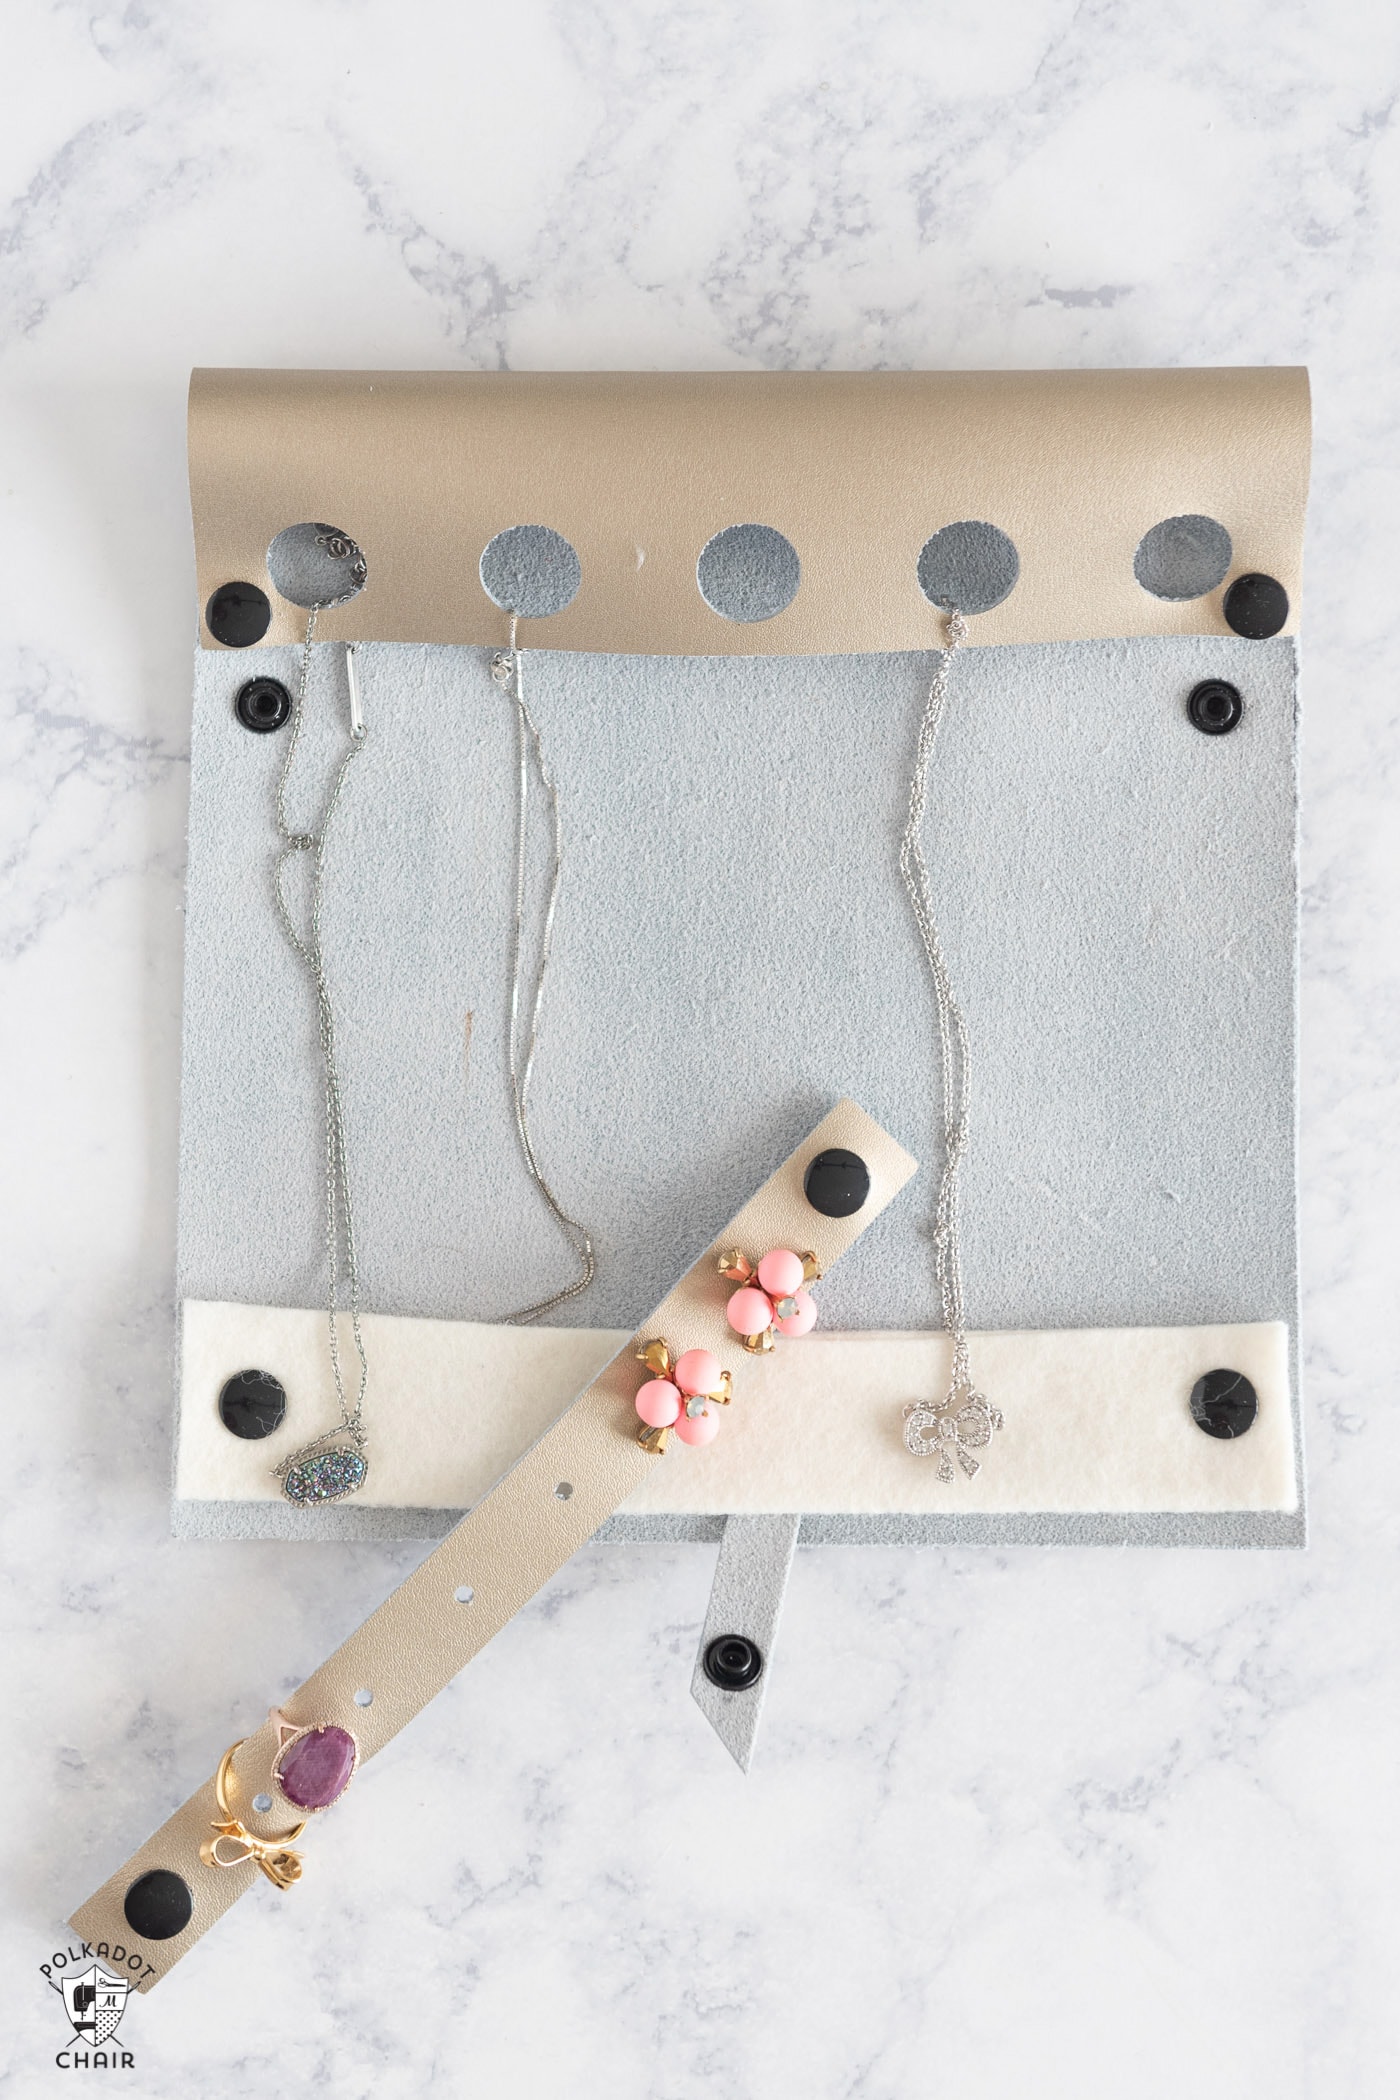
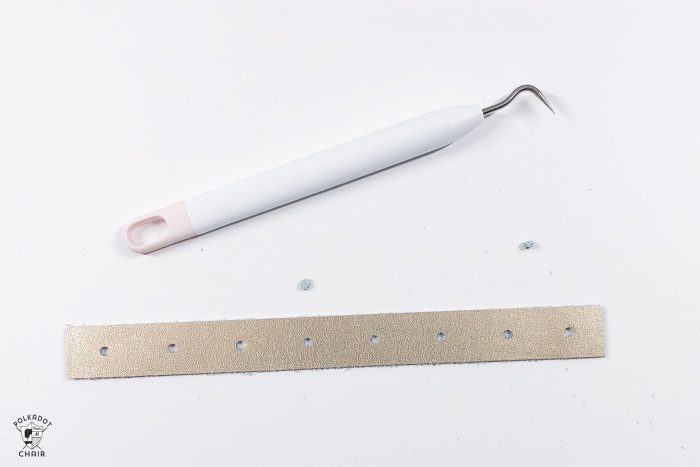
I also hate it when I lose my earrings when I travel. They are so small that they sometimes sneak out of my travel case. That’s why I designed a leather strip with holes in it, specifically for holding earrings.
For this project, I used a sheet of Cricut Leather. You can use other leather or vegan leather if you like. Just ensure it’s sturdy enough to hold up to being rolled up.
Leather Travel Jewelry Roll Tutorial:
Supplies for Travel Jewelry Roll:
12″ x 12″ piece of Leather- I used Cricut Metallic Leather in Gold and Rose Gold. I suggest 4-5oz of leather if you use other leather. Thinner leather may not hold up well when rolled
Cricut Maker Machine with either Deep Cut Blade or Knife Blade (depends on what you are cutting out) – this may also work on the Explore Machines using the deep cut blade, but I haven’t tried it personally.
Cricut Strong Grip Mat
Painters Tape
Optional: Awl & Cricut Pen. 2″ x 8″ piece of Felt (more on that later)
Jewelry Roll Design File CLICK HERE I’ve shared mine with you.
My Favorite Cricut Supplies
- Cricut Maker 3 (you can get great deals on machine bundles on Cricut.com)
- Roll Holder for Maker 3
- Cricut EasyPress (I like the large size the best): Make sure you get the EasyPress mat as well.
- Cricut Weeding Tools: (I use the small hook tool ALL the time, making weeding vinyl so much easier).
- Cricut BrightPad: A cordless, flat, bright lightbox. I use it to weed Cricut vinyl and use it all the time to trace applique shapes for sewing & quilting.
- Cricut Iron On Vinyl
- Cricut Permanent Vinyl
Step One: Choose WRITE or CUT for Snap Set Holes
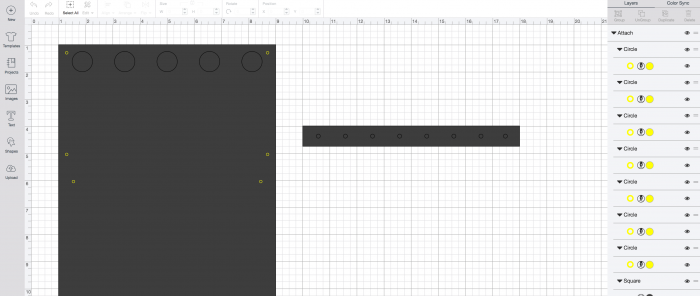
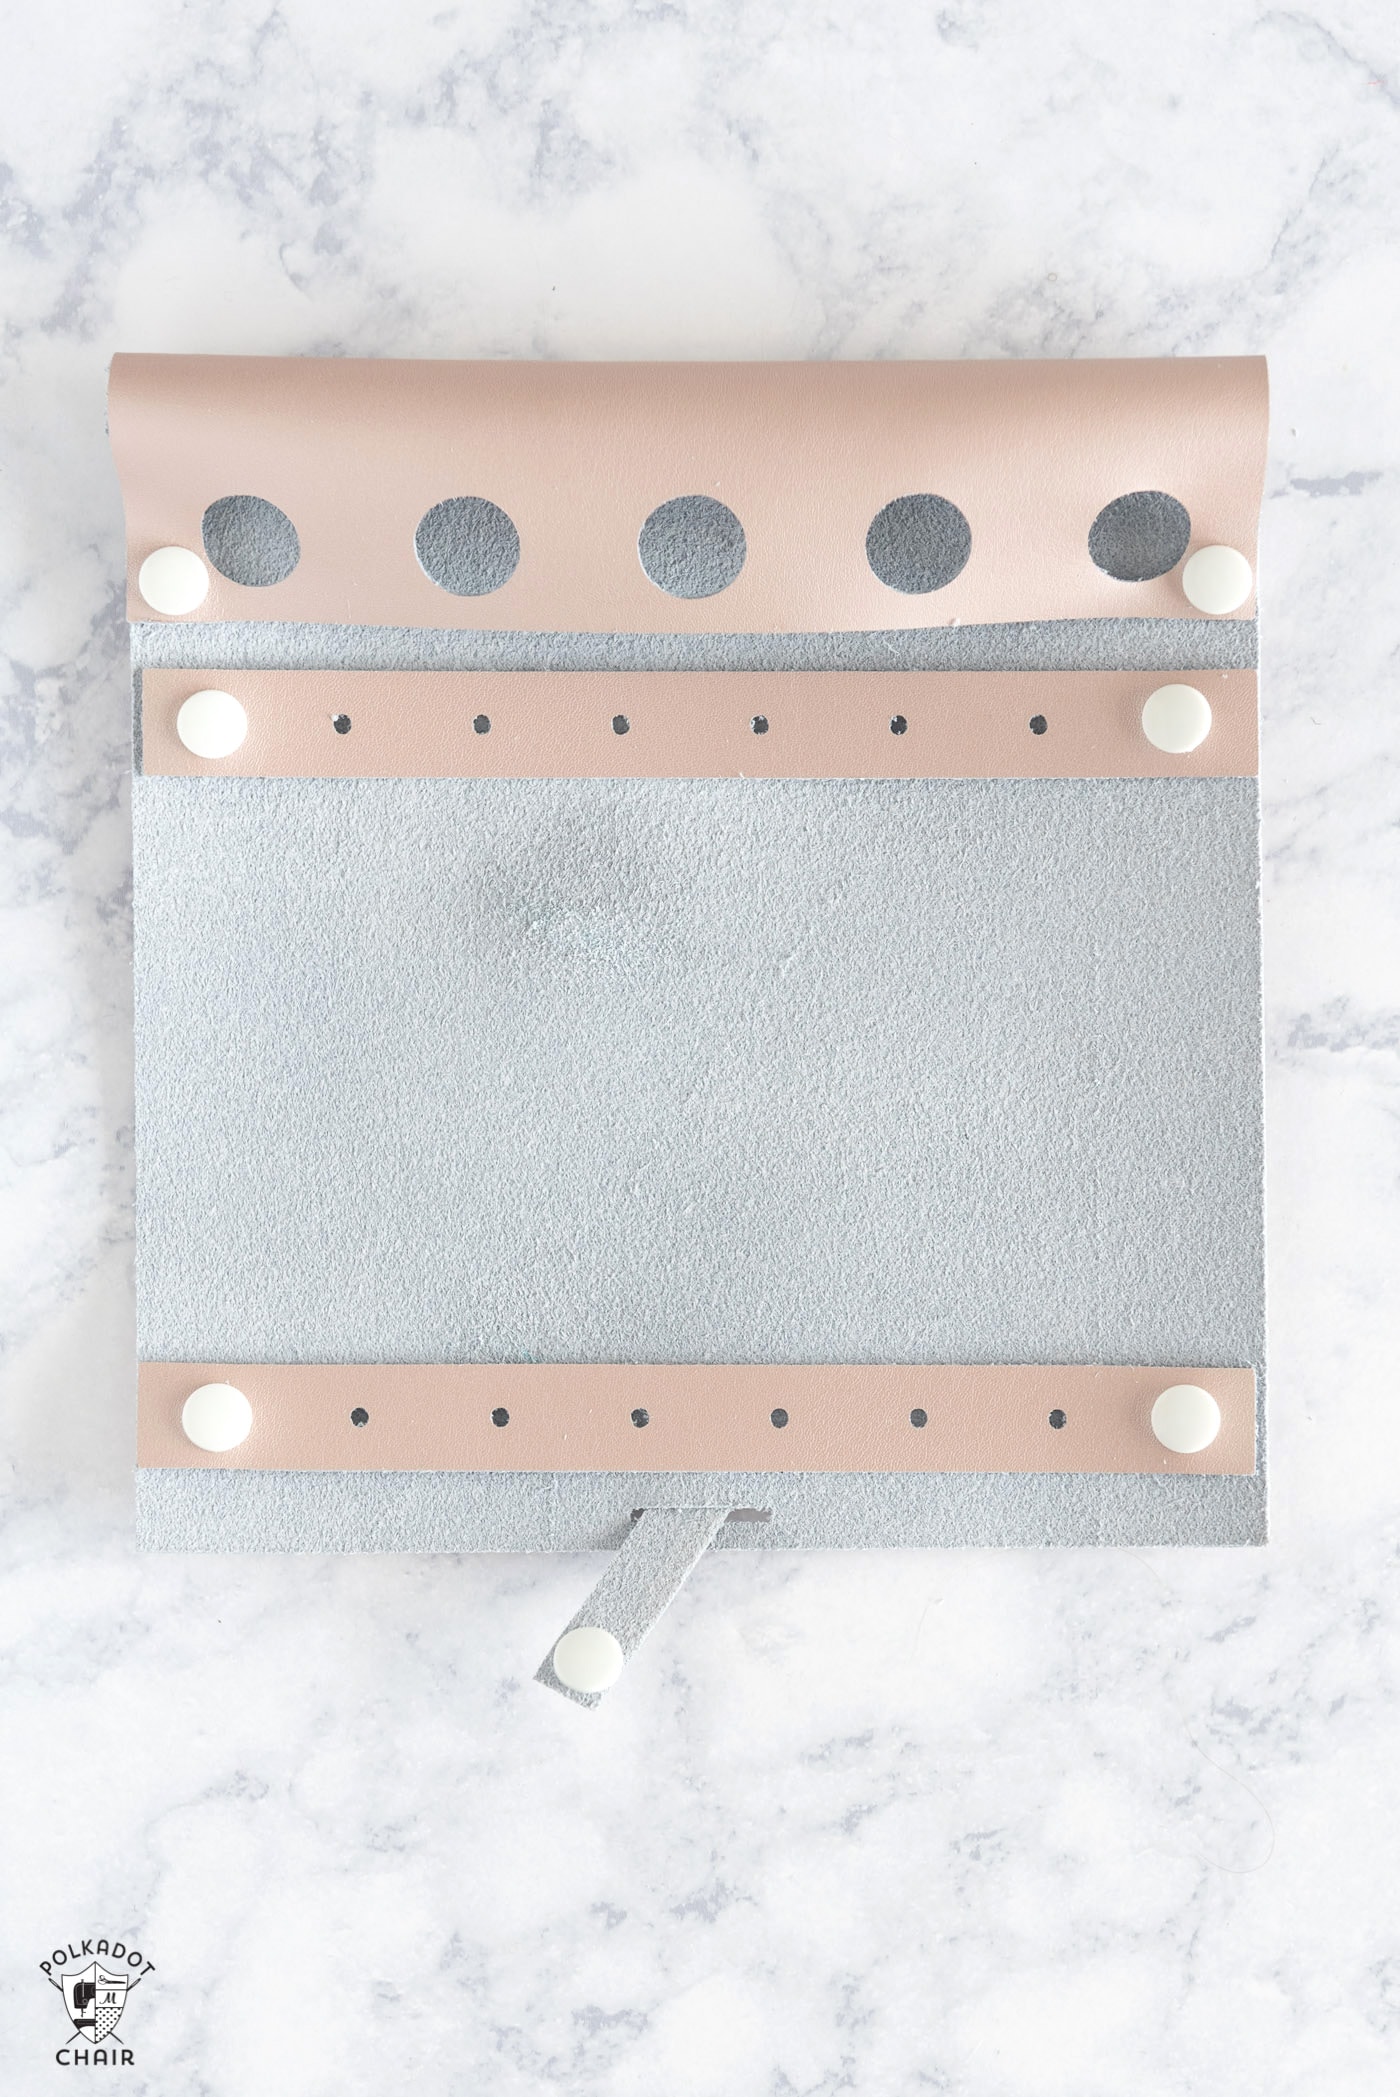
Open up the file in Cricut Design space. You’ll notice that some of my “dots” are yellow. Those dots are marked to be used with the Pen tool. Depending on the leather you are cutting, the machine may not cut a nice hole that small. Those holes are the snap insertion points. If you keep the file as is with the yellow dots, it will use the pen tool to mark where you should use an awl to punch holes to set the snaps.

I used the Cricut leather and Cricut Deep Cut blade. My machine cut the small holes like a champ! If you want to try it with the machine cutting all of the holes, click on each yellow dot on the toolbar on the right. Change the properties of the dot from WRITE to CUT.
Step Two: Choose Optional 2nd Earring Row or Felt Pocket
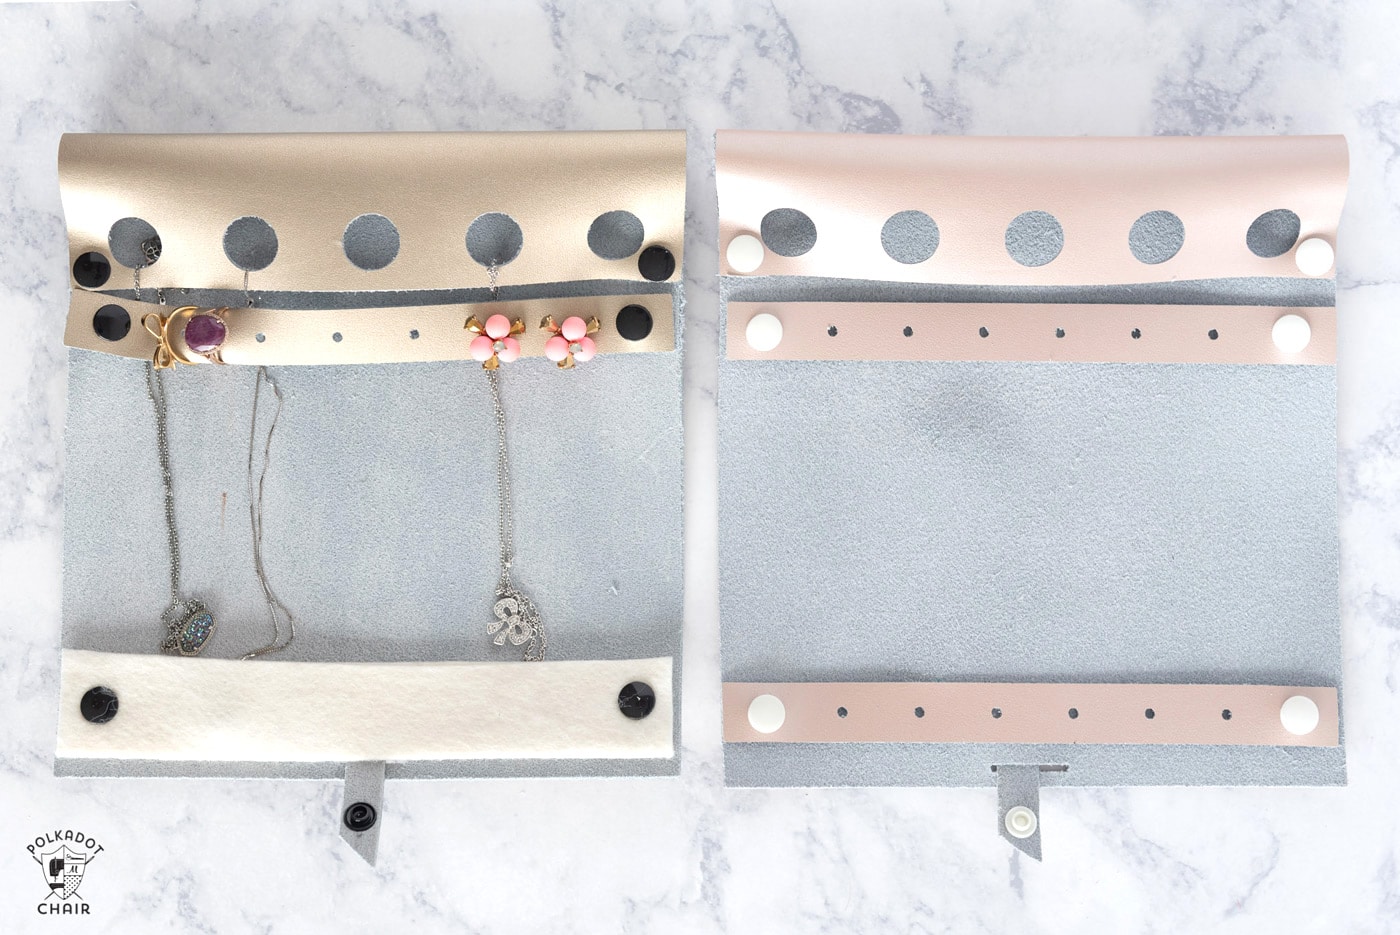
As you can see from my examples, I made two different versions of the jewelry roll. I couldn’t decide which one I liked better so I thought I’d show you both.
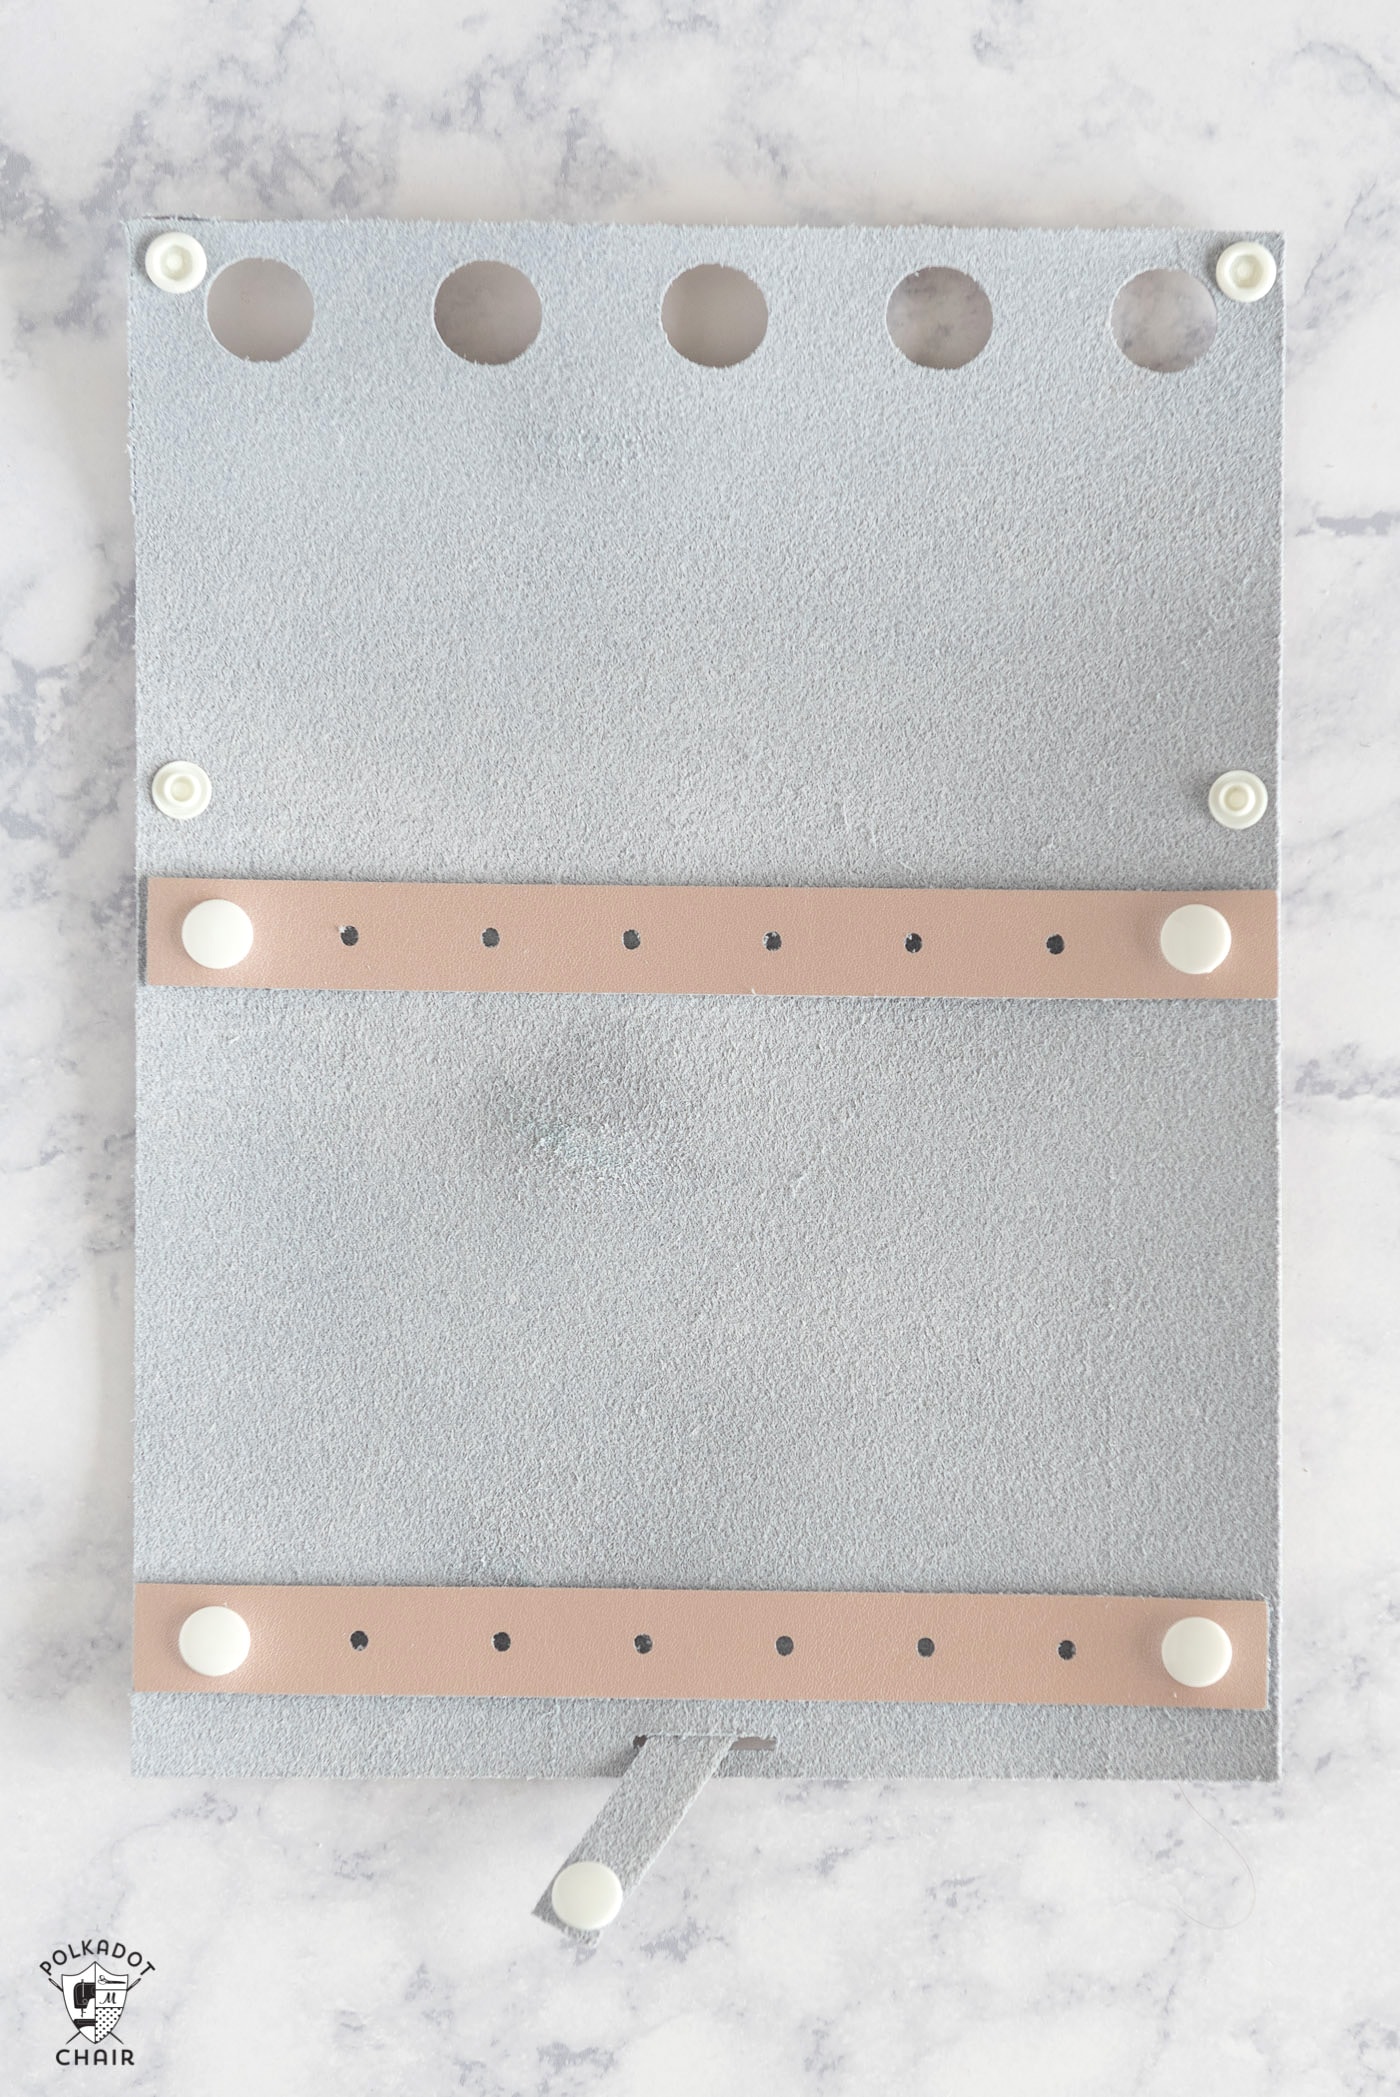
One features a felt pocket to hold the ends of your necklaces, the second other one features a second row of earring holders.
If you want a send row to hold your earrings (on the bottom), click the Attached Ear Ring Row Group in Design space. Click Copy, then Paste. The machine will now cut two earring rows.
Step Three: Cutting the Leather with the Cricut
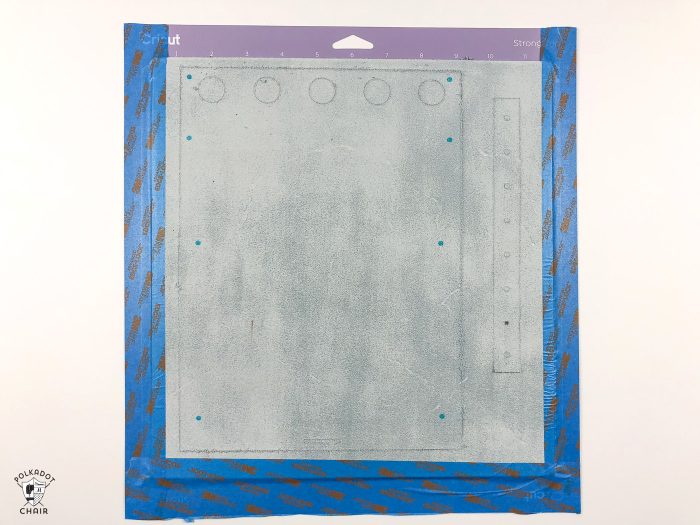
Trim your leather piece to 11 1/2″ wide. You can keep it 12″ tall. To trim leather I just use a rotary cutter and ruler.
Place your leather, front side facing down, on your Cricut Strong Grip Mat. Make sure that it’s centered, so you have 1/4″ on each side of the mat.
Move the rollers on your Cricut Machine all the way to the outside edges.
Place painters tape on the two sides and bottom of the leather on the mat. Cricut recommends this. I go back and forth between taping and not taping. I decided to tape this time since I was cutting leather, which is more expensive if I mess up!
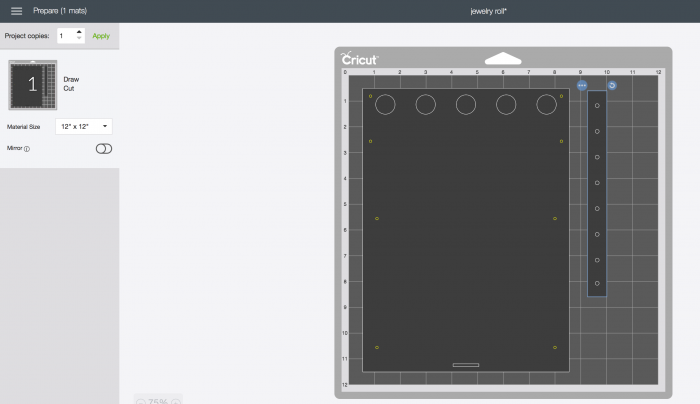
Click MAKE IT to cut the Design. In the first window, use your mouse to move both of your pieces in, so that they are at least 1/2″- 1″ in from the outside edges, and 1/2″ down from the top.
Click to go to the next screen.
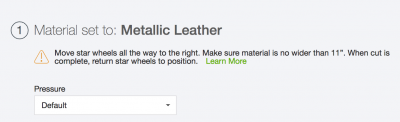
On this screen, select your material from the drop-down list. I chose Metallic Leather.
On the pressure dialog box, I chose MORE.
If you have a Cricut with a Knife Blade and choose 4-5oz leather from the materials screen, then you don’t need to set the pressure.
Load the mat into the machine, and click the Cricut button to cut.
Step Four Create the Jewelry Roll:
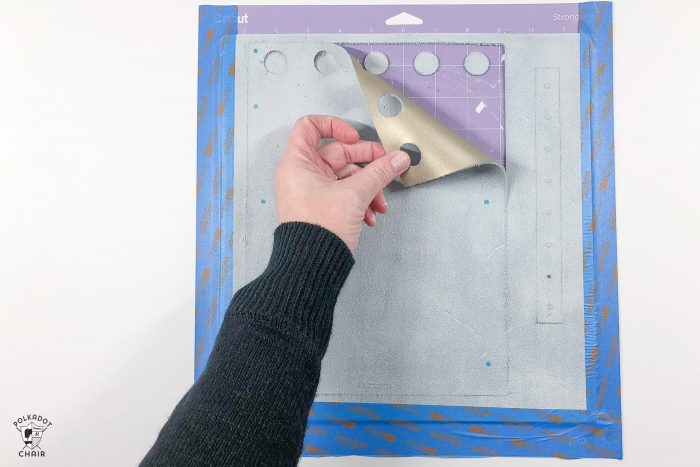
Remove the leather from the mat. Punch out the holes. I like to use my Cricut tool to punch out the small holes.
If you are using an awl, (you didn’t want to cut the tiny holes with the machine). Punch a small hole at each blue dot on your leather piece.
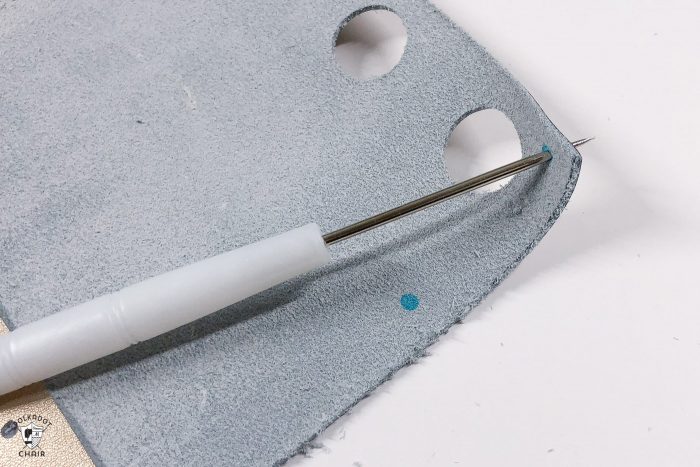
If you had the machine cut the holes, you don’t need to do this.
Step Five Set the Snaps:
Each KAM Snap has 4 parts. Two outsides (the smooth part that shows), and either a male or female inside piece. Pair up your snaps so you have 1 of each type.
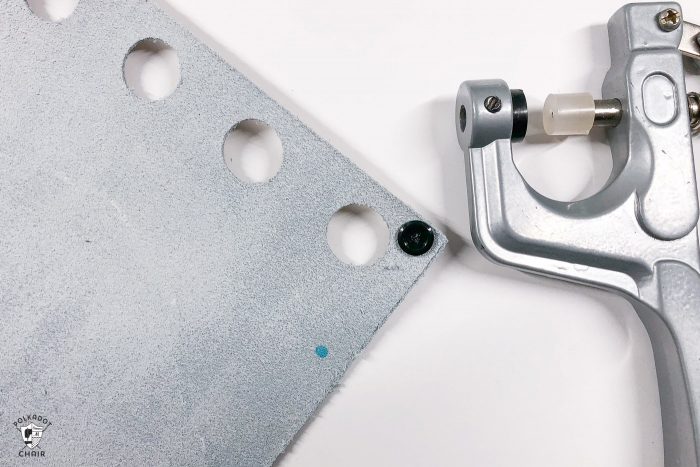
Using the KAM setter, set a snap on each hole. Make sure you set one type of snap in the top row and the other type of snap in the 2nd row. This will all you to snap the top roll over.
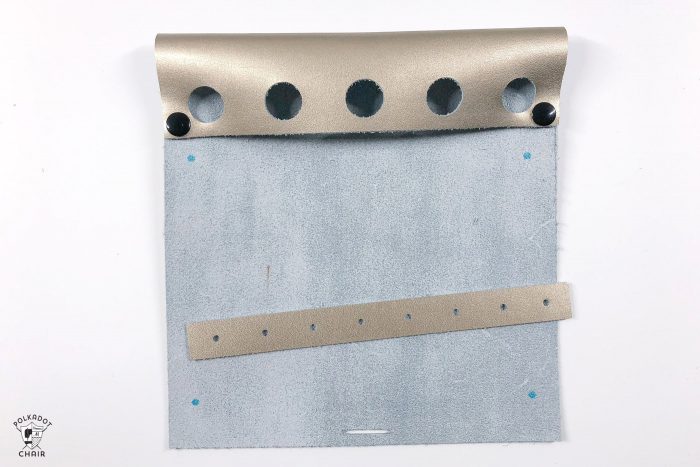
Set more SNAPs in the row to hold the earring holder, setting the other part of the snap on the back side of the earring holder.
If you want a second earring row, do that as well.
If you want the felt pocket at the bottom, fold your 2″ x 8″ piece of felt in half lengthwise and press.
Set two snaps in the side and attach them to the bottom row.
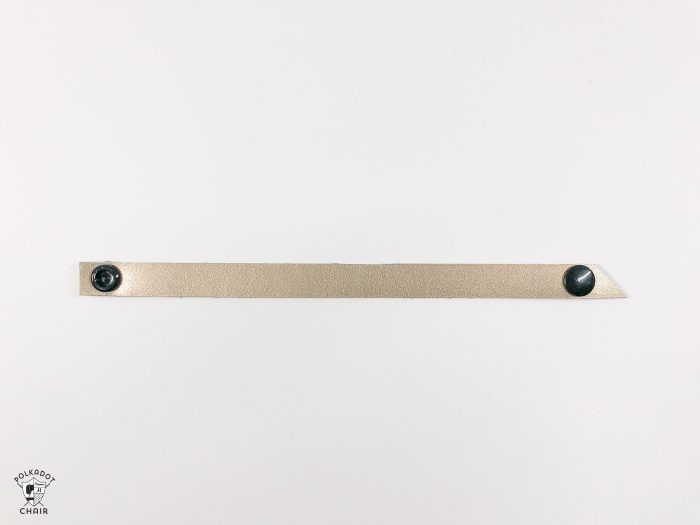
Step Six Make the Leather Strap:
Take the 1/2″ strip of leather that you cut off the leather square before you started and wrap it around your rolled up jewelry roll. Make sure it’s not rolled too tight.
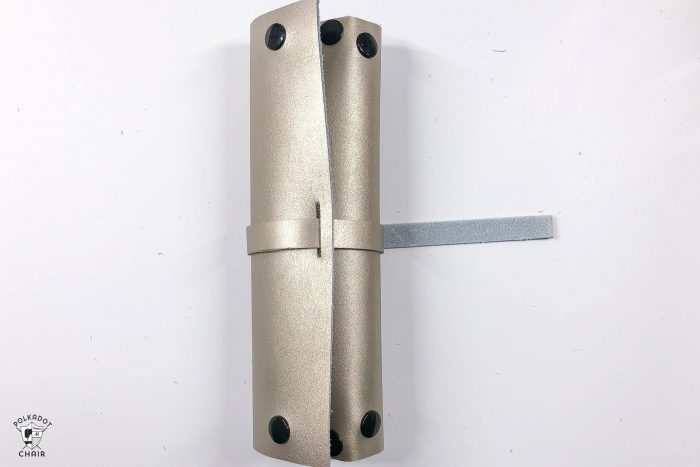
Measure how long the strap should be to hold it closed, remove it and set two snaps in the strap.
That’s it!
Enjoy!!
More Cricut Projects on the Polka Dot Chair Blog:
Fabric Basket Sewing Pattern for Cricut Maker
How to add a Disney Monogram to a YETI Tumbler
This is a sponsored conversation written by me on behalf of Cricut. The opinions and text are all mine.


Really love this. I will give this a try after I work with my Cricut a few more weeks!