Tuesday Tutorial: Scripture Case from a pair of Jeans
My son received a nice set of scriptures for his 8th birthday. He’s been toting them to church for almost a year and I’ve been worried the whole time something would happen to them. I’d been meaning to make him a scripture case and finally last week got around to it! (yes it took me almost a year to make it… )
While I was trying to think of what to make it out of I realized I have a stack of blue jeans that I’ve been saving for “something”… I bit the bullet and chopped up a pair of my jeans!
I made the case a bit bigger than the scriptures, (it fits the LDS compact quad scriptures). I wanted him to have extra room in them for papers, notes etc… If you want the bag to fit snugger, then just subract 1″ from ALL the measurements. (instead of 6×8 it would be 5×7 etc). You can also resize it for just a bible or other book. Just measure your book, then add 2″ to each . The scriptures are 3″ deep by 6″ wide x 4″ tall so my pieces were 6″ x 8″ (kept the same depth), so adjust accordingly to the size you want to fit.
To begin:
You will need:
1 pair of old jeans (adult size)
scraps of fabric:
2 6×8 for bag lining
1 3×21 for bag lining
2 5×8 for bag pocket
1 8×8 for flap lining
(you should be able to get it all out of one fat quarter)
Heat n Bond lite
Magnetic Snap
webbing for handle
contrast thread
jeans needle
If your jeans have a coin pocket. Cut it off (you won’t be able to unpick it) and set it aside. When you cut it out, keep the denim “backing” … (you want it to still be a pocket even when not attached to anything)..
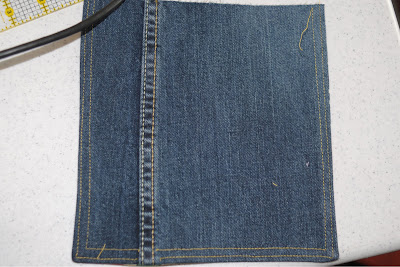
Cut off one of the legs of your jeans as high as you can. I decided to have part of the original seam of the jeans showing for the flap of the bag. So I measured a piece slightly bigger than 8×8, cut it out (keeping the seam in the right 1/3). After I cut it out, I used my quilting ruler to cut it to 8×8 and make sure it was square.
Cut from the denim also:
2 pieces 6″ x 8″
1 piece 3″ x 21″
(you may need both legs of the jeans depending on the size)
Take your 2 5×8 pieces of fabric and sew them right sides together across the 8″ side. Press the seam open and turn right side out. Press and top stitch along the top.
Place your sewn piece over your 6″x 8″ piece of denim.
Place your cut out coin pocket on top of this piece (as shown in the photo above).
Baste around the edges of the 6″x8″ denim piece to hold in place. Do NOT sew around the coin pocket, just along the bottom seam, you will attach the coin pocket to the bag pocket after you are done.
About 2″ up from the bottom and in the center of the fabric pocket, attach a magnetic snap. Make sure you only go through the fabric piece and not the denim also.
Sew straight lines to divide the pocket. Make sure you backstitch at the top of the pocket.
Take your 3″x 21″ denim piece and pin it to the 6×8 denim piece that has the pocket attached. Sew around 3 sides.
Trim any extra denim (of the 3″ wide piece) off the top.
Pin your other 6″x8″ denim piece to your 3″ x 21″ piece. Sew. (you will pin it the same way as shown in the photo above).
Repeat the above steps with your fabric (with the exception of attaching the pocket) to form the bag lining.
**note: I decided to add an applique at the last minute… BUT I would recommend adding it now before you complete the next step.*** If you would like to know how to add an applique letter you can refer to my tutorial here****
Take your 8×8 denim piece and your 8×8 fabric piece, place them right sides together and sew around 3 sides (leaving the top open). Clip corners and turn right side out.
Press.
Top stitch using contrast thread around the flap. I chose to do 2 rows of contrast top stitching.
Take the other part of your magnetic snap and attach it to the inside of the flap (the piece you just sewed). Place it in the center about 1″ up from the bottom.
Place the right side of your flap inside your bag facing the right side of the bag back. Stitch in place.
Cut your nylon webbing to the length you would like (I used 10″ long). Place it in the bag and center it in the bag gusset (the 3″ wide piece in the center of the bag). Stitch it in place on both sides. (the nylon webbing will be making a U shape inside of the bag, with the ends attached to each side of the bag).
Place your bag lining inside your bag (right sides together). Pin. MAKE sure the bag lining and bag pieces line up perfectly, if not adjust the seams on your bag lining piece until they do.
Sew 1/2″ down from the top of the bag according to the diagram below.
Turn bag right side out and press. Turn under the open edges of the bag along the front and press under. Top stitch (to close the opening), starting at the bag flap on one side, around the front to the other side of the bag flap.
To finish, you need to attach your coin pocket. Using fabric fuse or some other fabric glue, glue your coin pocket to your bag. Place a piece of freezer paper or wax paper to prevent the glue from bleeding through.
You’re done!! If you make one don’t forget to share your creation in the Polkadot Chair Flickr Group!






What a great bag! I linked to your tutorial on Craft Gossip Sewing:
http://sewing.craftgossip.com/tutorial-denim-scripture-case/2010/03/02/
–Anne
what a cute bag! this would make a great gift for sunday school teachers. tfs!
Cute! I love the fabric you picked for the inside and the A what is that fabric?
Melissa- you blow me away.
LOVE it!!
Genius! Love it. Enough said.
This is great! I need to make a new scripture case. I love the inside fabric.
Kristin
peapodcreations.blogspot.com
very cute!
super cute! thanks for the great idea
I really like this idea. I’ve been thinking about one for myself for a while, just haven’t got around to making it. Thanks for sharing.
Just as cute as can be. Thanks for sharing.
This is great!
I am loving the new look of your blog. I love coming here.
Hope you are doing well.
Danielle
curlyscreations.blogspot.com
What a great way to recycle jeans! I’ve made three bags so far & I’m enlarging the pattern to fit my lap top too! Thanks for the great idea!
–Gena
http://www.etsy.com/shop/WytcheHazel
What a great use of jeans! Brilliant! Thanks for sharing.
This is soooo fabulous!! I’ll definitely be featuring!
I totally love your bag! My daughter has been asking me to make her another scripture bag, this may be the one for her! Thanks for sharing!
This is adorable!! I’d love it if you’d link up at my “Sew Cute Tuesday” link party!! I keep MckLinky open until Fridays so there’s plenty of time to add your cute sewing projects! You can check it out at http://thecreativeitchboutique.blogspot.com
I noticed that you linked the acronym LDS from your post to the Church’s main website. I am LDS and I was just visiting mormon.org today and it is amazing at explaining what LDS means! I thought you could also link there too… or if you’re someone else reading this, you can know to visit there if you’re wondering. 🙂 Thanks again for the cool tutorial. This is darling. I am going to make one with a pair of jeans I was thinking of retiring just today.
Love it! Thank you so much for sharing, I can’t wait to try m hand at it!
God Bless,
Anita
So very nice! ~Kelly
unDeniably Domestic
so cute Melissa! I’ll be linking!
I seriously love this! What a cute and creative idea. I posted about your bag on my craft blog (giving the credit back to you of course). I seriously want to make this. Fun.
Cute idea for boys.. I just made a fun one for my girls that looks like a cute hand bag, but was clueless on how to make one for a boy..
This comment has been removed by the author.
If the scriptures are 3 inches deep, the 21 inch piece needs to be wider than 3 inches. We made it as written and I can barely squeeze a bible in, much less a quad.
I love this tutorial. A scripture case is on my list of things to make. My son also got scriptures for his 8th birthday (also a year ago) and he wants a unique scripture case (he has a generic black one from the distribution center).
To the commenter right above me, was your quad the compact version? The measurements she used were for a compact quad, not a regular size quad. The compact is about the same thickness as the regular size bible. I hope that helps.
Thank you so much for the tutorial. You are fabulous! I made three bags this week. I linked to your blog.
http://jenshappybrain.blogspot.com/
~Jen
I love your Denim Scripture Tote! I repinned it weeks ago to a Pinterest board. I also included it with links back to you in my Mother’s Day Gift Tutorials post here:
http://freshjuniper.blogspot.com/2012/05/mothers-day-gift-tutorials-25-quick.html
Happy Mother’s Day!
Super-cute, now I just need to dust off my sewing machine and get started. I just LOVE this!
Thanks Diane! So glad you stopped by!
I modified the sizes of this bag to fit my galaxy not tablet and it turned out terrific! I have never sewn a bag before and this was the perfect beginning style to tackle, The only other adjustments I made were I added a strip of the lining fabric to the length of the nylon webbing (and made it much longer to wear over the shoulder) and I attached it to the back using rectangular metal loops and fixing them to the exterior of the sides of the bag instead of incorporating the handing into the side seams. If any one wants the dimensions I used, I’d be glad to share.