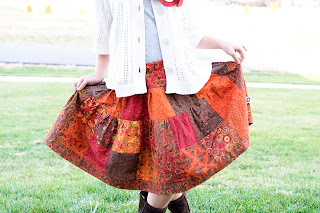
Patchwork Skirt tutorial


So a very exciting thing happened to me last month. I was asked to be a Moda Bake Shop designer!
I was SOOOOOO excited! I didn’t dare say anything until I had my first post up over there, but today I have my first tutorial on the Moda Bake Shop…
It’s this patchwork skirt tutorial.
If you want to make one you’ll need:
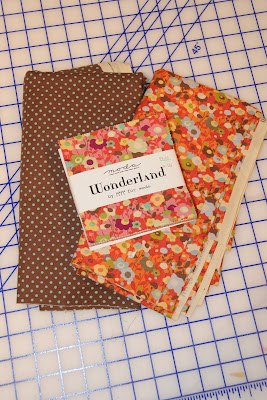
1/2″ wide elastic
for optional t-shirt
2 black buttons for owl eyes
heat & bond lite
This will yield a skirt size 6-8, instructions below for changing sizes:
Instructions:
Cut from waistband fabric:
4 waistband pieces (1 waistband front, 1 back, 1 waistband lining front, 1 waistband lining back)
4″x 13″
2 tie pieces
5″ x 23″ (or width of your fabric 22-23″)
From Skirt band fabric cut
2 pieces:
5″ x 32.5″

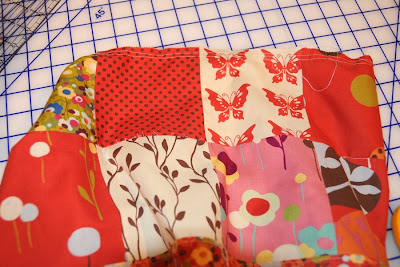
From your charm pack, layout a pattern of squares that you would like for the skirt front. You will have 2 rows of 7 squares
.
Pin Pieces together
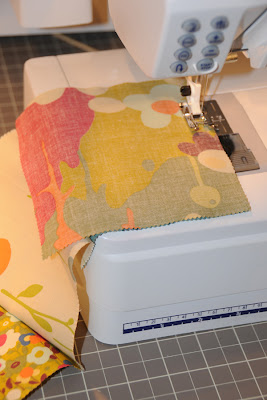
Sew the 1st row of 7 squares together using a 1/4″ stitch- it is very important to keep all your seams the same. My machine has a setting for a 1/4″ stitch. Press seams open on row 1.

Repeat for row 2
Pin and sew row 1 to row 2.
Repeat for Skirt back
You will end up with 2 panels, 2 squares by 7.
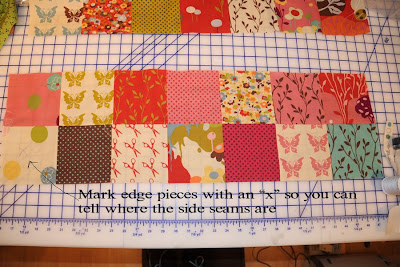
Mark, with a fabric marker, the 2 edge squares. This is so you will know where your side seams are (this will be important when attaching the skirt to the waistband) Do NOT sew side seams yet.

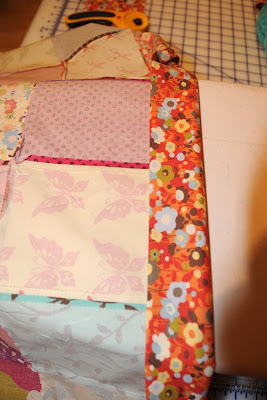
With the right sides together, attach the skirt band to the bottom of the skirt. (skirt band will overlap the skirt at this point) Sew with 1/4″ seam.
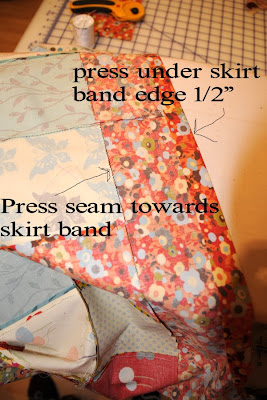
Press seams towards the skirt band.
Sew side seams together.
Turn under the bottom edge of skirt band 1/2″ and press.
Fold the skirt band in half so that the pressed edge covers the seam of the skirt/skirt band. PIN in place from the RIGHT side of the skirt.
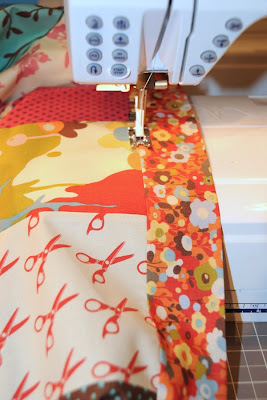
Topstitch skirt band. Sew on skirt band about 1/8″ away from skirt bottom seam
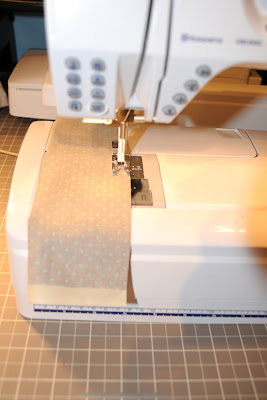
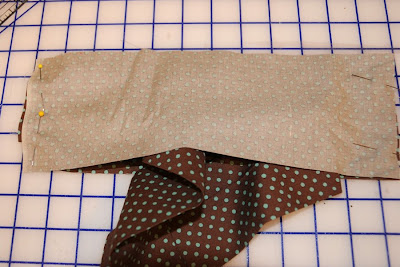
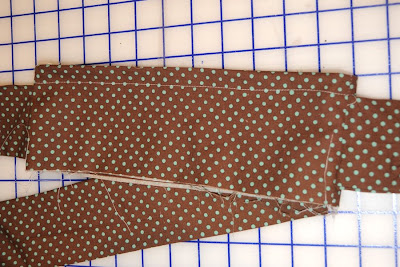
Fold tie pieces in half lengthwise. Sew with 1/4″ seam. At the end sew and angle, so that the tie comes to a point.
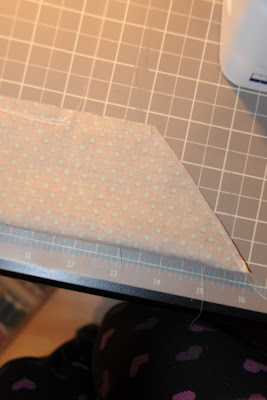
Trim. Turn right side out and press. Repeat for tie #2
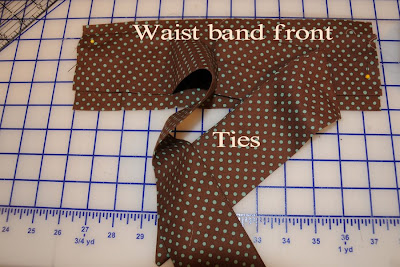
Take waistband FRONT piece. Pin ties to it, 3/4″ down from the top. Baste in place.
Attach waistband BACK to front, sew at side seams. Press open seams.
Sew waistband lining pieces together at side seams. Press open seams.
Sew waistband to waistband lining at TOP seam. Press open.

Fold waistband at the top seam. Press well. Come down 5/8″ from the top and sew a casing. Leaving a 1″ opening for the elastic.
On skirt, run two rows of gathering stitches, starting and stopping at side seams. (it’s easier to gather a skirt in 2 pieces than one really long gathering stitch)

Pin RIGHT side of the skirt to RIGHT side of skirt band, matching side seams. Sew, being careful not to catch ties in the seams.


Turn the skirt inside out. Measure elastic to size and thread through casing. sew elastic together and close the casing.
Press under the unfinished edge of waistband lining 1/2″. Pinto skirt (covering gathers). Whipstitch closed.
VOILA! You’re finished!!
Sizing:
This is how I figured the sizing:
My daughter’s waist is 20″, normally for gathers you double the waist, but I did not want this skirt as full so I took 20″ x 1.75 = 35″, which is 7 charm squares.
Since she is small I thought 2 rows of squares would look best. If you are making a larger size, add a 3rd row of squares.
If making it smaller, just use less squares across (say 5 or 6 instead of 7)
For the waistband measurement, I took her hip measurement.
For the ties, I wanted to conserve fabric, so I cut 1/2 the width of my fabric. They BARELY fit, I would make them longer if you have enough fabric.
Owl applique, from Amazing Mae (click on owl applique pattern on her sidebar)
—————————-
added: If you are looking for another version of the patchwork skirt I’ve made a new and improved tutorial. You can see it here:

That is super cute! I can’t wait to make one for my daughter! Congrats! Jennifer
Saw the skirt at church and about DIED at how cute it is. WIshing I could hire you….
Congrats! You seriously are ubber talented Melissa. 🙂
Beautiful skirt.
I am so excited about this skirt (don’t let the phase end!) that I’m going to squeeze in a trip to the quilt shop before I go to a meeting!
Another amazing skirt!? You are fantstic, you do the best tutorials, I am soooo excited to make this for my daughters!
Found you from the Bake Shop, your blog is so cute! It makes me want a little girl even more than I already did!
You go girl!!!!!! Love! Love! Love! The skirt is so amazing. Have a few questions, if you don’t use the 1-2 Wonderland Charm Packs, how much fabric do you need, and how big are the squares?
Keep it up!
LOVE that skirt!!
Congratulations! I have spent waayy too long going through your blog, but i can’t help it, it is FABULOUS!!! You are simply awesome!
Congratulations!!!! That is so exciting! Can’t wait to try the skirt!!
I love your blog. What a treat. 🙂
Shannon
This one is has the best colors. I love it. The owl applique goes with it perfectly. Thanks for including me in this one!
Couldn’t have happened to a better person! I’m so excited for you and lucky to know you away from blog land too!
Darling skirt!
Found your blog via the Moda Bake Shop. I absolutely love this skirt and the tutorial looks so easy. I’ve never made clothes before, but I think I could totally do this. Is it possible to tailor the pattern for an adult? I would love to have one of these skirts of my own! 🙂
I too found you from the bake shop. Love your blog, and what a great skirt tutorial!
Just found you via Moda Bake shop, and not only are you super creative, but in l’ville. My husband is from Louisville, and we lived there from 2003 to 2006. I miss so many things, and one is the amazing creative people that live there. I’ll be checking in often!
I’ve can’t wait to brag about you some more- Congratulations!
I love the skirt and the owl- dArLiNg!
SUPER cute– CONGRATULATIONS!!!!