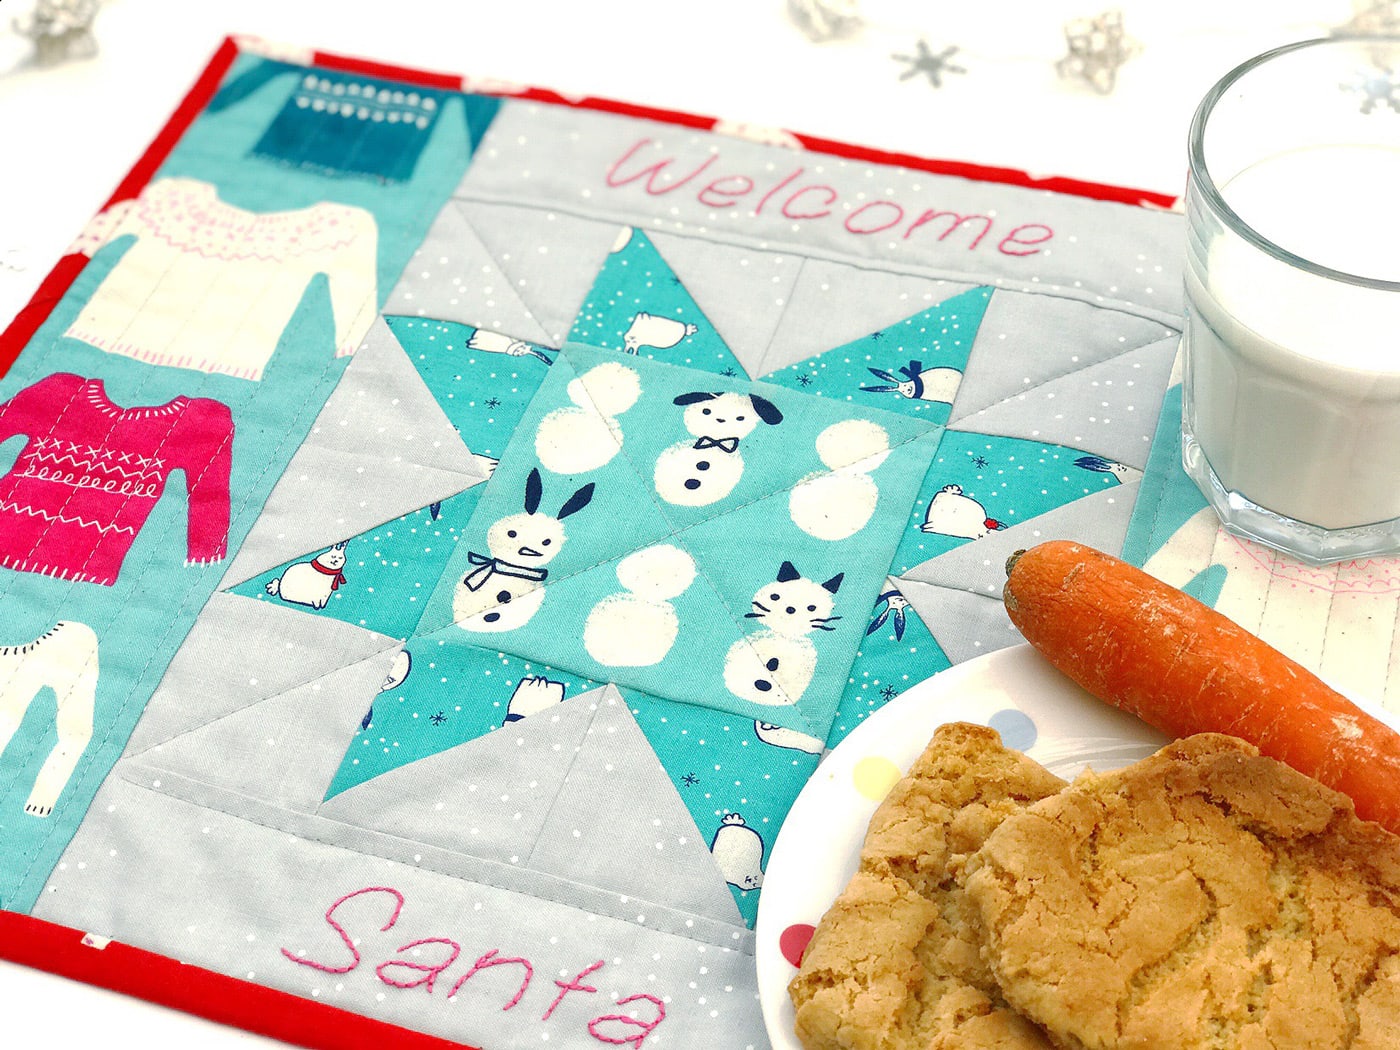
• Skip to primary navigation
  • Skip to main content
  • Skip to primary sidebar

The Polka Dot Chair logo

  • SEWING
    • Free Sewing Patterns
    • Bag Patterns
    • Costumes
    • Apparel
    • Learn to Sew
    • Beginner Friendly
    • Embroidery Projects
    • Tips & Techniques
    • All Sewing
  • QUILTING
    • Quilt Blocks
    • Learn to Quilt
    • Free Patterns
    • Quilt Patterns
    • All Quilting
  • CRAFTS
    • Disney
    • Cricut
    • Printables
    • All Crafts
  • HOLIDAYS
    • Seasonal Projects
    • Valentine’s Day
    • Easter
    • 4th of July
    • Halloween
    • Thanksgiving
    • Christmas
    • All Holidays
  • TUTORIALS
  • ABOUT
    • About Me
    • My Fabric Collections
    • Published Books
    • Press
    • FAQ’s
    • Contact
  • SUBSCRIBE
  • SHOP
menu icon
go to homepage
  • SHOP
  • TUTORIALS
  • SEWING
  • QUILTING
  • SUBSCRIBE
  • CRAFTS
  • HOLIDAY PROJECTS
  • ABOUT
    • Published Books
    • My Fabric Collections
  • CONTACT
    • Facebook
    • Instagram
    • Pinterest
    • YouTube
  • subscribe
    search icon
    Homepage link
    • SHOP
    • TUTORIALS
    • SEWING
    • QUILTING
    • SUBSCRIBE
    • CRAFTS
    • HOLIDAY PROJECTS
    • ABOUT
      • Published Books
      • My Fabric Collections
    • CONTACT
    • Facebook
    • Instagram
    • Pinterest
    • YouTube
  • ×

    Home » Holidays » Christmas

    Santa’s Snack Mat – a Christmas Mini Quilt Tutorial

    Updated: May 24, 2019 by Melissa Mortenson · This post may contain affiliate links · This blog generates income via ads · 1 Comment

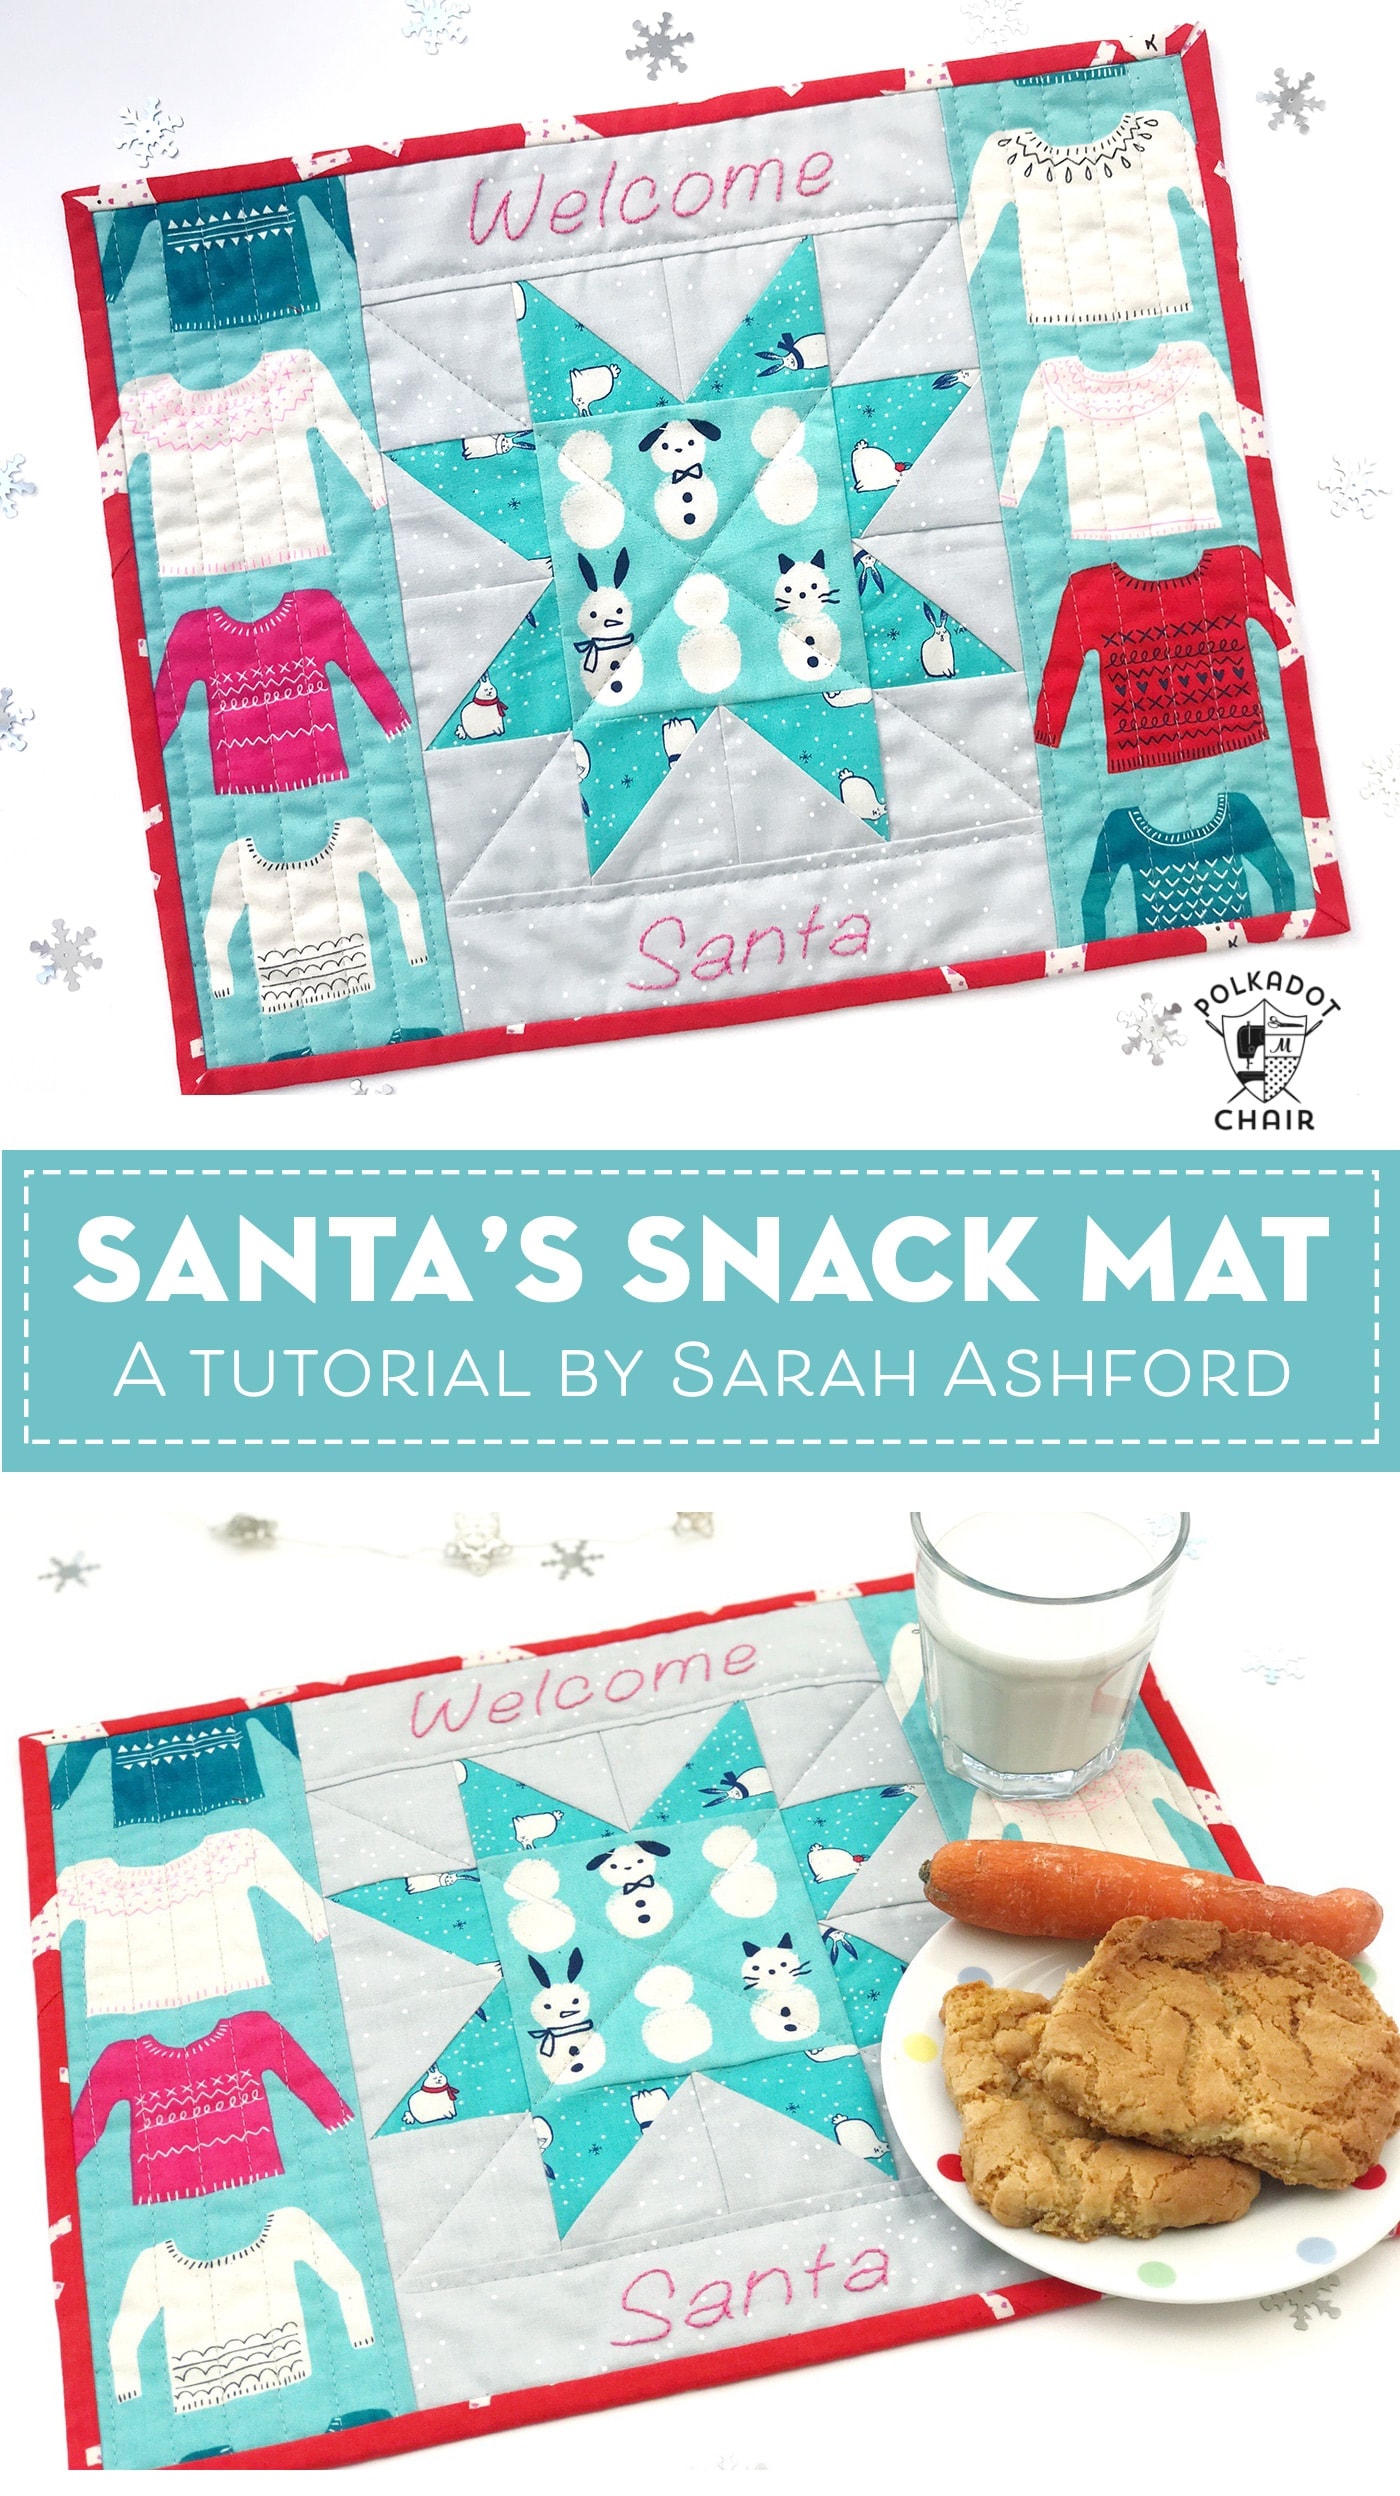
    Sarah Ashford has the cutest idea for today’s quilt tutorial! She created a special snack mat just for Santa Claus. What a perfect way to leave milk and cookies out for him on Christmas Eve! I love that it’s a fun take on a Christmas Mini quilt pattern. Keep reading to find out how to make one yourself. 

    Santa's Snack Mat a Christmas Mini Quilt Tutorial


    December is finally here and excitement is mounting as we start counting down to the big day. The tree is up, the lights are on, the presents are wrapped and the stockings are hanging, waiting to be filled. But how are you going to welcome Santa into your home?

    What offerings are you leaving for him and his reindeer? Nothing is more delightful and charming than seeing little ones set the table and leave treats for the big man himself. So why not add a handmade touch to this magical time with a very special Santa Snack Mat. It’s a clever take on a Christmas mini quilt!

    Make his visit to your house one he’ll remember!

    Santa’s Snack Mat Christmas Mini Quilt Tutorial:

    Finished size: Approximately 15 ½” x 12”

    Supplies for Snack Mat:

    You will need:

    Selection of coordinating fat eighths
    Batting
    Embroidery wording PDF (download here)
    Embroidery Thread
    Optional – Stitch and Tear
    Usual sewing supplies (sewing machine, matching thread, rotary cutter, ruler etc.)

    Santa Snack Mat Cutting Guide:

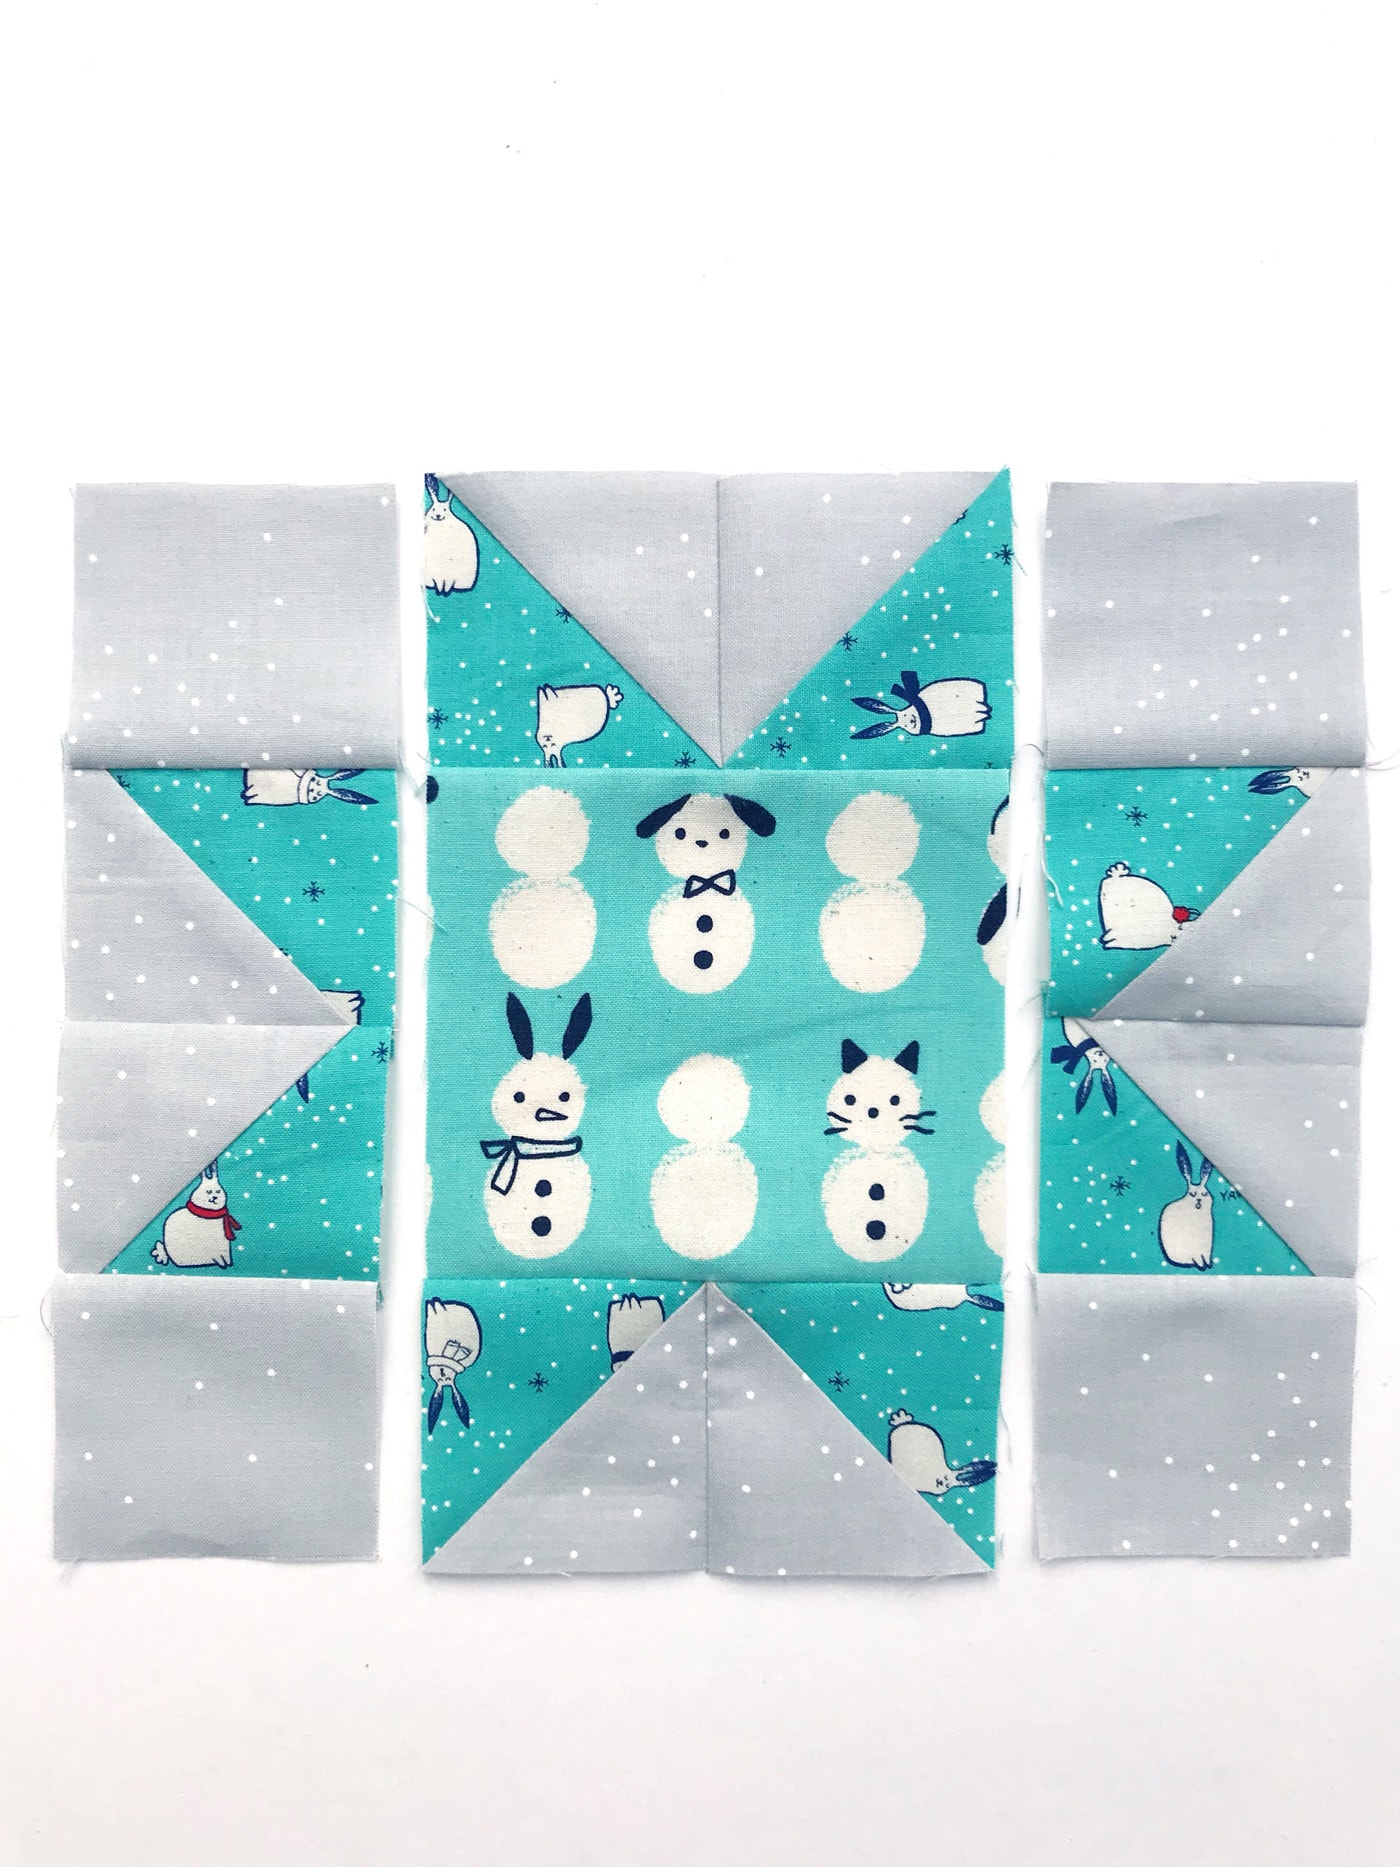
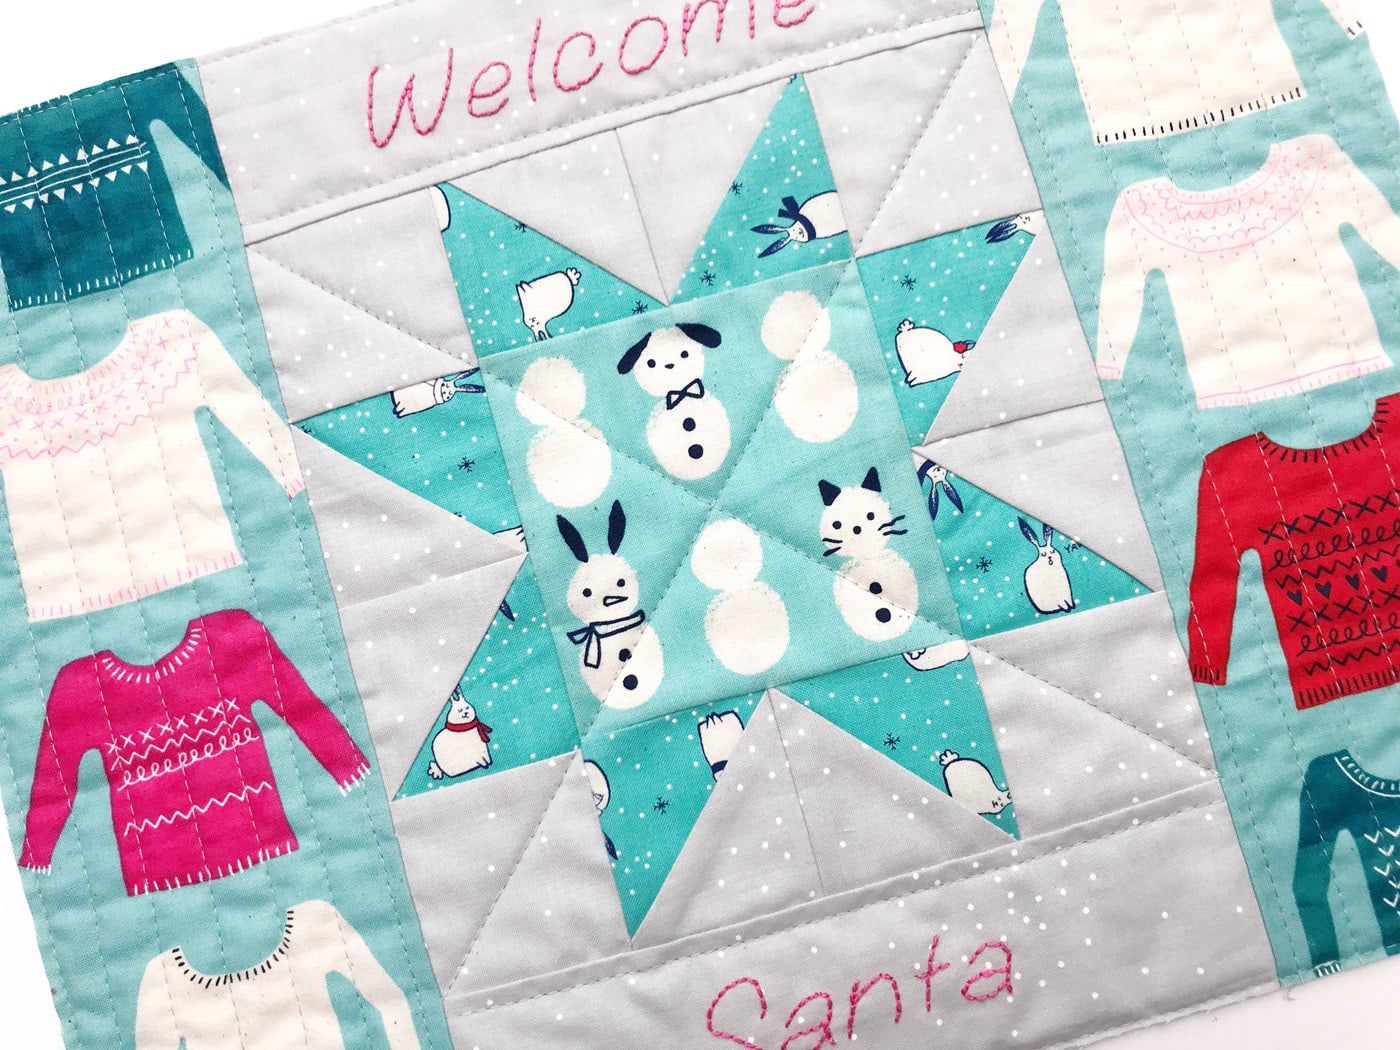
    To make the central star cut:

    One 4 ½” square
    Four 3” squares in light blue
    Four 3” squares in grey (background)
    Four 2 ½” squares in grey

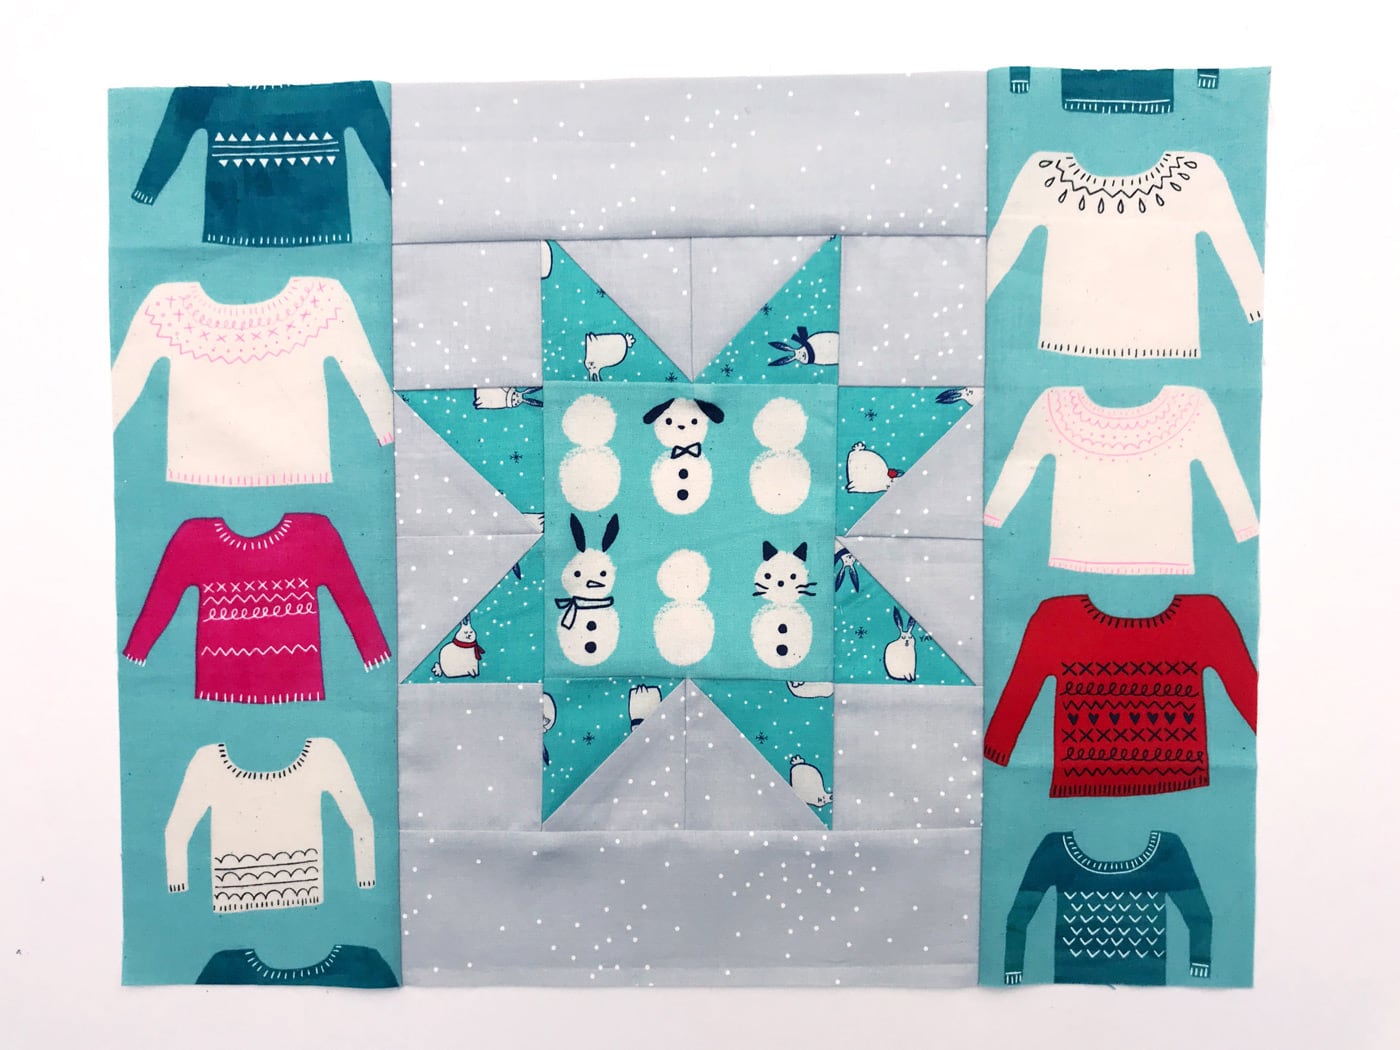
    Top and bottom border:
    Two 8” x 3” strips

    Side borders:
    13” x 4” ( You may want to make your border slightly narrower, but I’ve made mine wider as I’ve fussy cut the jumper fabric).

    Backing: 17” x 14”
    Binding: 60” x 1 ½” (Single fold)


    Mini Quilt Assembly Directions:

    Santa's Snack Mat a Christmas Mini Quilt Tutorial

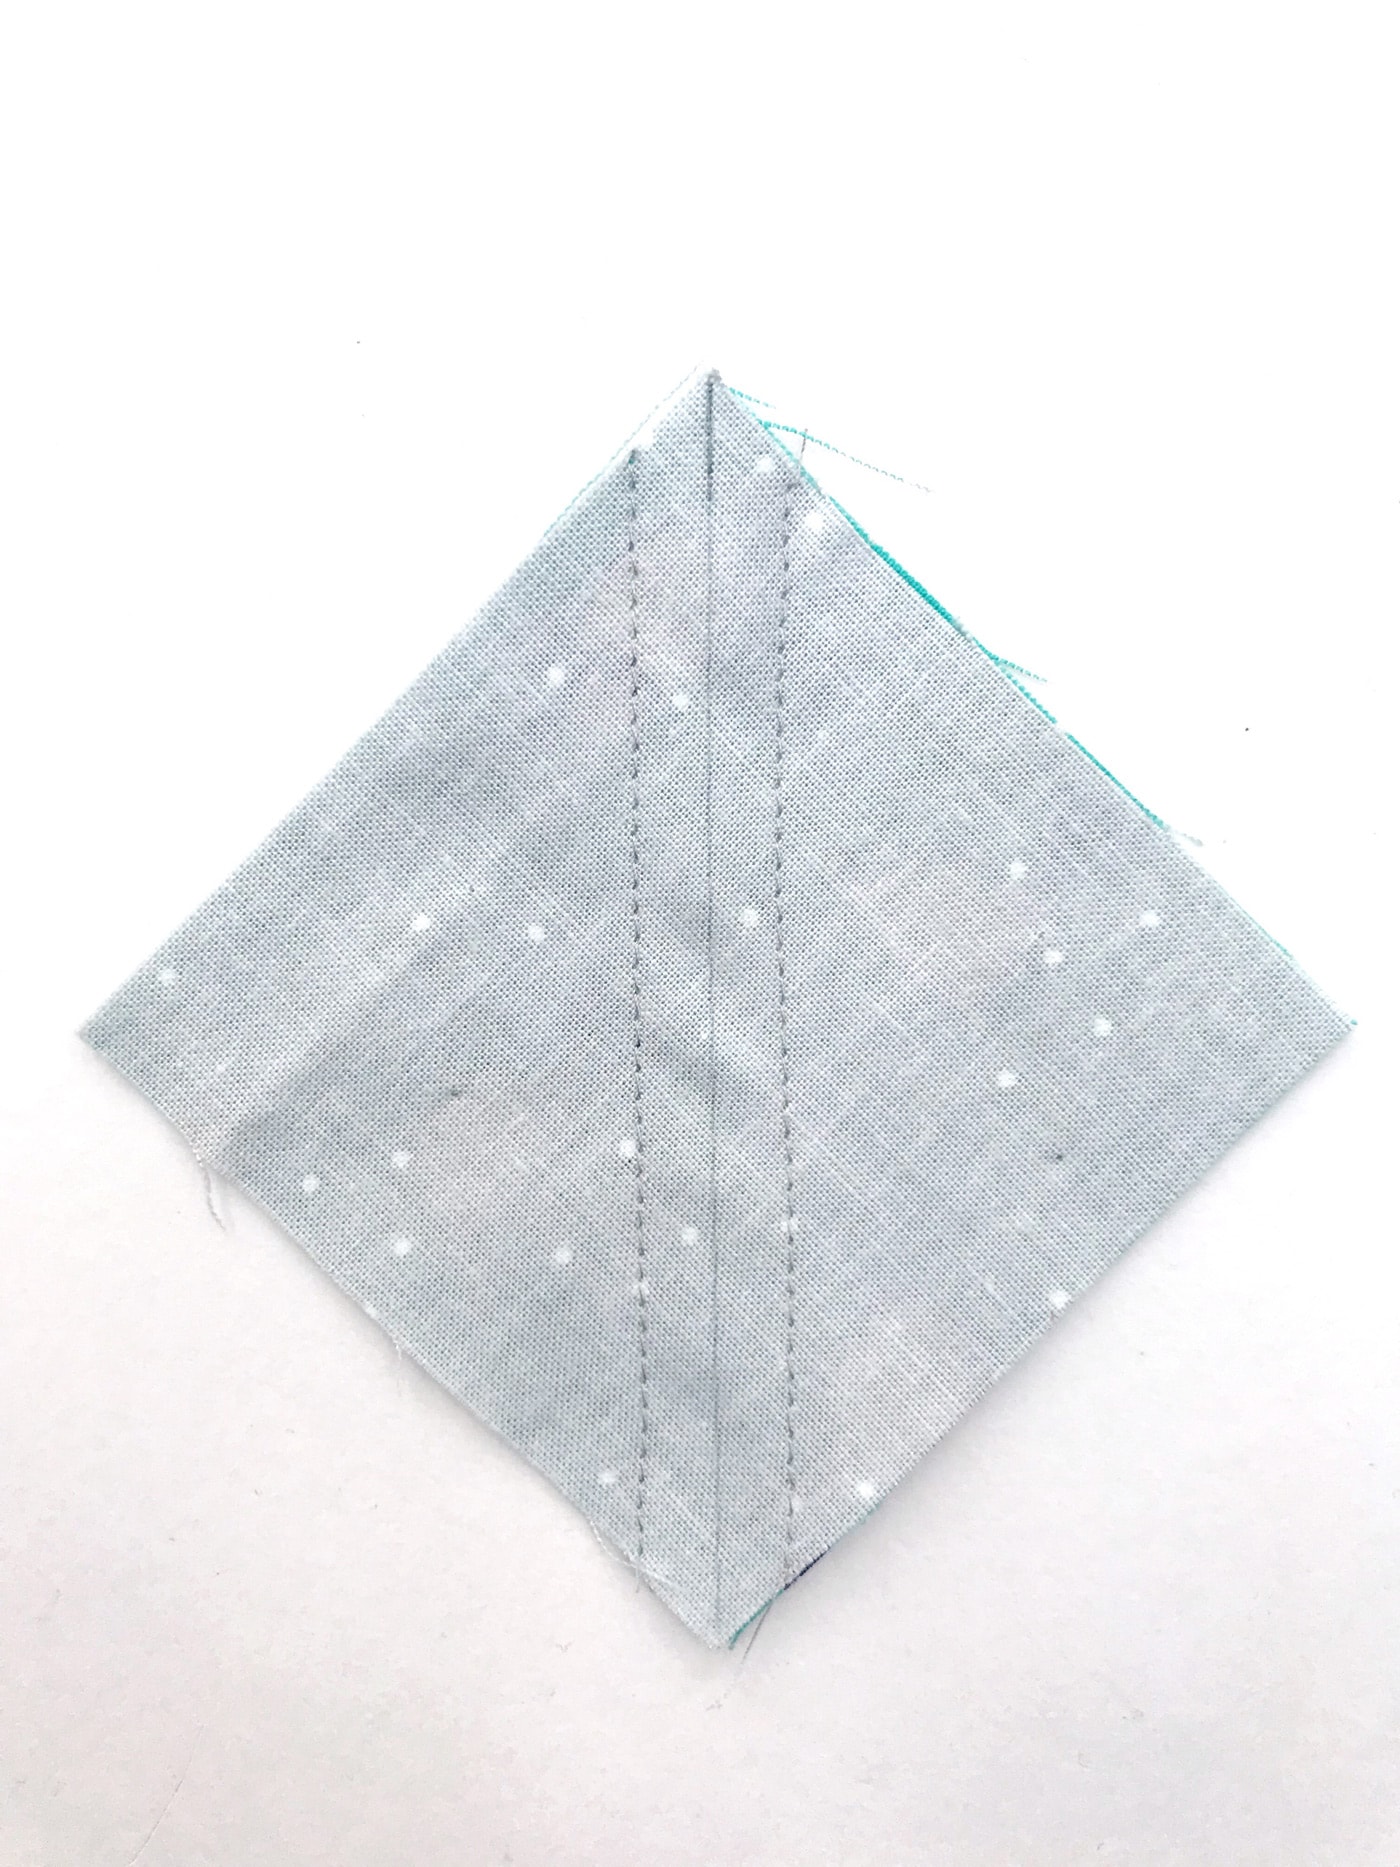
    First, you need to make the half square triangles (HSTs). I always like to take the approach of making them slightly bigger then trimming them up to get maximum accuracy, which is why I’ve suggested starting with 3” squares. Place two squares (one blue, one grey) right sides together, and pin in place. Draw a line down the centre from one corner to the other and stitch a ¼” seam either side of the line.

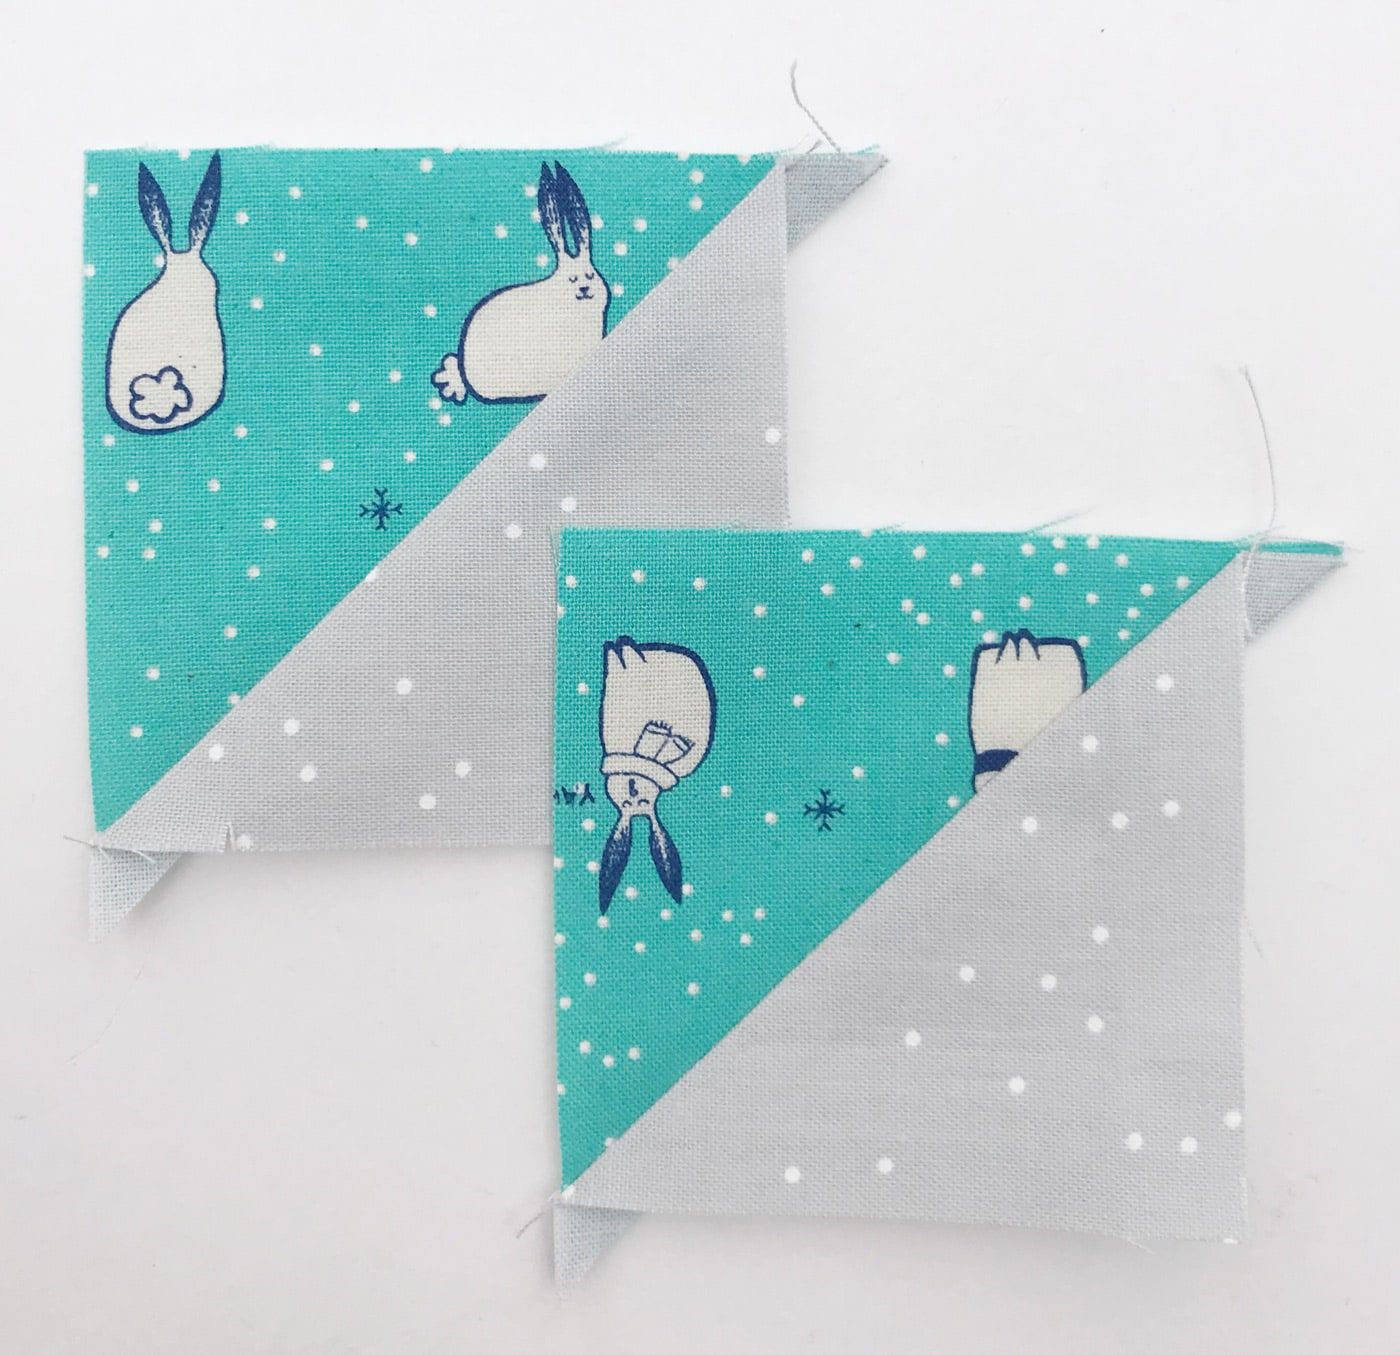
    Using a rotary cutter, cut down the drawn line and open our the HST blocks. Repeat for the remaining 3” squares.

    Santa's Snack Mat a Christmas Mini Quilt Tutorial

    You will notice that they still have the ‘ears’ on them and remember they were too big, so we need to accurately trim them down. Fold the square in half and mark a crease at the edge on the halfway point. Place your ruler at the 1 ¼” position on this crease and trim.

    Rotate the square and trim all four sides, then repeat with all the HST blocks. Press.

    Stitch the top and bottom points of the stars together and then stitch them to the central part of the star, referring to the photo to orientate the points in the right direction.

    Santa's Snack Mat a Christmas Mini Quilt Tutorial

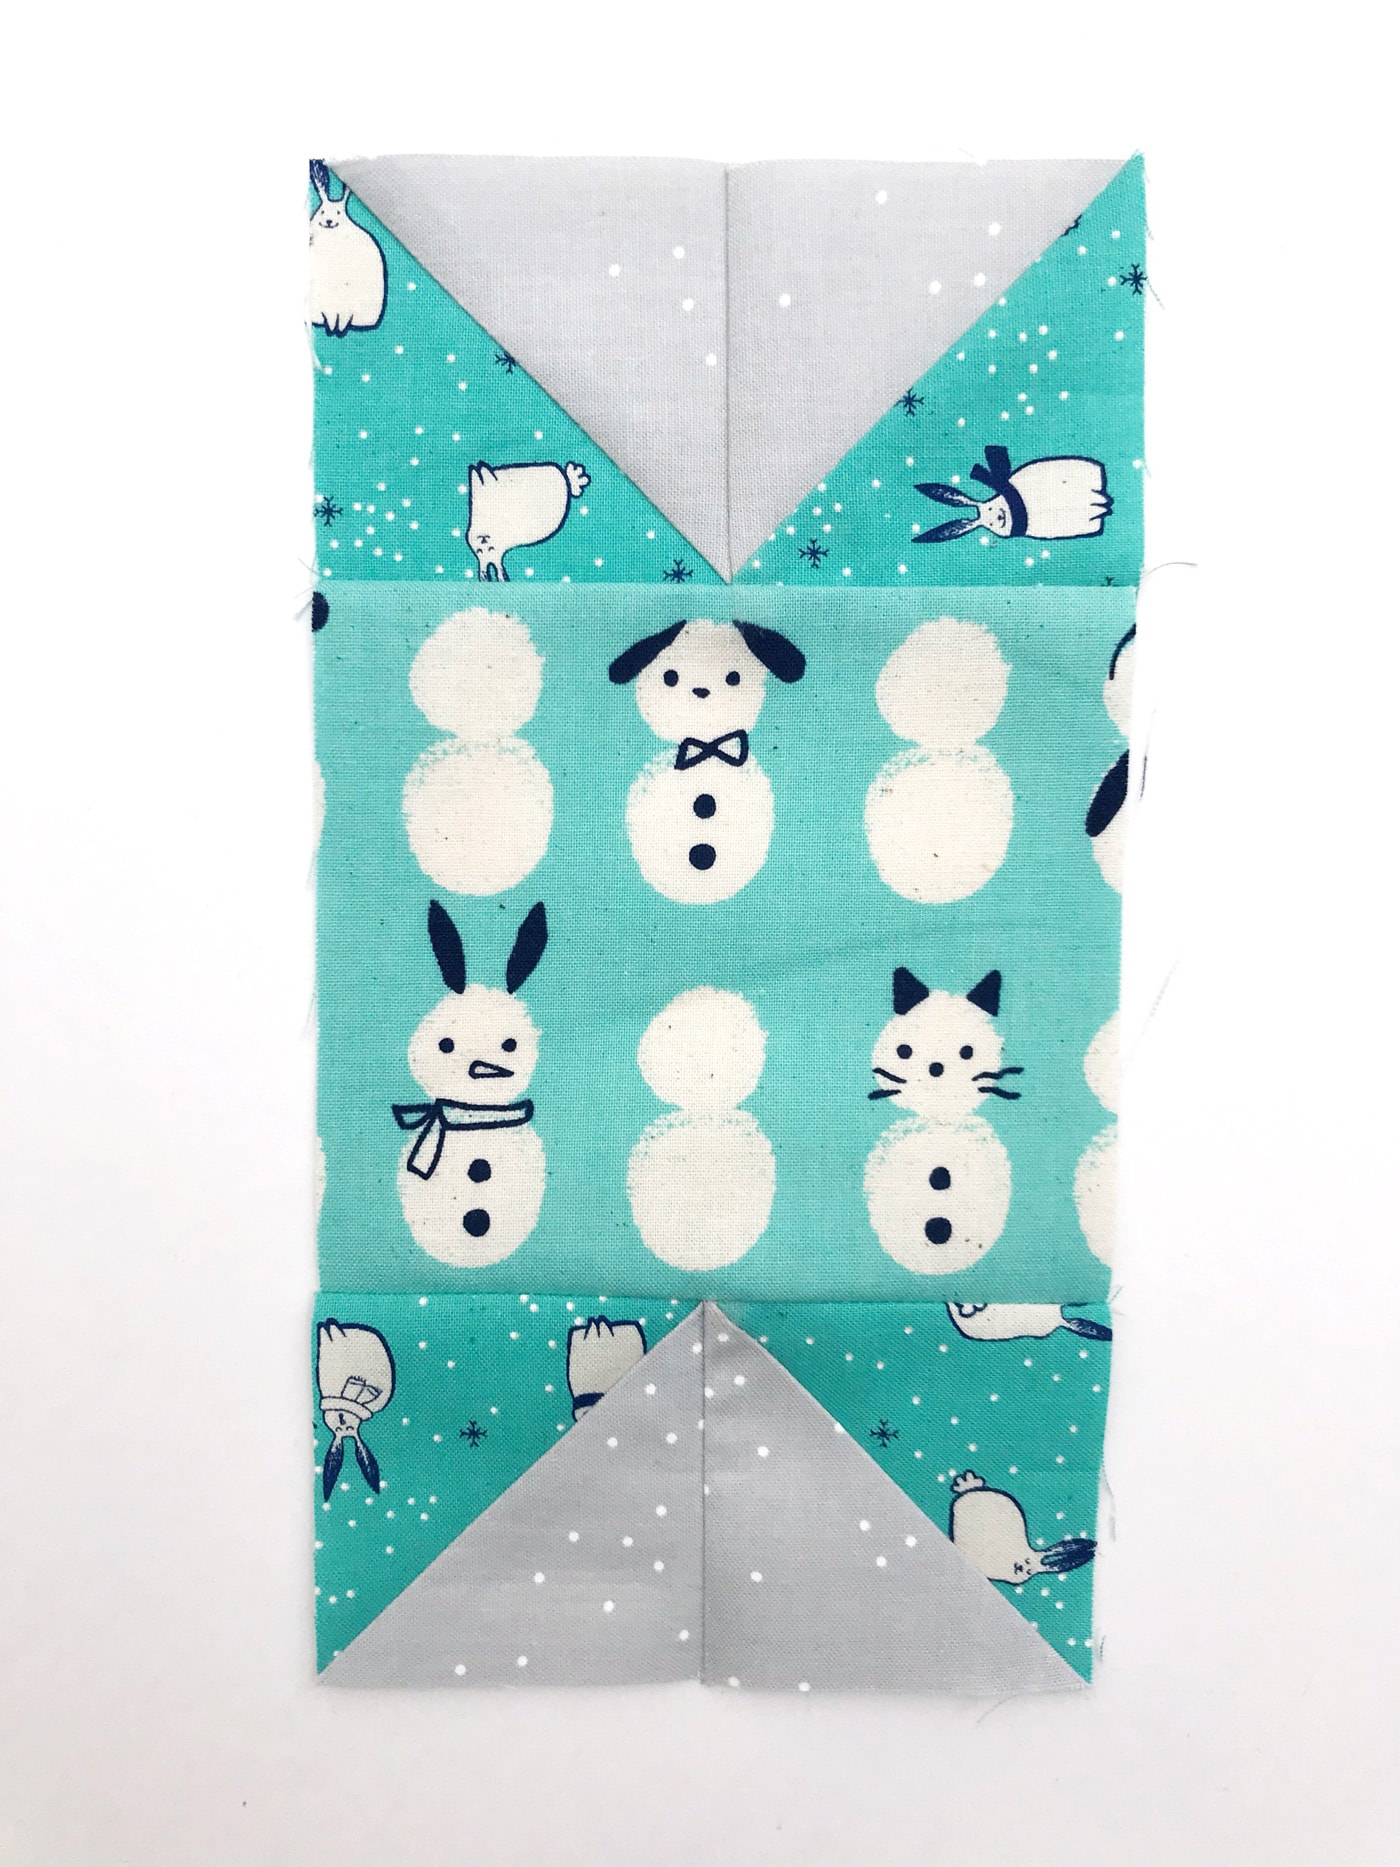
    Stitch the left and right points of the star together, and add the corner squares.

    Santa's Snack Mat a Christmas Mini Quilt Tutorial

    Add the top and bottom borders then add the side borders.

    Santa's Snack Mat a Christmas Mini Quilt Tutorial

    Embroidery Steps:

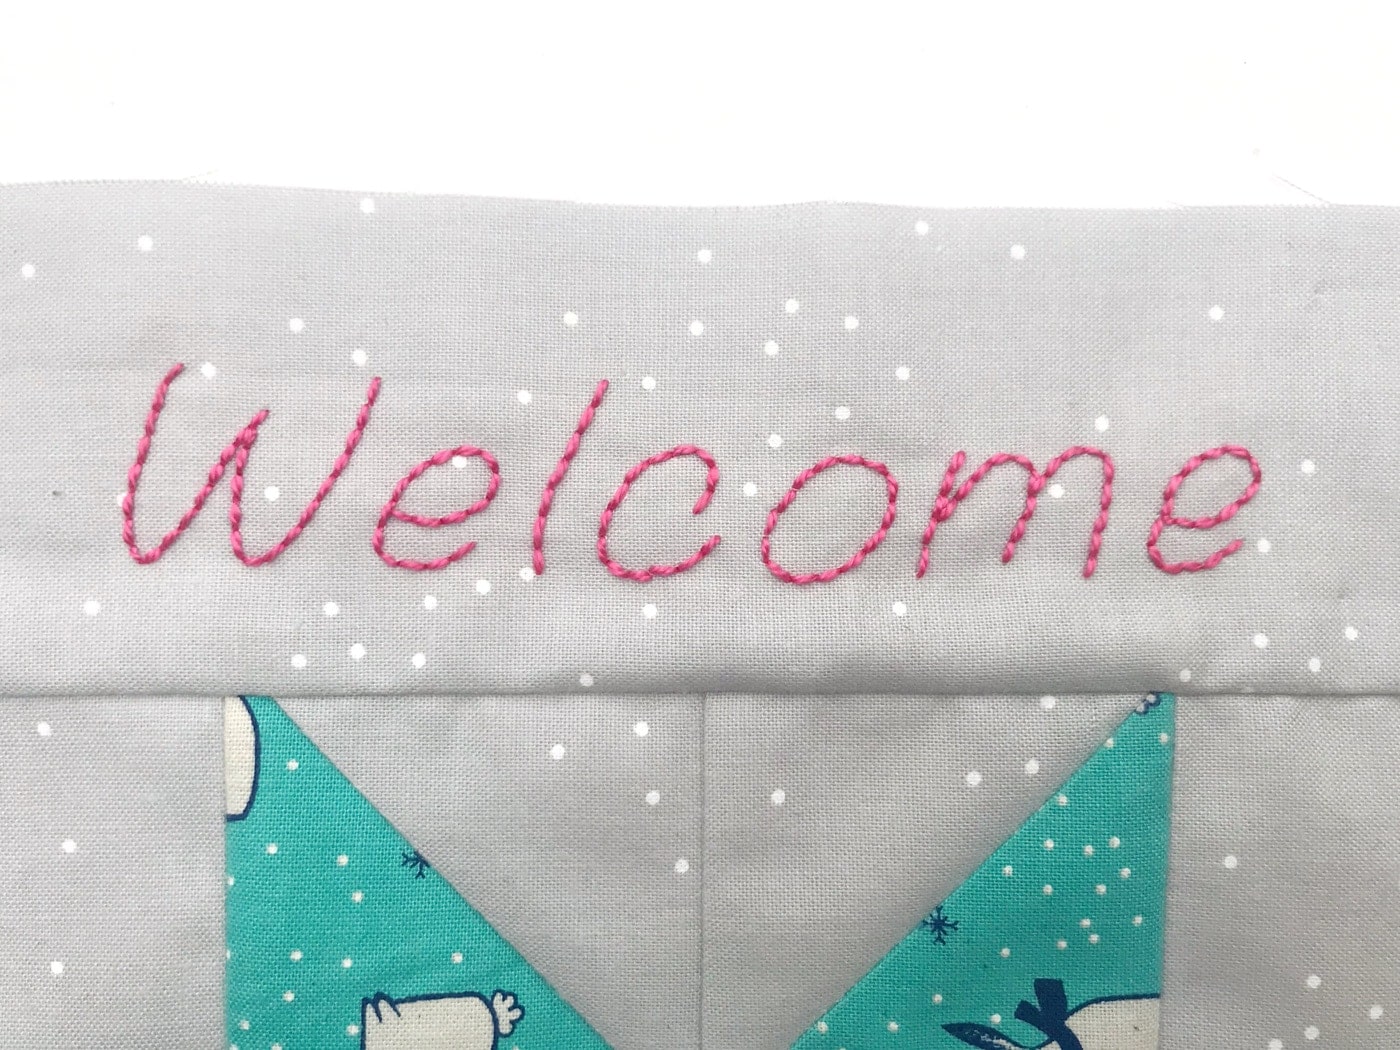
    The next section is the embroidery. Print off the lettering and either place behind the fabric or use a light box and trace the letters onto the fabric with a pencil. You may wish to attach some ‘Stitch n’ Tear’ interfacing to the back of the panels to be stitched at this point, just to reinforce the fabric and make it a bit more stable for embroidery.

    Santa's Snack Mat a Christmas Mini Quilt Tutorial

    Santa's Snack Mat a Christmas Mini Quilt Tutorial

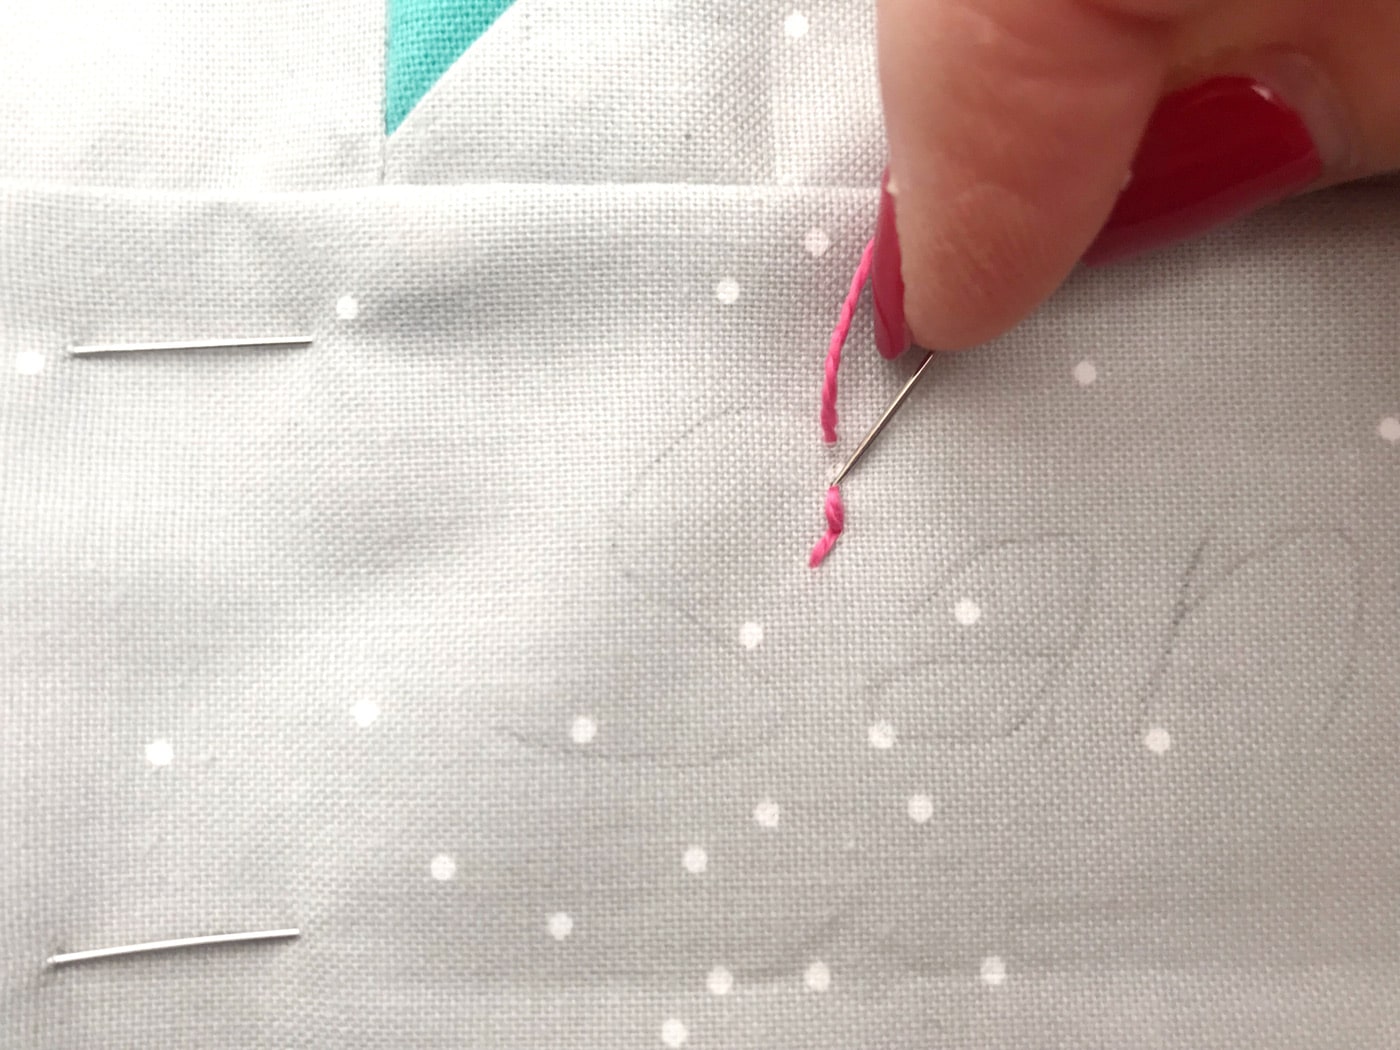
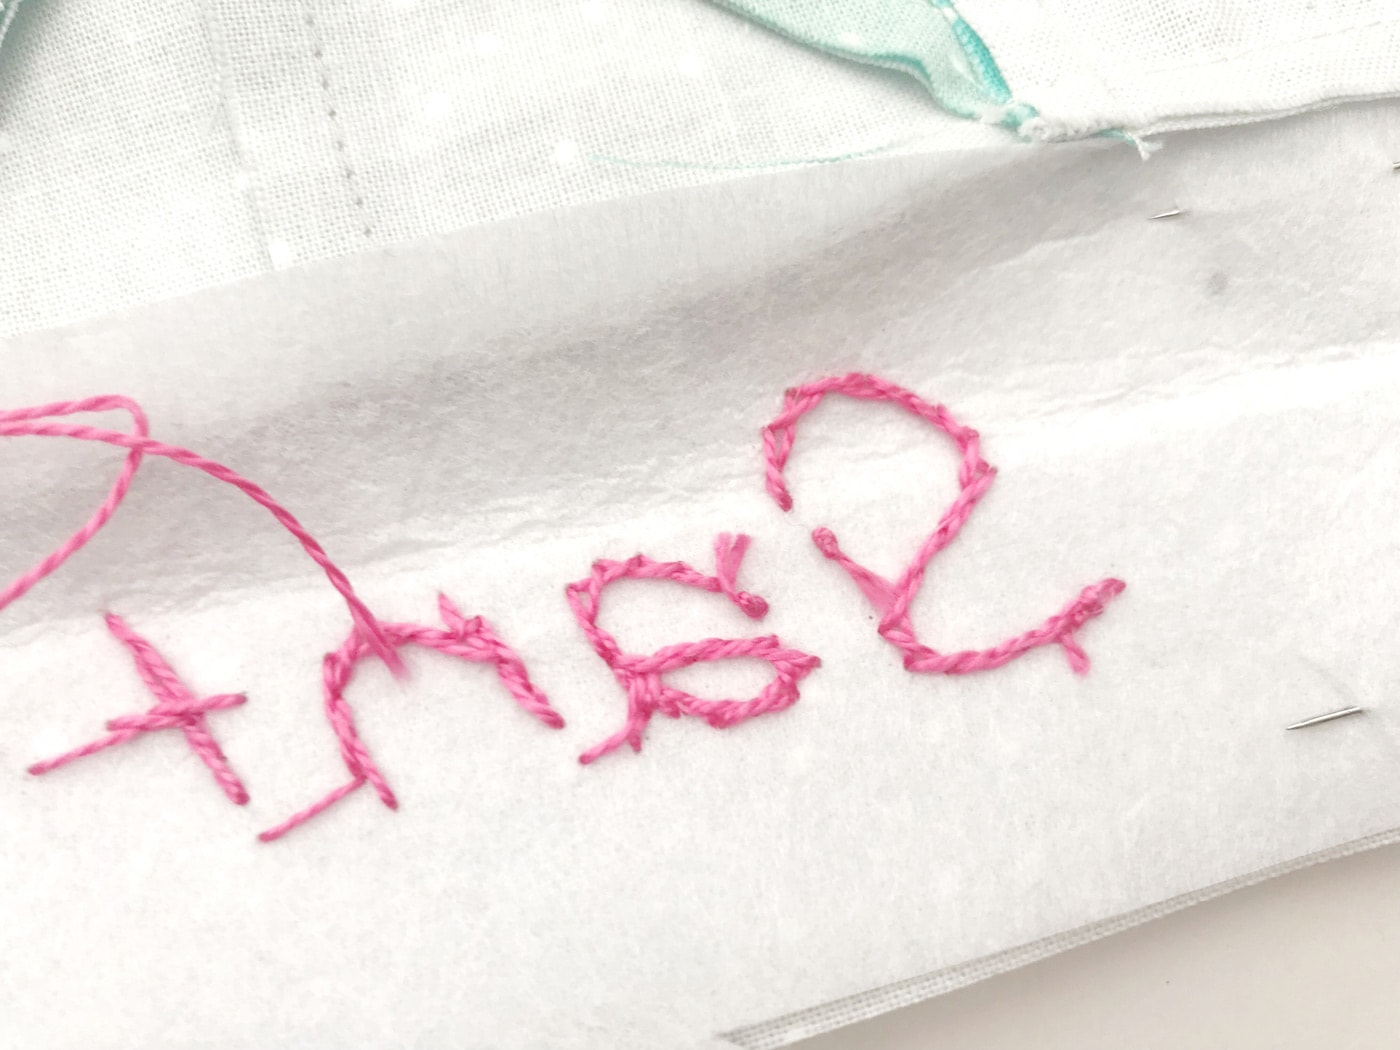
    Using an embroidery thread in your chosen colour, stitch a neat backstitch over the pencil lines. Choose a colour that compliments the fabrics; I’ve gone for a hot pin, like one of the jumpers.

    To backstitch, bring your needle up from the back and take it down about 3mm ahead. Come up about 3mm ahead and go back down where the first stitch ended. Repeat in this way to complete the lettering.

    Santa's Snack Mat a Christmas Mini Quilt Tutorial

    If you’ve used the Stitch n’ Tear, you can now carefully tear it away.

    Finishing:

    Press the fabric all over and make a quilt sandwich with the backing fabric, batting and pieced top. I like to use spray baste but you can use basting pins if you prefer. Quilt as desired. I’ve kept mine simple as not to detract from the fabric motifs and I’ve also avoided stitching over the embroidery.

    Santa's Snack Mat a Christmas Mini Quilt Tutorial

    Trim up and join your binding strips together. I like to do mine on the diagonal for a professional looking finish.

    Santa's Snack Mat a Christmas Mini Quilt Tutorial
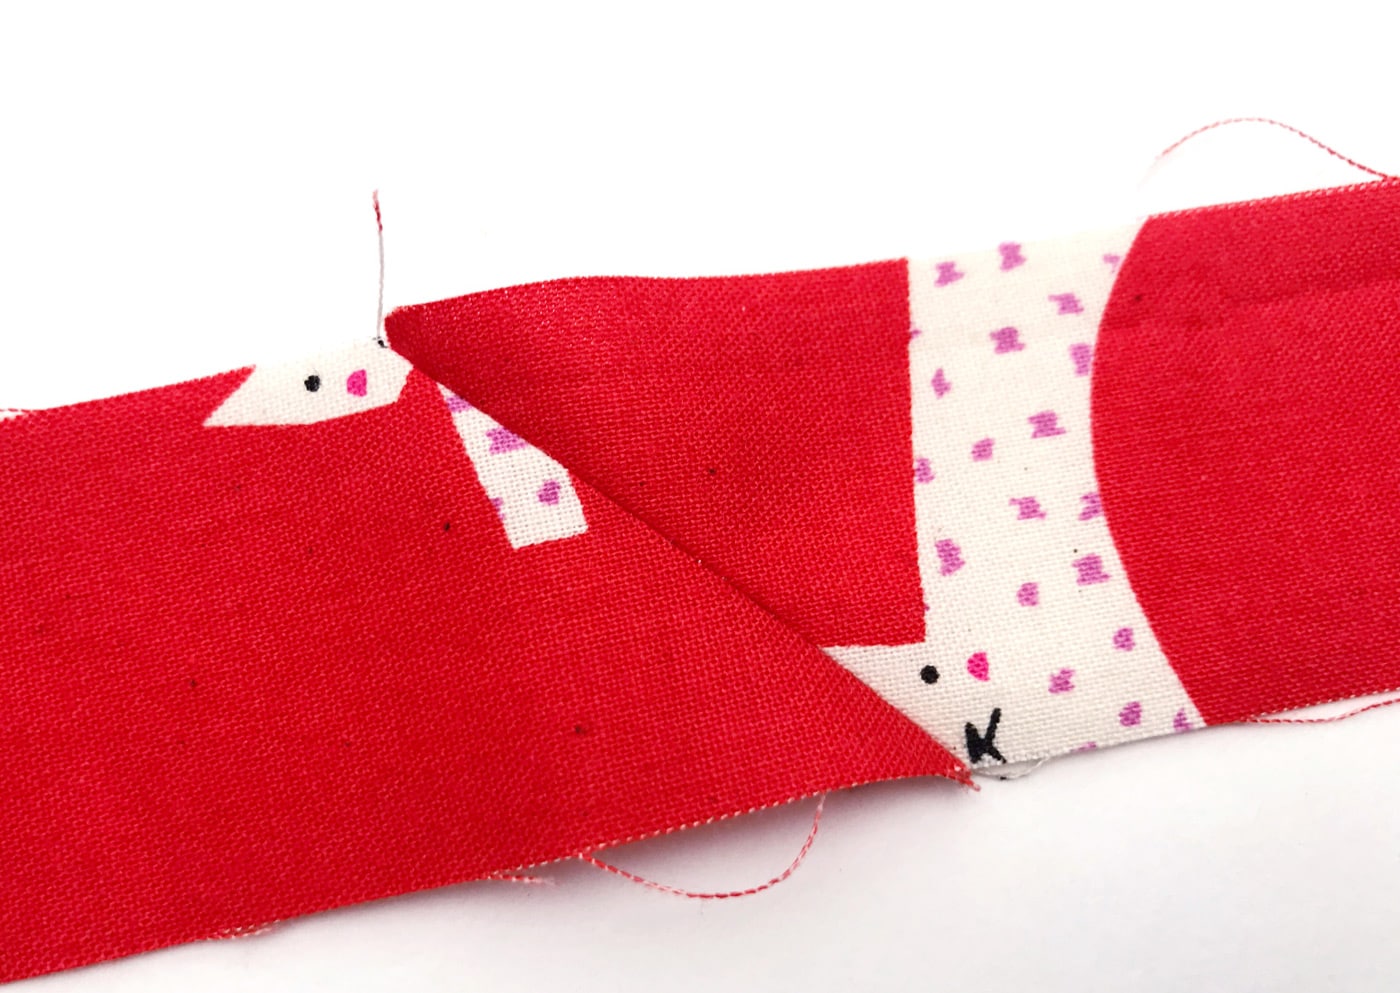
    Stitch the binding to the front of the mat by machine, then turn over and hand stitch it down to the back using a small slip stitch and matching thread.

    Now your mat is finished! All you need to do now is find some snacks for Santa. I’ve made some homemade cookies! And don’t forget to leave a carrot for the reindeer!

    Santa's Snack Mat a Christmas Mini Quilt Tutorial

    Wishing you all a very Merry Christmas,

    Sarah x

    About the Maker:

    Sarah Ashford is a British Quilter and embroiderer and founder of the GreatBritishQuilter challenge on Instagram. Sarah regularly contributes projects to magazines and loves to spread the joy of quilting everywhere she goes. Follow her on Instagram at @sarahashfordstudio and be sure to check out her beautiful sewing room decals in her Etsy shop www.etsy.com/shop/sarahashfordstudio

    More Quilt Projects & Tutorials:

    45+ Beginner Quilt Patterns & Tutorials

    Dresden Plate Mini Quilt Pattern

    Quilting Basics for Beginners


    More Projects You May Enjoy

    • How to Make a Retro Diorama Ornament
    • How to Make String Christmas Ornaments
    • Hot Chocolate Christmas Neighbor Gift Idea
    • Peeking Rudolph Christmas Pillow Pattern

    • Share
    • Email

    About Author

    Melissa Mortenson

    Melissa Mortenson is a blogger, designer, and content creator. She is the Polka Dot Chair blog founder and has been sharing fresh and creative ideas with readers since 2008. She is the author of “Project Teen, Handmade Gifts your Teen will Actually Love.” Her work and designs have been featured on HuffPost, TODAY, Pioneer Woman, HGTV, BuzzFeed, Better Homes & Gardens, and many other established publications. Her first fabric line, “Derby Style,” debuted in January 2015 through Riley Blake Designs.  Additional fabric collections have followed it in subsequent years. A mom of 3, she considers herself lucky to be living in Kentucky.

    Reader Interactions

    Comments

    1. Karla says

      December 16, 2018 at 8:46 pm

      I love the snack mat! Thanks so much for the tutorial!

      Happy Holidays!

      Reply

    Leave a Reply Cancel reply

    Your email address will not be published. Required fields are marked *

    This site uses Akismet to reduce spam. Learn how your comment data is processed.

    Primary Sidebar

    Hello! It’s nice to meet you.

    I’m Melissa. I like to design things, like fabric, printables, and projects.

    I’m also a Mom and a Maker. I am like most of you, just trying to do my best every day. Some days I succeed, many days I fail.  I find joy in creating, if you do too, then I hope that you find something here bring a little “happy” to your life.  Find out more about me here.

    COPYRIGHT POLICY

    All my images and text are copyrighted. You may NOT use any images from this site in any kind of Video (this includes YouTube). If you would like to feature my work, you may use ONE (1) NON-COLLAGED image and must “follow” link back to my original blog post. You may NOT edit, crop, or change my images in any way without written permission. You MAY NOT print out or copy and distribute any text, images or patterns from this site. All patterns, content, instructions, and templates are for personal use ONLY! Thank you! Violators will be reported.

    Footer

    ↑ back to top

    About

    • Privacy Policy
    • Disclaimers
    • About Melissa
    • Instagram
    • Facebook
    • YouTube
    • Pinterest

    Newsletter

    • Sign Up! for emails and updates

    Contact

    • Contact
    • FAQ
    • Press
    • Published Books
    • Fabric Collections

    Welcome to the Polka Dot Chair! Here you’ll find easy, step-by-step, sewing, quilting, and crafting projects. We design projects for Makers of all skill levels. Beginners are welcome!

    DISCLAIMER:

    While every effort has been made to ensure the accuracy of the content on this website, the information is made available without warranty of any kind. The Polka Dot Chair accepts no responsibility or liability, whether direct or indirect, as to the currency or accuracy of the information, nor any consequence of its uses. This website is not intended to substitute the advice of a professional.

    Copyright © 2022 Polka Dot Chair

    [ Placeholder content for popup link ] WordPress Download Manager - Best Download Management Plugin