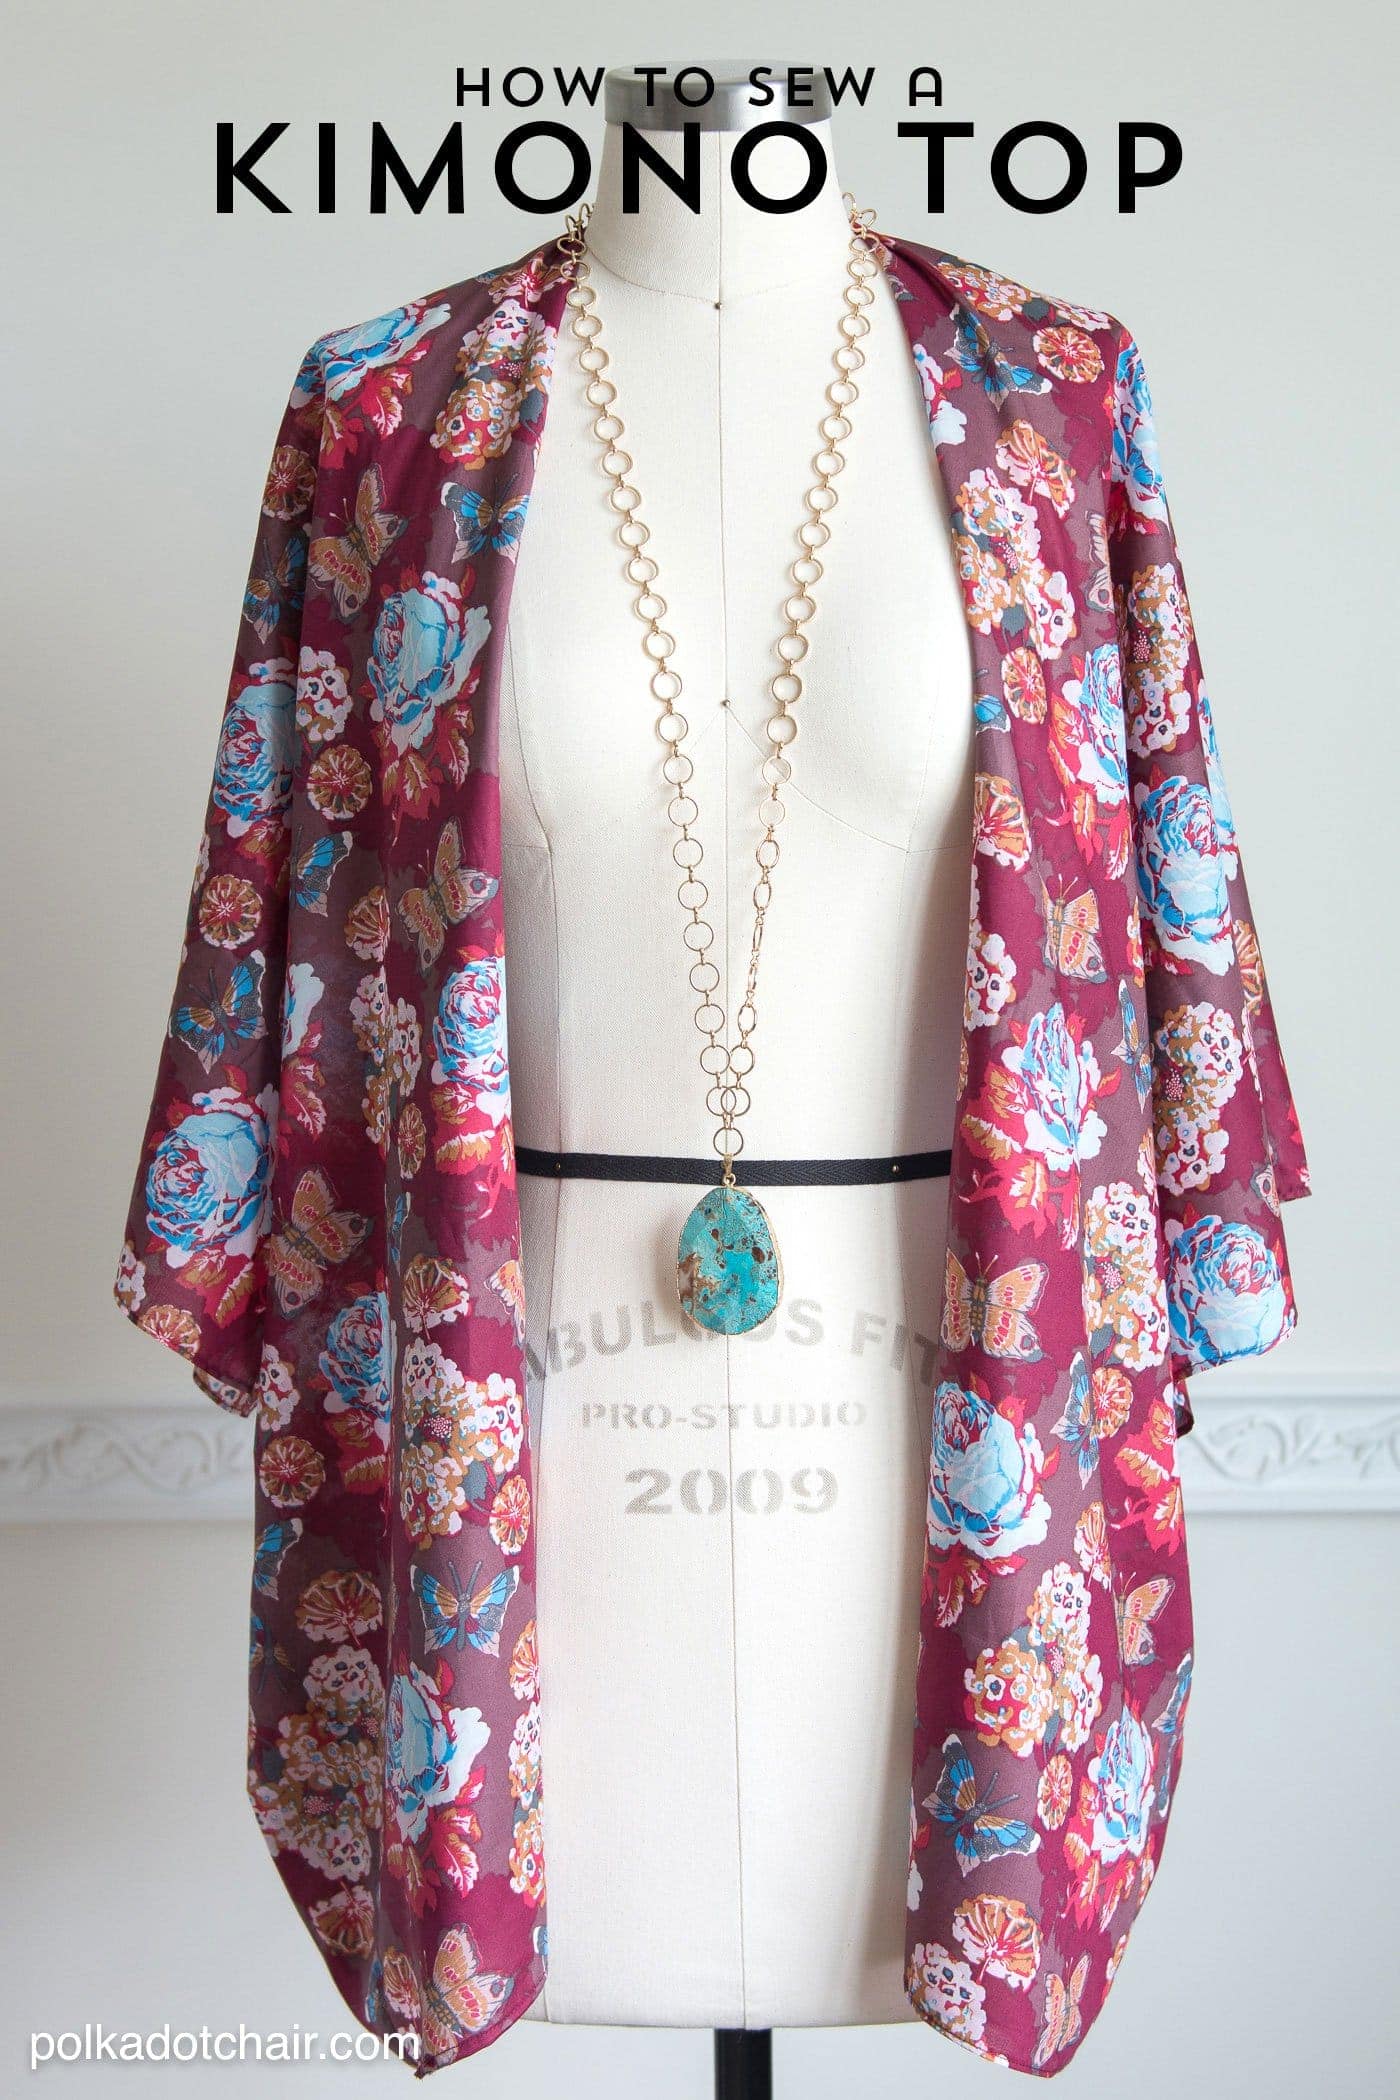
How to Sew a Lightweight Summer Jacket
If you need a stylish yet cool top to wear this summer, then you may like this free Jacket Pattern. I stitched this one up last summer and already have plans to make a few more. If you like this project, you may also enjoy our Summer T-Shirt Sewing Pattern.
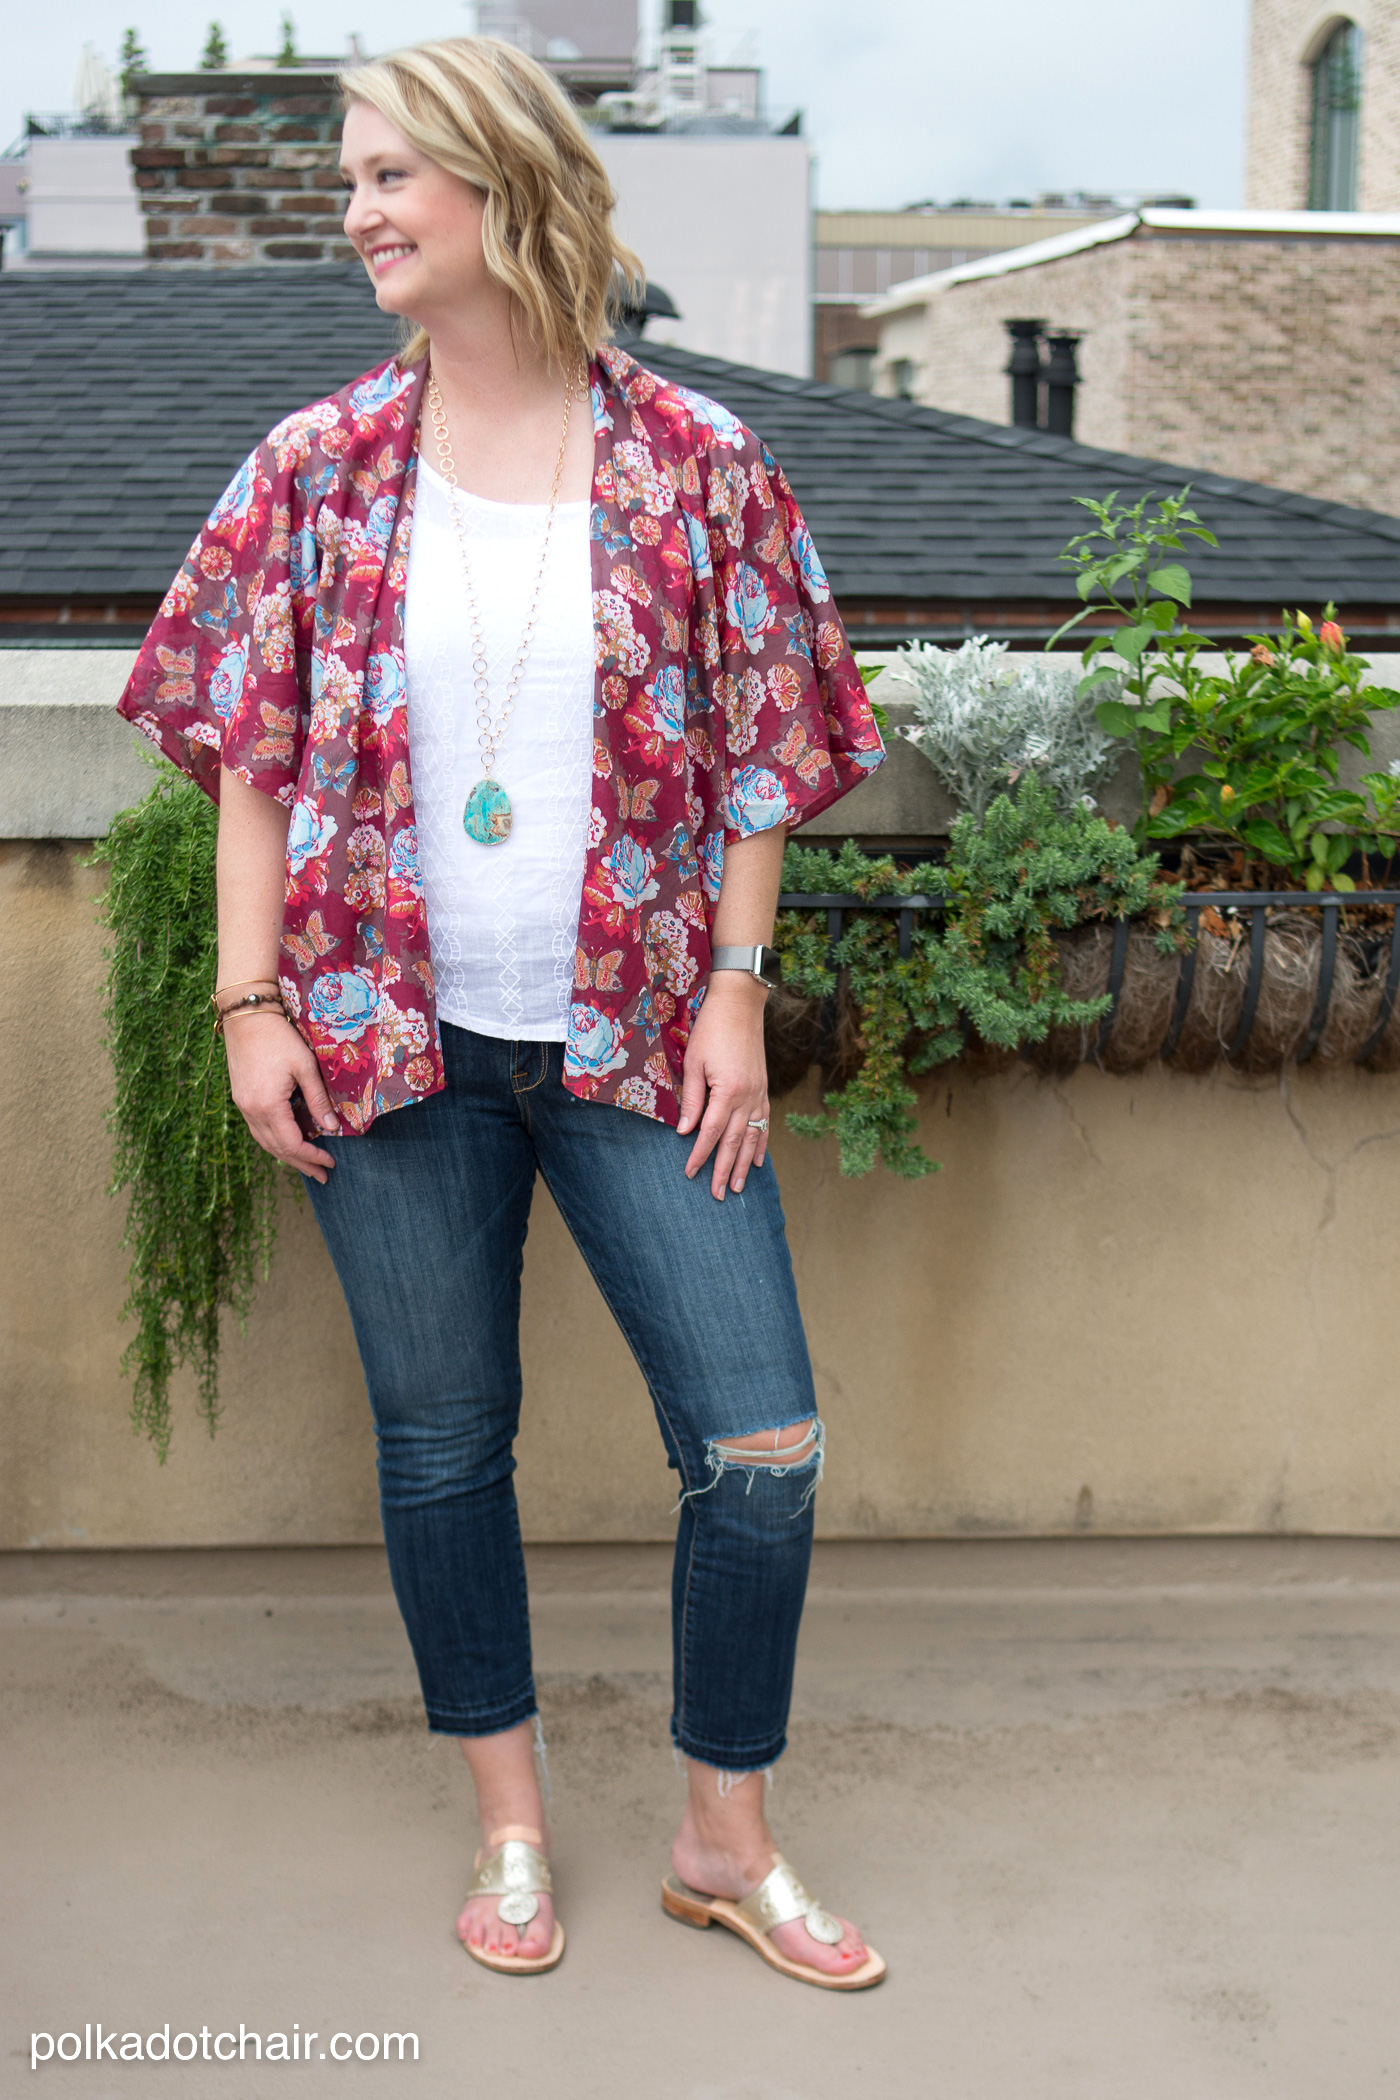
If you’re looking for an easy, breezy sewing project for summer, this top is a great choice. It’s simple in design and perfect for hot days when you want to look put-together without overheating.
If you live in the Southeastern US, you know that the air conditioning in shops and restaurants can be pretty intense during the summer.
This jacket is just what you need to keep the chill off your arms when you’re indoors, yet it’s lightweight enough to wear outdoors as well.
This top is easy to make; the most challenging part will be hemming the lightweight fabric, but I’ll provide you with a few tips for doing so.

I wore the top last summer on our trip to Charleston. It was a million degrees outside, and I wanted to look stylish (because Charleston is one of the most fashionable cities I’ve ever been to), but I wanted to stay cool at the same time.
Since it’s such a large project, I really couldn’t get great photos of the process, so I’ve illustrated over my photos to give you a good idea of how the top is constructed.

How to Sew a Lightweight Summer Jacket
Equipment
- Chalk and a Ruler
- Rolled Hem foot for your machine if you have one.
supplies
- 2 yards of 45″ wide lightweight fabric. Such as voile or light rayon. If you buy 60″ wide fabric, you will just need to cut it down.
- An old t-shirt that fits you well not a fitted tee, a boxy one
Instructions
Step One: Create your Custom Pattern Piece
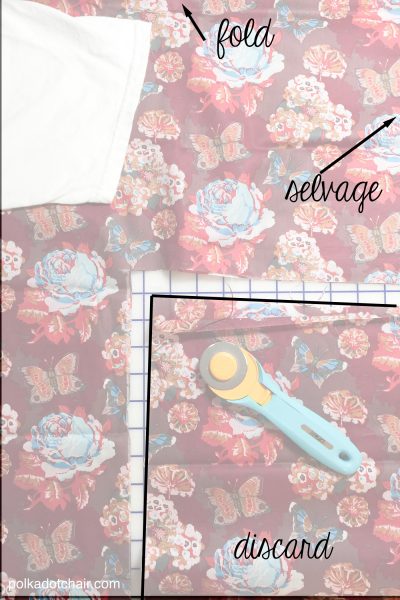
- Don’t let this step scare you. All you are doing is making a giant rectangle with some cutouts. It’s not a complicated step!
- Measure from your neckline to the point on your body that you’d like the jacket to hit. For me, it was 30 inches (I’m 5’9″ for reference). Cut your fabric to DOUBLE that length – so my fabric was 60″ by 45″ (the fabric comes 45″ wide)
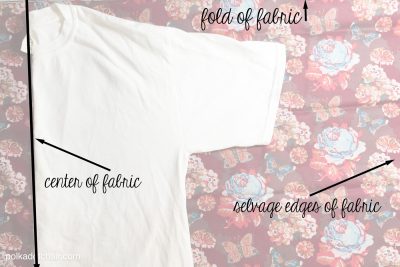
- Fold the fabric in half lengthwise. It will be 45″ long by 30″ tall (cause it’s folded) with a fold at the top, and the selvage edges on each end.
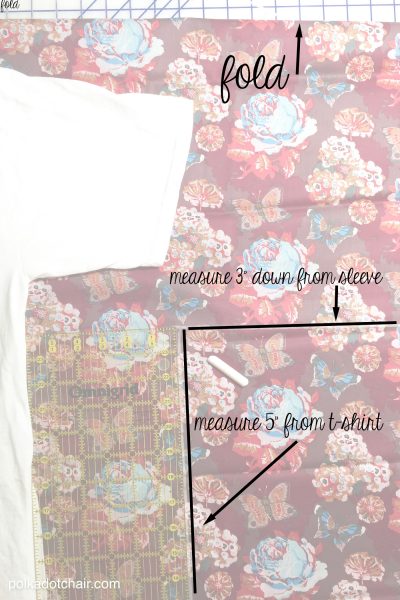
- Find the center of the fabric and mark it with a piece of chalk. Fold your t-shirt in half, placing the fold on the center mark of the fabric. The neckline of the t-shirt should be even with the fold on top of the fabric.

- Using a ruler and chalk, measure 5″ from the edge of your folded t-shirt. Draw a line. Then, measure down 3 inches from the bottom of the t-shirt sleeve. Draw another line.

Step Two: Cut your Fabric
- Cut the fabric away. Take the cut-away piece and use it to cut a piece the same size on the other side of the fabric.
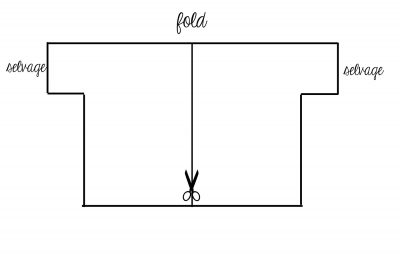
- Your piece will roughly resemble this (note that the illustration is not to scale).

- Next, with a sharp pair of scissors, cut ONE layer of the fabric along the center line up to the fold. DO NOT cut both layers of fabric—just the top.
Step 3: Sew the Top
- With the right sides of the fabric facing each other, stitch the underarm seams. Press seams open.
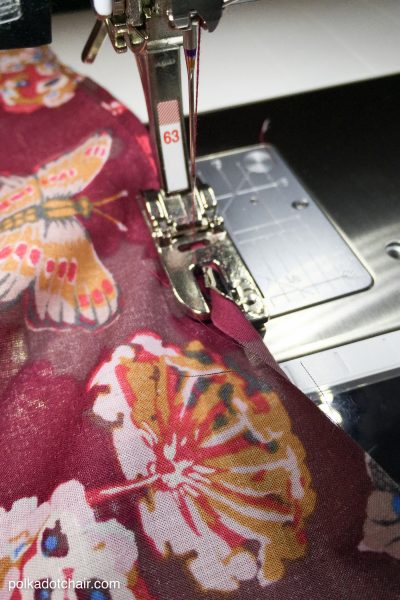
Step Four: Hem your Fabric
- Now, all you need to do is hem all of the raw edges of the fabric. I like to use a rolled hem foot for this step. If you don’t have one, then fold the fabric over 1/8 inch and fold it again 1/8 inch, and stitch along the folded edge.
Tip:
- If you’re having trouble hemming the lightweight fabric, try using a Microtex needle. It’s super sharp and will help the machine “punch” through the lightweight fabric more easily.
- You may also need to hold your strings from your machine when you start your stitches to help prevent the fabric from bunching up under the presser foot as you begin sewing
This post was originally published in 2015. It has recently been updated and renamed. While I realize that another name is commonly used to describe the style of jacket, I felt it was the correct name to represent the tutorial.
More things to Sew that you can Wear:
How to make a Dress from Two T-Shirts
Girls Maxi Dress Sewing Pattern (easy! Uses a t-shirts for the top).
Hi Melissa, I just got here as I have been looking for a Kimono to make and I love yours. I just want to say you don’t need to keep repeating yourself when all these questions fly at you, you are very sweet and very understandable.. I have watched many tutorials and I love yours. I am very glad I found you! Thank You.
Chloe
Hi Melissa,
I have watched your creating for some years now and want to tell you that I have made several of these sweet little jackets, even a silk one. I get so many compliments. What I wanted to say most clearly is that your directions are perfectly straightforward, easy to follow and I find it hard to understand why you get so many questions. Your illustrations are perfect. Keep up the good work.
Thanks for the tutorial. If I read the instructions correctly, the inside seams on the side for the underarms are left with raw edges. How do you finish them? Or we were supposed to finish them and only leave the bottom of the kimono unfinished to do the rolled hem?
You can finish them any way that you would like. Some like to use a serger, others a zig zag stitch. Also not all fabrics need to have finished seams, as not all fray.
Love this kimono jacket. Would be very helpful if you could post a video tutorial,
I’m looking for a longer version.
Thank you
Love this! One of the photos looks like it’s longer than the photo of you modeling it. How much fabric to purchase if I wanted to make it say thigh or knee length?
The length is the same. I only made one!
Just to let you know it’s SELVEDGE not selvage ( the self edge of the fabric) 😊
In the US it’s spelled without the D
http://www.allpeoplequilt.com/how-to-quilt/quilting-basics/what-selvage
Can you please explain to me how did you make the neck.
Thank you
You just fold the two edges under a tiny bit until they come to the center point.
Thanks for this tutorial – I made a kimono, I’m basically a beginner, but managed – I used an overlocker on the underarm and side seams, and a narrow hemming foot for the rest. I also added belt loops and a belt, although I think they might not be successful, we’ll see. It’s a dressing gown for my sister for Christmas.
Would it be easier, for a beginner, to hem the edges BEFORE sewing the underarm seams?
No, I don’t think so. I think that would be harder.
I really like this pattern. I was wondering if I can use a slightly heavier fabric like brocade for this project?
I don’t think that would work. A brocade would have a heavy drape and part of why this pattern works is that the fabric is very lightweight and breezy..
If you allow for the differences in drape and weight almost any fabric can be used for this jacket. I have made a similar jacket, using a very heavy wool remnant: 60″ wide by 3 yards long. It was a dark grey and I had a piece of dark green crushed velvet, upholstery weight, that I lined it with. Just cut it double, sew it right sides together, except for enough to turn it, then handstitch the opening. The extra width and length made it wrist and knee length, so it was warm enough for winter. When I wanted elegant I flipped it inside out so that the wool became the lining.
Can you post a picture of your grey wool Kimono?
Hi! I’m sorry but it’s not printable by design. I’ve had many, many problems in the past with people printing the pages and projects from my blog and selling them in shops and on etsy.
If I wanted to make this kimono top long sleeved would that work? How would you do it? Thank you, love the top!
And also, I’ve got a solid blue coloured cotton viole, would that work for this top?
Yes, you could do that, you’ll just need to buy more fabric.
Love this. I don’t like my arms uncovered and finding something light to wear over short or sleeve less tops for a woman my age is nearly impossible. Thanks for posting it.
I have been looking for a kimono pattern so was delighted to find this I don’t wear t-shits, so how would I fit this? M machine doesn’t have such a foot. How do I finish the edges?
Is the only fold at the top of the fabric so the back has a center seam?? Thanks.
i was wondering the same thing!
I too am confused. It seems as though “Take the cut away piece and use it to cut a iece EXACTLY the same size on the other side of the fabric” means no fold at the top. Maybe it works out when one is doing it. Uncertain.
No there is no back seam. The back of the jacket is one piece of fabric. The only seams you sew are the underarm seams
I don’t understand isn’t “long” and “tall” the same measurement…both vertical measures? Plz state which is length and which is width, I might be able to understand then.
The back isn’t cut at all. No seam you’re just using the T-shirt to guide cutting the sleeves correctly. And next the discard piece is used on the opposite side for the same purpose.
Then when you have a shirt shape with the fold at the shoulders, you cut ONE layer on the straight line down the fabric from bottom edge center to the center of the fold so that it’s open on front and not on the back after the sides and sleeves are sewn.
This would be a good jacket for a beginning sewer. I like the fabric colors and pattern.
How did you finish the back neckline? It looks like it might be a bit tricky at the back center neck.
Thanks for your help.
I just folded the back neckline under the same 1/8″ as the hem. It took a bit of pressing to get it to lay just right but I was able to work it out.