Tips for Painting Kitchen Cabinets
Today I’m going to share with you tips for painting kitchen cabinets based on our experience. This is the second post showing you how we painted our kitchen cabinets. You can see post #1 here with a lot more photos of the finished project.
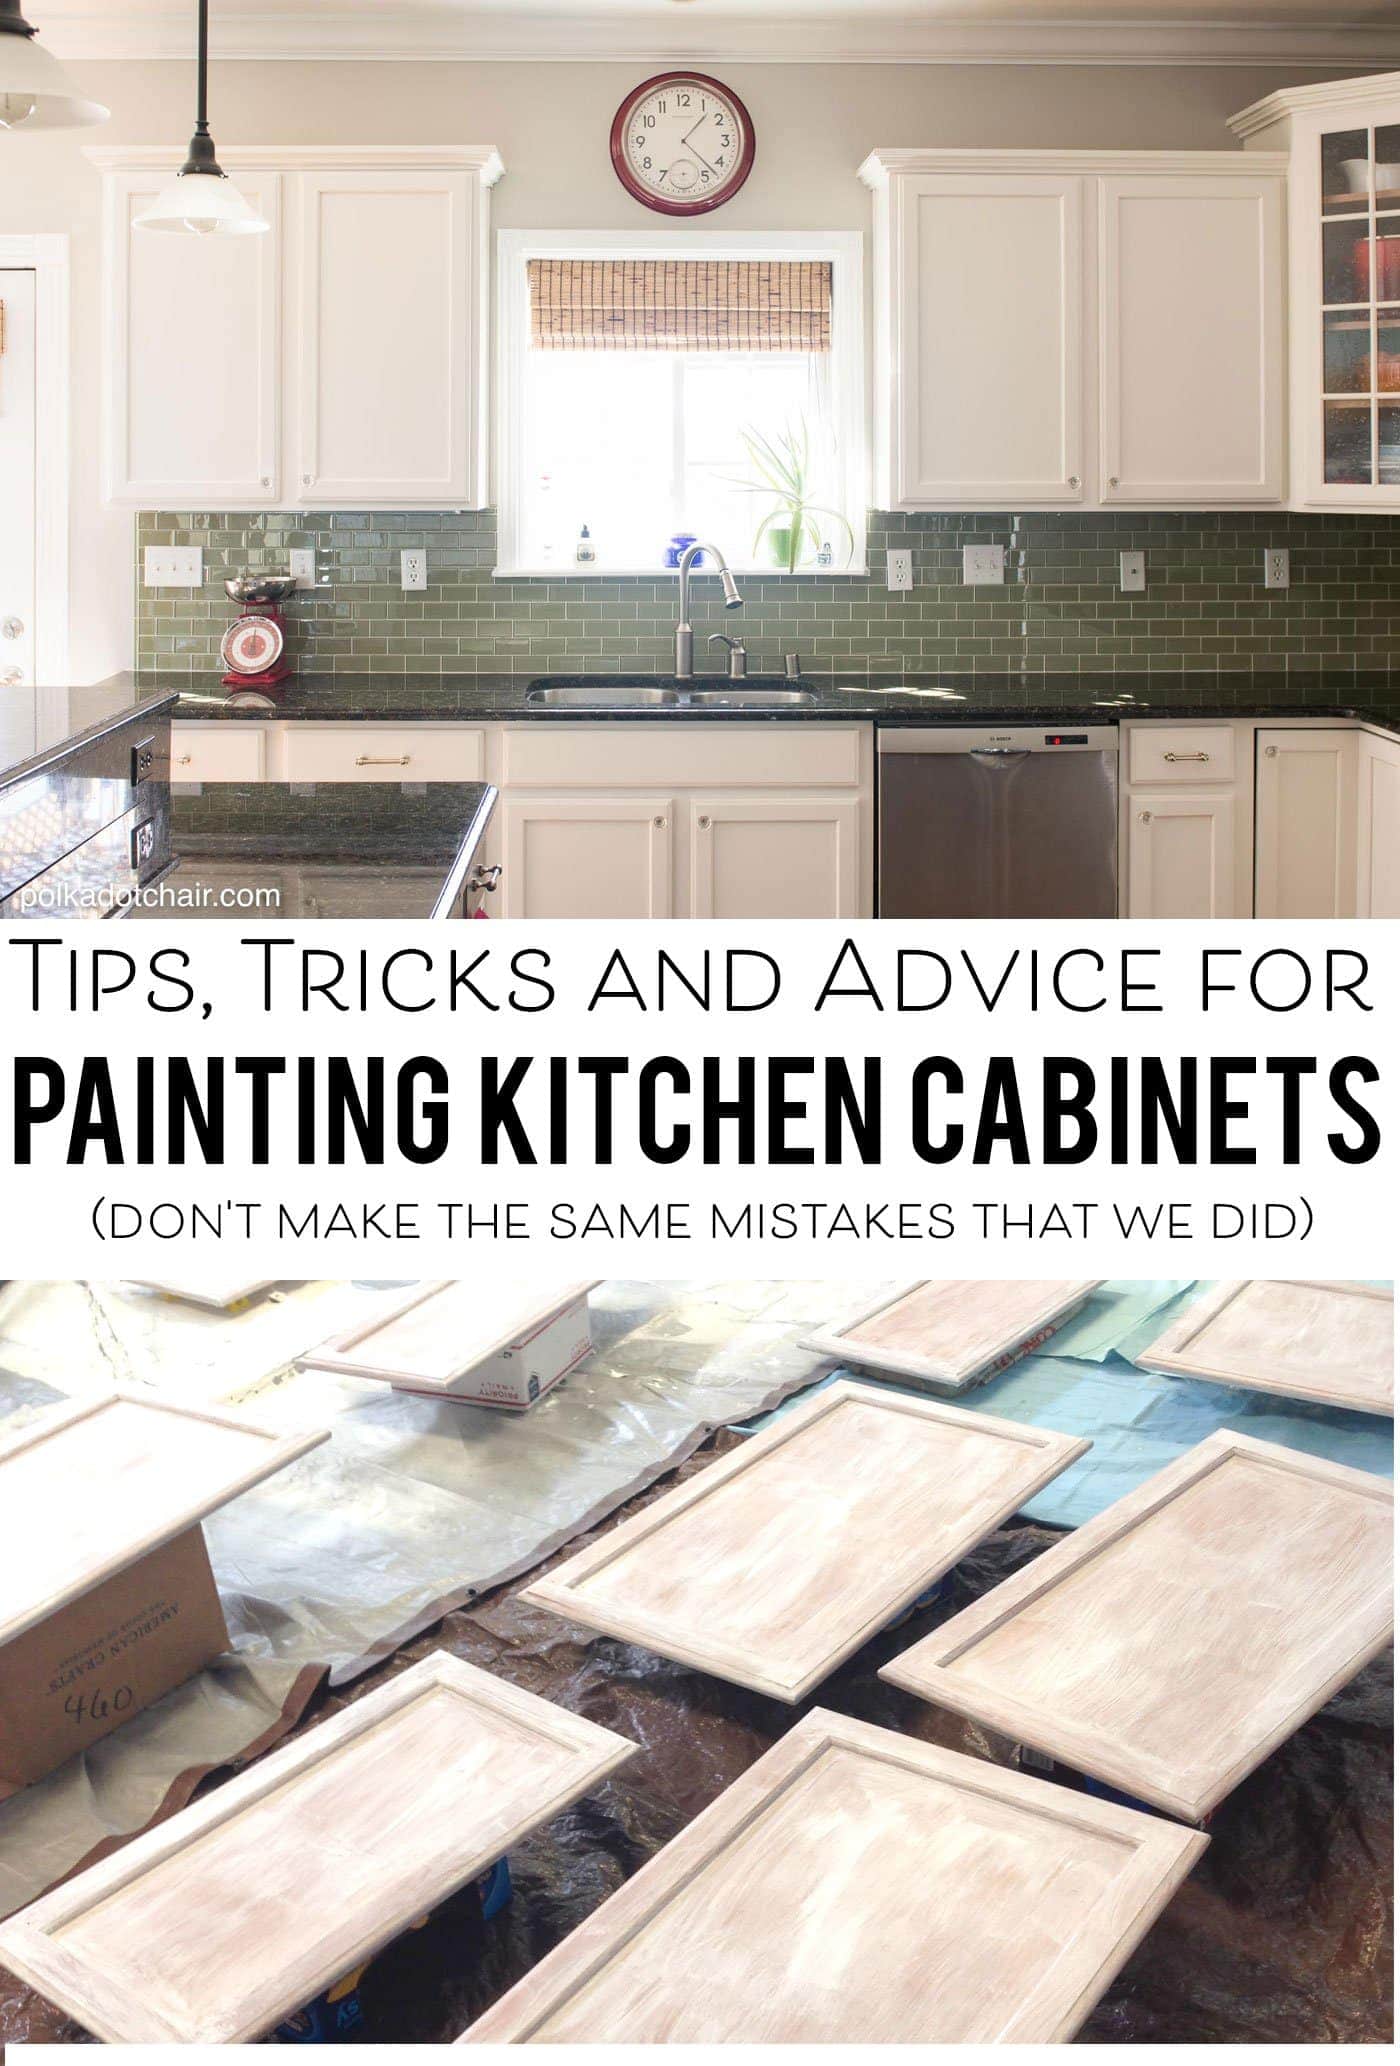
Thank you for all of the great comments and compliments on our Kitchen Makeover. It was a long process (about 7 years) but I’m so happy with how it turned out. I thought I’d dedicate a post to the process we went through to paint the cabinets, given all of the questions left on the last post.
How to Paint Kitchen Cabinets:
We made a lot of mistakes and I’m happy to share with you those mistakes so that if you tackle painting kitchen cabinets yourself in the future that you might avoid some of them.
How Long Does It Take to Paint Kitchen Cabinets?
Let me first say that this is a HUGE undertaking. It’s not really a weekend project, more like a “month of weekends project”.
My husband and I worked mostly on Saturdays and evenings and had everything went as planned it would have taken at least 2 full weekends plus several other weeknights.
Tips for Painting Kitchen Cabinets:
We were really nervous before we started painting. We have tackled a lot of DIY projects in the past, my husband even built a deck and pergola behind our home once. We’ve painted every room in our home, installed beadboard paneling, replaced lights, and installed hardwood floors. But this project was a bit different.
I think we knew that if we messed up we could seriously hurt the value of our home going forward. I think that kitchens sell homes, and a bad paint job would mean that we’d either A- have to replace the cabinet doors or B- pay a professional a lot of $ to fix our mistakes.
We went back and forth on it for years because honestly there was nothing wrong with the kitchen before, although I would argue that it would have started to look dated soon.
How we Painted our Kitchen Cabinets
So funny story (well now we can laugh about it but it didn’t seem very funny at the time). We practiced by painting kitchen cabinets that were in our butler’s pantry.
We went to the paint store, told them what we wanted to do, and they told us what paint to use and how to do it. It turned out great. Even a builder friend of ours said that he would have thought the cabinets we originally white.
After this burst of confidence, we decided to tackle the kitchen. We went back to the paint store to get more paint, but this time visited a location closer to our home (same brand of paint, different store).
When we tried to buy the same paint that we used in the butler’s pantry, the kid at the counter said they didn’t make it anymore and to use this other paint instead. So we went with their recommendation.
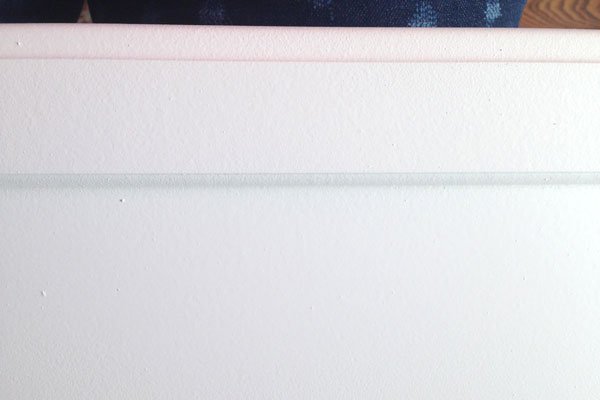
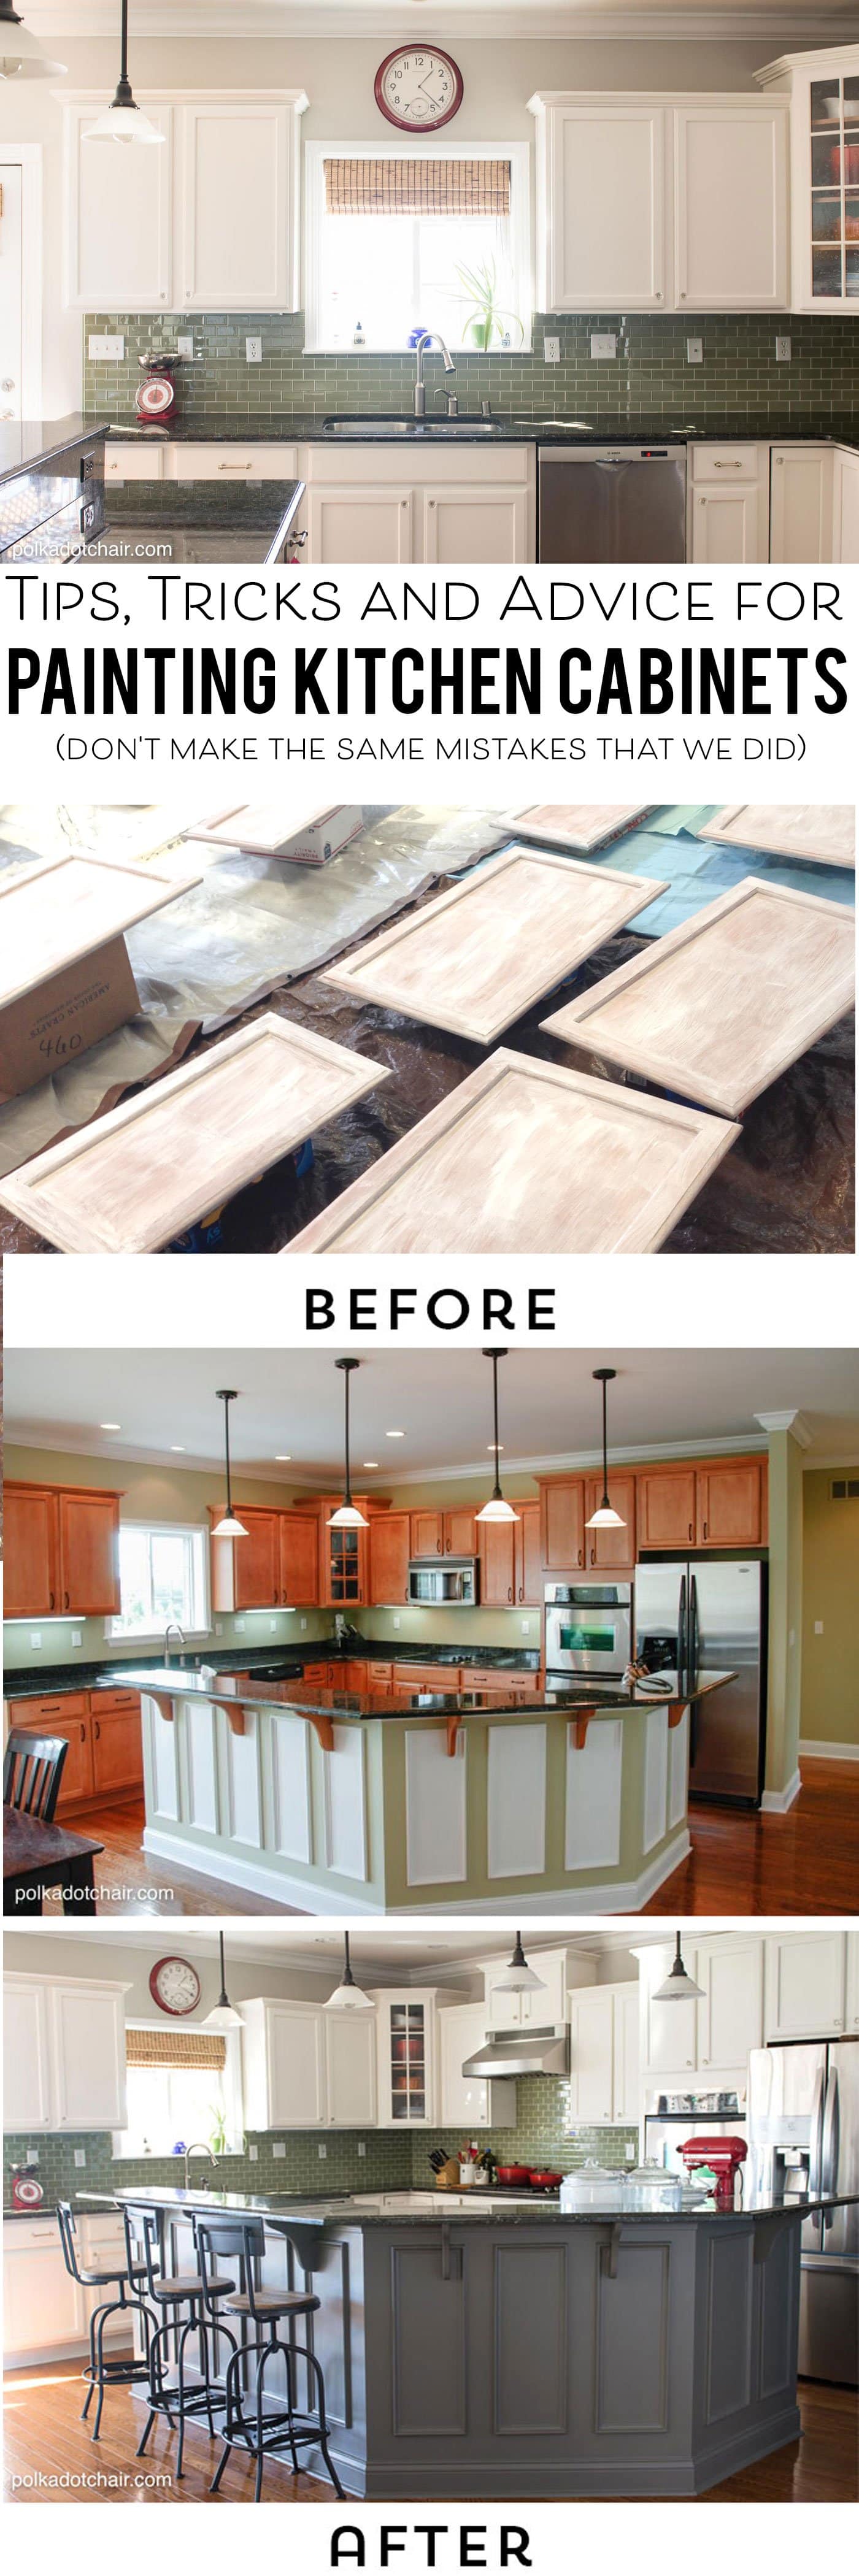
(you can see the orange peel texture in this photo)
The Mistakes We Made
As the cabinets started to dry we realized there was a problem. The finish was chalky and there was an orange peel texture on the cabinets. I read online about how to fix it and could not figure it out.
We changed the settings with our paint sprayer, changed how much the paint was thinned, and made a few other adjustments Every time I thought we had resolved the problem the solutions didn’t work.
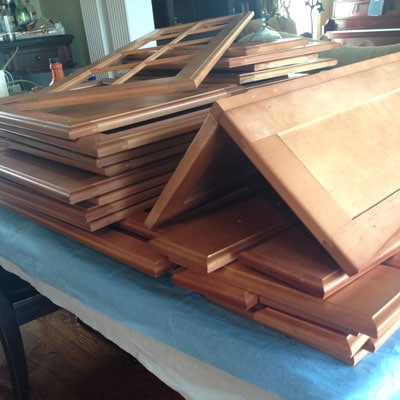
Grumpy and tired we stacked up the cabinet doors in the garage (don’t do that they stick to each other) and left them alone while we decided what to do next.
Just by coincidence, we stopped in the first location of the paint store because we were running errands in the area. We were buying paint for another project, and I noticed that the same guy was there that we talked to originally.
I told him the problems that we were having painting kitchen cabinets and asked if there was ANY way that we could get that first paint again, special order, or something? He proceeded to walk over to a shelf in the store and picked up the paint. It was right there the ENTIRE time!
We told him how the cabinets looked and he told us we needed to sand off all of the other paint then start over again.
So we began step 2 of the whole process AGAIN.
Here is what we did the 2nd time that worked, and I’ll never paint cabinets with any other way again.
If you are going tackle painting kitchen cabinets here are my recommendations
One: Remove the Doors
First of all, remove the cabinet doors and hinges. Then number the cabinet doors so that you can put them all back in the same location when you’re done.
To do this we marked the number with a sharpie inside of the hole that the cabinet sat. We then covered up the number of painters tape. That way the number would be visible when we were done, but would not show since it was hidden inside the hinge hole.
Two: Wash the Cabinets
Next, wash the cabinets doors and frames with a mild detergent.

Then tape off the insides of the cabinet frames, and the floor of the kitchen. (on a side note, we did not paint the inside of our cabinets, I would not tackle that job unless we were going to tape off all of the walls in the kitchen and spray the inside).
If you are going to install different cabinet hardware at this time be sure to use wood filler to fill in the existing holes.
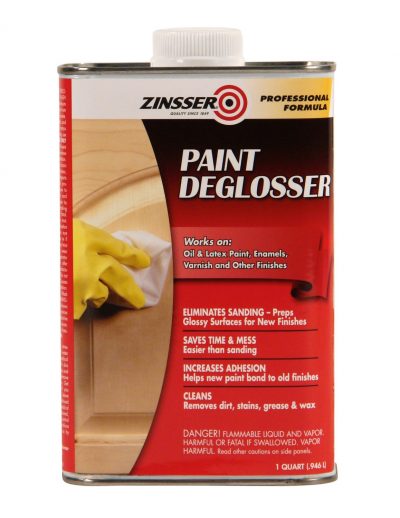
Three: Degloss
Now degloss the cabinets (doors and frames). Ask for a wood sander/deglosser at the hardware store, then apply it according to the directions on the bottle. It will rough up the surface a bit so that the primer and paint will stick, and you should not have to sand your cabinets.

Four: Prime
After you’ve deglossed and cleaned the cabinets apply a light coat of primer. We used Kilz primer. You can use a brush for this step but make sure that you apply a very light coat and don’t leave any brush marks. If there are brush marks sand them lightly after they are dry.
Now you’re ready to start painting kitchen cabinets. Before let me just say that I’ve been happy to work with a few different paint companies in the past for projects on this blog. This project is not one of them. This is just the paint that we bought and found that worked ourselves. It’s not sponsored in any way although I did include a few affiliate links for some of the items that we used).
Five: Picking the Paint
Using a good quality brush paint the cabinet frames, sides and crown molding. If you’re not sure which brush to use check the paint can, the manufacturer usually will recommend a brush to use with that brand of paint.
It will take about 2 coats. We found a brush that gave us a smoother finish than a foam roller. We tried both. The water-based paint we used is “self-leveling” meaning it levels out any brush marks and gives you a smooth finish. Just make sure you don’t use too much paint. I didn’t notice any brush marks on our cabinet frames after we finished.
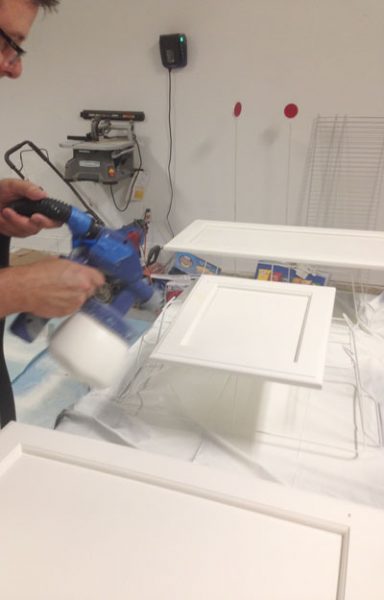
Six: Spray Paint the Doors
We tried a lot of different ways and found the best way was to spray paint the door on a table then moving it to the floor of the garage to dry.
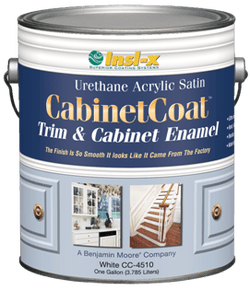
This is the paint we used. It’s called Cabinet Coat and the color is Sierra Blanca (that is a color created by manufacturer of the paint, the paint cannot be tinted to any color, they recommend using their predetermined colors)-
The color we wanted originally was Dove White by Valspar, the Sierra Blanca is the closest one, and I’m happy with how it came out. It’s white but not too bright or sterile. We bought it at our local Benjamin Moore store, but it’s not made by Benjamin Moore so you may be able to buy it at other paint stores.
How to Spray Paint the Cabinets
We tried two different paint sprayers, the one we liked the best was the Flexio Paint Sprayer by Wagner. (The first paint sprayer had a hose that kept coming out of the sprayer, and it would mess up the paint).
We did thin our paint with water. The sprayer comes with a guide so that you know when the paint is the correct consistency. It will be too thick to spray as it comes, the thinned paint will give you a smoother finish. Make sure you mix the paint and water well. we used a mixer attached to our drill.
Before you paint a cabinet you need to test spray a surface of similar texture. You can buy an old cabinet door or a smooth piece of wood. There are a bunch of different settings on the paint sprayer and you need to make sure that you’ve got the setting that will work best with your paint and on your cabinets.
When you spray to make sure to do it in smooth even strokes. Don’t hover over one place for too long and don’t get the sprayer too close to the board or too far away. Let the paint dry completely, keep practicing until you get a finish that you like. Then you’re ready to tackle the doors.
If you have trouble READ the directions that came with your paint sprayer. Ours included lots of tips.
Tips for Spray Painting the Doors
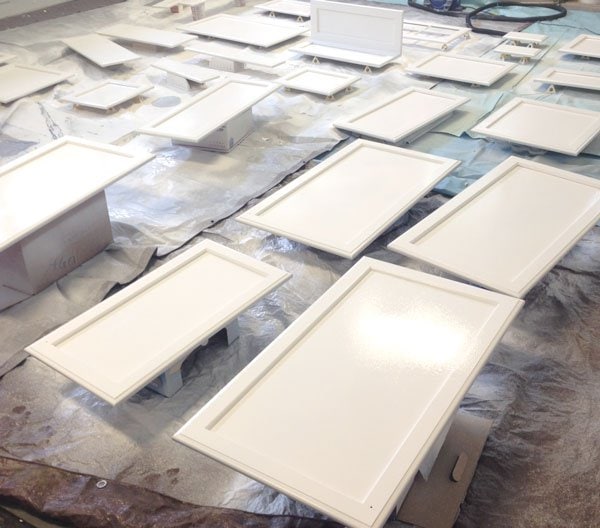
We set up a table in our garage to spray the doors and covered it with plastic and put tarps on the floor just to be safe. We sprayed the doors on one side (while on the table) then gently lifted the door (fingers touching the unpainted side only) and moved them to the floor of the garage, resting them on these paint pyramids.
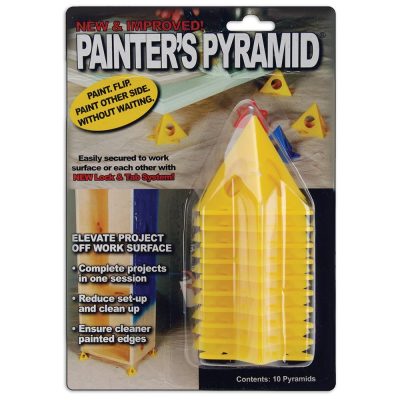
They totally saved our butt. Before we were stacking them on old paint cans or boxes. We then let the doors dry completely and just prayed that a bug didn’t land on it while it was drying. That happened to us a lot – it was July in Kentucky.
It took two coats of paint on the front and the back of each cabinet door. You have to let them dry completely between coats, that’s why it takes several days to complete the process.
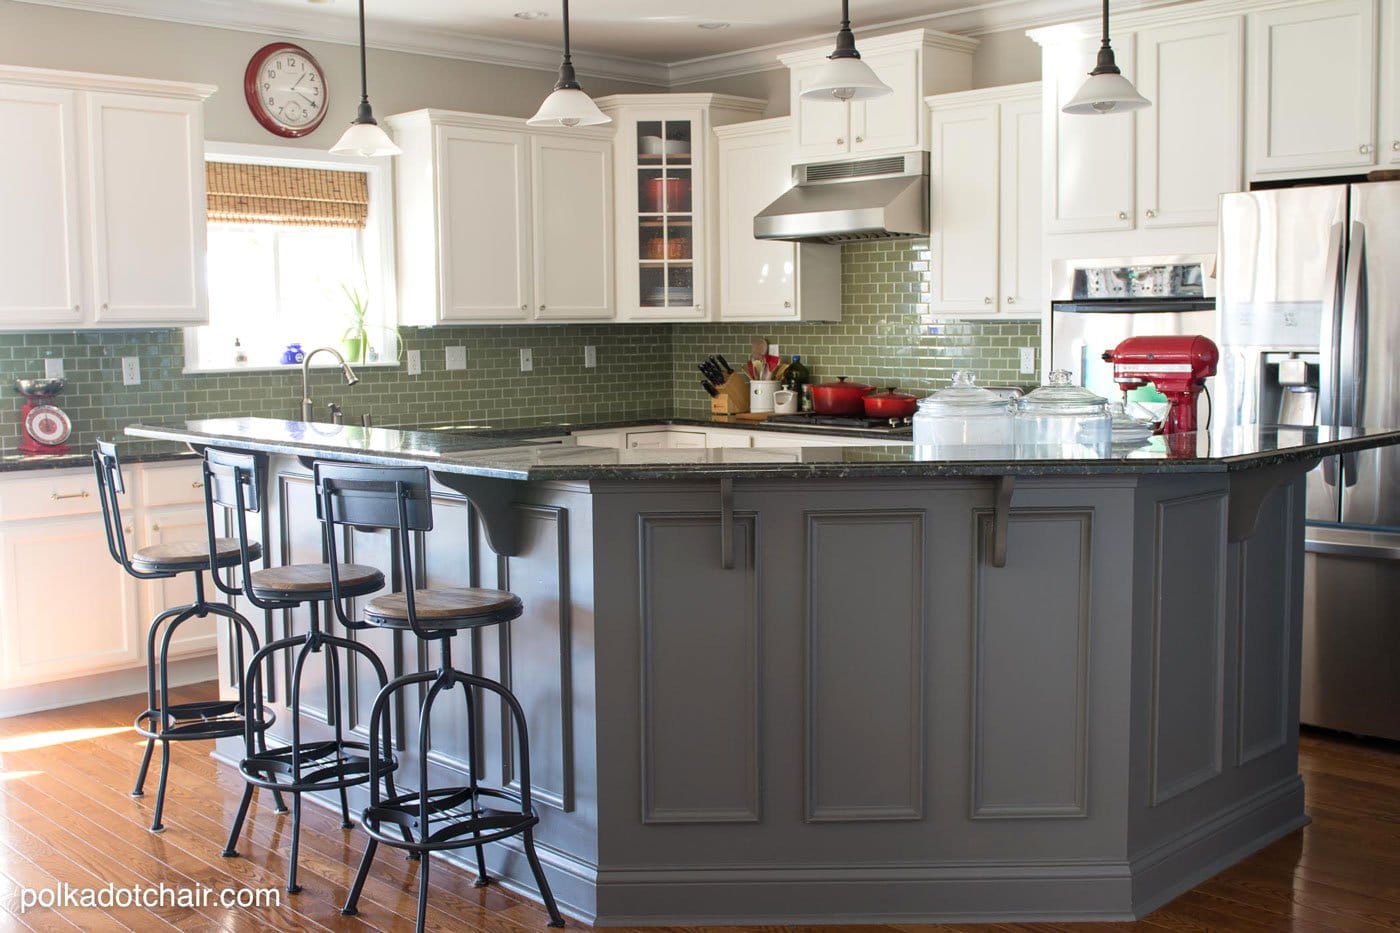
Also: Since we could not use the Cabinet Coat on the island (we wanted a custom color) we used a paint recommended by the store. The color is Kendall Charcoal by Benjamin Moore.
Painting Kitchen Cabinets, my Final Thoughts:
Like I said before I think this process comes all down to the paint. That was by far the biggest mistake we made. We used the Cabinet Coat paint but I know others have had great results with other types of paint.
Just be sure you talk to someone at a paint store that KNOWS what they are talking about. You don’t want to use regular wall paint. You need something with an enamel finish so that it will hold up (you don’t want it to chip). I wish we had sprayed test samples before we tackled the entire kitchen, but you know what they say “live and learn”.
If you’ve painted your cabinets before I’d love to hear your tips and I’m sure others reading this post would love to hear them also.
More Home DIY Projects You May Like:
How to Build an Outdoor Firepit

I do like the colors and the green subway tile backsplash BUT I can’t get over the crooked outlet plates. Drive me nuts! You can use a level or work off the tile edges to make them straight. As pretty as the kitchen is, that was the FIRST thing I noticed. Like a crooked painting. Easy fix and everything else looks awesome! Love gray!
I am getting ready to conquer my kitchen and have found your instructions very helpful. I do have 2 questions. Can I use a self leveling paint and do you see or feel the grain in your paint from the cabinets? I am curious if the primer is enough to fill in the frain. Others have recommended applying space and sand to make them smooth.
The paint we bought is self-leveling. When brushed on it looked fine but for the doors it looked much better sprayed.
Painting kitchen cabinet looks easy, but it is not so as you think. If you are not experienced, then I am sure you cannot complete the job fairly. You have to learn few ideas for it from experts. But, I am suggesting you, if you are confident and money is not a matter for you, you can try it yourself thinking that if it would be not up to mark, I will try again. If you are not so confident, you should hire a home remodel company, its talented team would provide you a quality service. As a result, the kitchen interior looks great.
I see that you removed the granite backsplash and replaced it with tile. Did removing it cause a lot of drywall damage or damage the countertop at all?
Do one thing at a time. Don’t get ahead of yourself and do them all at once. There will be tweaks and errors and you don’t want to mess it all up at once.
Great article. My kitchen cabinets also need new color. I will surely try out these tips. Thanks for sharing.
Thank you so much for your tips, I’ll need them!! What kind of paint sprayer did you use?
Love this!!! Thank you so much!!!
Thanks for sharing this very valuable information! We have been trying to talk ourselves into painting our cabinets, this advice really helps! Your kitchen is beautiful!
I love your cabinets, they look as though you bought them like that! I have been researching for months now, as to what to do with my mother’s yellowy/orange oak cabinets. I was over loaded with soon much out there…..but, have decided to do white….it looks so crisp & clean!!! Maybe, like you, a different color on the bottom? Thank you for all your I helpful hints! ?
Outstanding job, it looks amazing. Now my question to you since you painted your cabinets about 1 year ago……How is the paint holding about against bumps, bangs, dirt, grease and build up?
I have done my laundry cabinets which look wonderful but in some areas the paint came off bumping against it. Also in some areas where the hinges fitted a little snug.
Any additional advice would be greatly appreciated. Thank you for the great tutorial.
Great job! It looks wonderful. I wanted to ask about your counter tops. I noticed you did keep your same counter tops, which we are planning to do. In the before pictures you have a 2-3 in backsplash of your counter. In the after pictures it gone. Was that difficult to do?
I see that this is an older post, but I was looking at the photos and wondering what you did on the hardware for your pull out drawers. When I did my small bathroom cabinet, I unscrewed it, painted it, and then reattached it, but I imagine that would be a pain for kitchen cabinets, although I will be going from honey oak to either grey or white. What did you do? What do most people do?
Hi – just love your makeover! We are planning ours now and have a similar cabinet arrangement as yours. I noticed your microwave gone…we want to take ours out but are unsure where to go with it. Where did you end up putting yours?
It’s on a bookcase next to our pantry. We love it there, no regrets!
Thank you for this wonderful blog. I am contemplating doing this myself. How far away would you say you held the paint sprayer?
Your cabinets look fantastic. I am in the process of painting mine. I have stopped counting the number of paint sprayers I have tried and returned. I finally had to admit to myself there are a lot of things I’m good at but operating a paint sprayer ain’t one of them. I ended up where I began, painting them by hand.
Do you remember what the color of your walls were in the first picture before you painted your cabinets? Is that a green color? I like the color. Thanks for a great blog.
I don’t know the color. I’m sorry. It was painted that color when we moved in.
I am so happy to have found your blog! Your kitchen makeover looks beautiful! My husband and I have been looking for just the right primer and paint to hold up in our kitchen. We are starting from scratch. Purchased unfinished oak cabinets from lowes, do I need to sand to a smooth finish before priming? I’m worried about grain raise and an unwanted, textured finish. Thanks in advance!
Hello! I’m about to tackle our kitchen and was curious as to which paint you liked more – the BM or the CabinetCoat. I will be buying Maple/MDF Panel Shaker style doors to replace laminate doors and painting them and the bases all 1 color. Any advice would be much appreciated!!!!
We used the Cabinet Coat, we never used any Benjamin Moore on the cabinets. We love the Cabinet Coat, one year later and NO chips at all!
Hi Melissa!
Not sure if you still see comments on this post, but I have a question for you.
My husband has “charged” me with the task of finding and purchasing paint and primer for our cabinet makeover…. I am getting to my whit’s end. There is SO much information and so many varying reviews!
I was leaning toward Benjamin Moore’s Advance OR Sherwin Williams ProClassic, until I came across your page.
Two questions:
1. It is now almost 2 years after your kitchen makeover, I think, and I would be curious to know how they are still holding up?
2. I did a quick Google search and it looks like the brand of paint you used is sold at Wal-Mart and Home Depot. Which, are two of the lower priced, value stores, that I know of. Would you STILL recommend this paint, even from these stores? (It looks exactly the same). I would love to save half the price of what I WAS considering (and my husband would be quite happy too, as we just spent $350 on replacing 6 doors :/ but I have read over and over to NOT go cheap).
Thank you for any help you can give!!
Please feel free to email me at saffraun@gmail.com
Andrea
Hi,
I’m not a “paint expert” but what I have learned is that when you paint kitchen cabinets you need an enamel paint. The paint we used is made just for cabinets. I don’t think it matters that they sell it at Home Depot or Walmart. 2 years later and the cabinets look the same way they did when we first painted them. Our island was painted with paint from Lowes and has chipped (we couldn’t get a dark color of paint in the other brand). If I redo it I will use the Benjamin Moore Advance, since we used that in our mudroom cabinets and it has held up well.