• Skip to primary navigation
  • Skip to main content
  • Skip to primary sidebar

The Polka Dot Chair logo

  • SEWING
    • Free Sewing Patterns
    • Bag Sewing Patterns
    • Costumes Sewing Tutorials
    • Apparel Sewing Patterns
    • Learn to Sew
    • Beginner Friendly Sewing Projects
    • Hand Embroidery Patterns
    • Tips & Techniques
    • All Sewing
  • QUILTING
    • Quilt Block Patterns
    • Learn to Quilt
    • Free Quilt Patterns
    • Quilt Patterns
    • All Quilting
  • CRAFTS
    • Disney
    • Cricut
    • Printables
    • All Crafts
  • HOLIDAYS
    • Seasonal Projects
    • Valentine’s Day
    • Easter
    • 4th of July
    • Halloween
    • Thanksgiving
    • Christmas
    • All Holidays
  • TUTORIALS
  • ABOUT
    • About Me
    • My Fabric Collections
    • Published Books
    • Press
    • FAQ’s
    • Contact
  • SUBSCRIBE
  • SHOP
menu icon
go to homepage
  • SHOP
  • TUTORIALS
  • SEWING
  • QUILTING
  • SUBSCRIBE
  • CRAFTS
  • HOLIDAY PROJECTS
  • ABOUT
    • Published Books
    • My Fabric Collections
  • CONTACT
    • Facebook
    • Instagram
    • YouTube
  • subscribe
    search icon
    Homepage link
    • SHOP
    • TUTORIALS
    • SEWING
    • QUILTING
    • SUBSCRIBE
    • CRAFTS
    • HOLIDAY PROJECTS
    • ABOUT
      • Published Books
      • My Fabric Collections
    • CONTACT
    • Facebook
    • Instagram
    • YouTube
  • ×

    Home » Sewing

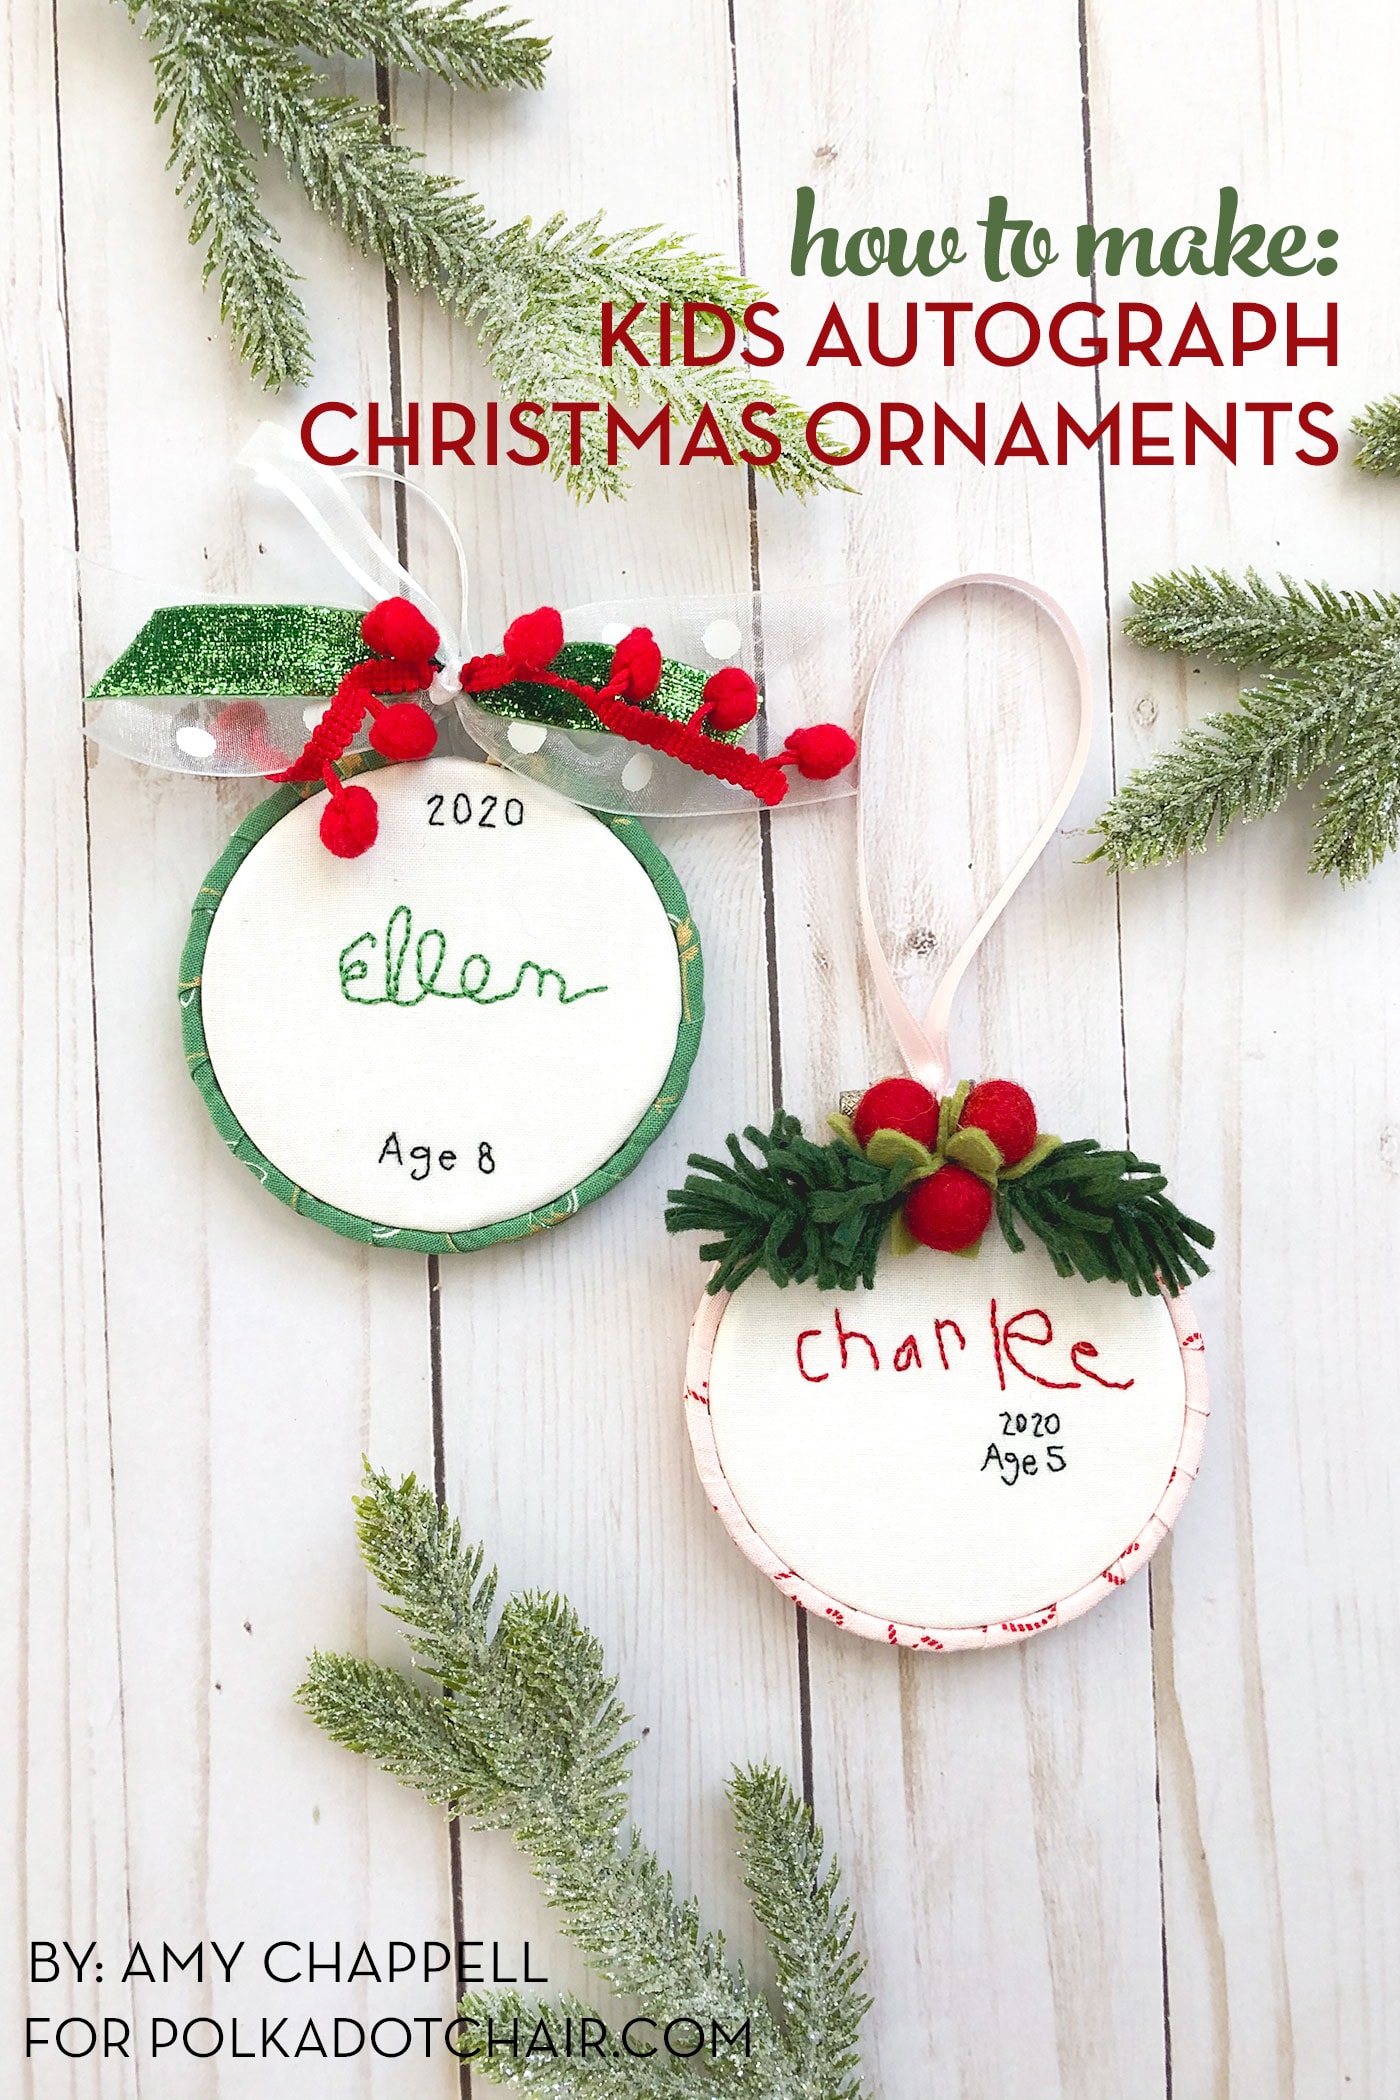
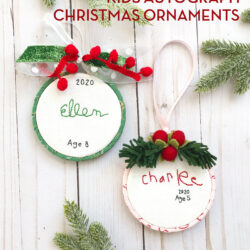
    Child’s Handwriting Hand Embroidered Christmas Ornament Tutorial

    Updated: Oct 29, 2020 by Melissa Mortenson · This post may contain affiliate links · This blog generates income via ads · 4 Comments

    hand embroidered christmas ornaments with childrens names on white wood table


    Freeze your child’s handwriting in time with this fun Handwriting Embroidered Christmas Ornament. Today we will walk you through the steps of creating this one of a kind personalized Christmas ornament.

    hand embroidered christmas ornaments with childrens names on white wood table
    Table of Contents
    • Autograph Embroidered Ornament Supplies
    • 3 Free Christmas Hand Embroidery Patterns

    When my 8-year-old was in kindergarten she would write her name as a mirror image of what it actually should be. That is how we learned that she is ambidextrous.

    I wish I had thought of this idea back then and made a point of preserving that unique stage in her life. If this year has taught us anything it’s to cherish the little things, like children’s handwriting.

    hand embroidered christmas ornaments with childrens names on white wood table

    If you are looking for a whole set of ornaments to embroider, you might just love my Embroidered Word Ornament Pattern Set.

    hand embroidered christmas ornaments with childrens names on white wood table

    Are you new to embroidery? If you would like to see how I do each of these steps, you can find video tutorials for each step on my Instagram IGTV.

    hand embroidered christmas ornaments with childrens names on white wood table

    Autograph Embroidered Ornament Supplies

    • 3” embroidery hoop
    • Background fabric
    • Embroidery floss
    • Embroidery needle
    • Felt- optional, but I prefer to embroider with felt backing my stitching so there’s no shadowing from the knots, it also adds a nice slightly quilted texture to the embroidery that I love. Inexpensive acrylic felt from a craft store is my preference.
    • Scrapbook paper
    • Hot glue gun
    • Ribbon or trim
    hand embroidered christmas ornaments with childrens names on white wood table

    Children’s Handwriting Embroidered Christmas Ornament Tutorial

    Amy Chappell
    Freeze your child’s handwriting in time with this fun Hand-Embroidered Handwriting Christmas Ornament.
    4.12 from 9 votes
    Pin It! Share by Email Share on Facebook
    Prep Time 15 minutes mins
    Active Time 1 hour hr
    Total Time 1 hour hr 15 minutes mins

    Equipment

    • Small Sharp Scissors
    • Embroidery Needles
    • Hot Glue Gun

    supplies

    • 3" Embroidery hoop
    • Background fabric
    • Embroidery floss
    • Felt- optional but I prefer to embroider with felt backing my stitching so there’s no shadowing from the knots, it also adds a nice slightly quilted texture to the embroidery that I love. Inexpensive acrylic felt from a craft store is my preference.
    • Scrapbook paper
    • Ribbon or trim

    Instructions
     

    Preparing hoop:

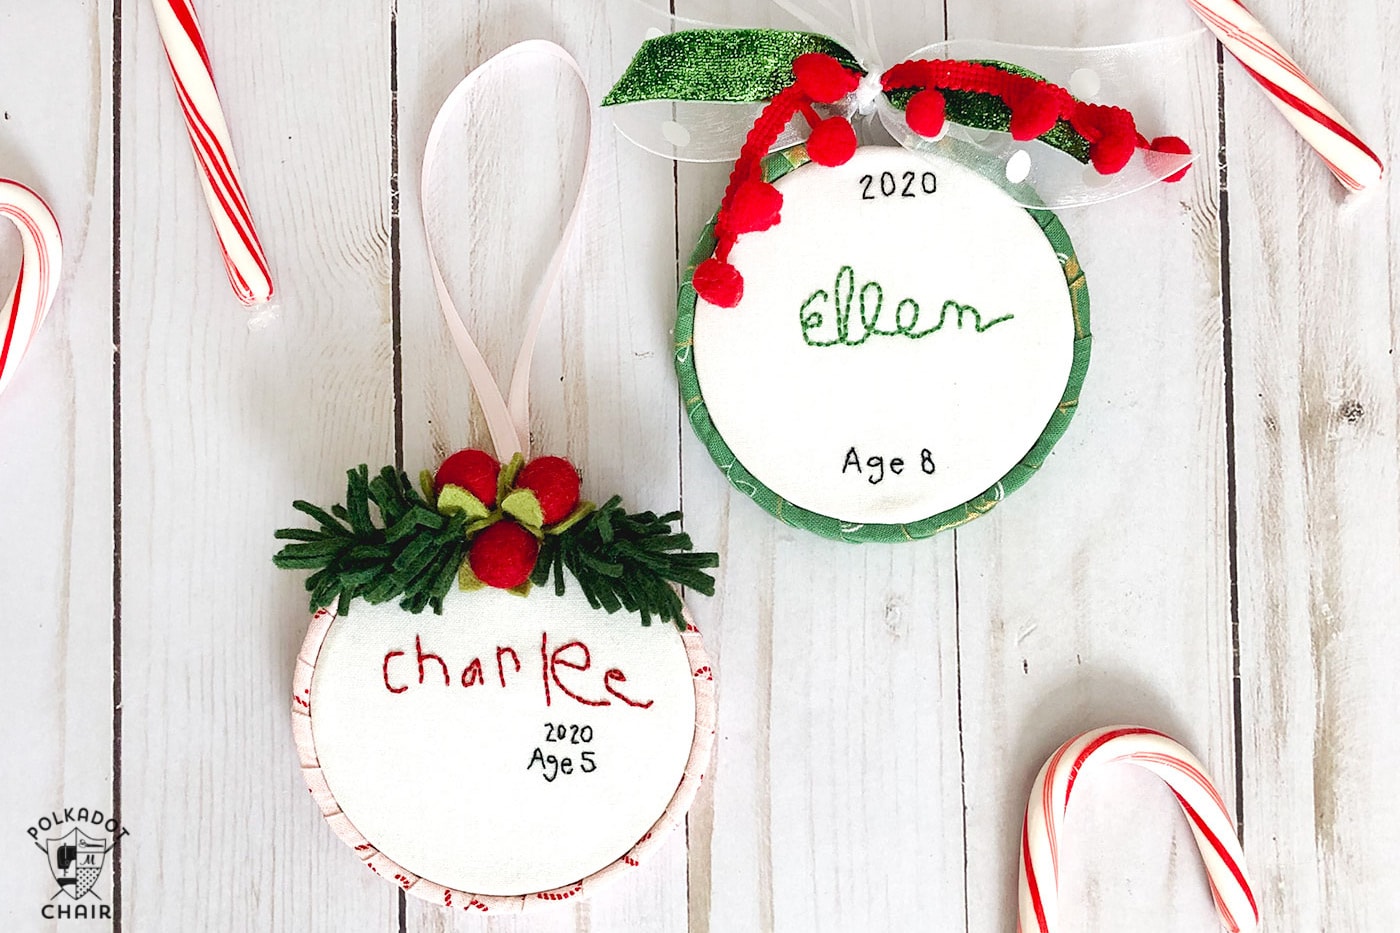
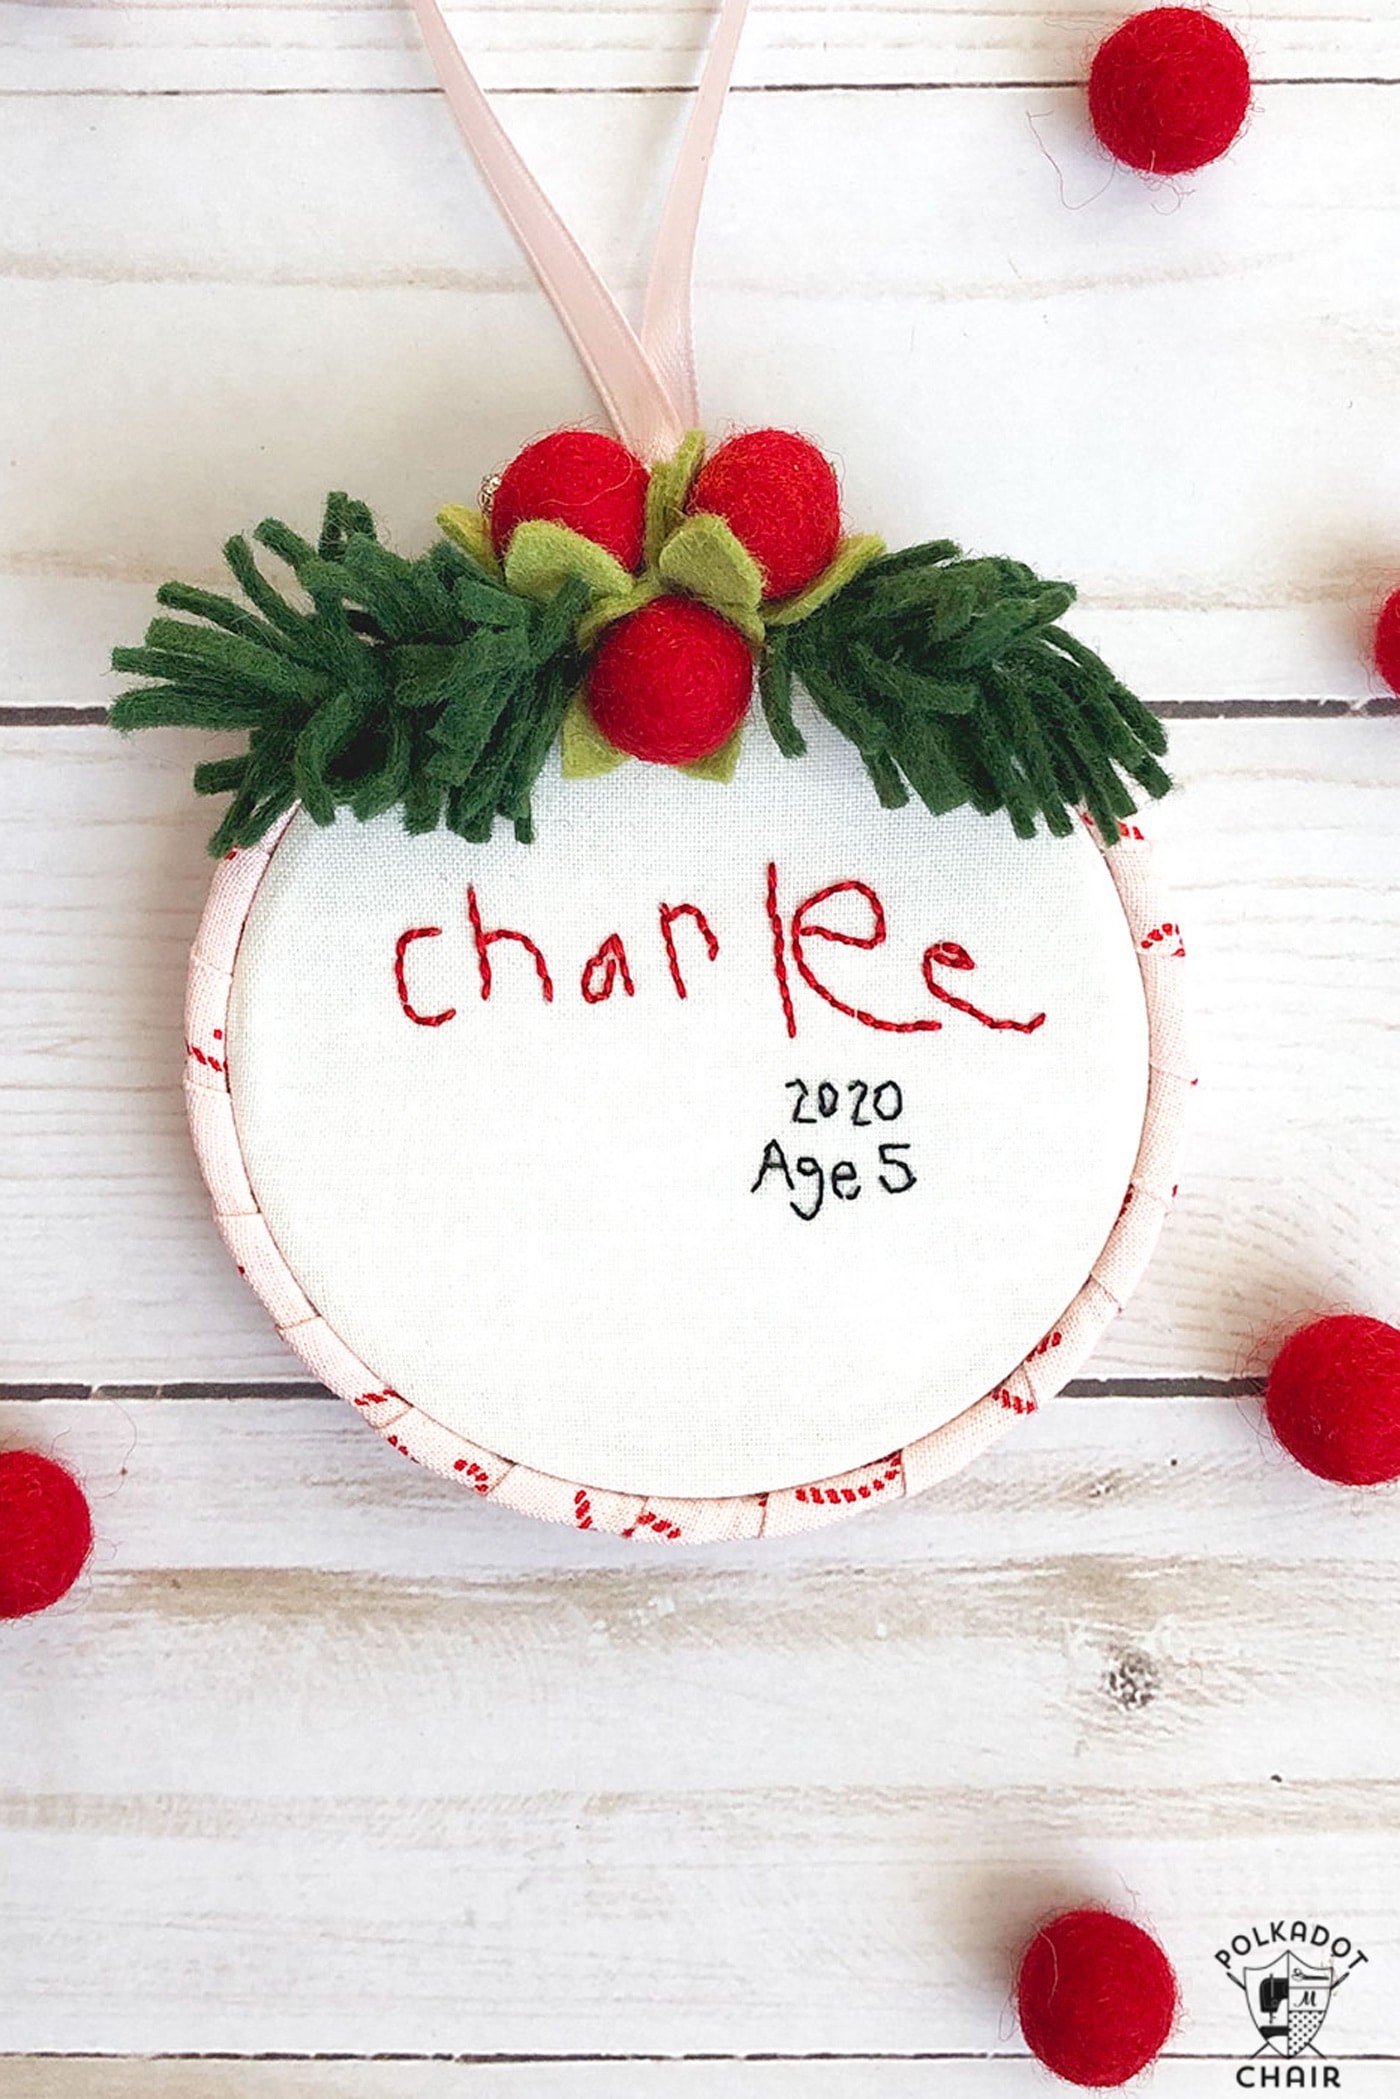
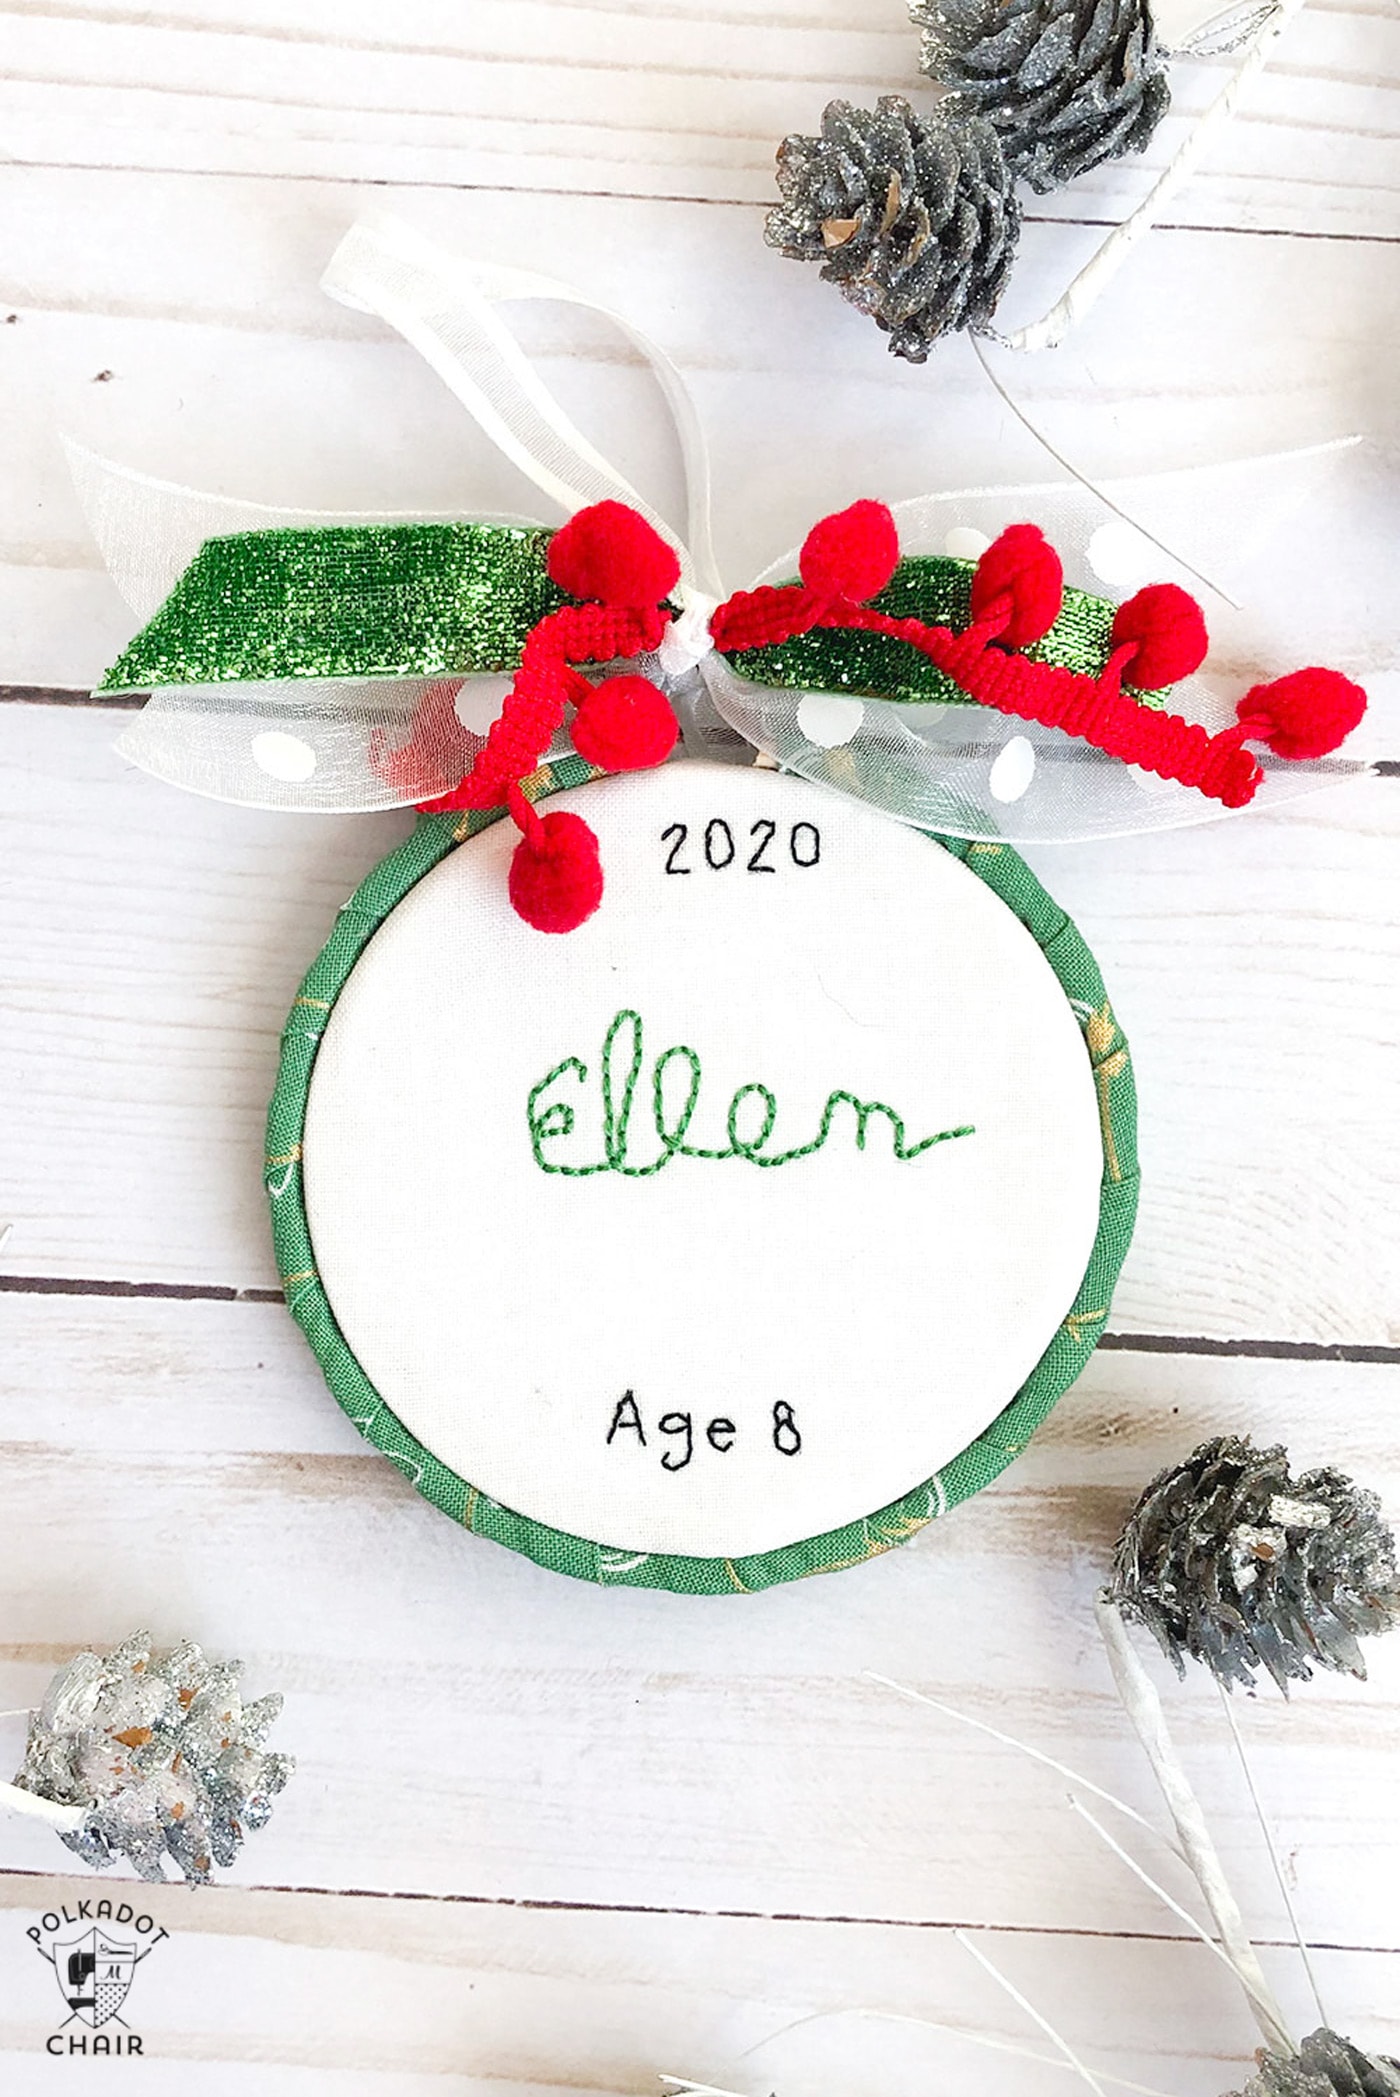
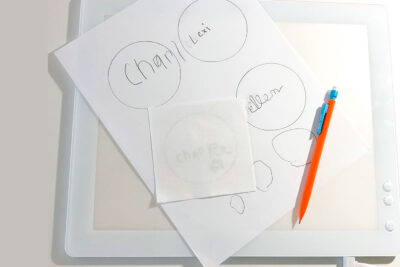
    • Trace the inside of the inner ring of your embroidery hoop.
      Have your child write their name inside the circle. You may need to have them do it a couple of times to get it the right size. If desired write the year and/or age underneath or in another place on the hoop.
      paper on a light box
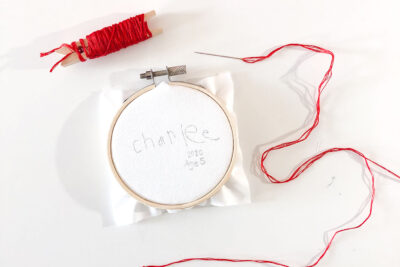
    • Cut your background fabric to a 4 ½” square, also cut your felt to the same size if you are using felt to back your stitching.
    • If needed trace your child’s handwriting with a black marker to make it easier to transfer to your fabric.
    • Center your fabric over the handwriting and transfer the image to the fabric.
      I find it easiest to do this with a light table, but you can use a bright window if you need more help seeing the handwriting through your background fabric.
    • Before placing fabric in the hoop, trace the outside of the hoop onto the back of your scrapbook paper and cut out. Set aside until hoop is stitched.

    Begin stitching:

    • Place your fabric on top of the felt square.
      Center the pattern in the hoop and tighten the set screw. Use three strands of floss in the color of your choice to embroider the name with a simple back stitch.
      With a single strand of floss in the color of your choice, embroider the year and age if you added it to your ornament.
      white fabric in embroidery hoop with red thread on a needle on white table

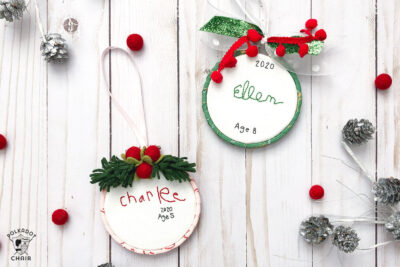
    Finish your ornaments:

    • You can wrap your hoop with fabric, paint it, or stain it if desired.
      Once your hoop is ready for finishing, place your embroidery back into the hoop. Be sure the stitching is centered and the set screw is at the top of the ornament.
    • Trim your felt so it is flush with the hoop- be careful not to cut into the background fabric. Next, trim the fabric to ½” from the hoop.
    • Attach the fabric to the inside of the inner hoop on the back using a thin line of hot glue. Cover the back of your ornament with the scrapbook paper circle you cut out earlier. Make sure to test the paper first to ensure it is the right size, trim if necessary before gluing into place.
    • Add a ribbon hanger and embellishments to hide the set screw if desired.
      hand embroidered christmas ornaments with childrens names on white wood table

    Notes

    These would make a treasured gift for a grandparent or a fun way to mark a big year, like Kindergarten.
    You could also use handwriting from grandparents or another loved one instead. The options are endless, but the meaning and the love will last a lifetime.
    PRINT
    Tried this tutorial?Let us know how it was!

    These would make a treasured gift for a grandparent or a fun way to mark a big year, like Kindergarten. You could also use handwriting from grandparents or another loved one instead.

    The options are endless, but the meaning and the love will last a lifetime.

    More Great Patterns by Amy

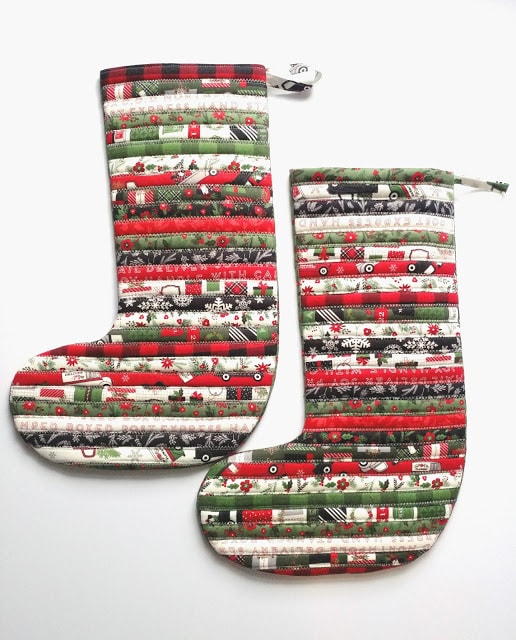
    Another project sure to be treasured would be a new set of stockings. This Jelly Roll stocking is one of my favorite projects.

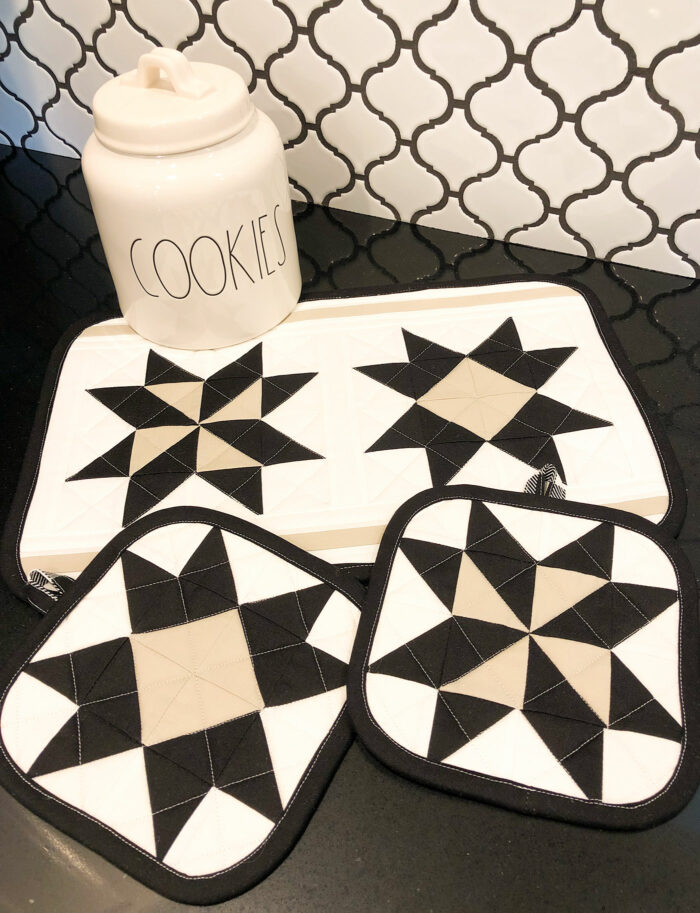
    And if you are looking for a fun gift idea, my hot pad and trivet set is sure to be loved and used for a long time.

    Happy Holiday Sewing! Amy

    About the Designer

    Amy Chappell Bio Photo

    Hi! My name is Amy Chappell and I blog over at Ameroonie Designs. I currently live in Wyoming with my husband and 6 kids. I love being a mom but needed an outlet that would give me something to do that stayed done, enter sewing and creating. Love the satisfaction of taking fabric and ideas and making something new. I also love that blogging has given me a way to meet new people and find a community of amazing people who love fabric and sewing as much as I do.
    xoxo,
    Amy
    Ameroonie Designs
    www.amerooniedesigns.com

    3 Free Christmas Hand Embroidery Patterns

    Hand Embroidered Merry Christmas Ornament Pattern

    Felt Gingerbread House Christmas Ornament Pattern

    Snowflake Snack Mat Pattern

    hand embroidered christmas ornaments with childrens names on white wood table

    More Projects You May Enjoy

    • girl throwing giant pillow outdoors
      DIY Giant Floor Pillow Pattern
    • two brightly colored pillows with jockey silk applique on gray chair
      DIY Derby Jockey Silks Pillows
    • collage image with minky fabric and baby blanket
      How to Sew with Minky Fabric: Easy Tips for a Beginner
    • pink patchwork pincushion on gingham paper with sewing notions
      Charming Patchwork Pincushion Tutorial

    • Share
    • Email

    About Author

    Melissa Mortenson

    Melissa Mortenson is a blogger, designer, and content creator. She is the Polka Dot Chair blog founder and has been sharing fresh and creative ideas with readers since 2008. She is the author of “Project Teen, Handmade Gifts your Teen will Actually Love.” Her work and designs have been featured on HuffPost, TODAY, Pioneer Woman, HGTV, BuzzFeed, Better Homes & Gardens, and many other established publications. Her first fabric line, “Derby Style,” debuted in January 2015 through Riley Blake Designs.  Additional fabric collections have followed it in subsequent years. A mom of 3, she considers herself lucky to be living in Kentucky.

    Reader Interactions

    Comments

    1. Anjanette says

      November 09, 2020 at 7:19 pm

      These are so cute! I love the embellishment on Charlee’s – did you make that?

      Reply
      • Melissa Mortenson says

        November 18, 2020 at 3:30 pm

        yes, she did. Amy’s a whiz with wool felt. There’s probably a tutorial on her blog.

        Reply
    2. K says

      November 27, 2021 at 9:05 am

      I love the way you provide printable instructions! What a great idea and help!

      Reply
    3. Darcie says

      December 10, 2022 at 2:00 pm

      Do you have a video tutorial of this?

      Reply

    Leave a Reply Cancel reply

    Your email address will not be published. Required fields are marked *

    This site uses Akismet to reduce spam. Learn how your comment data is processed.

    Primary Sidebar

    Hello! It’s nice to meet you.

    I’m Melissa. I like to design things, like fabric, printables, and projects.

    I’m also a Mom and a Maker. I am like most of you, just trying to do my best every day. Some days I succeed, many days I fail.  I find joy in creating, if you do too, then I hope that you find something here bring a little “happy” to your life.  Find out more about me here.

    COPYRIGHT POLICY

    All my images and text are copyrighted. You may NOT use any images from this site in any kind of Video (this includes YouTube). If you would like to feature my work, you may use ONE (1) NON-COLLAGED image and must “follow” link back to my original blog post. You may NOT edit, crop, or change my images in any way without written permission. You MAY NOT print out or copy and distribute any text, images or patterns from this site. All patterns, content, instructions, and templates are for personal use ONLY! Thank you! Violators will be reported.

    Footer

    ↑ back to top

    About

    • Privacy Policy
    • Disclaimers
    • About Melissa
    • Instagram
    • Facebook
    • YouTube
    • Pinterest

    Newsletter

    • Sign Up! for emails and updates

    Contact

    • Contact
    • FAQ
    • Press
    • Published Books
    • Fabric Collections

    Welcome to the Polka Dot Chair! Here you’ll find easy, step-by-step, sewing, quilting, and crafting projects. We design projects for Makers of all skill levels. Beginners are welcome!

    DISCLAIMER:

    While every effort has been made to ensure the accuracy of the content on this website, the information is made available without warranty of any kind. The Polka Dot Chair accepts no responsibility or liability, whether direct or indirect, as to the currency or accuracy of the information, nor any consequence of its uses. This website is not intended to substitute the advice of a professional.

    Copyright © 2022 Polka Dot Chair

    [ Placeholder content for popup link ] WordPress Download Manager - Best Download Management Plugin