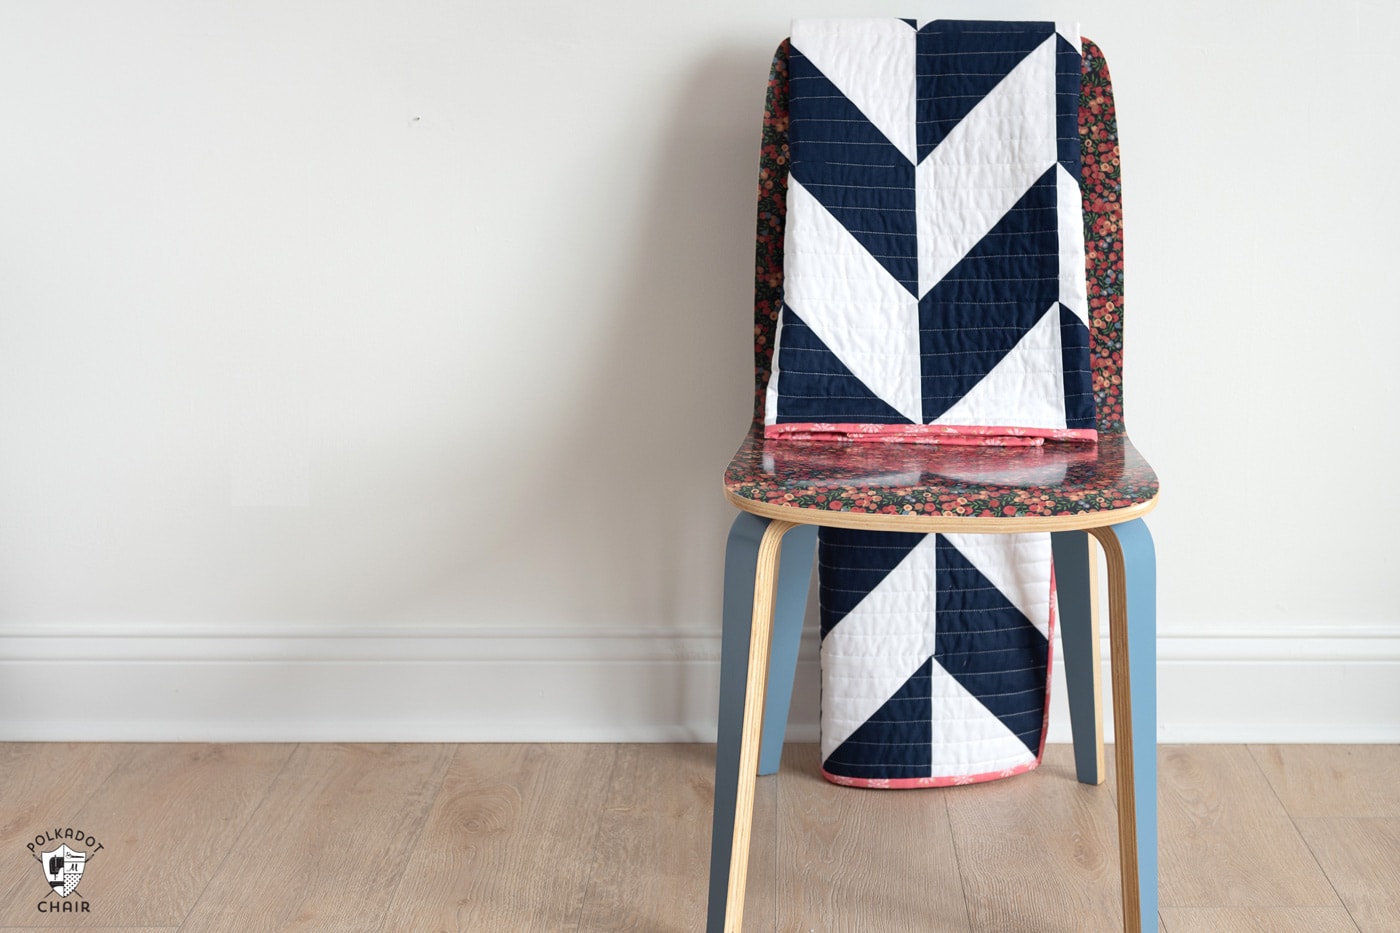
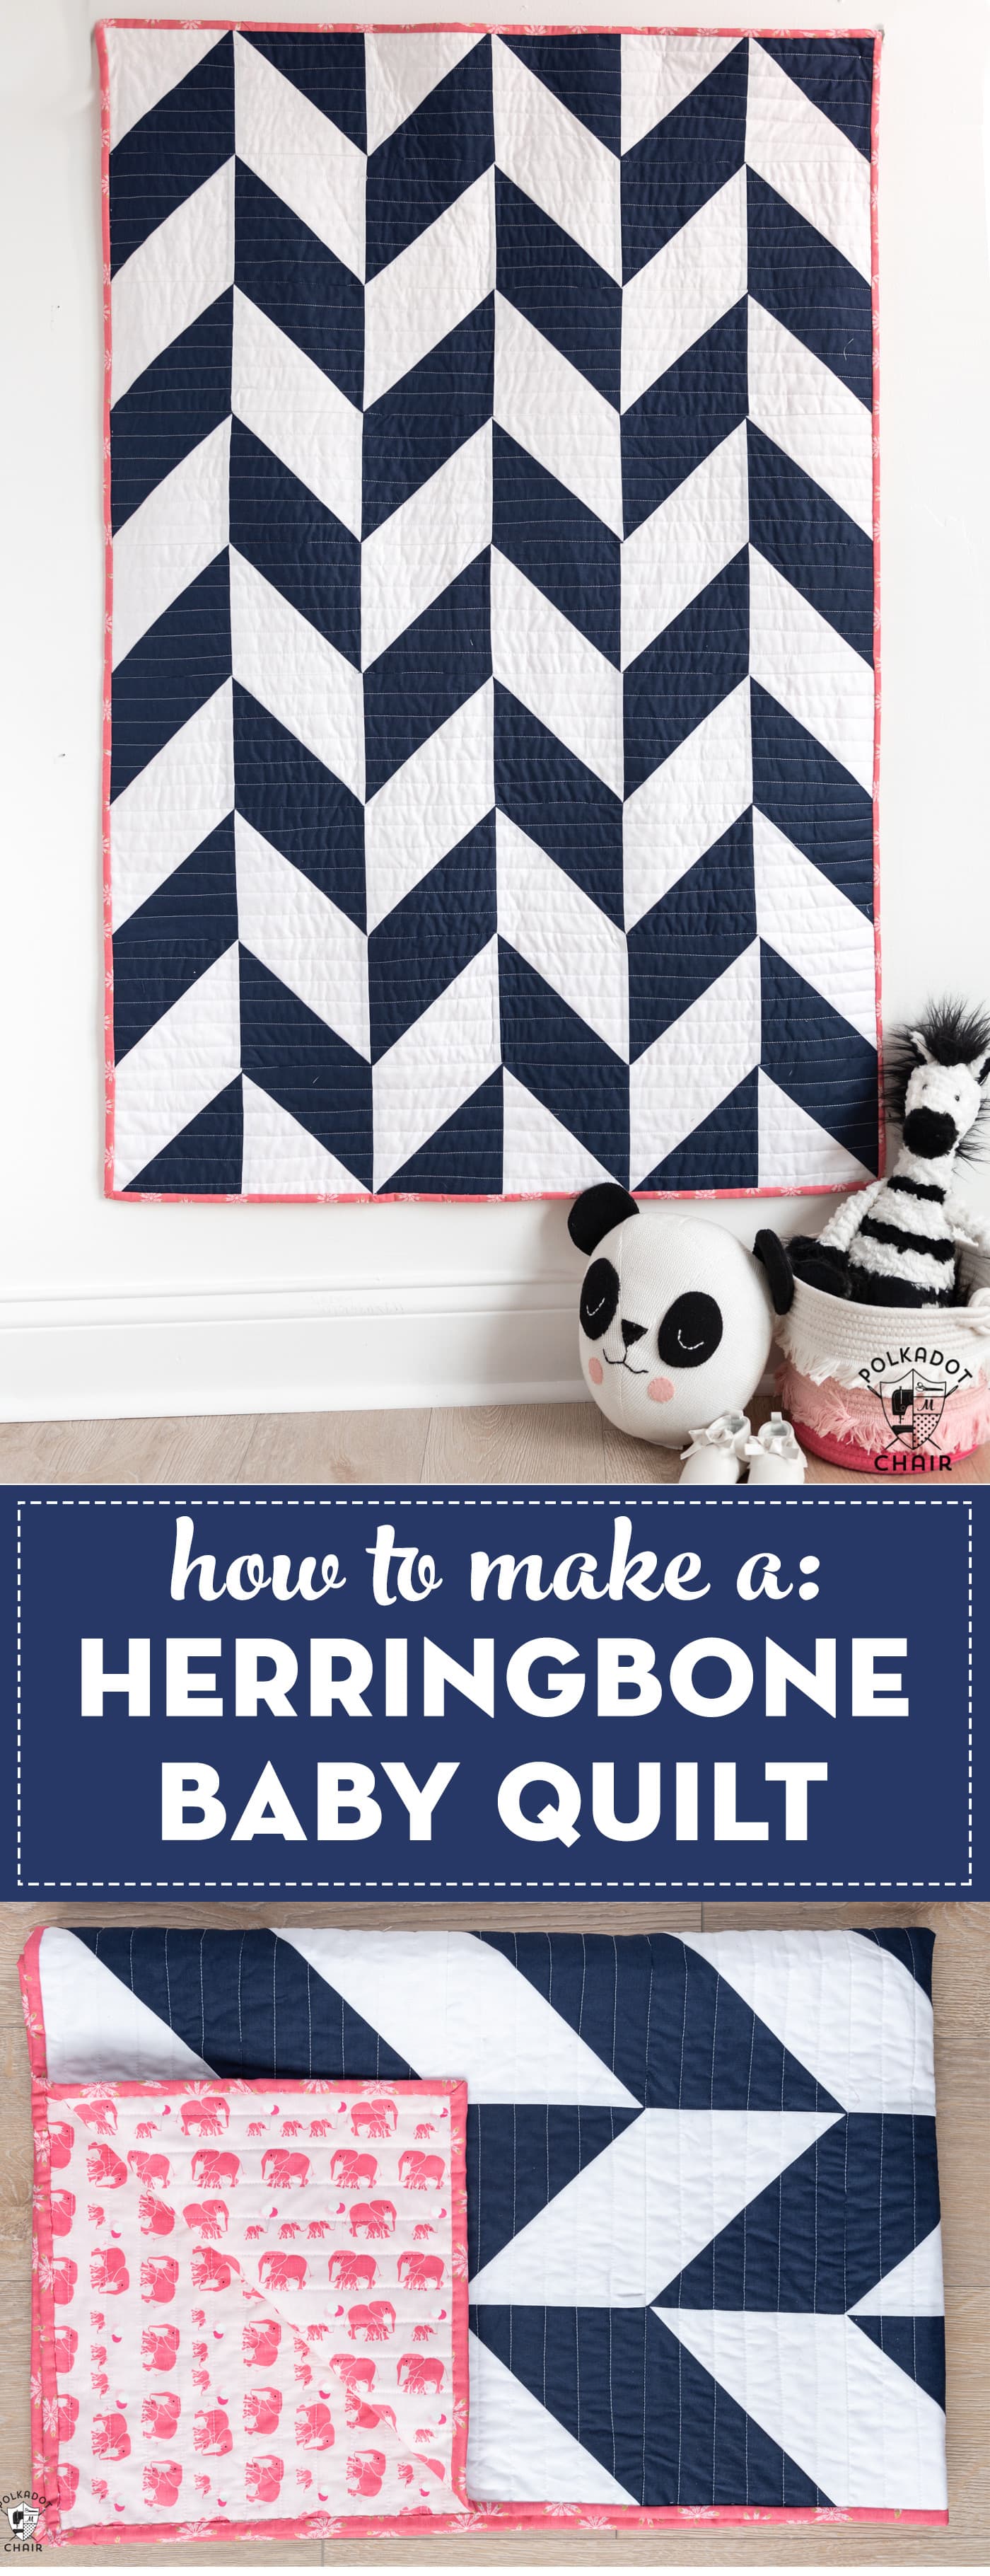
Herringbone Baby Quilt Pattern using 8 at a time HST Method
Learn how to make a simple modern baby quilt. This Herringbone baby quilt pattern features a quick-to-piece 8-at-time half-square triangle method.

Last year, we added a new baby to our extended family! My brother and his wife had a baby girl. As soon as I found out my sister-in-law was expecting, I started bugging them about baby quilt designs. Of course, I’m making a quilt for that new baby!
We kept returning to a simple herringbone pattern while talking to my brother about what he liked regarding quilting designs and colors. I was up for making something more intricate, but my brother and his wife have a simple modern style, and the herringbone pattern seemed to blend into their nursery design perfectly.
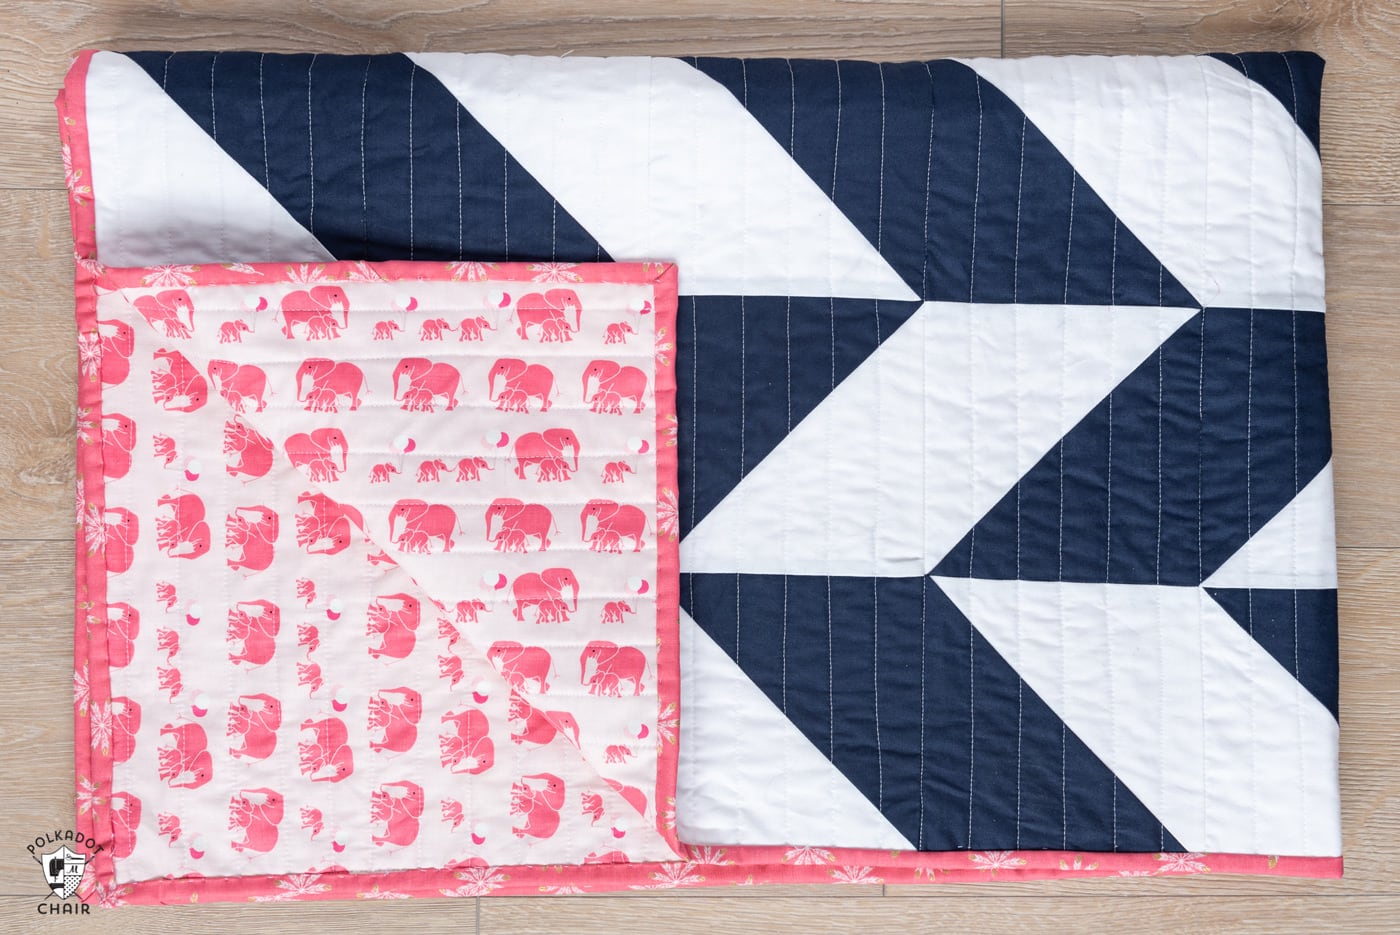
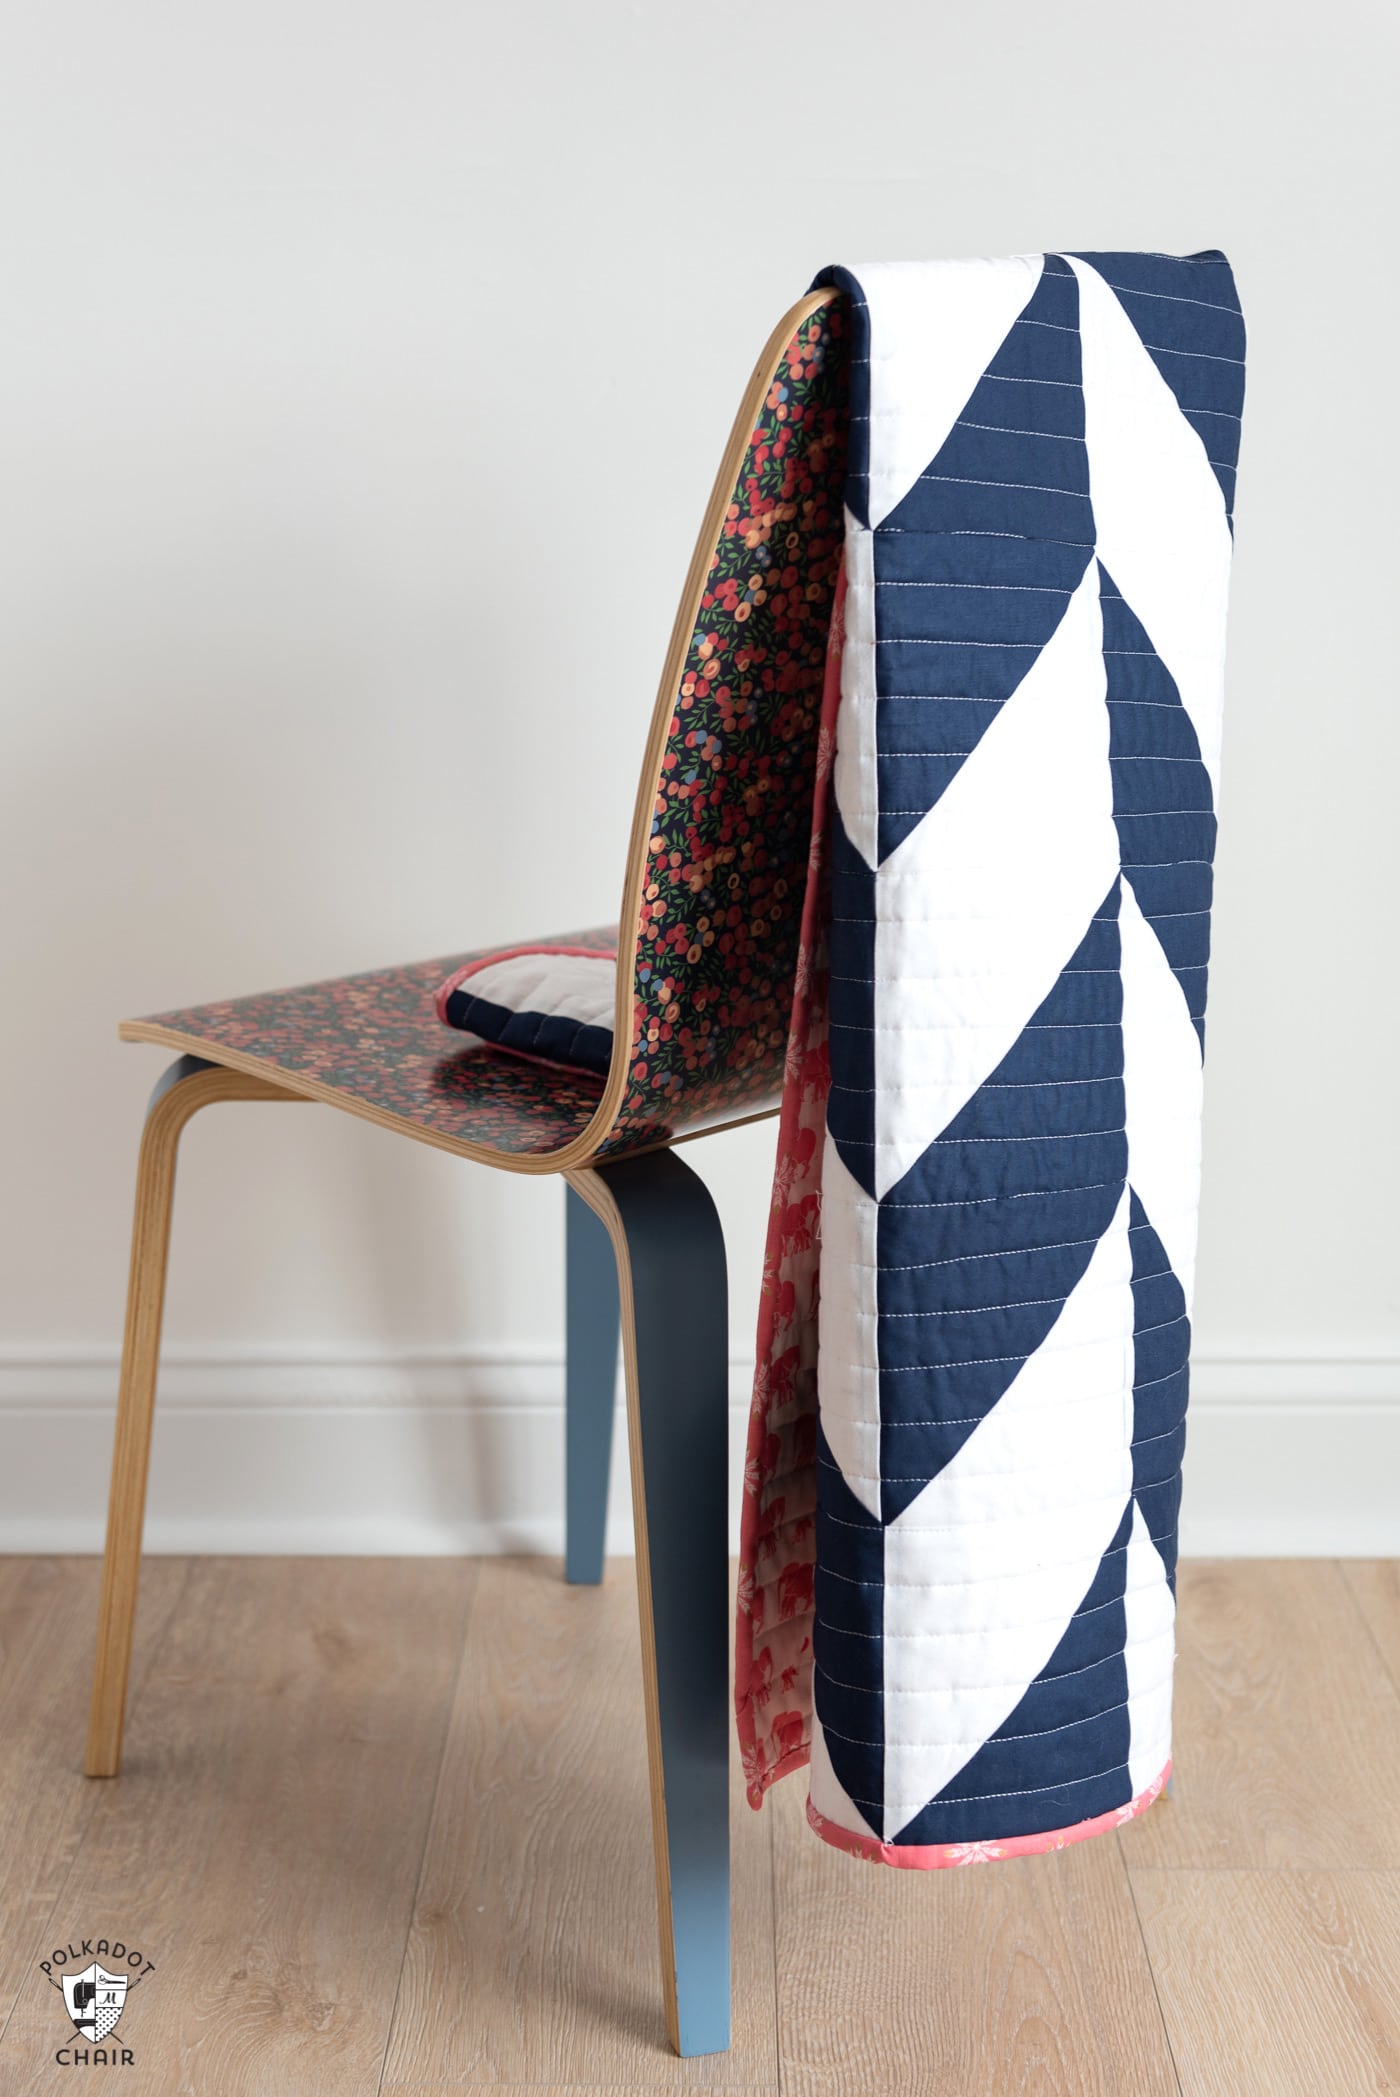
We settled on using solid fabrics for the front of the quilt, and then he asked me if I had any elephant fabric for the back.
I had to laugh because, YES, I have elephant fabric. My Safari Party fabric line had a print with rows of mama and baby elephants. I was so excited that I could use the print in the quilt.
Quilt Pattern Details

Before I share the tutorial, know I did not “invent” a herringbone quilt pattern. It’s been around for AGES. I’m not claiming that I invented it. I’m sharing how I made this quilt if you want to make one yourself.
Block Details: For this quilt, you need 54 Half-Square Triangles (HST). I will show you how to make 8 HSTs at a time, saving you LOADS of time while making this baby quilt.
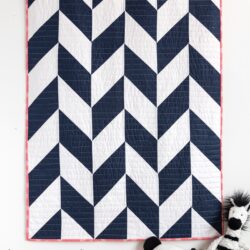
Baby Quilt Dimensions: 36″ x 54″
Finished Block Size: The Half Square Triangles in this quilt are 6″ x 6″ finished (which means they are 6 1/2″ x 6 1/2″ before they are sewn into the quilt). You can make the quilt bigger by making more blocks; you’ll have to do some math.
Easy Herringbone Baby Quilt Pattern
Equipment
- 6 1/2″ x 6 1/2″ Bloc-Loc Ruler Recommended
supplies
- 1 3/4 Yards Main Fabric (Fabric A) I used Riley Blake solid in Riley Navy
- 1 3/4 Yards Background Fabric (Fabric B) I used Riley Blake solid in Riley White
- 1 3/4 Yards Backing fabric Pink Elephant from Safari Party Fabrics line – out of print
- 3/8 Yard Binding fabric
- 40" x 60" piece Quilt batting I use 100% cotton
Instructions
- Baby Quilt Dimensions: 36" x 54"
Cutting Directions:
- 7 pieces from Fabric A: 13 3/4" x 13 3/4"
- 7 pieces from Fabric B: 13 3/4" x 13 3/4"
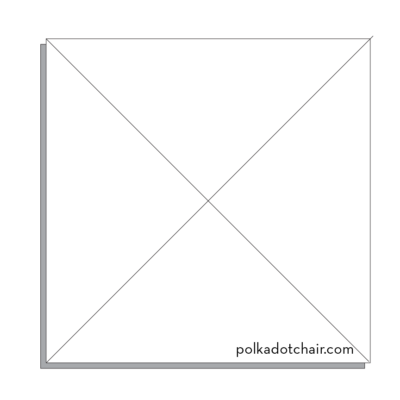
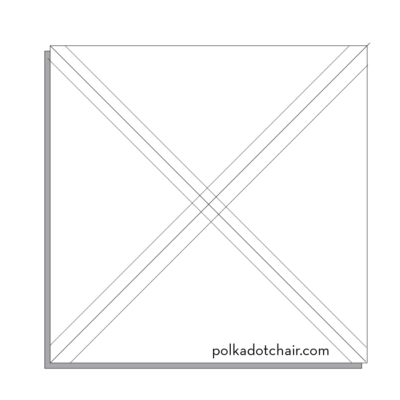
Step One: Mark the Fabric
- Draw an X diagonally on the wrong side of all of the lightest pieces of fabric.

Step Two: Pin
- Pin one marked fabric square with one square from a 2nd fabric, right sides facing.
Step Three: Sew
- Ensure you know the 1/4″ seam mark on your sewing machine foot. For these steps, stitching exactly 1/4″ on each side of the line is essential.
- Stitch 1/4″ on each side of the line you drew in both directions.
Step Four: Cut
- You are now ready to cut your square into eight smaller pieces. Using your rotary cutter and quilt ruler, make four cuts.
- First, cut a line horizontally across your block precisely in the center. Next, make a vertical cut also in the center.
- The last cuts are made diagonally along the line you drew in step one.
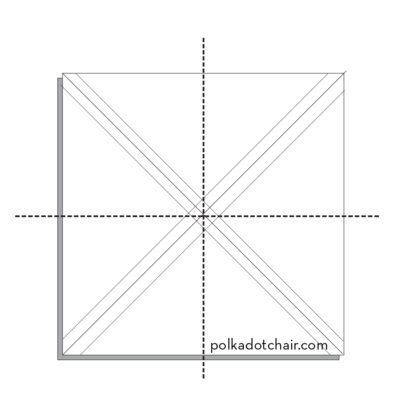
Step Five: Press & Trim
- You should now have eight pieces of fabric. Open up the HSTs and press the seam towards the darker fabric.
- Trim up each sewn HST to 6 1/2″ x 6 1/2″. I like to use a Bloc-Loc ruler to trim and square up my HSTs.

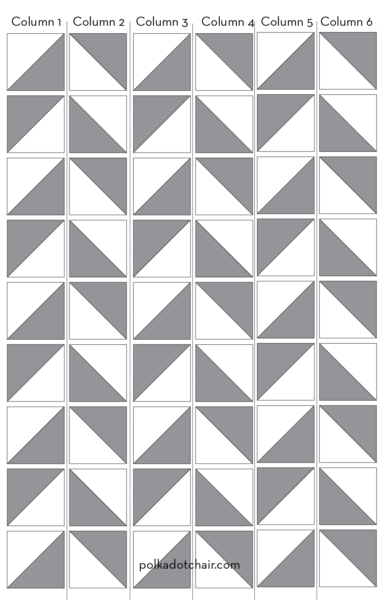
How to Assemble the Quilt Top:
- There are dozens of ways to stitch half-square triangles together to create patterns in quilts. You can create chevrons, triangles, stars, pinwheels, and many other patterns. The herringbone pattern created in this quilt is made by arranging the triangles in such a way as to create a herringbone pattern.

- Usually, I like to stitch my quilts together in rows; for this quilt, I think it’s easier to sew them together by column.
- Follow the diagram below to arrange the HSTs in the quilt. There are 9 HSTs in each column of the quilt.
- After you’ve sewn 6 columns of HSTs together, you will stitch the columns to each other. Again, follow the diagram directions.
- Quilt and bind as desired. I just quilted straight lines 1″ apart using my BERNINA and walking foot to quilt my quilt.
So many cute baby quilts can be made using just Half Square Triangles. If you like this pattern, you may love this baby quilt pattern with six different layout options.
More Free Baby Quilt Patterns:
Would you be able to adjust to any size block just double and add 3-1/4″ seams? If I wanted 5″ blocks I could do 10.75″ squares similar to your above guidance?
Making this quilt now! Maybe it’s my math but the 13.75” big square size seems a smidge too small to use 1/4” seam spacing and be left with 6 1/2”… 13.75/2 = 6 7/8…. Subtract 1/4 * 2 for the amount you lose to the seam on each triangle half: 6 7/8 – 1/4 – 1/4 = 6 3/8”. That leaves you about 1/8” short of being able to make the 6 1/2” HST size, and that’s if everything is perfect. I had to tighten up my seams to 1/8” once I realized this. Am I thinking of this wrong or should be big squares be at least 13 7/8, or 14 for some wiggle room/imperfection?
You don’t subtract 1/2″ from the measurement, I think that’s where your math is off. Think of it as creating individual blocks. 13.75 x 2 = 6.875 minus the 1/4″ seam = 6.625 leaving you enough fabric to trim and square up to 6 1/2″ as noted in the pattern. The pieces are 6 1/2″ before finishing, and are 6″ FINISHED blocks. The 6″ is after they are sewn into the quilt.
But there is no harm in cutting your first squares 14″ if you prefer that method.
Hi Melissa. Just adore your Herringbone Baby Quilt. My daughter saw this and has asked me to make her one (she is a baby no longer but a full grown adult). Could you please tell me what measurements and size I would need to make for a King Size quilt if you could please.
I love this tutorial! Thank you for such awesome instructions! I am new to quilting and have made a quilt for 3 of my granddaughters, each one I’ve tried a new skill. This pattern will be perfect for a quilt for one of my grandsons! I already have the fabric picked out!
Is it me or does the fabric seam off.
If I’m am to cut 7-13.75” that’s 3 per width of the fabric, so that’s 3 cuts or 41.25” or 1 1/4 yds.
I haven’t made it just yet, but bought supplies and now I’m kinda messed up and ver bought fabric…arg.
If you notice, the pattern says “assuming 40″ of useable fabric width”. Not all fabric purchased has 42 useable inches. Some have very large selvage edges. In that case you would only be able to get 2 squares per cut.
Such a cute and fun pattern to make. Can you tell the width of your binding strip?
2 1/2″
Love it!! I bought my fabric tonight and plan to follow your instructions. Thanks for posting this!!
Hi- I’m new to quilting and decided to start so that I could make a blanket for my soon to be niece. I have a gifting etiquette question, should you wash the quilt before gifting? Since this is for a baby I have a strong inclination to wash first to get rid of all the starch and spray basting but on the other hand I love how crisp it looks and worry it won’t look fresh and new if washed (totally superficial reason!). Do you ever attempt to press a quilt after washing or do you embrace this cozier aspect of a quilt and let the crinkles reign supreme?
It’s totally up to you and there is not really a right answer. I don’t wash mine, unless I feel like it got excessively handled or my machine quilting looks bad and a good wash and dry will make it nice and crinkly! If you do wash it, just included a note “washed and ready for use”. I’d also use a baby-friendly detergent like Dreft.
Thank you for the tutorial. It was simple to follow and my quilt turned out beautiful.
Beautiful and easy to understand. Thank you. I want to try this for a basinet with the scraps I used to make sheets.
What was the purpose of this post if you’re not giving specifics? I don’t know what to do after the 13.75 cuts and you’re not giving specifics because you don’t want questions? Sheesh
The specifics are listed. Just keep scrolling down, you stopped reading the blog post too soon.
What size do you cut the blocks to get 8 HST that’s are finished 6 inches.
Will this be horribly off if I measure and hand cut these out without the rulers/cutting mats? I’m a perfectionist and while I’d love to have all that, it’ll be awhile before I’m able to get those so I’m trying to get over the “it has to be perfectly square” unless it actually needs to be perfectly square lol
Thanks for this post! I’ve always wanted to make this, and you’ve given me just the nudge I needed!
So simple and yet oh so pretty! Thanks for the tutorial! Does this way of making HSTs produce all on the bias, like when you sew around the edges of the squares to make 4 at a time?
The diagonal edge is on the bias… but not the sides.