• Skip to primary navigation
  • Skip to main content
  • Skip to primary sidebar

The Polka Dot Chair logo

  • SEWING
    • Free Sewing Patterns
    • Bag Patterns
    • Costumes
    • Apparel
    • Learn to Sew
    • Beginner Friendly
    • Embroidery Projects
    • Tips & Techniques
    • All Sewing
  • QUILTING
    • Quilt Blocks
    • Learn to Quilt
    • Free Patterns
    • Quilt Patterns
    • All Quilting
  • CRAFTS
    • Disney
    • Cricut
    • Printables
    • All Crafts
  • HOLIDAYS
    • Seasonal Projects
    • Valentine’s Day
    • Easter
    • 4th of July
    • Halloween
    • Thanksgiving
    • Christmas
    • All Holidays
  • TUTORIALS
  • ABOUT
    • About Me
    • My Fabric Collections
    • Published Books
    • Press
    • FAQ’s
    • Contact
  • SUBSCRIBE
  • SHOP
menu icon
go to homepage
  • SHOP
  • TUTORIALS
  • SEWING
  • QUILTING
  • SUBSCRIBE
  • CRAFTS
  • HOLIDAY PROJECTS
  • ABOUT
    • Published Books
    • My Fabric Collections
  • CONTACT
    • Facebook
    • Instagram
    • YouTube
  • subscribe
    search icon
    Homepage link
    • SHOP
    • TUTORIALS
    • SEWING
    • QUILTING
    • SUBSCRIBE
    • CRAFTS
    • HOLIDAY PROJECTS
    • ABOUT
      • Published Books
      • My Fabric Collections
    • CONTACT
    • Facebook
    • Instagram
    • YouTube
  • ×

    Home » Quilts

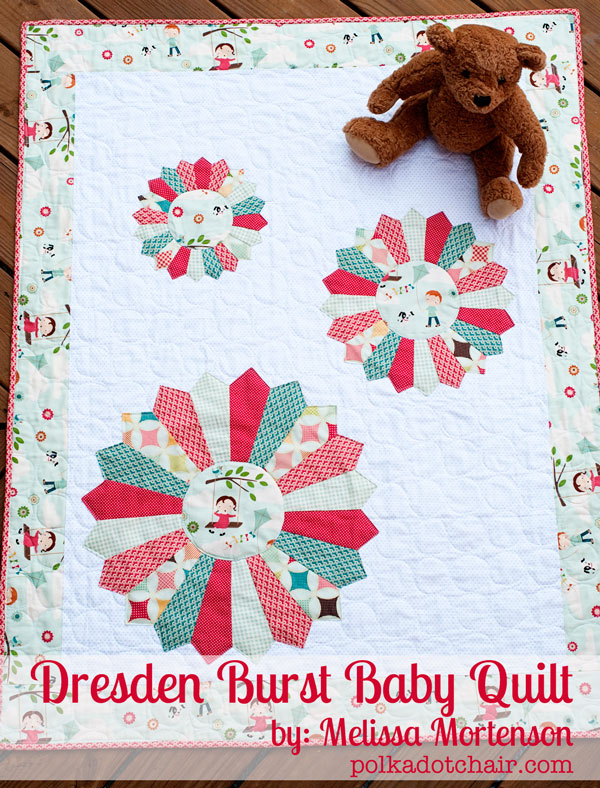
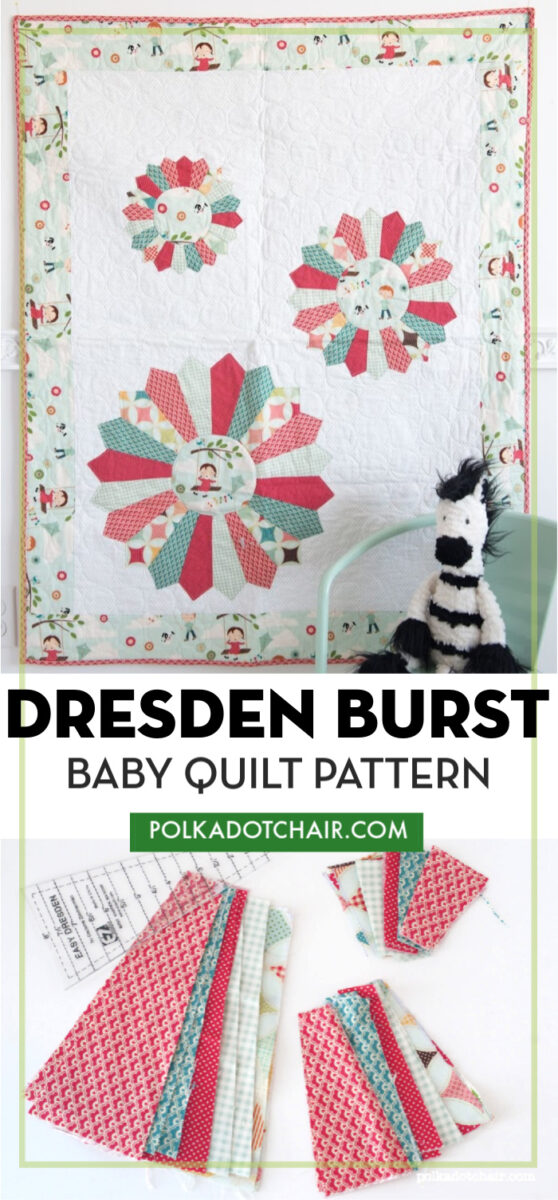
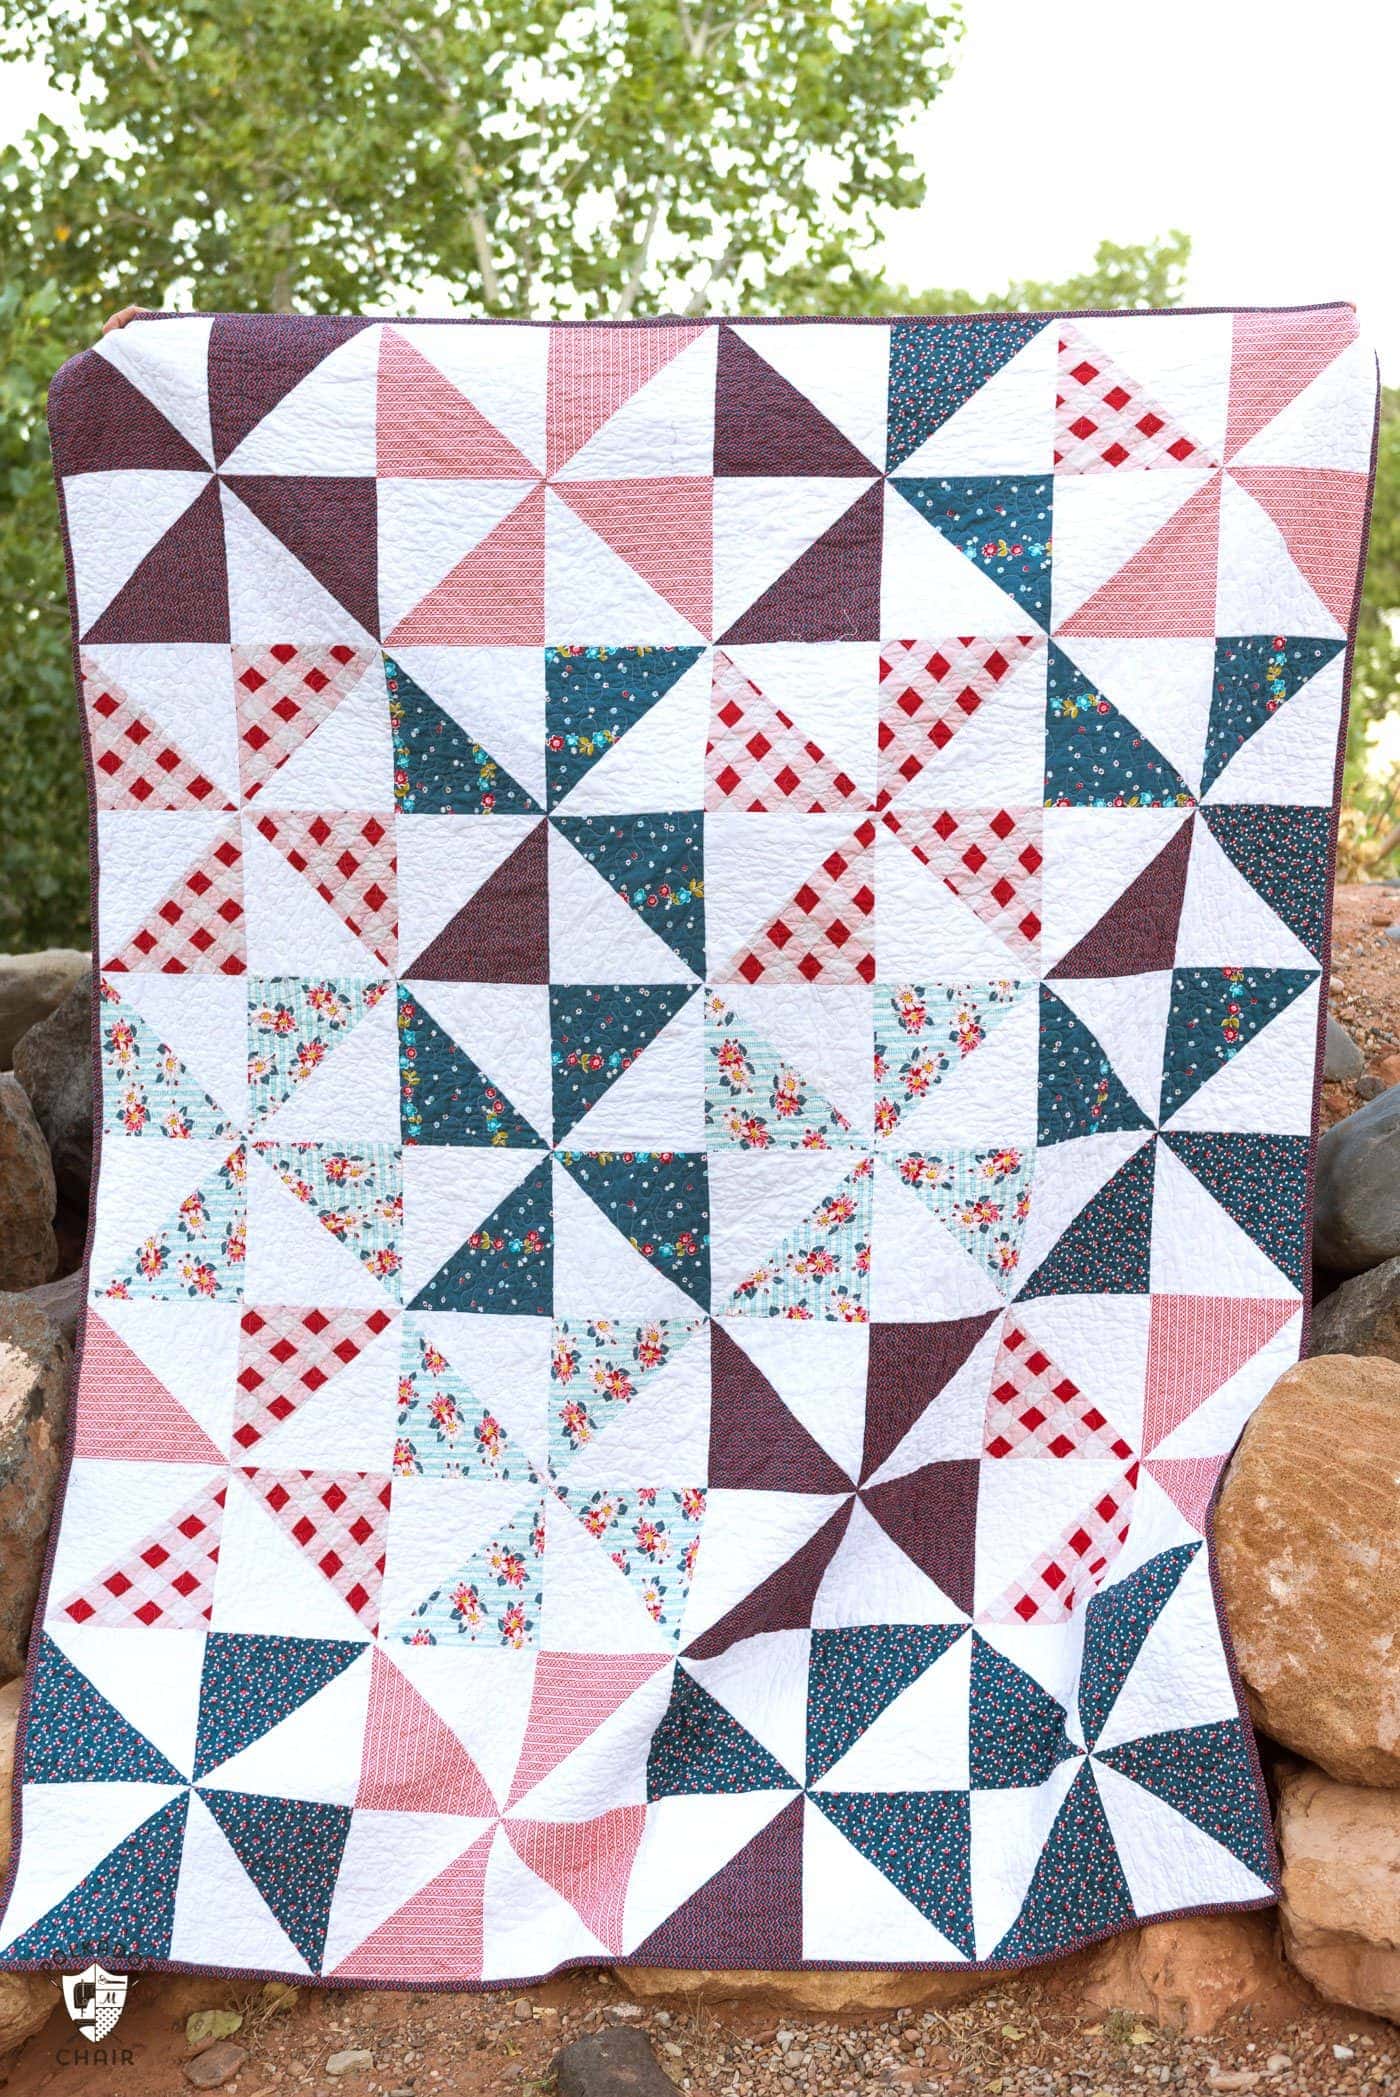
    Dresden Burst Baby Quilt Tutorial

    Updated: Oct 7, 2020 by Melissa Mortenson · This post may contain affiliate links · This blog generates income via ads · 34 Comments

    I hope that you’ll enjoy this simple Dresden Block Baby Quilt tutorial that I’m calling “a Dresden Burst!”.  If you like this post you may also like this Turnstile Baby Quilt Tutorial. 

    Free tutorial for a Dresden Baby Quilt, so cute and simple!

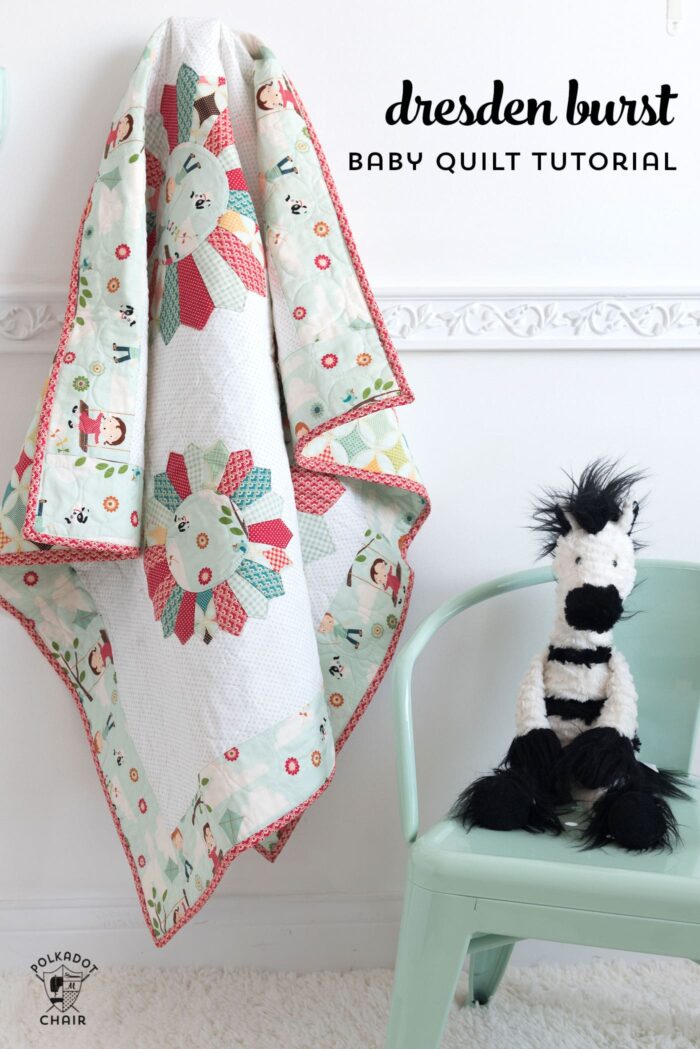
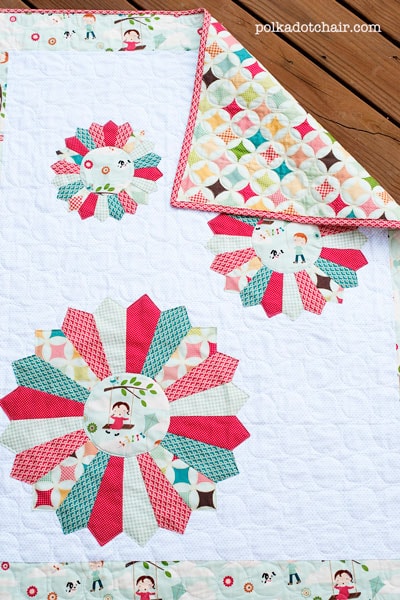
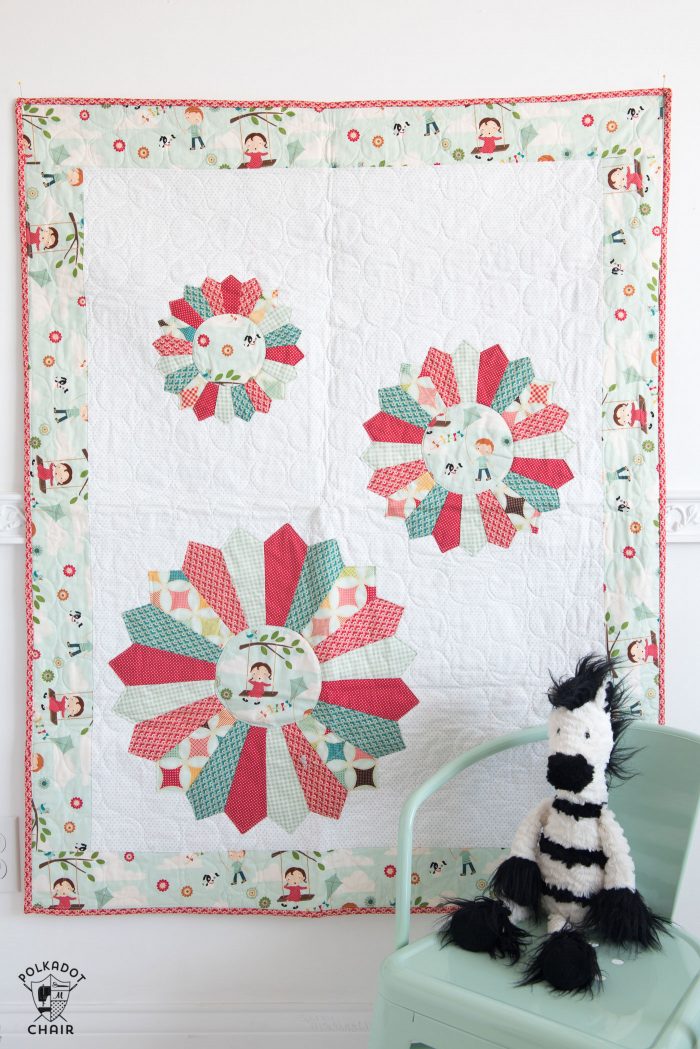
    For this month’s free tutorial, I am going to show you how to make a baby quilt from Dresden Quilt Blocks.  I love Dresden Blocks but didn’t want to make an entire quilt of them.   Instead, I scattered 3 sizes of them on the front of a quilt.

    Table of Contents
    • How to Get the Pattern
    • How to Make a Baby Quilt with Dresden Blocks
    • Supplies for Dresden Baby Quilt:
    • Instructions

    How to Get the Pattern

    Option 1:

    You can now purchase this tutorial in PRINTABLE PDF version, with 2 of our most popular Baby Quilt Patterns!

    JUST CLICK HERE to purchase in our SHOP!

    Option 2: Read the Directions off of this page

    How to Make a Baby Quilt with Dresden Blocks

    What to make one?

    Free tutorial for a Dresden Baby Quilt, so cute and simple!
    Free tutorial for a Dresden Baby Quilt, so cute and simple!

    Supplies for Dresden Baby Quilt:

    All fabric is from Go Fly a Kite line from Riley Blake Fabrics. The white fabric with gray dots used for the background is from the Willow line, also from Riley Blake Fabrics. Both fabrics are now out of print. I recommend picking a fabric line that has a “featured image” that you can fussy cut for the center of the dresden blocks. You can also use a simple swiss dot for the background fabric.

    • ½ yard each of 5 different fabrics to make the Dresden blades
    • ¼ yard fabric (may need more for pattern matching) for the centers of the Dresden Blocks
    • 1 ½ yards fabric for the quilt back
    • ½ yard for binding
    • ½ yard for borders
    • 1 yard white with gray dots (or light color) for quilt front
    • Easy Dresden Ruler
    • 1 ½ yards cotton batting
    • Spray Starch
    • Spray Basting

    All seam allowances are ¼″

    Instructions

    Step One: Create your Dresden Blocks

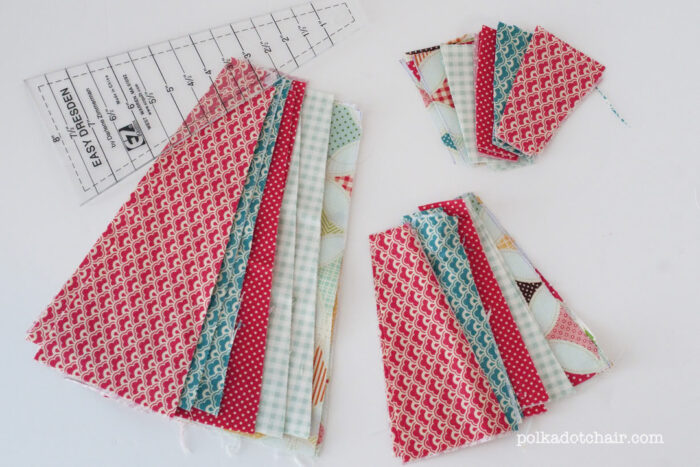
    You will need 20 pieces to complete each Dresden block.

    I used 5 different fabrics and cut 4 pieces from each of the 5 fabrics.

    You will need to cut: (using the easy Dresden ruler)

    20 Dresden pieces 8″ tall, 20 Dresden pieces 5″ tall and 20 Dresden pieces 3″ tall.

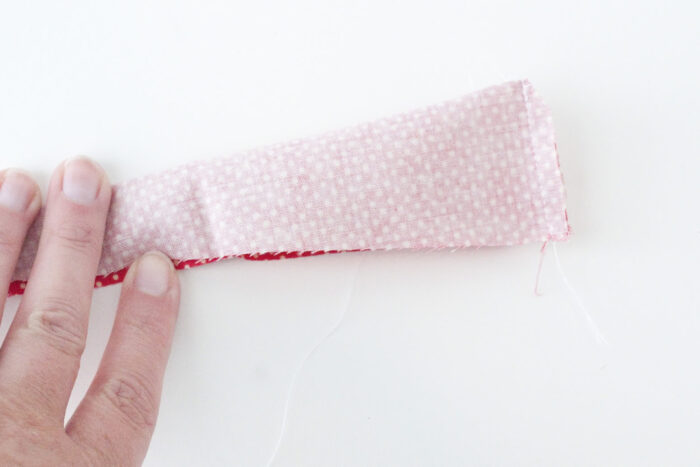
    To begin making your Dresden block, fold your cut piece in half lengthwise.  Stitch a ¼″ seam along the wider edge.

    Trim the seam allowance at the corner and turn right side out.

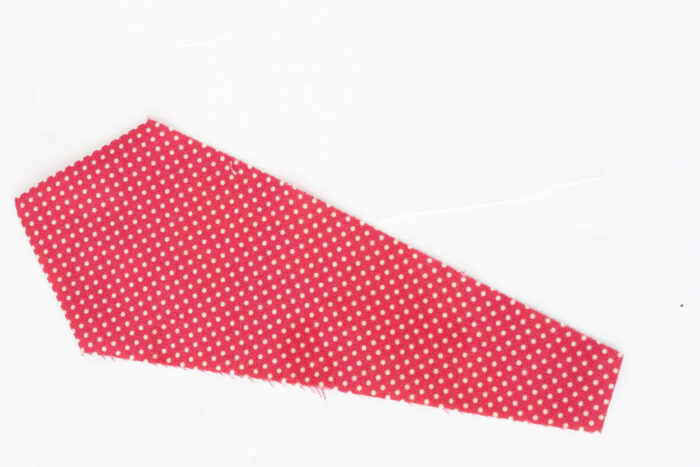
    You will have a piece that looks like this.  Starch lightly and press. Repeat until all 20 are sewn.

    How To Make the Dresden Plate:

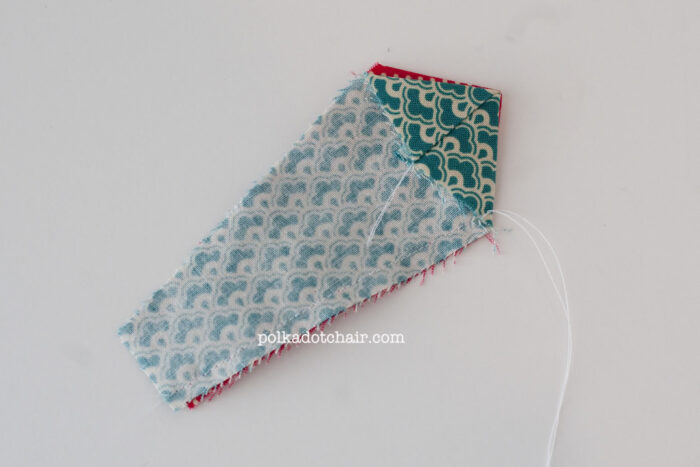
    Pin 2 of your sewn Dresden pieces together.  Stitch along one side.

    Repeat until all 20 Dresden pieces are sewn together.

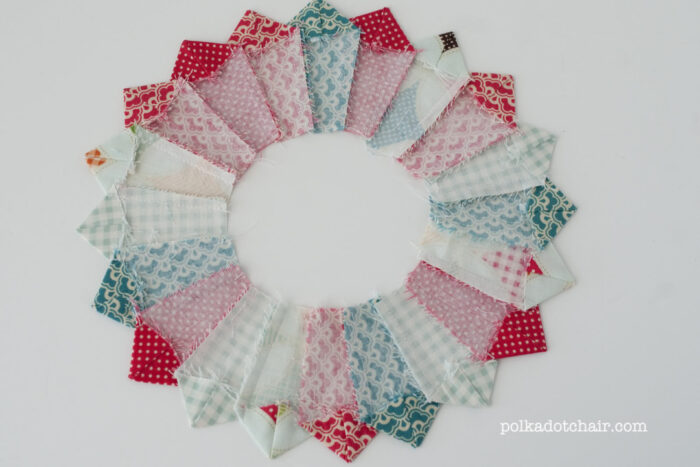
    Press all seams to one side.

    Repeat these steps with your other 2 sizes of Dresden’s, so that when you are done you have 3 different sizes of dresden blocks.

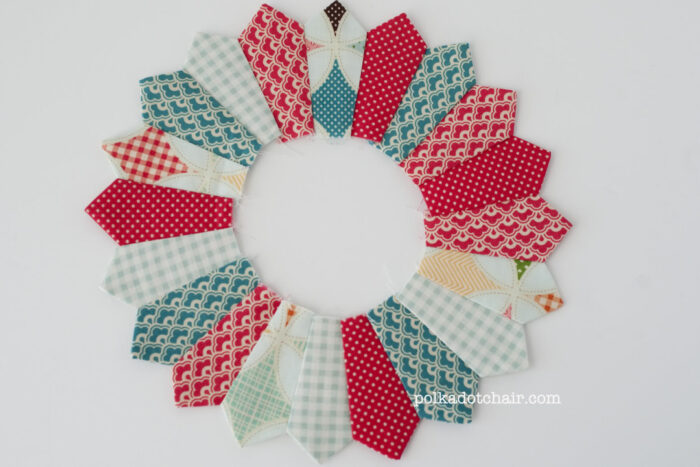
    Set aside all 3 pieces.

    Step Two: Prepare the Quilt Top.

    Cut your background fabric (the white with gray dots) to 30″ x 40″.

    Cut 4 strips from your border fabric each 4″ wide by the width of the fabric. (so 4″ x 44″)

    Stitch two 4″ border strips to the 40″ sides of your background fabric.  Press seams to one side and trim edges flush with the background fabric.

    Stitch remaining two 4″ border strips to the 30″ sides of your background fabric. Press seams to one side. Trim.

    Step Three: Attach Dresden Blocks to Quilt.

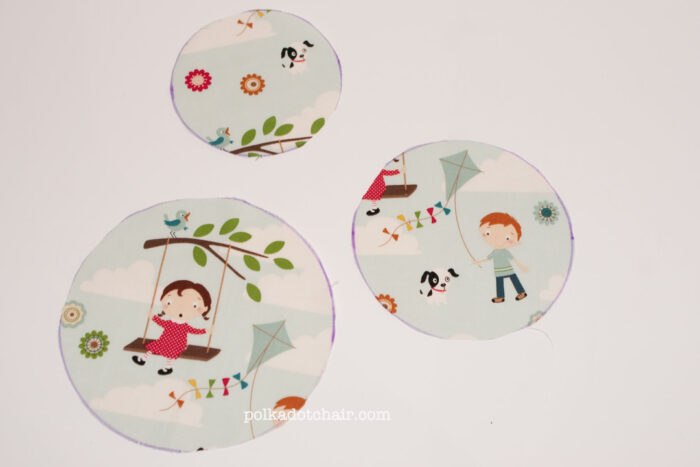
    Cut 3 circles from the fabric you wish to use for the center of your Dresden blocks. I chose to fussy cut each one.

    One circle 3 ¼″ in diameter, one circle 4 ¼″ in diameter and one circle 5 ¼″ in diameter.

    Place the circle, right side down onto a scrap of white fabric.
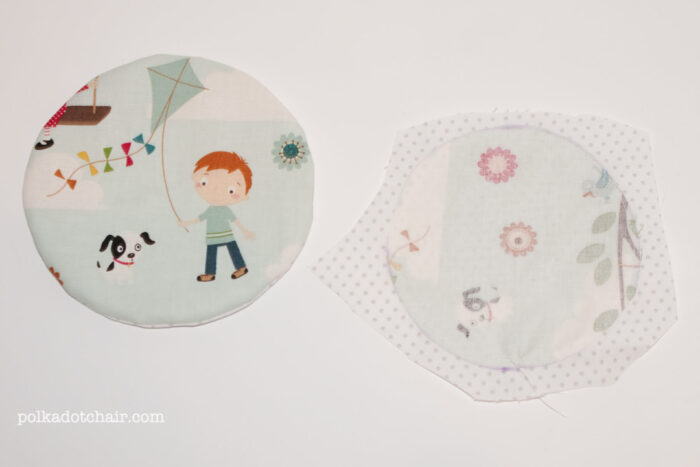
    Stitch around the entire circle with ¼″ seam (don’t leave an opening).  Trim your white fabric and clip the seams around the circle.

    Cut a slit in the white fabric and turn the circle right side out.  Press well. Set aside.

    Now place the dresdens on your quilt top as you like.  I scattered mine.  Use some spray basting to hold the dresdens in place and LOTS of pins.  Stitch the Dresden to the quilt along the outside edge.  Stitch as close to the edge as possible.

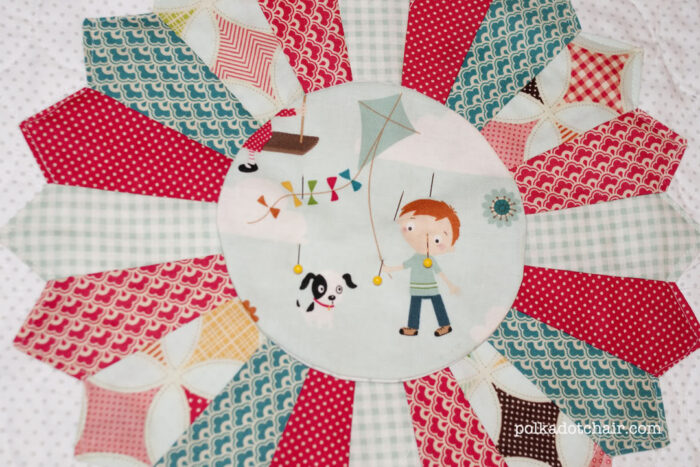
    After you have stitched all 3 dresdens to the front of your quilt, pin your prepared circles to your blocks.  

    The 3″ (after sewn) circle goes on the 3″ tall dresden block, the 4″ circle goes on the 5″ tall dresden block and the 4″ circle goes on the 8″ tall dresden block.

    Stitch each circle in place, I used an appliqué stitch around the circles to give it a more finished look.

    Step Four:  Quilt

    Make a “quilt sandwich” with your prepared quilt top, quilt batting and quilt backing (you do not need to cut it, just leave it as 1 ½ yards).

    Baste well and machine quilt as desired.

    I chose to machine quilt circles onto my quilt, using my backing fabric as a guide.

    There are TWO ways to quilt this. One is all over pattern quilting. You can also custom free motion quilt it. Alternatively, you can FIRST quilt the quilt then AFTER applique the Dresden blocks on to the quilt. That way the free motion quilting will not show in the blocks. However, there may not be enough quilting on the blocks to hold the fabric in place properly after it is washed.

    I quilted the same pattern right over the top of the dresden blocks. If I didn’t I would need to custom free motion quilt the top. I am not skilled enough to do that so I just did an all-over pattern.

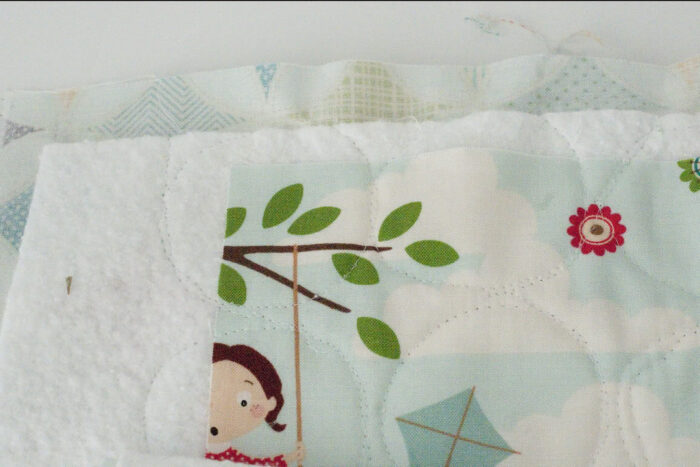
    Complete your machine quilting and trim all layers even.

    Finishing: Binding the Quilt

    Cut your binding strips to 2 ½″ and bind as desired.

    Dresen Burst Baby Quilt Tutorial

    If you liked this project, you may also like these quilt patterns:

    Derby Prize Ribbons Quilt Pattern!

    Giant Star Baby Quilt Pattern

    Rail Fence Baby Quilt Pattern – Beginner Friendly

    25+ Free Baby Quilt Patterns

    More Projects You May Enjoy

    • Thread Weights Used In Machine Quilting Explained
    • English Bloom Mug Rug; an EPP Project
    • Color Combination Ideas for your Next Quilt or Sewing Project
    • 15+ Quilted Table Runner Patterns Perfect for Spring

    • Share
    • Email

    About Author

    Melissa Mortenson

    Melissa Mortenson is a blogger, designer, and content creator. She is the Polka Dot Chair blog founder and has been sharing fresh and creative ideas with readers since 2008. She is the author of “Project Teen, Handmade Gifts your Teen will Actually Love.” Her work and designs have been featured on HuffPost, TODAY, Pioneer Woman, HGTV, BuzzFeed, Better Homes & Gardens, and many other established publications. Her first fabric line, “Derby Style,” debuted in January 2015 through Riley Blake Designs.  Additional fabric collections have followed it in subsequent years. A mom of 3, she considers herself lucky to be living in Kentucky.

    Reader Interactions

    Comments

    1. Jessica Abbott says

      August 06, 2012 at 8:32 am

      Oh how cute this is! What a great tutorial! This quilt would be loved and cherished forever!

      I hope you will consider adding a photo of this into SewSet, a new on-line sewing pattern & tutorial directory. I would love for others to be able to find this and you as they search!

      Thank you so much for sharing!
      – Jessica, SewSet.com

      Reply
    2. VickiT says

      August 07, 2012 at 3:36 pm

      I absolutely LOVE! LOVE LOVE this quilt. Thank you for the awesome tutorial. I only wish I had such adorable fabrics to make one right now. I have the baby that needs one (my almost 6 month old Granddaughter) but not the cute fabrics. darn.

      Reply
    3. Fiona says

      August 24, 2012 at 5:58 am

      This is gorgeous. What is the backing fabric? It ties everything together beautifully.

      Reply
      • melissa says

        August 27, 2012 at 9:22 pm

        Thanks!
        The backing fabric is also from the Go Fly a Kite fabric line from Riley Blake

        Reply
    4. Robyn says

      September 17, 2012 at 11:38 pm

      Great quilt, I am very keen to make it, but tutorial doesn’t show how to make the point on the dresdan plate. Can you please show this is more detail. Thanks

      Reply
      • Dora says

        September 19, 2012 at 1:19 pm

        Robyn, when you fold the “plate” in half lengthwise and then sew across the widest short edge (make sense?) the point will be formed when you open the plate. Hope that helps

        Reply
        • melissa says

          September 24, 2012 at 9:34 pm

          Dora… thanks for clarifying that for me!

          Reply
    5. Diane says

      December 12, 2012 at 11:36 am

      I did one of these for a baby boy. It turned out well. Should I send you a picture? The fabrics that I used look like little neck ties.

      Reply
    6. Kay says

      December 28, 2012 at 11:18 am

      Love Dresden plate. I was wondering if you could do a tute. On a Dresden table mat. I need to know how to put a backing on them? Love your tute. Very easy to follow. Keep up the good work.

      Reply
      • Melissa Mortenson says

        December 29, 2012 at 3:21 pm

        Kay,
        There is a great tutorial for what I think you are talking about here.
        http://www.modabakeshop.com/2009/10/plates-for-your-table.html

        Reply
    7. natalie gerlack says

      February 12, 2013 at 11:08 pm

      Melissa – this is the cutest thing I’ve ever seen!

      Reply
      • Melissa Mortenson says

        February 15, 2013 at 9:57 am

        Thanks Natalie!

        Reply
    8. Pat says

      March 24, 2013 at 6:45 pm

      Is the backing cathedral windows or does it come with that look?

      Reply
    9. Pat Wagner says

      August 15, 2013 at 2:59 am

      Is the dresden plate hand sewn or machine sewn. does this effect the quilting done before the plates are applied?

      Reply
    10. Jan Hood says

      September 16, 2013 at 5:26 pm

      “Is the backing cathedral windows or does it come with that look?”
      I was just about to ask the same thing ( a month later..lol) I’ve looked all over for that fabric..no luck..then it just dawned on me..was it your own cathedral window using Riley Blake fabric ???
      Love the quilt !!

      Reply
      • Melissa Mortenson says

        September 20, 2013 at 1:17 am

        Yes, it’s from the Go Fly A Kite line from Riley Blake Fabrics

        Reply
    11. Nancy G. says

      September 16, 2013 at 5:32 pm

      I love this material, do you know if this material is still available?

      Reply
    12. Barbara Morrison says

      September 19, 2013 at 11:23 am

      I instantly fell in Love with this Baby Quilt. So I made it. I had it done in no time. It was easy and came out Beautiful. I would Love to share pics but don’t know how.

      Reply
      • Melissa Mortenson says

        September 20, 2013 at 1:16 am

        I’m so glad you were able to make it!

        Reply
    13. Kendra says

      December 06, 2013 at 3:26 pm

      Made a small version of this quilt, where the bigger dresdan plate centered in the middle and went around with layer cake squares cut in half for the border. Was absolutely darling.Thank you for the tutorial.

      Reply
      • Kendra says

        December 06, 2013 at 3:28 pm

        Pss I left the middle plain so they can write the babys name and birthdate.

        Reply
    14. Judy Sidwell says

      December 18, 2013 at 2:42 pm

      I just made this quilt in a throw size. It will be given as a Christmas gift. It turned out beautiful and was so quick!

      Reply
    15. Brenda says

      January 18, 2014 at 10:41 pm

      This quilt is adorable … as soon as I have a great grandchild I will make it.
      Is the Dresden Plate Ruler and a 22.5 degree ruler the same angle?

      Reply
      • Melissa Mortenson says

        January 20, 2014 at 2:16 pm

        I’m not 100% sure of the angle… this is the ruler that I use: http://www.fatquartershop.com/ez-quilting-easy-dresden-ruler

        Reply
    16. Deanna Watson says

      March 06, 2014 at 4:19 am

      Is the Dresden Plates machine or hand sewn onto the quilt? If machine quilting does it affect the look of the backing.

      Reply
    17. Darlenle says

      January 11, 2015 at 1:03 pm

      I made this quilt for a Great Granddaughter. It turned out beautifully. You instructions were so easy to follow. For the centers of the Dresden Plates I made some machine embroidered Bugs on white fabric. I named the quilt; Cute as a Bug. The new Mom loved it. Thank you for this pattern. I will use it again but this time for a bigger quilt for myself.

      Reply
    18. site says

      February 02, 2015 at 5:43 am

      Enterprises having a large website with a lot of traffic influx
      will require the reseller hosting package. A dedicated rented machine can be rented for operating complex web applications and for the multiple sites interconnected to your business.
      You can be diligent about protecting your website but someone else on the same server might
      not be.

      Reply
    19. Vicki says

      February 14, 2015 at 11:15 am

      Love it!!!! Tip that I use: Use fusible interfacing for the back of the circle and you don’t have to pin so much. Really easy.

      Reply
    20. Linda Losinski says

      August 27, 2015 at 10:21 am

      Love your quilt! Some little one is going to love it!

      Reply
    21. Terri says

      August 28, 2015 at 1:27 pm

      Same question that’s been asked twice before but with no answer, were the Dresden plates and circles hand sewn on or machine sewn on?

      Reply
      • Melissa Mortenson says

        August 28, 2015 at 4:06 pm

        They were machine sewn on. Sorry, I emailed the others individually with their questions.

        Reply
    22. Farah says

      May 31, 2017 at 2:05 pm

      Thankyou so much for this pattern , I made one following the instructions.

      Reply

    Leave a Reply Cancel reply

    Your email address will not be published. Required fields are marked *

    This site uses Akismet to reduce spam. Learn how your comment data is processed.

    Primary Sidebar

    Hello! It’s nice to meet you.

    I’m Melissa. I like to design things, like fabric, printables, and projects.

    I’m also a Mom and a Maker. I am like most of you, just trying to do my best every day. Some days I succeed, many days I fail.  I find joy in creating, if you do too, then I hope that you find something here bring a little “happy” to your life.  Find out more about me here.

    COPYRIGHT POLICY

    All my images and text are copyrighted. You may NOT use any images from this site in any kind of Video (this includes YouTube). If you would like to feature my work, you may use ONE (1) NON-COLLAGED image and must “follow” link back to my original blog post. You may NOT edit, crop, or change my images in any way without written permission. You MAY NOT print out or copy and distribute any text, images or patterns from this site. All patterns, content, instructions, and templates are for personal use ONLY! Thank you! Violators will be reported.

    Footer

    ↑ back to top

    About

    • Privacy Policy
    • Disclaimers
    • About Melissa
    • Instagram
    • Facebook
    • YouTube
    • Pinterest

    Newsletter

    • Sign Up! for emails and updates

    Contact

    • Contact
    • FAQ
    • Press
    • Published Books
    • Fabric Collections

    Welcome to the Polka Dot Chair! Here you’ll find easy, step-by-step, sewing, quilting, and crafting projects. We design projects for Makers of all skill levels. Beginners are welcome!

    DISCLAIMER:

    While every effort has been made to ensure the accuracy of the content on this website, the information is made available without warranty of any kind. The Polka Dot Chair accepts no responsibility or liability, whether direct or indirect, as to the currency or accuracy of the information, nor any consequence of its uses. This website is not intended to substitute the advice of a professional.

    Copyright © 2022 Polka Dot Chair

    [ Placeholder content for popup link ] WordPress Download Manager - Best Download Management Plugin