• Skip to primary navigation
  • Skip to main content
  • Skip to primary sidebar

The Polka Dot Chair logo

  • SEWING
    • Free Sewing Patterns
    • Bag Sewing Patterns
    • Costume Sewing Tutorials
    • Apparel Sewing Patterns
    • Learn to Sew
    • Beginner Friendly Sewing Projects
    • Hand Embroidery Patterns
    • Sewing Tips
    • All Sewing
  • QUILTING
    • Quilt Block Patterns
    • Learn to Quilt
    • Free Quilt Patterns
    • Quilt Patterns
    • All Quilting
  • CRAFTS
    • Disney
    • Cricut
    • Printables
    • All Crafts
  • HOLIDAYS
    • Seasonal Projects
    • Valentine’s Day
    • Easter
    • 4th of July
    • Halloween
    • Thanksgiving
    • Christmas
    • All Holidays
  • TUTORIALS
  • ABOUT
    • About Me
    • Melissa Mortenson Fabric Collections
    • Published Books
    • Press
    • FAQ’s
    • Contact
  • SUBSCRIBE
  • SHOP
menu icon
go to homepage
  • SHOP
  • TUTORIALS
  • SEWING
  • QUILTING
  • SUBSCRIBE
  • CRAFTS
  • HOLIDAY PROJECTS
  • ABOUT
    • Published Books
    • Melissa Mortenson Fabric Collections
  • CONTACT
    • Facebook
    • Instagram
    • YouTube
  • subscribe
    search icon
    Homepage link
    • SHOP
    • TUTORIALS
    • SEWING
    • QUILTING
    • SUBSCRIBE
    • CRAFTS
    • HOLIDAY PROJECTS
    • ABOUT
      • Published Books
      • Melissa Mortenson Fabric Collections
    • CONTACT
    • Facebook
    • Instagram
    • YouTube
  • ×
    Home » Home

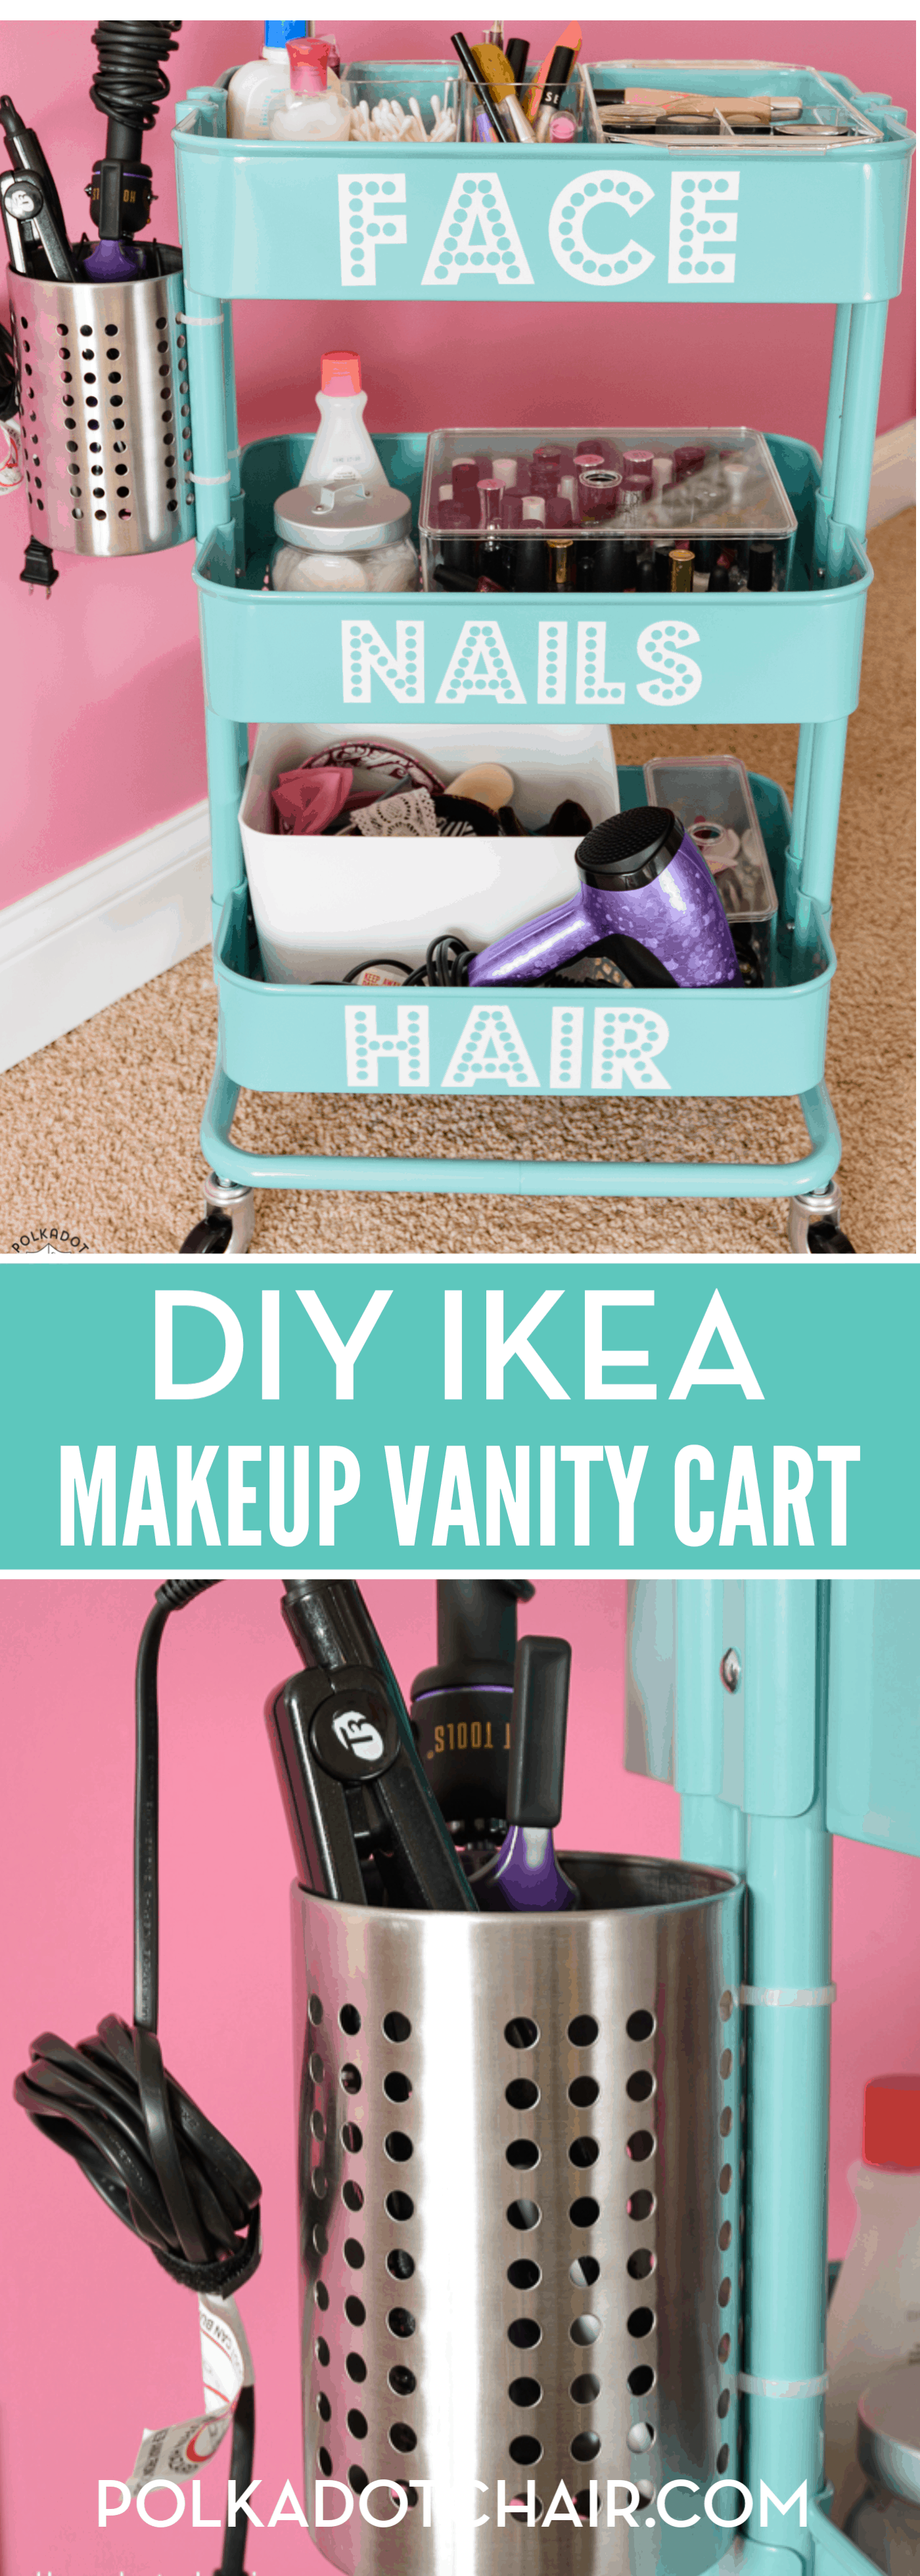
    DIY IKEA Makeup Vanity an IKEA Raskog Hack

    Last Updated: Nov 1, 2023 by Melissa Mortenson · This post may contain affiliate links · This blog generates income via ads · 58 Comments

    IKEA Makeup Vanity

    Today I will to show you how to create an IKEA Makeup Vanity Cart that rolls around! It’s the perfect solution for a too-small or shared bathroom.  I love a good IKEA hack, and this IKEA Raskog hack has to be one of my favorite ones to date! Keep reading to find out how I did it.

    Blue IKEA Raskog Hack, a DIY Rolling Vanity. White vinyl letters spell out face nails and hair on the three shelves.

    Disclosure: This is a sponsored post from IKEA and the Mom it Forward Blogger Network. All opinions and hair-brained ideas are 100% mine.

    DIY IKEA Vanity Rolling Cart

    Table of Contents
    • DIY IKEA Vanity Rolling Cart
    • Supplies Needed for IKEA Makeup Vanity Trolley
    • More info about the Makeup Cart
    • How to add the Curling Iron or Hair Dryer Holder
    • How to Organize the Cart
    • How to Add Lettering to the Cart

    Right now, my twins are sharing a bathroom, although they both have laid claim to the empty bathroom by my college kid. We will see who “grabs” that one first.  Since they are twins and leaving at the same time every day, this creates a bit of a bottleneck in the bathroom in the mornings.  

    Especially for my daughter. She is at the age where she would like to take a bit more time on her hair and makeup in the morning. She has difficulty doing that when her brother is crowding her in the bathroom. This project would also be great for anyone with roommates sharing an apartment or college dorm.

    silver canister with black and purple curling iron attached to side of blue cart.

    So I created a simple IKEA makeup vanity cart to help her out. She can easily roll it back and forth between her bedroom and the bathroom, whichever is the easier place to get ready that morning. She then is able to have all her hair and beauty products in one place. You could even store a portable vanity mirror in it to ensure you have all your tools in one place.

    Supplies Needed for IKEA Makeup Vanity Trolley

    IKEA Raksog Cart

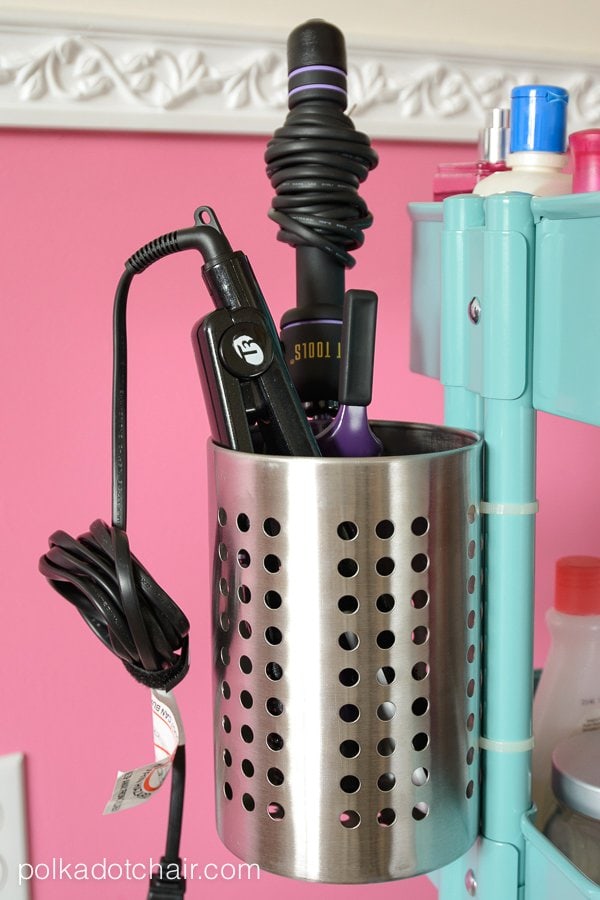
    Metal Utensil Holder from IKEA

    Zip Ties

    IKEA Godmorgon clear plastic dividers

    Vinyl Lettering for the Front of the Cart – I made mine with my Cricut Machine- the font is called Budmo and can be downloaded for free online.

    More info about the Makeup Cart

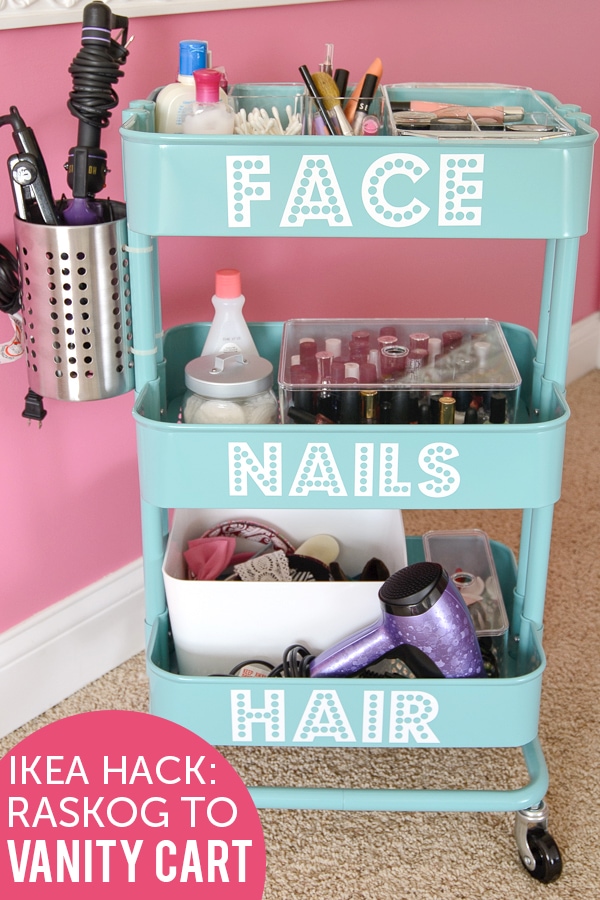
    The rolling vanity is a very slightly modified Raskog Cart. I have to tell you I LOVE THESE THINGS! I have 4 now. One for my office, one for sewing supplies, one for the “art” stuff in the kitchen, and now this one. They are the perfect functional piece of furniture and can be used in many different ways, not just as a vanity cart or dressing table.

    How to add the Curling Iron or Hair Dryer Holder

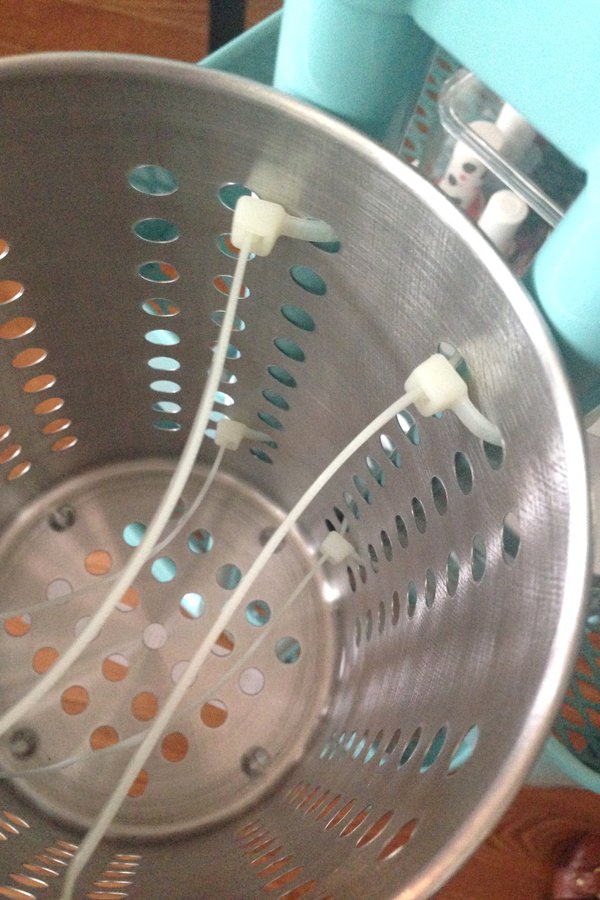
    It’s the handiest little cart (plus it’s super cute).  To make the vanity, take a utensil holder from IKEA (similar one found here) and attach it to the side of the Raskog with zip ties.

    To attach it, string two zip ties through the top and two through the bottom, tighten very well, and clip off the extra ties.

    inside of silver canister held onto blue cart using zip ties.

    Now, she has a place to hold her curling iron and flat iron.  The metal utensil holder is just the right shape to hold them, and since it’s metal, she can place slightly hot curling irons in it. Helping to optimize storage space so you can fill the cart with a lot of stuff, including jewelry and makeup storage.

    I will say this is not intended to be used with a turned-on, hot curling iron, just one that is unplugged and in the process of cooling down.

    How to Organize the Cart

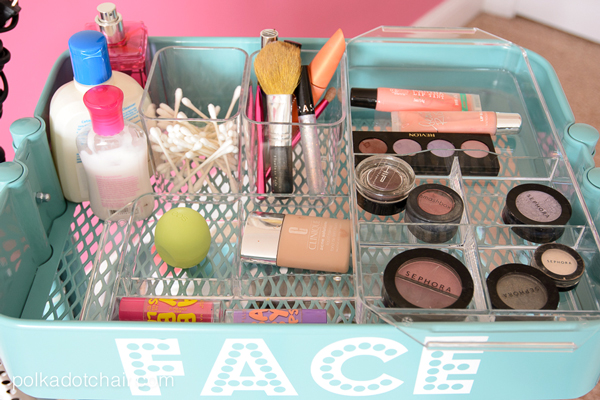
    Divide each of the 3 trays into separate purposes. I chose Face, Nails & Hair, but you can use whatever you’d like.  I cut out some vinyl letters for the cart too, to help keep it organized and for a bit of decoration (more info on cutting out the vinyl lettering below).

    Amazon is a great place to find organizational tools to help you maximize space and have enough storage in this DIY makeup vanity.

    blue shelf with word FACE in white vinyl filled with clear dividers and makeup and skin care products.

    The Makeup Shelf

    To organize the makeup on the top tray, use IKEA Godmorgon clear plastic dividers (another great makeup storage option found here). My daughter was then able to divide up her makeup collection into plastic dividers to keep everything organized.
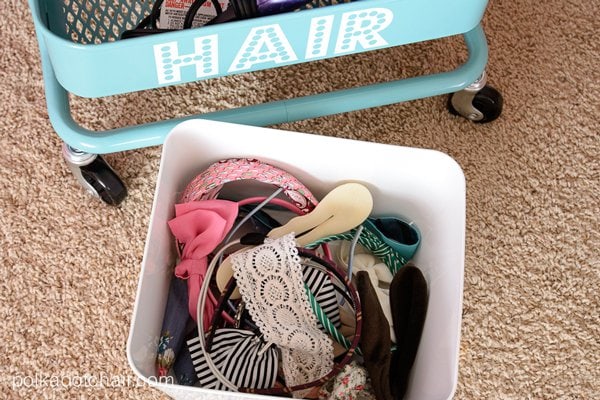
    white bin filled with various hair accessories including headbands and hair bows on tan carpet.

    The Hair Shelf

    The bottom shelf holds her hairdryer (it also can fit in the canister on the side) and two more plastic bins, one large one for hair accessories and one smaller one for hair bands and bobbypins. This shelf is also great for storing any extension cords needed for electric hair tools.

    Drawers and jars are also great for keeping hair accessories organized on this shelf. Mason jars can be used to store hair ties and bobby pins, and plastic drawers can hold larger hair accessories like headbands.
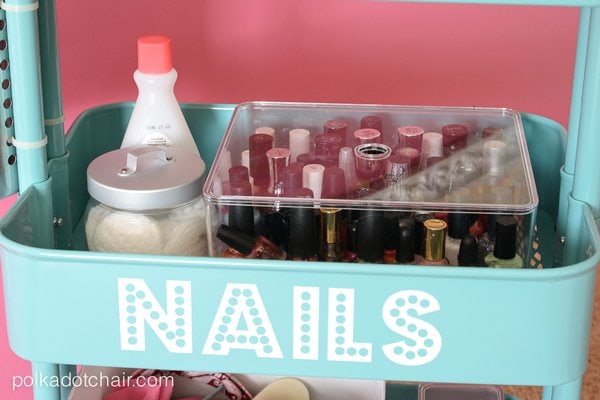
    Blue shelf with the word NAILS in white vinyl filled with a clear bin of nail polish and a jar of cotton pads and a bottle of nail polish remover.

    The Nails Shelf

    Even though she doesn’t do her nails every morning, she definitely needed somewhere to keep all of her stuff, so we dedicated a shelf to that.

    We also found out that the large Godmorgon organizer (similar to one found here) is perfect for holding bottles of nail polish; the one we chose has a lid to keep all her nail polish neatly organized and easily portable, but you don’t need one with a lid or even a large drawer, whatever works best for you is perfect.

    How to Add Lettering to the Cart

    You can cut the letters for the front of the cart at home yourself with an “e-cutting” machine.

    The font is Budmo. It is cut with a Cricut Machine and white vinyl.

    What is a Cricut? A Cricut Machine is an electronic cutting machine. It hooks up to your computer via USB or Bluetooth and cuts images you send to it, much like a printer. It just cuts instead of prints. It can cut vinyl, paper, fabric, and much more. The images are all digital; you can upload your own images or buy images in the Cricut Design space individually. You can read my full review of the Cricut Maker Machine HERE.

    About IKEA’s First59 Program:

    A few weeks ago, I shared with you one of the challenges that my family faces in the morning. Last-minute chaos. Most of this chaos is caused by us being slightly under-prepared and a little bit disorganized.   Right now we are dealing with two big issues regarding mornings. One, “I can’t find my clothes”.  Two, “There is no room for me in the bathroom”.

    With the help of IKEA and lots of inspiration found online, I decided to tackle the second of these two problems, the bathroom.  The clothing situation still needs to be addressed.  But that’s a bigger project, and I realized that I had a quick and simple solution to the bathroom problem.

    A little bit of chaos in the morning can get me a little bit frazzled. IKEA has done studies and found that the way that you spend the first 59 minutes of your day can affect your mood for the rest of the day.  They have made it their mission to provide simple solutions to help you make the most of those first :59.

    After one week of use I’m happy to report a “so far so good” with the cart, helping to streamline our morning routine.  I’ll be sure to pop in here again and share with you how it works long-term.

    We have learned a few things to help us at the beginning of our day. We do things like, laying out clothes the night before and setting out breakfast bowls.  Also, we make sure everyone’s homework is in their backpacks.

    Other IKEA Hacks & Ideas You Might Like

    The Best IKEA Hacks to Simplify your Morning

    IKEA Mudroom Hack; Bookcases to Lockers

    Sewing Room Organization Ideas

    IKEA Makeup Vanity three blue shelves on cart filled with hair, makeup, and nail supplies with white words on each shelf that say, FACE, NAILS, HAIR.

    More Projects You May Enjoy

    • How to make a cute Magnolia Wreath for your front door
      How to Make a Magnolia Wreath
    • How to Make Book Page Wreath that’s Perfect for Fall
    • How to Hang Outdoor Drapes & DIY Outdoor Curtain Rods
    • Kentucky Derby Craft ideas and free svg file for a Lucky Pillow to make your own pillow cover #CricutMade #Derby #KentuckyDerbyCrafts #CraftIdeas #DIYPillowCover
      Kentucky Derby Craft Ideas for Cricut Machines

    • Share
    • Email

    About Author

    Melissa Mortenson

    Melissa Mortenson is a blogger, designer, and content creator. She is the Polka Dot Chair blog founder and has been sharing fresh and creative ideas with readers since 2008. She is the author of “Project Teen, Handmade Gifts your Teen will Actually Love.” Her work and designs have been featured on HuffPost, TODAY, Pioneer Woman, HGTV, BuzzFeed, Better Homes & Gardens, and many other established publications. Her first fabric line, “Derby Style,” debuted in January 2015 through Riley Blake Designs.  Additional fabric collections have followed it in subsequent years. A mom of 3, she considers herself lucky to be living in Kentucky.

    Reader Interactions

    Comments

    1. andy says

      October 04, 2014 at 12:30 pm

      this is very cute ,,love it 🙂

      Reply
    2. Natalie @ Threads & Bobbins says

      October 05, 2014 at 10:16 am

      Brilliant idea! Never seen it used like this before 🙂 I was thinking about getting one for my sewing bits and bobs but actually prefer this idea!

      Reply
      • Melissa Mortenson says

        October 08, 2014 at 10:38 pm

        I have one for my sewing supplies and I love it for that too, it looks so cute loaded up with threads and needles in my sewing room 🙂

        Reply
        • rebeca says

          December 26, 2014 at 10:35 pm

          if I want one could I get it how much is it

          Reply
    3. Phyllis says

      October 05, 2014 at 10:33 am

      This is so clever and so cute! Love that trolly but would never have thought about using it in this way.

      Reply
    4. Amber says

      October 06, 2014 at 4:04 am

      This is such a brilliant idea! I’d never of thought of something like that but it looks really useful and cute!

      Reply
      • Melissa Mortenson says

        October 08, 2014 at 10:37 pm

        Thank you!! So far it’s working — fingers crossed 🙂

        Reply
        • Ami Rolston says

          November 17, 2015 at 5:19 pm

          My granddaughter saw this & would love to have one. Can you tell me what it is made of? Hopefully not plastic.

          Reply
          • Tara says

            November 25, 2015 at 4:17 pm

            It is made of heavy durable metal. We bought two of these last year-One for me and other for my daughter. One of my all time favorite ikea purchases (and I shop there a lot!!)- can’t go wrong with this cart 🙂

            Reply
        • Melanie says

          May 07, 2016 at 6:40 pm

          Love this, I’m making one for my Daughter who’s turning 13 this month. Can you tell me how big your lettering was Heigh and width?

          Reply
    5. Adrianna says

      October 13, 2014 at 2:43 pm

      Does anyone know what the name of that utensil may be? I tried to search for it on the ikea page with no success….was it in the office section of Ikea???

      Reply
      • Melissa Mortenson says

        October 13, 2014 at 2:54 pm

        It’s actually from the kitchen section- it’s meant to hold utensils, I’ll see if I can find the name..

        Reply
        • Adrianna says

          October 14, 2014 at 2:16 pm

          Found it !! Thanks!!!

          Reply
          • Cherilyn says

            November 11, 2014 at 10:10 pm

            What is this called?? So cute!

            Reply
    6. Iris says

      October 22, 2014 at 6:10 pm

      Love the cart. Where can I find the vinyls(Nails Hair Make-up)? I want to do this for my g’daughter for Christmas.

      Reply
    7. Kelly says

      October 27, 2014 at 7:49 pm

      Hello,

      Very cute idea !!! I just have a couple of questions,
      Is the wording made of vinyl ?? And if so can you tell me what size your made them ??

      Thanks

      Reply
    8. Tammy says

      October 28, 2014 at 3:22 pm

      Where do you get the cart? Looks great !!

      Reply
    9. Michele says

      October 28, 2014 at 5:11 pm

      How deep are the shelves?

      Reply
    10. Karen says

      October 29, 2014 at 8:29 am

      Love this!! Which Godmorgon sets did you use, and where did the plastic hair bins come from.. Also, the vinyl letters 😉 Thank you

      Reply
    11. Patti McGarry says

      November 16, 2014 at 10:17 am

      Hi Melissa, I’ve bought the cart, the utensil holder, the bins and I’m ready to go! I have a Silhouette, can you tell me the font and size you used for your vinyl? I’m making this for my daughter for Christmas, she just started beautician school! Thanks a bunch!

      Reply
      • Melissa Mortenson says

        November 17, 2014 at 12:06 pm

        Sure! The font is Budmo. It’s free, I’m not sure of the size… I measured the bins and made the font to fit each bin separately.

        Reply
    12. Amanda says

      December 14, 2014 at 11:50 am

      Hello Melissa,
      I was wondering what program you used to get the Budmo font? Or was it a cricut cartridge? I have the cricut but am having a hard time finding anything with that font.

      Reply
    13. Dinah says

      December 22, 2014 at 5:05 pm

      Where did you get the cart from??

      Reply
      • Melissa Mortenson says

        December 28, 2014 at 1:32 pm

        IKEA

        Reply
    14. darlene says

      December 26, 2014 at 11:04 pm

      The closest Ikea is 5 hours away. Any suggestion on where to get a substitute for this cart?

      Reply
      • lilly says

        July 29, 2016 at 2:23 pm

        You could just get home delivery

        Reply
    15. Lindsey says

      December 28, 2014 at 11:46 am

      would you consider making and selling one of these? I love this!!

      Reply
    16. Trinity says

      December 30, 2014 at 8:43 am

      Just stumbled upon your blog and LOVE all your cute ideas! Definitely following along from now on. 🙂

      Reply
    17. Dee says

      January 02, 2015 at 2:19 pm

      I keep seeing this cart pop up and I am determined to put one in the little corner of my bathroom that can be rolled throughout the apartment as needed! Heading to IKEA! Bye!

      Reply
    18. deidre says

      February 01, 2015 at 7:16 pm

      Hi, I really loved this idea, but I can’t find a place that has the metal flat iron and curling iron holder. I am going to do this for my teenager’s room. Thanks for the awesome idea!

      Reply
    19. Laurie Zimmer says

      February 08, 2015 at 8:25 pm

      My daughter found this idea. I am going to do this for her birthday. We even have a candle holder that we can use, like you did for the curling iron. Thanks for the idea.

      Reply
    20. Kadie says

      February 22, 2015 at 10:50 am

      Hello! Love this idea for myself but where did you get the Vinyl letters? Thanks!

      Reply
      • Melissa Mortenson says

        March 02, 2015 at 4:33 pm

        I cut them myself at home. I’d check etsy to see if someone will do a custom vinyl lettering order.

        Reply
    21. Rave + View says

      April 14, 2015 at 12:15 pm

      This is a must-recreate hack. Now, that my makeup collection is inevitably growing, I must include this in one of my projects. Thank you!

      Reply
    22. Yvonne says

      December 09, 2015 at 7:37 pm

      How big did you cut the letters?

      Reply
      • Melissa Mortenson says

        December 10, 2015 at 12:50 pm

        I used a Cricut Machine… there is a link to it at the bottom of the post under UPDATES

        Reply
    23. Ceci says

      April 20, 2016 at 10:43 am

      This item is available at Amazon. I just bought 2.

      Reply
      • lilly says

        July 29, 2016 at 2:13 pm

        Just a note: if anyone is wondering what the utensil holder is called it is: ORDNING

        I just found it but you can just search ‘Kitchen utensil’ and scroll down a bit if it doesn’t work

        Reply
    24. lilly says

      July 29, 2016 at 2:34 pm

      Melissa do you know the name of the white bins? Thank you!

      Reply
      • Sally says

        January 05, 2020 at 5:16 pm

        I love this idea, but I can’t find the clear plastic bins….. could you send me a link?

        Reply
        • Melissa Mortenson says

          January 06, 2020 at 1:01 pm

          The tutorial is several years old, IKEA might not sell those exact ones anymore.

          Reply
    25. Cindy says

      December 11, 2016 at 4:18 pm

      Hi, what cartridge is Budmo on?

      Reply
      • Melissa Mortenson says

        December 13, 2016 at 4:05 pm

        It’s not on one. I used it with the Cricut that I hooked up to my computer so that I could use the fonts on my computer

        Reply
        • cindy says

          December 20, 2016 at 10:41 pm

          oh ok I am not real savvy with my cricut so I will have to figure out how to use my computer fonts on the craft room. Thank you.

          Reply
    26. Tara says

      January 16, 2017 at 7:58 pm

      Did you spray paint it or use regular paint?

      Reply
      • Melissa Mortenson says

        January 23, 2017 at 8:34 pm

        I did not paint the vanity cart

        Reply
    27. Brenda says

      February 04, 2018 at 1:29 pm

      I love this! Ikea doesn’t have the blue anymore…or at least I can’t find it. Do you sell the letters?

      Reply
      • Brenda says

        February 09, 2018 at 8:56 pm

        If you go on Michaels.com you can get it in blue and….MUCH CHEAPER,! I paid $30 for mine! Got my stainless utensil holder on Amazon. Don’t know where to get the letters tho. I bought 2 carts for 1/2 of what the others wanted! Good luck!

        Reply
    28. Dianne Falcone says

      December 21, 2020 at 2:00 pm

      Made this for my daughter for Xmas. Thanks for the inspiration!

      Reply

    Leave a Reply Cancel reply

    Your email address will not be published. Required fields are marked *

    This site uses Akismet to reduce spam. Learn how your comment data is processed.

    Primary Sidebar

    Hello! It’s nice to meet you.

    I’m Melissa. I like to design things, like fabric, printables, and projects.

    I’m also a Mom and a Maker. I am like most of you, just trying to do my best every day. Some days I succeed, many days I fail.  I find joy in creating, if you do too, then I hope that you find something here bring a little “happy” to your life.  Find out more about me here.

    COPYRIGHT POLICY

    All my images and text are copyrighted. You may NOT use any images from this site in any kind of Video (this includes YouTube). If you would like to feature my work, you may use ONE (1) NON-COLLAGED image and must “follow” link back to my original blog post. You may NOT edit, crop, or change my images in any way without written permission. You MAY NOT print out or copy and distribute any text, images or patterns from this site. All patterns, content, instructions, and templates are for personal use ONLY! Thank you! Violators will be reported.

    Footer

    ↑ back to top

    About

    • Privacy Policy
    • Disclaimers
    • About Melissa
    • Instagram
    • Facebook
    • YouTube
    • Pinterest

    Newsletter

    • Sign Up! for emails and updates

    Contact

    • Contact
    • FAQ
    • Press
    • Published Books
    • Fabric Collections

    Welcome to the Polka Dot Chair! Here you’ll find easy, step-by-step, sewing, quilting, and crafting projects. We design projects for Makers of all skill levels. Beginners are welcome!

    DISCLAIMER:

    While every effort has been made to ensure the accuracy of the content on this website, the information is made available without warranty of any kind. The Polka Dot Chair accepts no responsibility or liability, whether direct or indirect, as to the currency or accuracy of the information, nor any consequence of its uses. This website is not intended to substitute the advice of a professional.

    Copyright © 2022 Polka Dot Chair