• Skip to primary navigation
  • Skip to main content
  • Skip to primary sidebar

The Polka Dot Chair logo

  • SEWING
    • Free Sewing Patterns
    • Bag Patterns
    • Costumes
    • Apparel
    • Learn to Sew
    • Beginner Friendly
    • Embroidery Projects
    • Tips & Techniques
    • All Sewing
  • QUILTING
    • Quilt Blocks
    • Learn to Quilt
    • Free Patterns
    • Quilt Patterns
    • All Quilting
  • CRAFTS
    • Disney
    • Cricut
    • Printables
    • All Crafts
  • HOLIDAYS
    • Seasonal Projects
    • Valentine’s Day
    • Easter
    • 4th of July
    • Halloween
    • Thanksgiving
    • Christmas
    • All Holidays
  • TUTORIALS
  • ABOUT
    • About Me
    • My Fabric Collections
    • Published Books
    • Press
    • FAQ’s
    • Contact
  • SUBSCRIBE
  • SHOP
menu icon
go to homepage
  • SHOP
  • TUTORIALS
  • SEWING
  • QUILTING
  • SUBSCRIBE
  • CRAFTS
  • HOLIDAY PROJECTS
  • ABOUT
    • Published Books
    • My Fabric Collections
  • CONTACT
    • Facebook
    • Instagram
    • Pinterest
    • YouTube
  • subscribe
    search icon
    Homepage link
    • SHOP
    • TUTORIALS
    • SEWING
    • QUILTING
    • SUBSCRIBE
    • CRAFTS
    • HOLIDAY PROJECTS
    • ABOUT
      • Published Books
      • My Fabric Collections
    • CONTACT
    • Facebook
    • Instagram
    • Pinterest
    • YouTube
  • ×

    Home » Sewing » Pillow Patterns

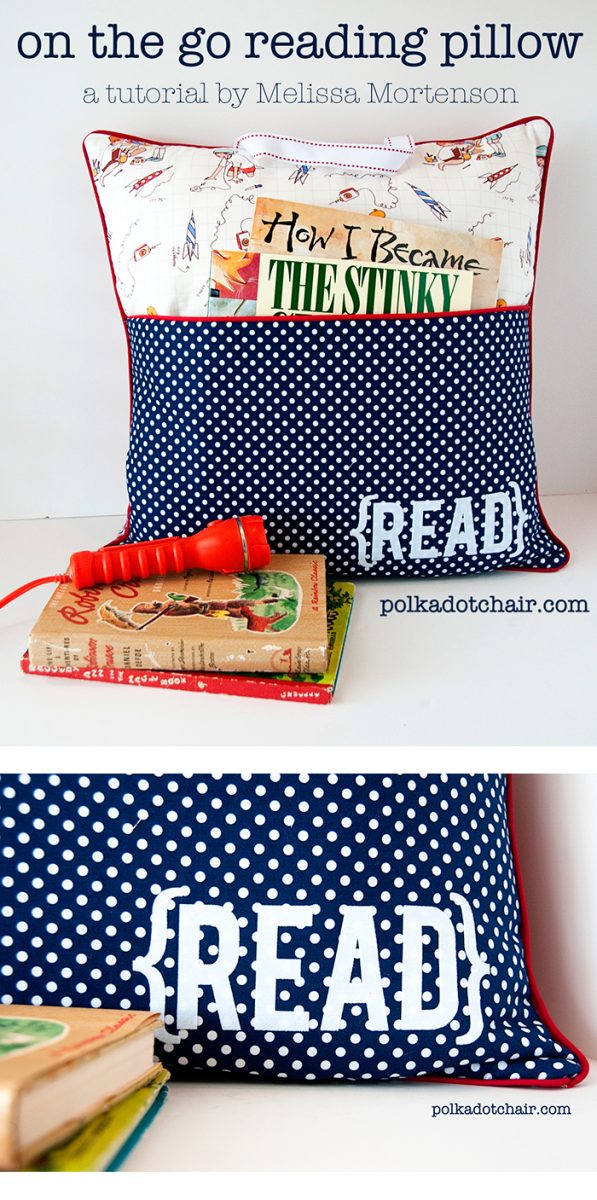
    On the Go Reading Pillow Pattern & Tutorial

    Updated: Dec 17, 2021 by Melissa Mortenson · This post may contain affiliate links · This blog generates income via ads · 63 Comments

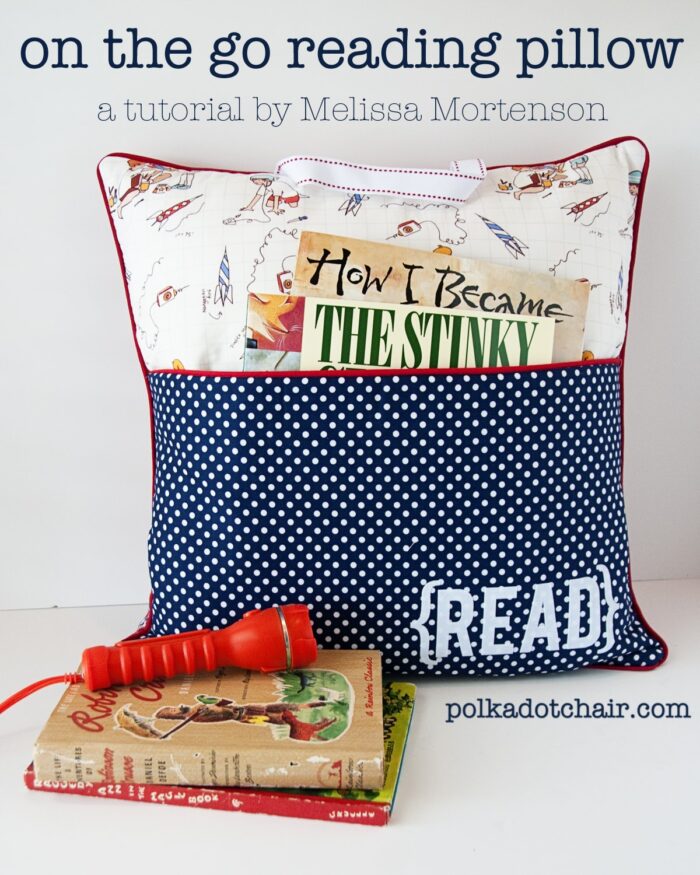
    Create a fun handmade gift for a little one with this FREE On the Go Reading Pillow Pattern! This is the ORIGINAL reading pillow pattern. 

    Reading Pillow Tutorial
    Table of Contents
    • Why I Designed the Reading Pillow Pattern
    • How to Get a Printable Pattern
    • Supplies
    • Video Instructions
    • Reading Pillow Cutting Instructions
    • Sewing Instructions
    • Construction Notes

    Why I Designed the Reading Pillow Pattern

    A few years ago, I decided to revamp some pillows I made for my nephews a few Christmases ago.  I did them quickly (like in an hour) and always thought that I could have done a better job.

    Regardless my sister says that her boys took them to bed every night and kept all kinds of treasures in the pocket.   I gifted the pillows with a flashlight because there is something charming about a little kid staying up late to read at night.

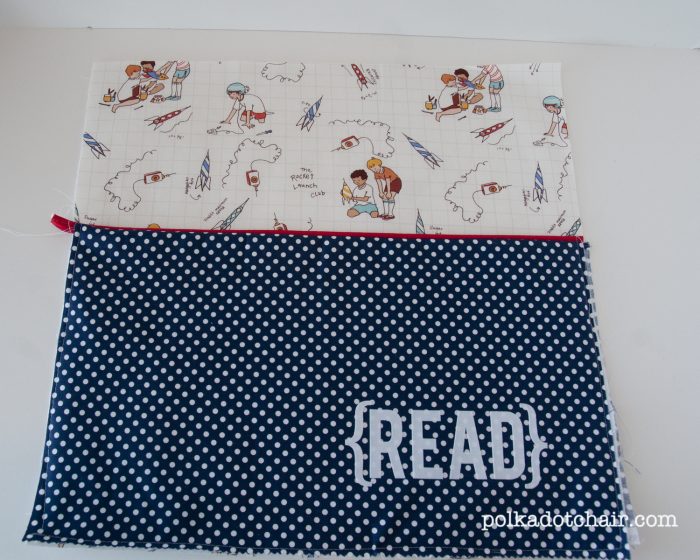
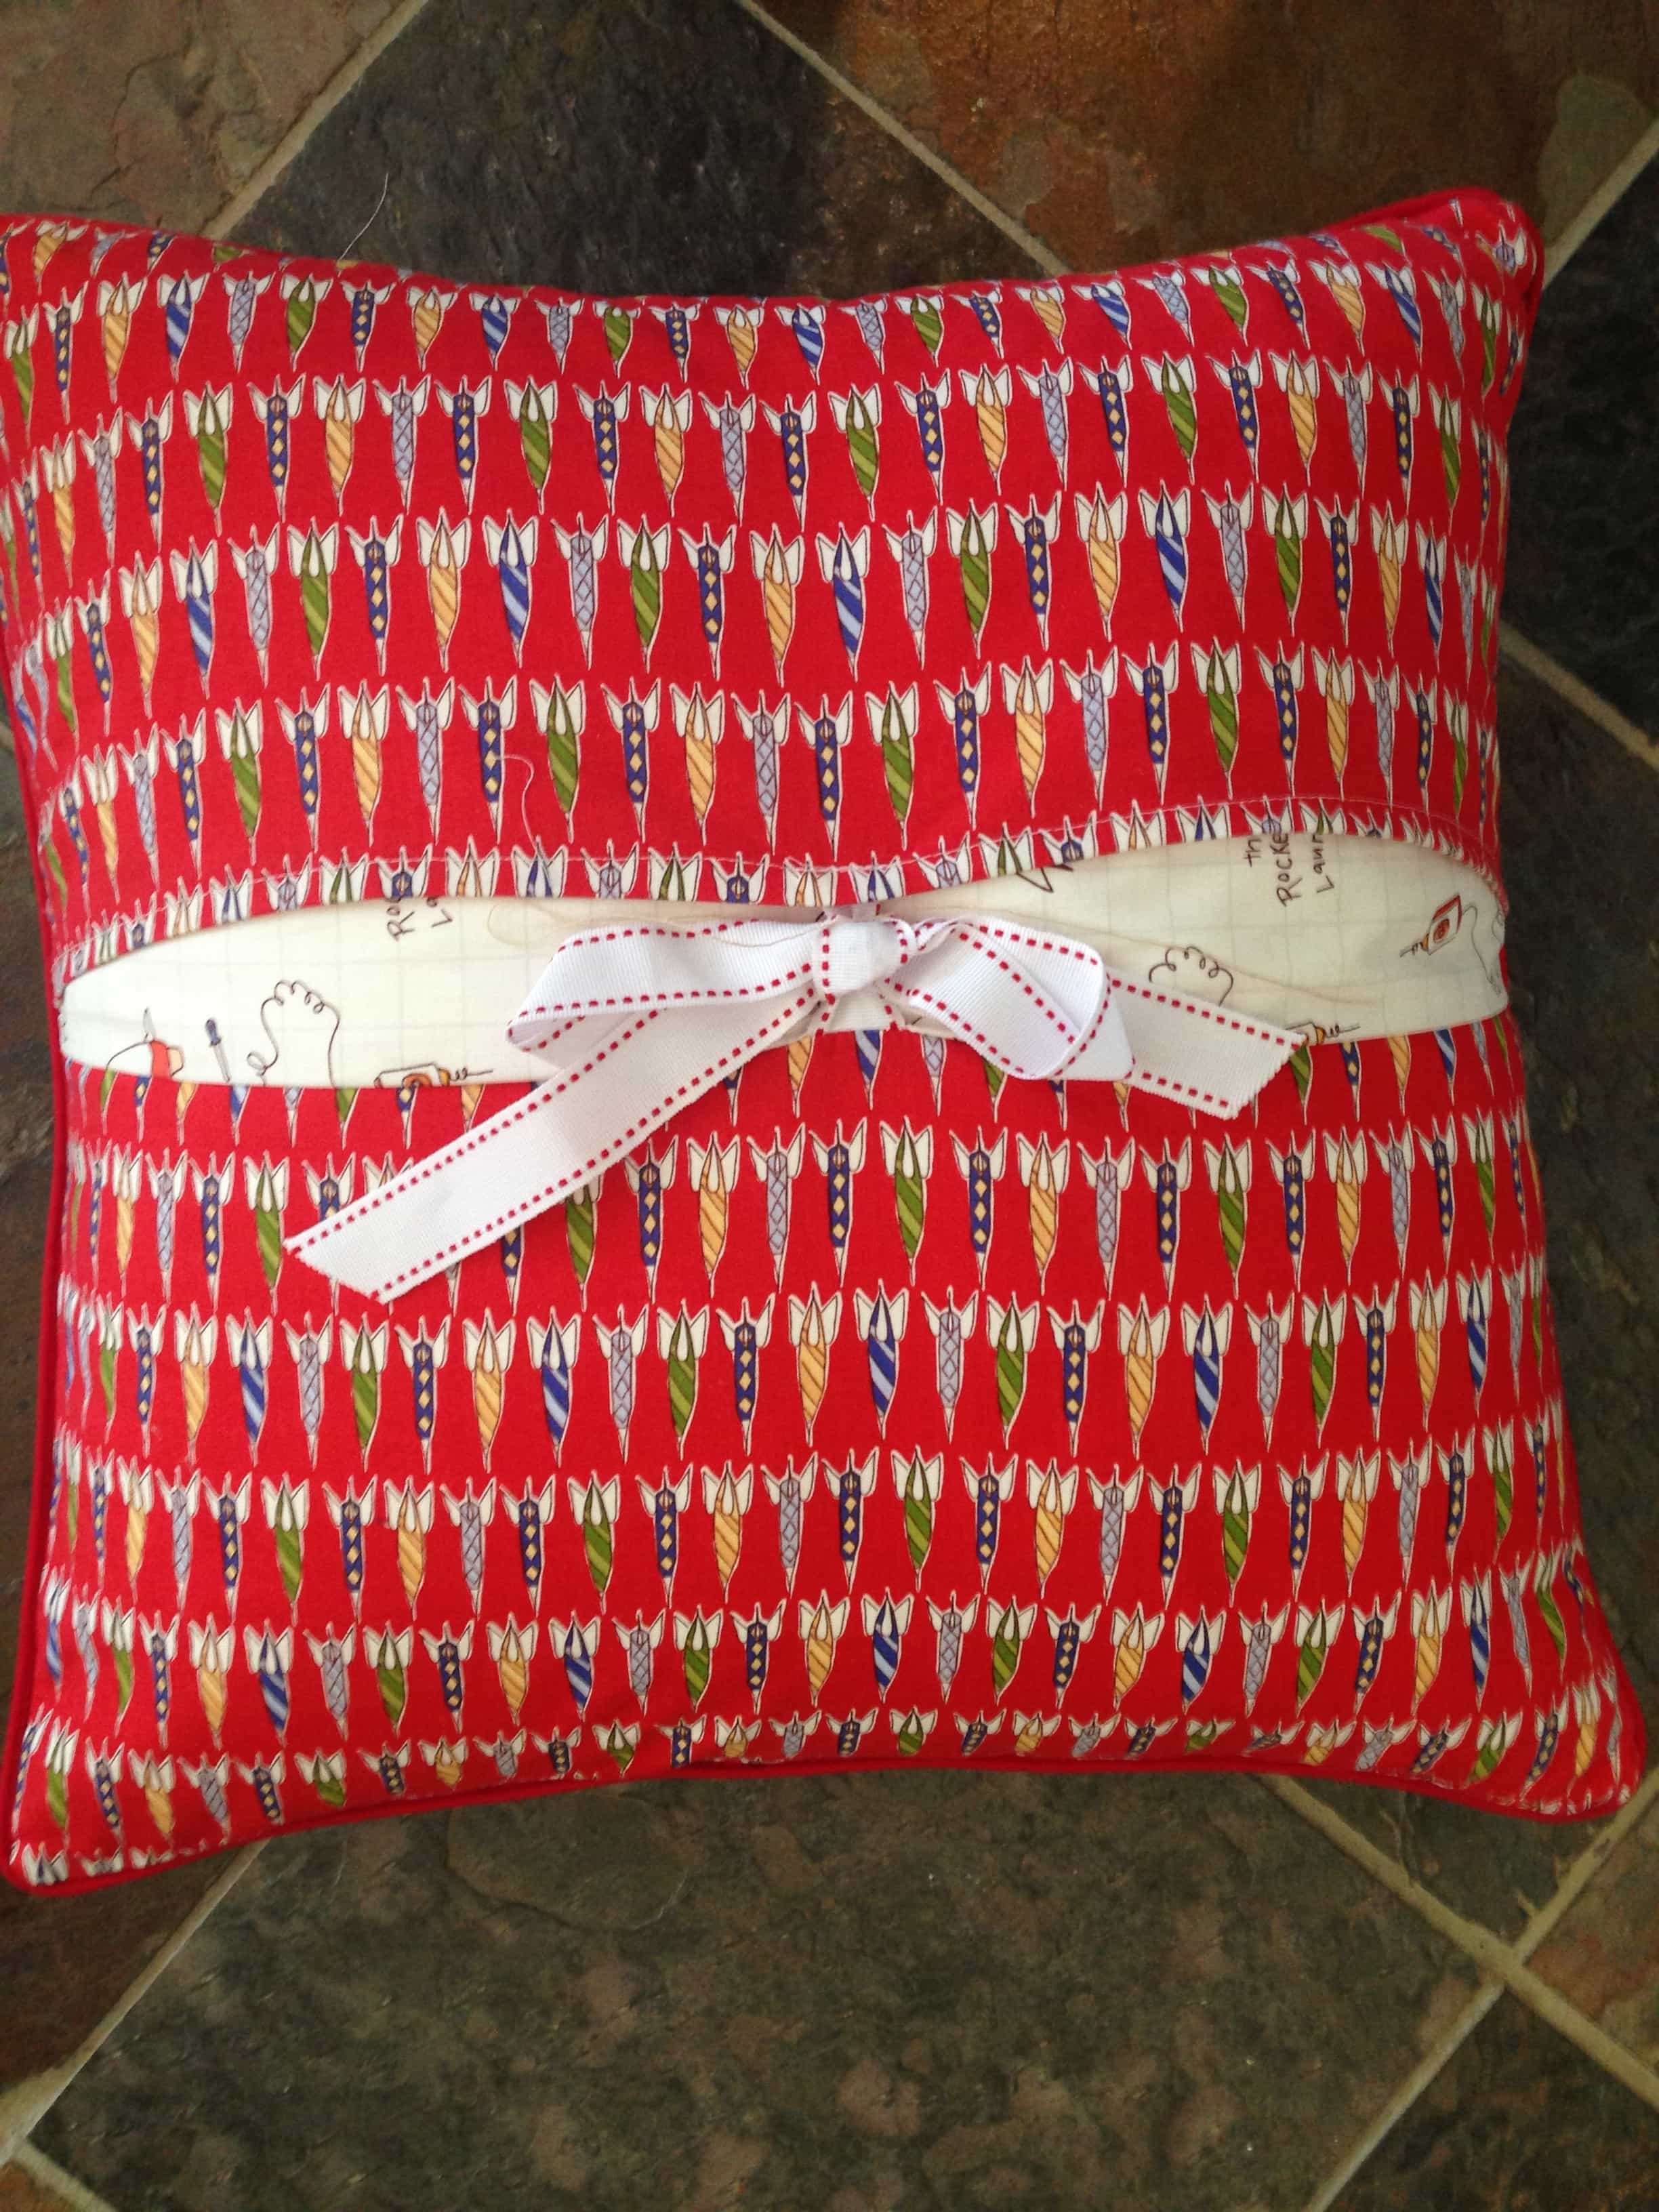
    Today I’m excited to share with you the improved finished project. These reading pillows feature one large pocket on the front to hold books or other treasures and a small handle on top to make it easy to carry around.

    Sewing Pattern for an "On the Go Reading Pillow" a cute pocket pillow for kids

    How to Get a Printable Pattern

    If you prefer, you can now purchase a PRINTABLE PDF Copy of this pattern. The purchased pattern includes instructions to create both the small and large reading pillow, along with applique patterns of the ENTIRE alphabet so you can spell whatever you’d like on the front of your pillow.

    You can also buy a printed pattern that will be mailed to you.

    NOTE: These pillows feature piping, if you’re not comfortable sewing piping, just leave it off. The pattern works great either way.

    Supplies

    This pattern is designed to work with fat quarters! If you want to make it from yardage you can. If you do that you may want to use this tutorial to add a zipper to the back of the pillow, instead of the closure that I created.

    • 3 Fat Quarters (the measurements leave little to no waste of these fat quarters, so if you are nervous about your cutting abilities buy 4 so you have an extra just in case).
    • 2 yards 1″ wide ribbon
    • Fusible Fleece
    • 1 package piping
    • Letters- I cut mine out of fuzzy fusible vinyl with my Silhouette machine. You can also use a Cricut machine. if you don’t have one, don’t worry you could also appliqué the letters on or buy iron-on letters at the craft store.
    • 18″ pillow form

    Video Instructions

    Reading Pillow Cutting Instructions

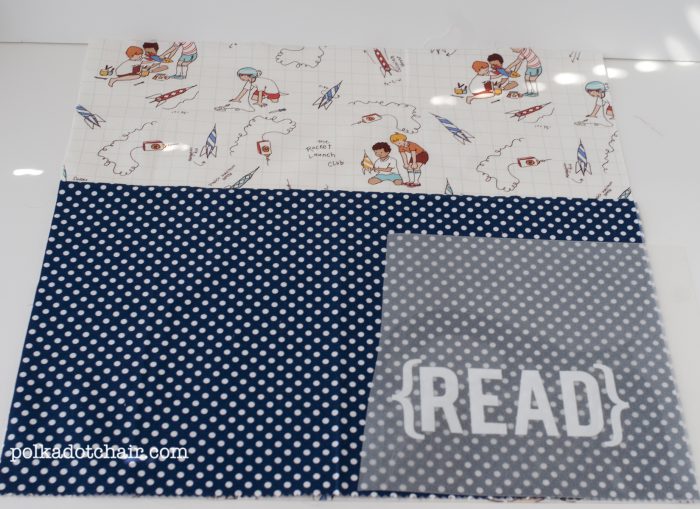
    1. Cut one Fat Quarter to 18″x 18″ for the pillow front, then cut the leftover fabric from this piece to 2 ½″ x 18″ for pillow back
    2. Cut one Fat Quarter (the navy blue dot for the pocket) into 2 pieces each 18″ x 11″
    3. Cut another Fat Quarter for the back into 2 pieces each 18″ x 9″
    Reading Pillow tutorial

    Sewing Instructions

    STEP 1: Create the Pocket

    Attach fusible fleece to the back of the Pillow Front piece (18×18) and the pocket front piece (11×18).

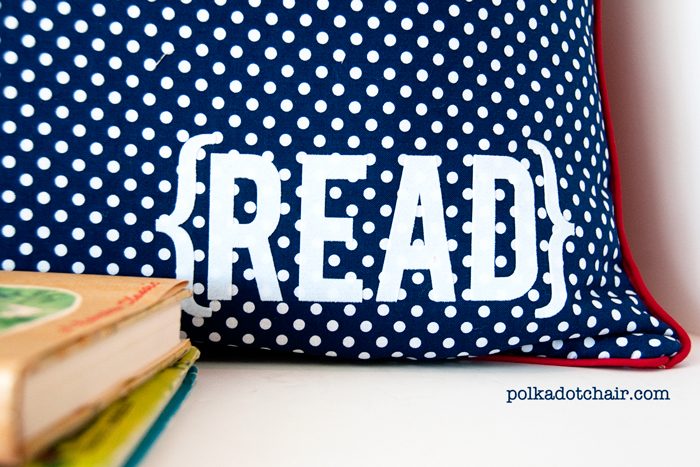
    If desired, Iron “READ” onto the front pocket piece.

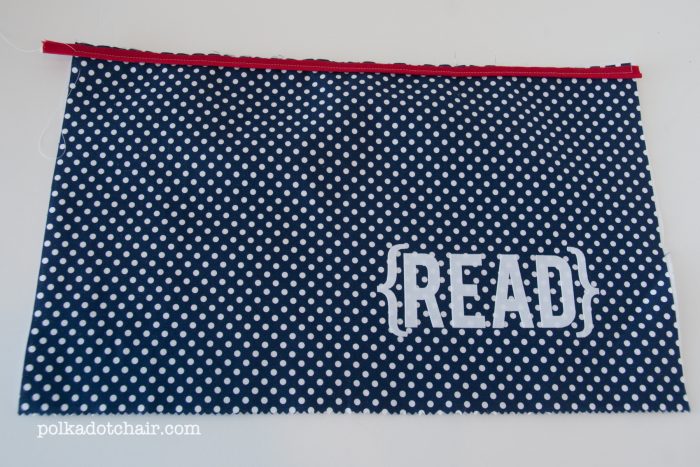
    Using a piping foot attach 1 piece of piping to the top of the pillow.  The raw edge of the piping will match up with the raw edge of the pocket piece. (Piping instructions can be found here)

    Place pocket lining piece (your 2nd 11×18 piece) right sides together with your pocket front piece.  Stitch along the top seam, along the same stitching line you just used to attach your piping.  This will ensure that your piping looks good on the outside of your pillow.

    Turn pillow pocket piece right side out and press.

    STEP 2: Attaching the Pocket

    Pin Pocket Piece to Pillow Front piece. Baste pocket to pillow front. Set aside.

    STEP 3: Create the Pillow Back

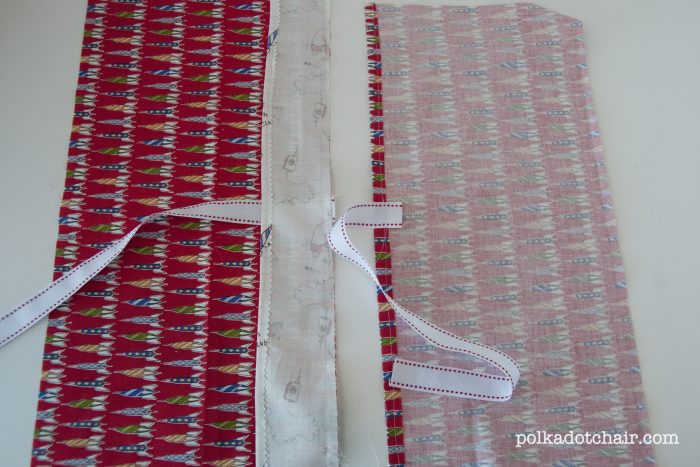
    Place about 12″ of ribbon in the center of one of your pillow back pieces along the 18″ edge.  Stitch in place.  Take your scrap piece from your pillow front and sew it to this same edge of the pillow back piece.  (as shown in the photo above) Turn under edge ¼″ and hem.

    Take your 2nd 9″x18″ pillow back piece and turn under the seam ¼″ and sew in place. Sew another piece of ribbon to the center of this piece.

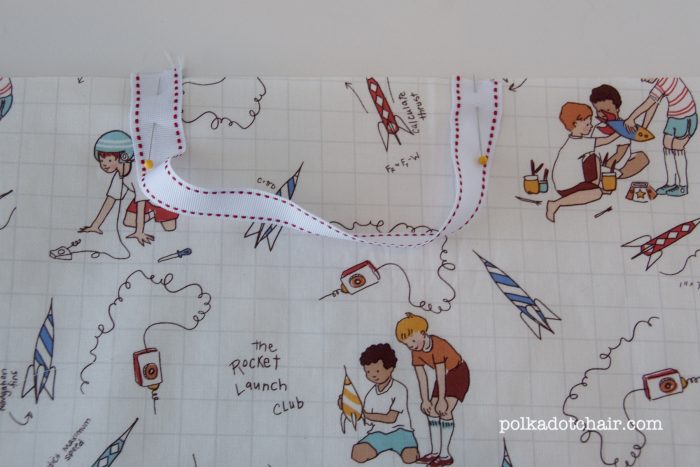
    STEP 4: Piping & Ribbon

    Attach a piece of ribbon about 10″ long to your pillow front at the top.  Each end should be 3″ in from the side of the pillow.
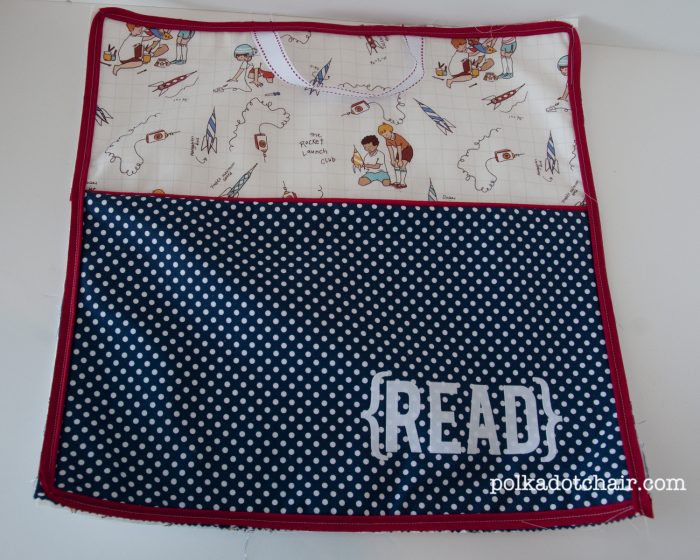
    STEP 5: Assembly

    Using your piping foot attach piping to the edge of the pillow front.  The raw edge of the piping is flush with the raw edge of the pillow front.

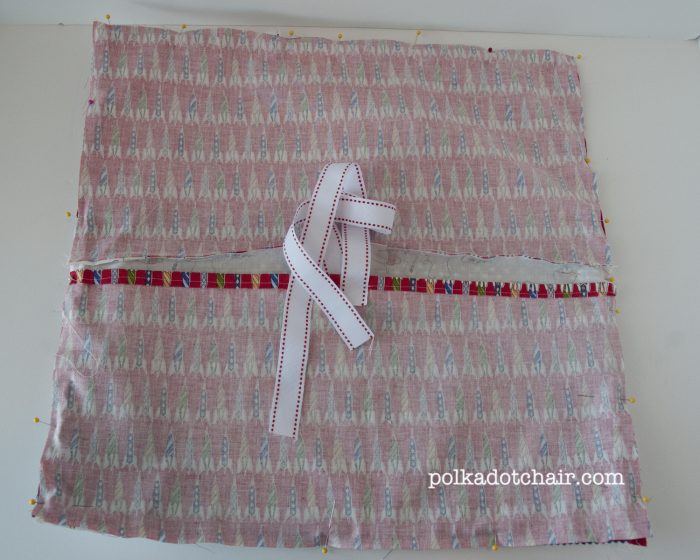
    Pin the 2 pillow back pieces to the pillow front piece. The ribbons should be matching in the center and the piece with the extra piece sewn onto it should be on top (the photo is wrong, learned that one the hard way *wink*).

    Using your piping foot sew pillow front to the pillow back along the same stitching line you used to attach your piping.

    Clip corners, turn right side out and you’re done!

    2013-11-11 14.21.31

    If you like this project, you may also like sewing projects in my book. Click here for more information

    Construction Notes

    In the years since I first wrote this tutorial, I’ve made DOZENS of reading pillows. I’ve learned a few things along the way. Here are some of my recommendations.

    1. If you are making this project from fabric yardage instead of Fat Quarters you can cut your pillow back pieces to 10″ x 18″. You can then eliminate the “strip” in the center of the back of the pillow. The strip was added because Fat Quarters do not yield enough fabric for two pieces each 10″ x 18″.
    2. I recommend adding a Zippered Back to this pillow since it is designed to be given to a child and will most likely need to be washed repeatedly. I have free instructions to add a zip back to a pillow on the blog.
    3. Make sure that you backstich when you sew over the seam where the pillow pocket attaches to the pillow front. This is a high tension point and a bit of extra stitching will help the pillow stay in place for years to come!
    4. There are so many cute book themed fabrics on the market right now. You could easily gift this pockeet pillow made with fabric that matches the book you give as well!
    project-teen-book-button
    21 Handmade Gift Ideas for Teens from Project Teen

    More fun Sewing Projects:

    Waterproof Patchwork Picnic Blanket

    Free Road Trip Pillowcase Pattern

    Sunnies, Sunglasses Case Pattern

    Sewing Pattern for an "On the Go Reading Pillow" a cute pocket pillow for kids

    More Projects You May Enjoy

    • Hot Chocolate Christmas Neighbor Gift Idea
    • Gifts for Babies & Toddlers; Things to Make & Buy
    • 25+ Things to Make & Buy for Kids as Gifts
    • 25+ Gifts for Mom; Things to Make and Buy

    • Share
    • Email

    About Author

    Melissa Mortenson

    Melissa Mortenson is a blogger, designer, and content creator. She is the Polka Dot Chair blog founder and has been sharing fresh and creative ideas with readers since 2008. She is the author of “Project Teen, Handmade Gifts your Teen will Actually Love.” Her work and designs have been featured on HuffPost, TODAY, Pioneer Woman, HGTV, BuzzFeed, Better Homes & Gardens, and many other established publications. Her first fabric line, “Derby Style,” debuted in January 2015 through Riley Blake Designs.  Additional fabric collections have followed it in subsequent years. A mom of 3, she considers herself lucky to be living in Kentucky.

    Reader Interactions

    Comments

    1. Margaret says

      September 24, 2012 at 10:36 pm

      Love your reading pillow !!!

      Reply
    2. Suzanne says

      September 25, 2012 at 9:01 am

      Love this fresh, original idea! Thanks so much for sharing. – Suzanne

      Reply
    3. Beckie says

      September 25, 2012 at 11:08 am

      This pillow is too cute! My kids love to Read! Great idea and {love} the fabric 🙂

      Reply
      • melissa says

        September 28, 2012 at 7:13 pm

        Thanks Beckie!

        Reply
    4. Denise says

      September 25, 2012 at 1:14 pm

      Just got my Christmas idea for my nieces! Love it…thanks for yet another great pattern!

      Reply
    5. Rebecca says

      September 25, 2012 at 3:43 pm

      This is adorable! I love it and am very tempted to make one for myself! And the idea of gifting with a flashlight is so cute! My year 4 teacher told us that everyone in her classes loved reading so much they all had torches so they could read past their bed time – I thought it was the cutest thing! Hope you have a great day!
      Rebecca
      http://www.heroncrafts.blogspot.com

      Reply
    6. Mary Lou says

      September 27, 2012 at 9:41 am

      I can see this as Christmas gifts with a gift card to a bookstore, too! Thanks!

      Reply
      • melissa says

        September 28, 2012 at 7:13 pm

        Ahhh! Genius!

        Reply
        • polly plum says

          December 28, 2014 at 11:39 am

          Melissa,I am new to the DIY world, and just found the tutorial for your reading pillow-I love it!!!2 questions: 1. How long does it take to make it?And2. What is a fat quarter?

          Reply
          • Melissa Mortenson says

            December 28, 2014 at 1:30 pm

            This is a pretty quick sew. A fat quarter is a quarter of a yard of fabric cut lenghwise instead of cross wise, so it’s “fat”… If you can’t find that at your local store, then buy 1/2 yard of fabric.

            Reply
    7. becky derry says

      September 28, 2012 at 2:32 am

      Thank-you for sharing your tutorial I saw it posted on craft gossip now I shall look around and join your site.Thanks

      Reply
      • melissa says

        September 28, 2012 at 7:11 pm

        So glad that you are here!

        Reply
    8. Okle Miller says

      September 29, 2012 at 2:08 pm

      Great pillow! As a school librarian I can’t think of a better gift idea to go with a good book, I like the flashlight idea too.

      Reply
    9. elsa says

      October 16, 2012 at 9:08 am

      Oh, this is a great pillow! I love to give books to the littles in my life and a pillow to go with them will be wonderful! Thanks so much for the tutorial!
      I found your blog through ‘the long thread’ blog.

      Reply
    10. Christie Harris says

      October 17, 2012 at 2:43 am

      “How I became The Stinky”
      *giggle*
      I completely love this, and have a couple of kids who would appreciate a reading pillow. Thanks for posting!

      Reply
    11. Susie Kasper says

      October 23, 2012 at 5:34 pm

      Our elementary school has “Reading Under The Stars” each year where parents and students go in the evening dressed in their PJ’s and all gather in the grounds and read books. The PTA serves hot chocolate and popcorn to go along with the reading. This is just perfect for this event.

      Reply
      • Melissa Mortenson says

        October 29, 2012 at 6:33 pm

        What a cute event! I remember doing something like that at the library when I was a kid.

        Reply
    12. Elizabeth V. says

      November 23, 2012 at 1:31 pm

      I made four of these for my nieces and nephews as Christmas presents. Thank you so much for sharing the great tutorial and helping me get a few more Christmas gifts completed!

      Reply
      • Melissa Mortenson says

        November 26, 2012 at 3:47 pm

        Oh I’m so glad you were able to use it!!

        Reply
    13. vaheeda says

      December 28, 2012 at 10:33 pm

      what a lovely pillow! I love polka dots..and ur blog is amazing with lot of clear tutorials…thanks for sharing…pls do visit my blog..http://zovascreations.blogspot.com/

      Reply
      • Melissa Mortenson says

        December 29, 2012 at 3:21 pm

        Will do!
        Thanks for visiting!

        Reply
    14. Kate says

      January 17, 2013 at 6:33 am

      Thank you for sharing this tutorial. My granddaughter is always reading and would love this pillow.

      Reply
    15. Marijke says

      February 24, 2013 at 11:53 am

      Hi Melissa,
      Please find my version of your reading pillow here: http://www.molenweg83.nl/?e=663.
      Thanks very much for sharing the pattern!
      Greets from Holland,
      Marijke

      Reply
      • Melissa Mortenson says

        February 24, 2013 at 2:19 pm

        I love your pillow! I’m so glad you liked the tutorial. We were in Holland last year, it was a wonderful trip I can’t wait to go back again.
        tot ziens!

        Melissa

        Reply
    16. Rebecca says

      May 14, 2013 at 5:20 pm

      This is sooo cute and my youngest is a book fiend! I just learned how to sew- I’ve only made a bag, a skirt that’s a just a big bottomless bag and an eye pillow. I wonder if I can pull this off? Either way, thanks for the idea- I’m pinning it for when I get courageous enough to try it!! 🙂

      Reply
      • Melissa Mortenson says

        May 15, 2013 at 5:16 pm

        You can do it ! 🙂

        Reply
    17. Texas mom in Missouri says

      November 05, 2013 at 12:55 pm

      Do you happen to have pictures of the back of the pillow? I’m a little confused as to how the back is constructed with the ribbon and two pieces. Thanks!

      Reply
    18. nicky says

      November 11, 2013 at 1:04 pm

      Hello, I’m also a bit confused about the back and about the strip of fabric underneath the ribbon. Where does that end up? I have the fabric and cushions ready but i just cant get my head around that bit.
      thanks

      Reply
      • Melissa Mortenson says

        November 11, 2013 at 2:23 pm

        The fabric strip covers the back of the pillow. When you tie the ribbons to close the pillow there is still a gap and you can see the pillow form. This strip allows you to get a clean look on the back of the pillow. I’ll upload a photo of the back today.

        Reply
    19. Kim says

      November 01, 2014 at 4:53 am

      I had to comment not only because the pillow is adorable, but the second I saw ‘The Stinky’ I recognized that book from my childhood! I now feel the need to go find The Stinky Cheese Man and read it again for memory’s sake!

      Reply
      • Melissa Mortenson says

        November 02, 2014 at 4:19 pm

        It’s one of my all time favorites! Definitely worth a second reading!

        Reply
    20. Staci says

      December 08, 2014 at 11:48 pm

      Thank you for a wonderful idea! I have a question about the ribbon. In e supply list it stats 2 yards. I think I must be missing something because I inky see where we need one 10″ piece and two 12″ pieces. I am attempting to make 9 of these before Christmas…. Thanks again for all of your continual inspiration!

      Reply
    21. Arael says

      April 20, 2015 at 3:12 pm

      What a fabulous idea! My daughter will just LOVE this 🙂 I might customize the front with her name instead of the word ‘read’, but we’ll see.

      Reply
      • Melissa Mortenson says

        April 25, 2015 at 10:16 am

        That’s a great idea!

        Reply
    22. Louise Walsh says

      November 13, 2016 at 2:18 pm

      I just made one and love it. Thank you

      Reply
    23. Joyce V. Hansen says

      December 10, 2017 at 10:51 am

      And the beat goes on. Here it is over a year after what I see is the last comment. I love the idea of this pillow and I hope to make it soon. Thank you so much for your tutorial

      Reply
    24. Lisa says

      April 08, 2018 at 6:38 pm

      This is just adorable – thank you for sharing. Just one question, when you mention ‘Attach fusible fleece to the back of the Pillow Front piece (18×18) and the pocket front piece (11×18)’ do you mean line the fabric with this?
      Thank you,
      Lisa

      Reply
      • Melissa Mortenson says

        April 09, 2018 at 1:21 pm

        Yes, the fleece irons onto the fabric, that’s why I wrote “attach”

        Reply
    25. Lorraine says

      January 13, 2019 at 2:45 pm

      Love this! Could you please let me know which fusible fleece you use?

      Thank you

      Reply
      • Melissa Mortenson says

        January 16, 2019 at 11:00 am

        I just got it at JoAnn, so just a basic fusible fleece, any kind should work though.

        Reply
    26. Barb Terpstra says

      December 07, 2019 at 8:56 am

      Just questioning the cutting–so, even though I’ll be purchasing a 18″ pillow form, I am not adding seam allowances when I cut it out. What seam allowance are you using with this pillow – the normal 5/8″? Or are you using 1/4″ seam allowance? Thanks!

      Reply
      • Melissa Mortenson says

        December 08, 2019 at 5:07 pm

        To make pillows “puffy” you always cut them the same size as the form. Then with seam allowances it makes the pillow cover just small enough that it fits the form and is not too lose. The seam allowance is determined by the piping. You sew it on, directions are in the pattern.

        Reply
    27. Molly Allen says

      November 02, 2020 at 9:52 am

      Sewing newbie here and found this in my search for beginner projects that might still make nice gifts. I’m going to make these for my nieces and nephews! I apologize if I’m missing this in the page, but does it matter what sewing needle I use? Also for the piping, am I correct that the when the raw edge is flush with the edge of the pillow piece, that means the piping part is on the inside (shouldn’t it be on the outside?). Thank you!

      Reply

    Leave a Reply Cancel reply

    Your email address will not be published. Required fields are marked *

    This site uses Akismet to reduce spam. Learn how your comment data is processed.

    Primary Sidebar

    Hello! It’s nice to meet you.

    I’m Melissa. I like to design things, like fabric, printables, and projects.

    I’m also a Mom and a Maker. I am like most of you, just trying to do my best every day. Some days I succeed, many days I fail.  I find joy in creating, if you do too, then I hope that you find something here bring a little “happy” to your life.  Find out more about me here.

    COPYRIGHT POLICY

    All my images and text are copyrighted. You may NOT use any images from this site in any kind of Video (this includes YouTube). If you would like to feature my work, you may use ONE (1) NON-COLLAGED image and must “follow” link back to my original blog post. You may NOT edit, crop, or change my images in any way without written permission. You MAY NOT print out or copy and distribute any text, images or patterns from this site. All patterns, content, instructions, and templates are for personal use ONLY! Thank you! Violators will be reported.

    Footer

    ↑ back to top

    About

    • Privacy Policy
    • Disclaimers
    • About Melissa
    • Instagram
    • Facebook
    • YouTube
    • Pinterest

    Newsletter

    • Sign Up! for emails and updates

    Contact

    • Contact
    • FAQ
    • Press
    • Published Books
    • Fabric Collections

    Welcome to the Polka Dot Chair! Here you’ll find easy, step-by-step, sewing, quilting, and crafting projects. We design projects for Makers of all skill levels. Beginners are welcome!

    DISCLAIMER:

    While every effort has been made to ensure the accuracy of the content on this website, the information is made available without warranty of any kind. The Polka Dot Chair accepts no responsibility or liability, whether direct or indirect, as to the currency or accuracy of the information, nor any consequence of its uses. This website is not intended to substitute the advice of a professional.

    Copyright © 2022 Polka Dot Chair

    [ Placeholder content for popup link ] WordPress Download Manager - Best Download Management Plugin