• Skip to primary navigation
  • Skip to main content
  • Skip to primary sidebar

The Polka Dot Chair logo

  • SEWING
    • Free Sewing Patterns
    • Bag Patterns
    • Costumes
    • Apparel
    • Learn to Sew
    • Beginner Friendly
    • Embroidery Projects
    • Tips & Techniques
    • All Sewing
  • QUILTING
    • Quilt Blocks
    • Learn to Quilt
    • Free Patterns
    • Quilt Patterns
    • All Quilting
  • CRAFTS
    • Disney
    • Cricut
    • Printables
    • All Crafts
  • HOLIDAYS
    • Seasonal Projects
    • Valentine’s Day
    • Easter
    • 4th of July
    • Halloween
    • Thanksgiving
    • Christmas
    • All Holidays
  • TUTORIALS
  • ABOUT
    • About Me
    • My Fabric Collections
    • Published Books
    • Press
    • FAQ’s
    • Contact
  • SUBSCRIBE
  • SHOP
menu icon
go to homepage
  • SHOP
  • TUTORIALS
  • SEWING
  • QUILTING
  • SUBSCRIBE
  • CRAFTS
  • HOLIDAY PROJECTS
  • ABOUT
    • Published Books
    • My Fabric Collections
  • CONTACT
    • Facebook
    • Instagram
    • Pinterest
    • YouTube
  • subscribe
    search icon
    Homepage link
    • SHOP
    • TUTORIALS
    • SEWING
    • QUILTING
    • SUBSCRIBE
    • CRAFTS
    • HOLIDAY PROJECTS
    • ABOUT
      • Published Books
      • My Fabric Collections
    • CONTACT
    • Facebook
    • Instagram
    • Pinterest
    • YouTube
  • ×

    Home » Sewing

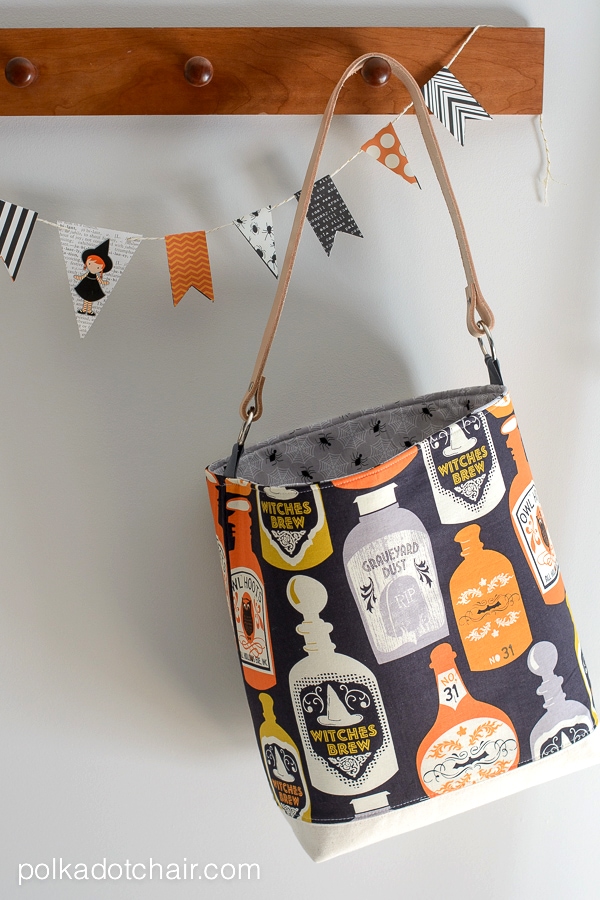
    Trick or Treat Bucket Bag Sewing Tutorial

    Updated: Oct 20, 2022 by Melissa Mortenson · This post may contain affiliate links · This blog generates income via ads · 2 Comments

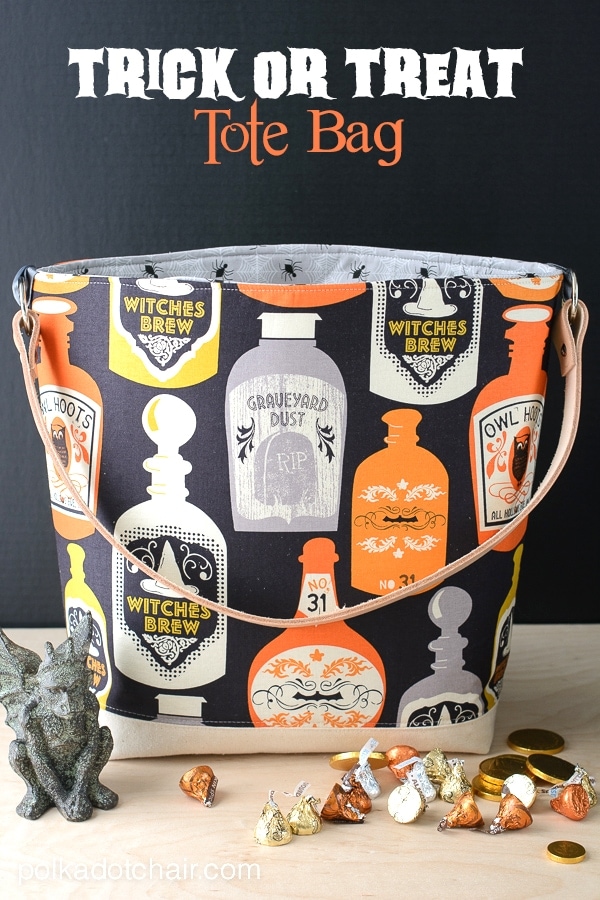
    Create a Trick or Treat Bag that’s nice enough to use year after year with this free Trick or Treat Bag Sewing Pattern. This bag features a fun and roomy bucket shape and leather handles.

    Trick or Treat Tote Bag Pattern by Melissa Mortenson of polkadotchair.com
    Table of Contents
    • How to Get the Pattern
    • About our Trick or Treat Bag Pattern
    • Supplies
    • Step One: Sew the Bag
    • Step Two: Add the Loops for the Leather Handles
    • How to Add the Leather Handle
    • A few Other Fun Halloween Sewing Projects

    Don’t your kids need a new Trick or Treat bag??? Come on; you know you want to sew up some of that Halloween fabric in your stash!!

    I always LOVE all of the Halloween fabrics that you see in stores every year, and I tend to buy more than my fair share. I’ve got quite a collection of Halloween fabric now!

    As much as I love to collect Halloween fabric, I also love to sew with it.  I realized that I’ve never sewn a Trick or Treat bag for my kids and decided it was time to change that.  

    I also decided that if I was going to make a trick-or-treat tote bag, that I’d make it nice enough to last for a few years and big enough to tote LOTS of candy!!

    Trick or Treat Tote Bag Pattern by Melissa Mortenson of polkadotchair.com

    How to Get the Pattern

    Option 1:

    You can now purchase a PRINTABLE copy of this pattern bundled with 2 of our most popular Halloween sewing projects! Find out more information in the shop, or click below to buy it.

    Option 2:

    Read the directions on this page. To print it, you can use a 3rd party service, like Print Friendly.

    About our Trick or Treat Bag Pattern

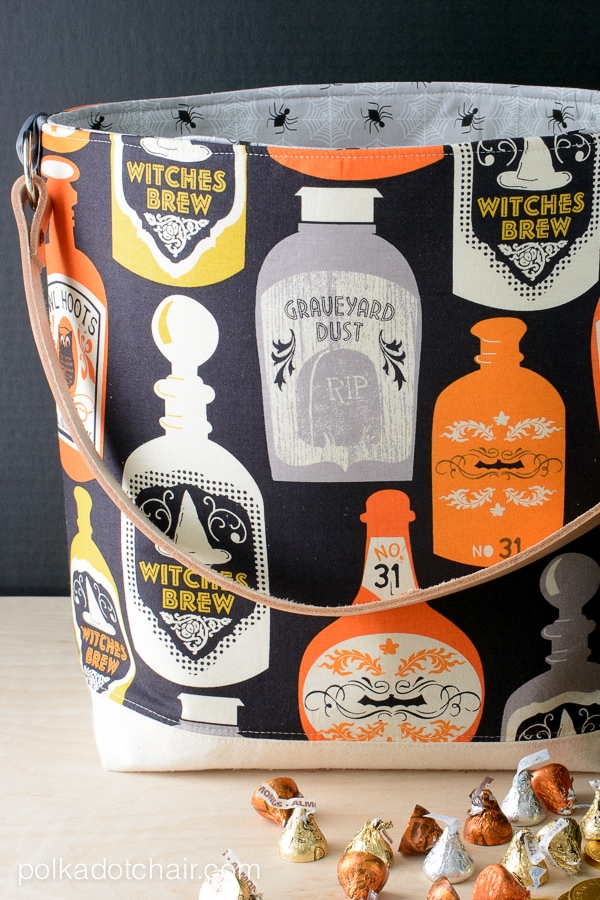
    This tote bag has a canvas bottom to make it nice and sturdy and a leather handle to dress it up a bit! Yep, a leather handle. Trust me; it’s not complicated to add the touch of leather; let me tell you a secret — it’s actually a leather belt blank that you can get at many craft stores for about $5!

    Supplies

    Here’s what you’ll need to make the bag:

    • Fabric cut to 12″ tall x 17″ wide for the tote front and back; 2 pieces
    • Fabric cut to 16″ tall x 17 wide for the tote lining; 2 pieces
    • Canvas 17″ wide by 5″ tall; 2 pieces
    • Heavyweight sew-in interfacing (I used Thermoweb Sew In Non-Woven, Firm)
    • Lightweight Fusible Interfacing
    • Leather Belt Blank
    • Heavy-Duty Hole Punch
    • Grommets for Leather
    • 2 purse rings
    • 2″ wide ribbon
    • Fray Check
    Trick or Treat Tote Bag Pattern by Melissa Mortenson of polkadotchair.com

    All seam allowances are ½″ unless otherwise stated

    Step One: Sew the Bag

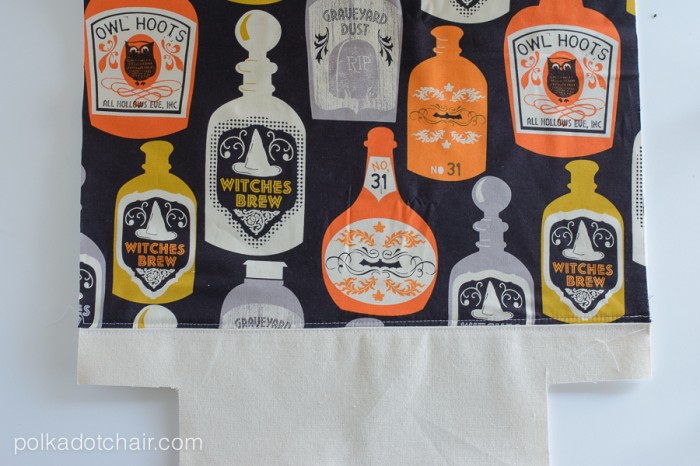
    Begin by cutting a 3″x3″ square from the bottom two corners of the 17″ side of the  17″ x 5″ canvas pieces and the 16″ x 17″ lining pieces.

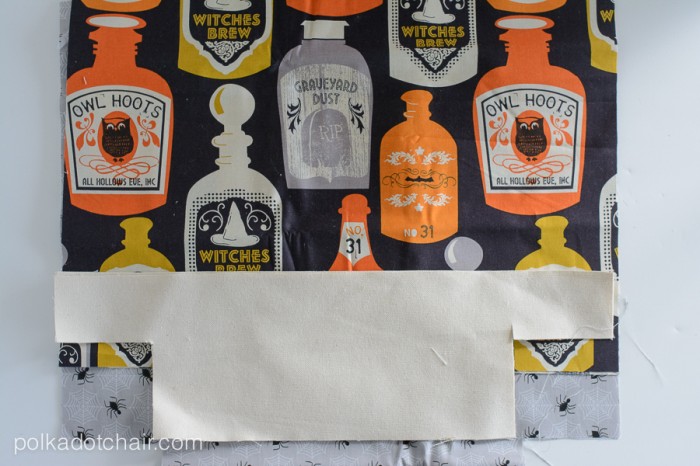
    Next, sew the 12″ x 17″ tote bag front piece to one of the 5″ x 17″ canvas pieces. Press the seam open. Repeat for the tote bag back piece.

    Cut a piece of heavyweight, interfacing the same size as the tote bag’s front and back pieces.

    Trick or Treat Tote Bag Pattern by Melissa Mortenson of polkadotchair.com

    Pin the interfacing to the wrong side of the tote bag’s front and back pieces. Top stitch along both sides of the seam between the tote bag fabric and the canvas. Do this for the front and the back pieces. This will help to keep the interfacing in place as you sew and give you a nice finished look.

    Sew the tote bag’s front and back pieces together along the bottom seam. (Just the straight seam, don’t sew in the spot that you cut the 3″ square from) Press the seam open.

    Sew the two sides seams of the tote. Press seams open.

    Trick or Treat Tote Bag Pattern by Melissa Mortenson of polkadotchair.com

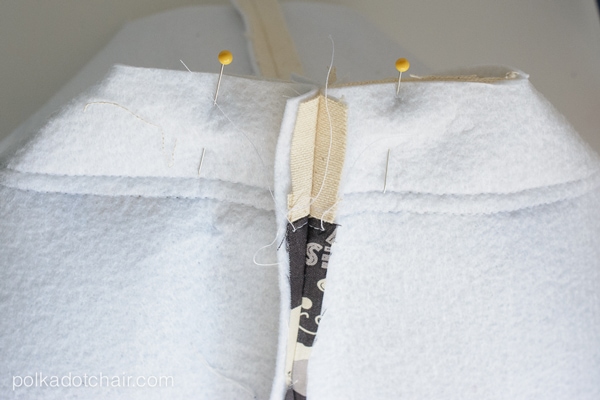
    Pinch the bottom corners of the tote so that the raw edges of the portion of the bag with the 3″ square cut-out meet.

    Stitch with a ¼″ seam allowance, making sure to backstitch.

    Turn right side out.

    Cut two pieces of lightweight interfacing the same size as the two lining pieces. Fuse the interfacing to the wrong side of the lining pieces.

    Sew the lining pieces together the same way that you sewed the tote bag’s outside pieces together.

    Step Two: Add the Loops for the Leather Handles

    Trick or Treat Tote Bag Pattern by Melissa Mortenson of polkadotchair.com

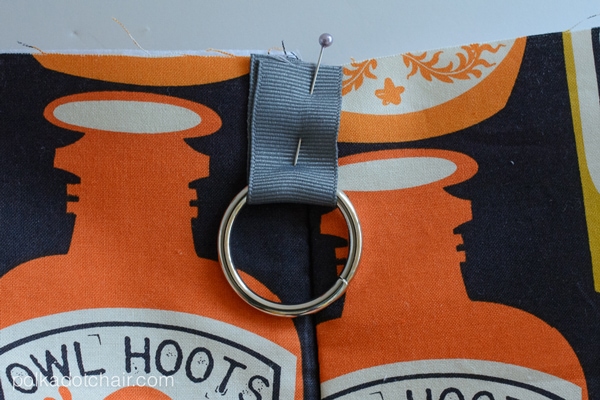
    Cut a piece of ribbon to 3″. Feed the ring through and pin it to the tote bag’s outside piece on top of the side seam. Repeat for other side. Use a bit of fray check on the ends of the ribbon to keep the ribbon from fraying and tearing out of the seam.

    Slip the tote bag outside into the tote bag lining.  RIGHT sides facing. Pin.

    Trick or Treat Tote Bag Pattern by Melissa Mortenson of polkadotchair.com

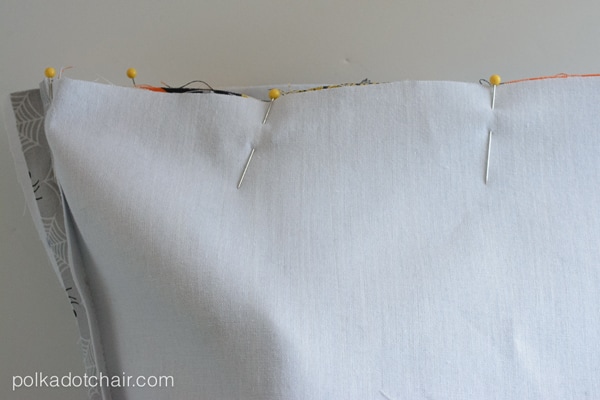
    Sew around the entire perimeter of the tote bag, leaving a 5″ opening on one side to turn the bag right side out. Turn the bag right side out. Press. Top stitch catching the opening in the tote bag as you go.

    How to Add the Leather Handle

    Cut your leather belt blank to the length you like; mine was 28″ long. Using a heavy-duty hole punch, punch two holes in the ends of the leather (hint, to cut the leather use a rotary cutter).

    leather handbag handles

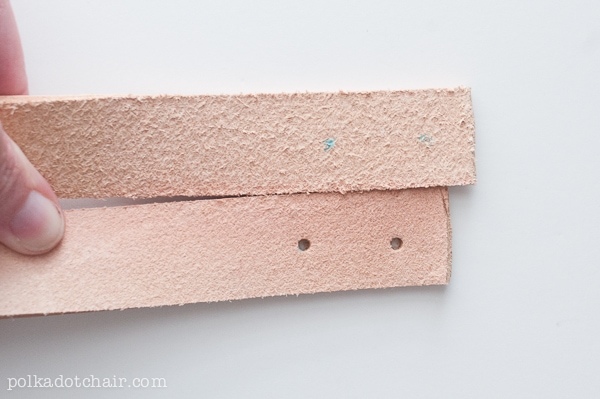
    Feed through the O ring and attach with a leather grommet. If you’d like more information about using leather handles on sewn bags, you can visit this tutorial on my blog. 

    Trick or Treat Tote Bag Pattern by Melissa Mortenson of polkadotchair.com

    That’s it!! I hope that your little trick-or-treater enjoys their bag!!

    This Trick or Treat Bag Sewing Tutorial first appeared on Tatertots & Jello. I’m bringing it back home to share it with all of you!

    A few Other Fun Halloween Sewing Projects

    Trick or Treat Canvas Halloween Banner Tutorial

    Witch’s Silhouette Pillow Pattern

    15 Must Know Bag Making Tips

    More Projects You May Enjoy

    • 25 Free Patchwork Quilted Pillow Patterns
    • Mini Fabric Envelope Sewing Pattern
    • Meet My Valentine’s Day Fabric Collection
    • 40 Valentine’s Day Projects to Sew

    • Share
    • Email

    About Author

    Melissa Mortenson

    Melissa Mortenson is a blogger, designer, and content creator. She is the Polka Dot Chair blog founder and has been sharing fresh and creative ideas with readers since 2008. She is the author of “Project Teen, Handmade Gifts your Teen will Actually Love.” Her work and designs have been featured on HuffPost, TODAY, Pioneer Woman, HGTV, BuzzFeed, Better Homes & Gardens, and many other established publications. Her first fabric line, “Derby Style,” debuted in January 2015 through Riley Blake Designs.  Additional fabric collections have followed it in subsequent years. A mom of 3, she considers herself lucky to be living in Kentucky.

    Reader Interactions

    Comments

    1. deb heisel says

      November 05, 2014 at 1:37 am

      i just discovered you and i’m so thankful that i did. i’d like to try and make your halloween bag with regular fabrics and would like to know the width of the leather handles. thank you, deb

      Reply
    2. Heather Knapp says

      September 23, 2016 at 8:52 pm

      What is the name of the fabric??? I must have it! Thanks!

      Reply

    Leave a Reply Cancel reply

    Your email address will not be published. Required fields are marked *

    This site uses Akismet to reduce spam. Learn how your comment data is processed.

    Primary Sidebar

    Hello! It’s nice to meet you.

    I’m Melissa. I like to design things, like fabric, printables, and projects.

    I’m also a Mom and a Maker. I am like most of you, just trying to do my best every day. Some days I succeed, many days I fail.  I find joy in creating, if you do too, then I hope that you find something here bring a little “happy” to your life.  Find out more about me here.

    COPYRIGHT POLICY

    All my images and text are copyrighted. You may NOT use any images from this site in any kind of Video (this includes YouTube). If you would like to feature my work, you may use ONE (1) NON-COLLAGED image and must “follow” link back to my original blog post. You may NOT edit, crop, or change my images in any way without written permission. You MAY NOT print out or copy and distribute any text, images or patterns from this site. All patterns, content, instructions, and templates are for personal use ONLY! Thank you! Violators will be reported.

    Footer

    ↑ back to top

    About

    • Privacy Policy
    • Disclaimers
    • About Melissa
    • Instagram
    • Facebook
    • YouTube
    • Pinterest

    Newsletter

    • Sign Up! for emails and updates

    Contact

    • Contact
    • FAQ
    • Press
    • Published Books
    • Fabric Collections

    Welcome to the Polka Dot Chair! Here you’ll find easy, step-by-step, sewing, quilting, and crafting projects. We design projects for Makers of all skill levels. Beginners are welcome!

    DISCLAIMER:

    While every effort has been made to ensure the accuracy of the content on this website, the information is made available without warranty of any kind. The Polka Dot Chair accepts no responsibility or liability, whether direct or indirect, as to the currency or accuracy of the information, nor any consequence of its uses. This website is not intended to substitute the advice of a professional.

    Copyright © 2022 Polka Dot Chair

    [ Placeholder content for popup link ] WordPress Download Manager - Best Download Management Plugin