• Skip to primary navigation
  • Skip to main content
  • Skip to primary sidebar

The Polka Dot Chair logo

  • SEWING
    • Free Sewing Patterns
    • Bag Sewing Patterns
    • Costumes Sewing Tutorials
    • Apparel Sewing Patterns
    • Learn to Sew
    • Beginner Friendly Sewing Projects
    • Hand Embroidery Patterns
    • Tips & Techniques
    • All Sewing
  • QUILTING
    • Quilt Block Patterns
    • Learn to Quilt
    • Free Quilt Patterns
    • Quilt Patterns
    • All Quilting
  • CRAFTS
    • Disney
    • Cricut
    • Printables
    • All Crafts
  • HOLIDAYS
    • Seasonal Projects
    • Valentine’s Day
    • Easter
    • 4th of July
    • Halloween
    • Thanksgiving
    • Christmas
    • All Holidays
  • TUTORIALS
  • ABOUT
    • About Me
    • My Fabric Collections
    • Published Books
    • Press
    • FAQ’s
    • Contact
  • SUBSCRIBE
  • SHOP
menu icon
go to homepage
  • SHOP
  • TUTORIALS
  • SEWING
  • QUILTING
  • SUBSCRIBE
  • CRAFTS
  • HOLIDAY PROJECTS
  • ABOUT
    • Published Books
    • My Fabric Collections
  • CONTACT
    • Facebook
    • Instagram
    • YouTube
  • subscribe
    search icon
    Homepage link
    • SHOP
    • TUTORIALS
    • SEWING
    • QUILTING
    • SUBSCRIBE
    • CRAFTS
    • HOLIDAY PROJECTS
    • ABOUT
      • Published Books
      • My Fabric Collections
    • CONTACT
    • Facebook
    • Instagram
    • YouTube
  • ×

    Home » Sewing

    Charming Patchwork Pincushion Tutorial

    Updated: Apr 10, 2023 by Melissa Mortenson · This post may contain affiliate links · This blog generates income via ads · 4 Comments

    Turn a few of your favorite fabric scraps into a simple and cute pincushion with our free Charming Patchwork Pincushion Pattern.

    pink patchwork pincushion on gingham paper with sewing notions

    Today’s project is perfect for using up some of your fabric scraps! I never know quite what to do with all of my scraps, it feels wasteful to throw them out, but at the same time, I feel like I’m buried in fabric at times.

    Table of Contents
    • About the Pincushion
    • What Filling to Use in a Pincushion
    • Instructions
    • You May Also Like

    Aside from donating the fabric (always a great option), you can sort and save your scraps for smaller projects.

    About the Pincushion

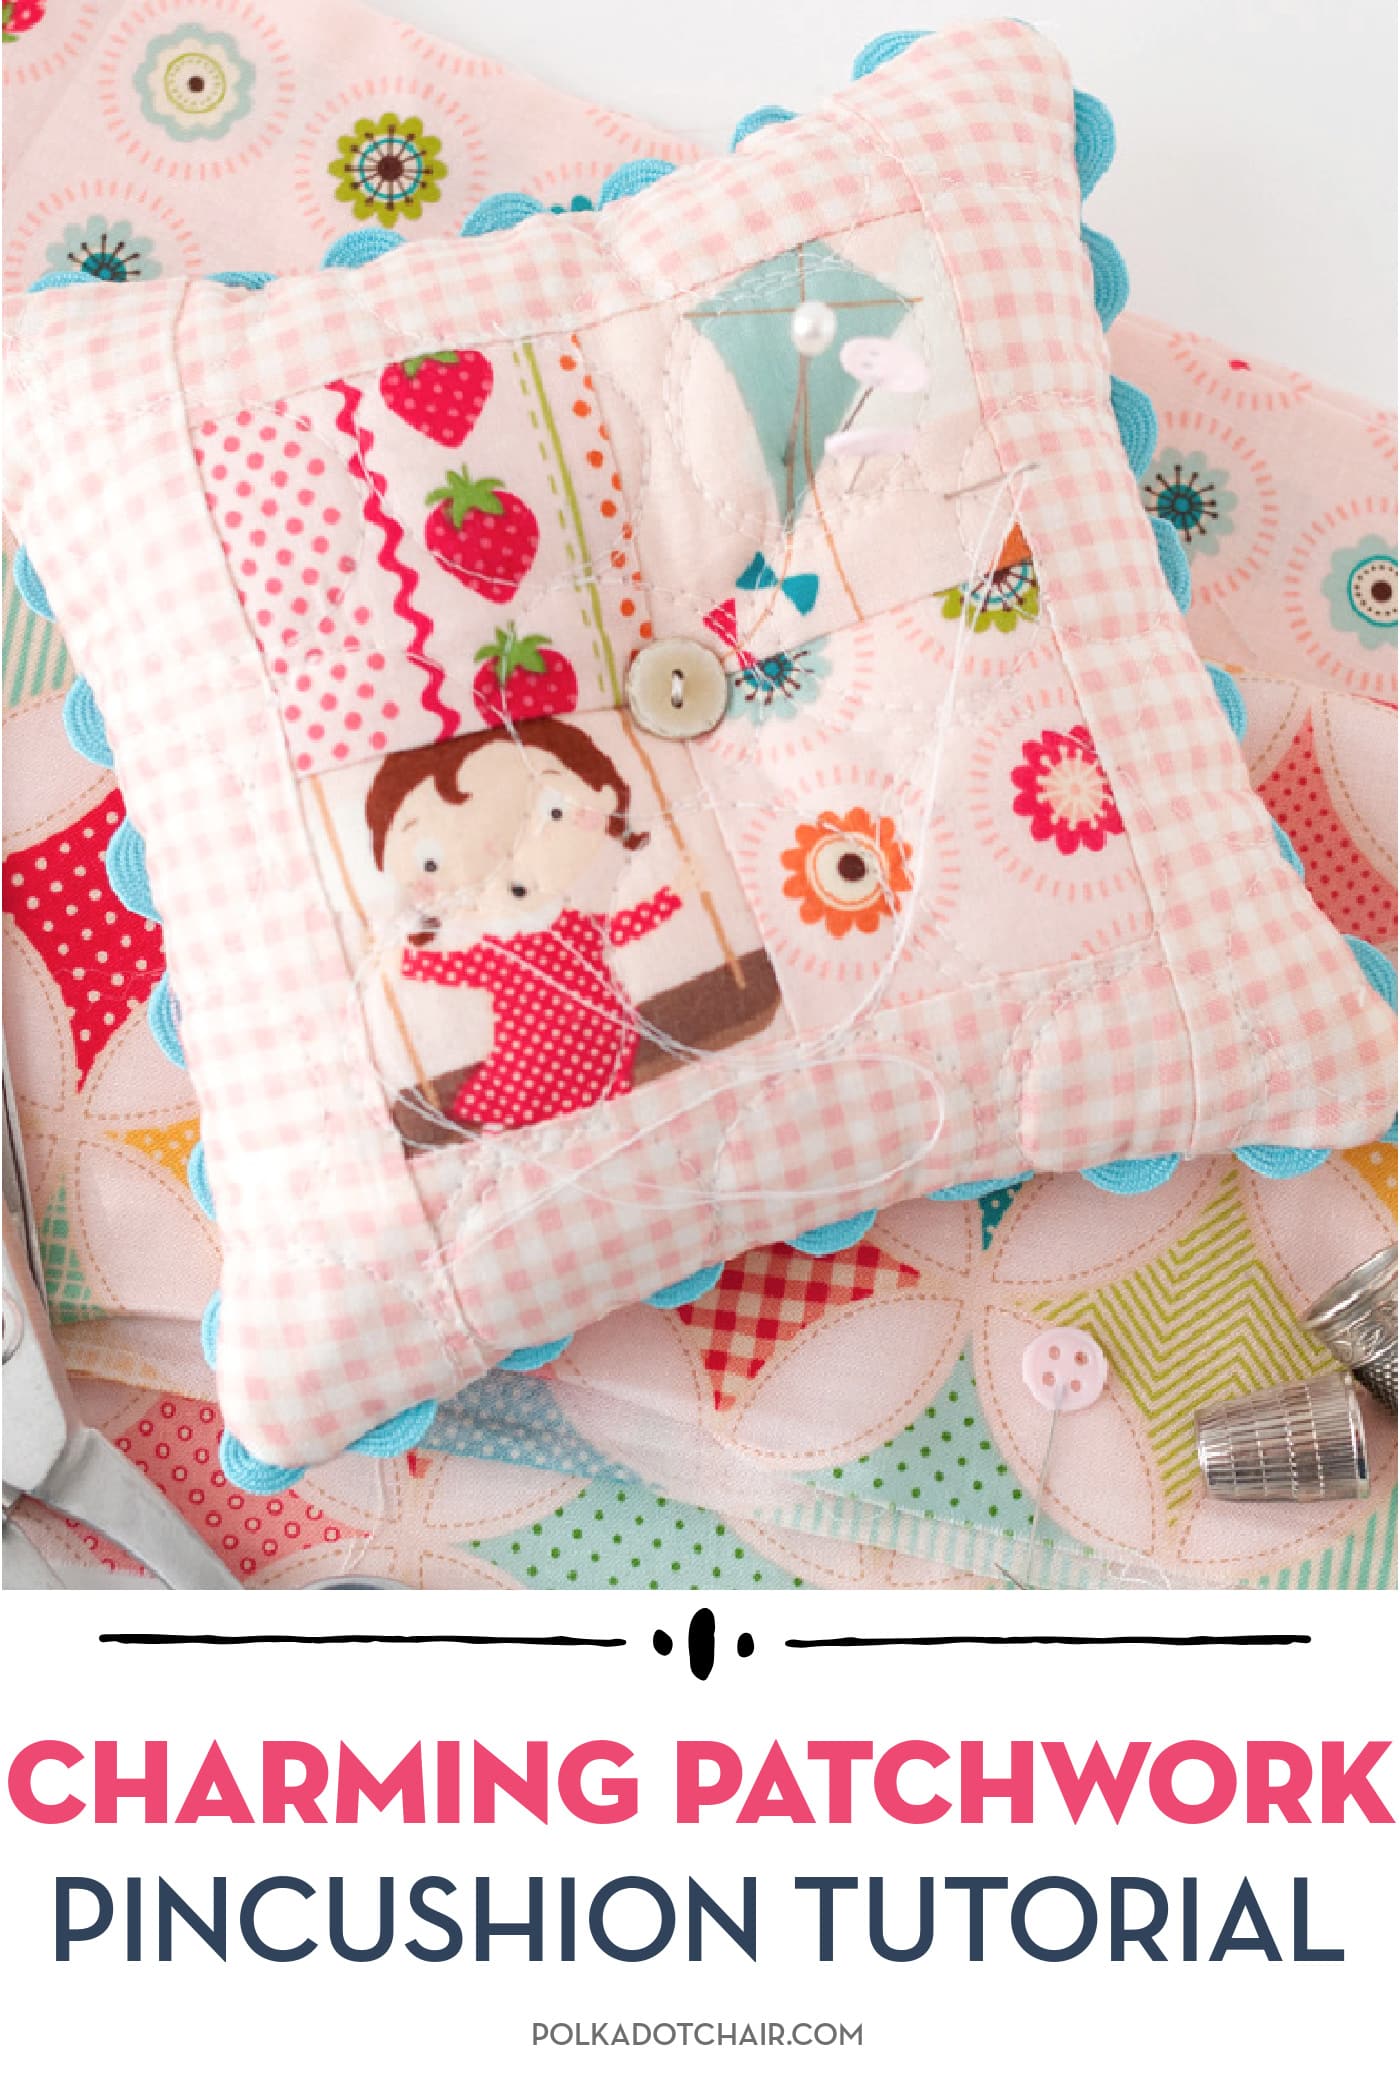
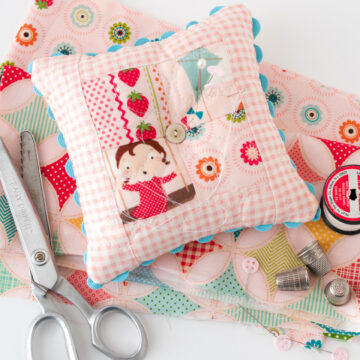
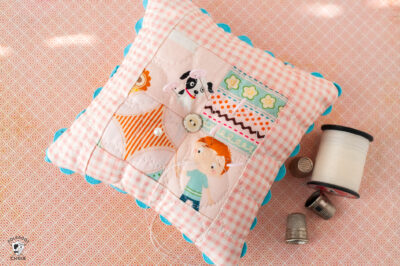
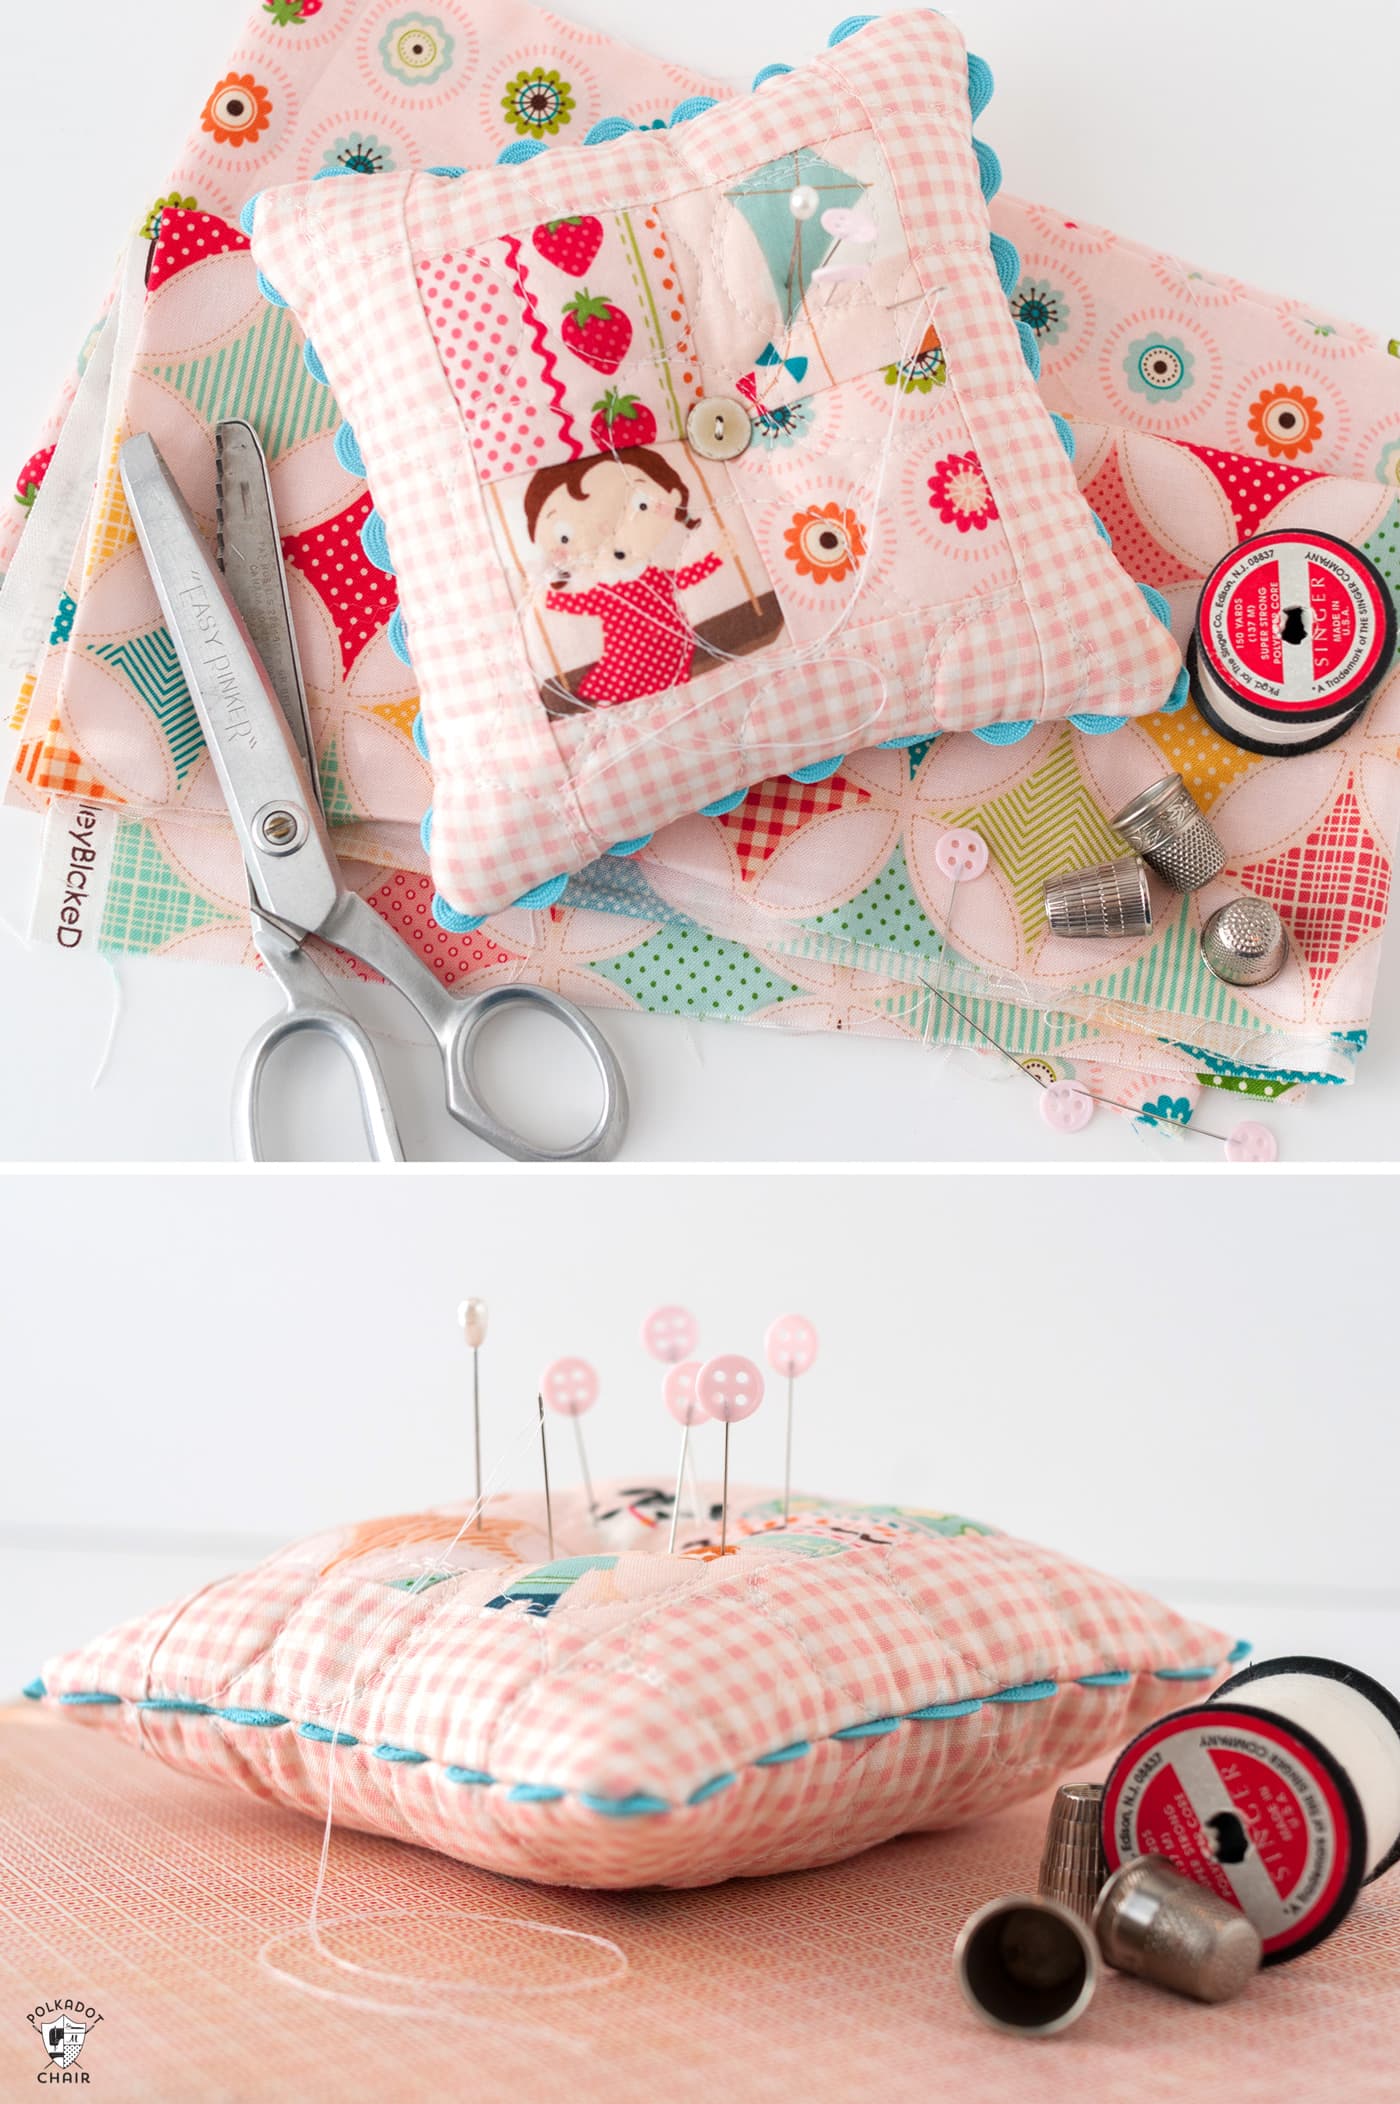
    This simple patchwork pincushion is created from fabric scraps that are 2 ½″ square. The fabrics on the pincushion are fussy cut, which makes it a bit “extra cute”.

    As I was choosing which fabrics to use for the project, I thought about trying to tell a little story with the fabrics I chose.

    pink patchwork pincushion on gingham paper with sewing notions

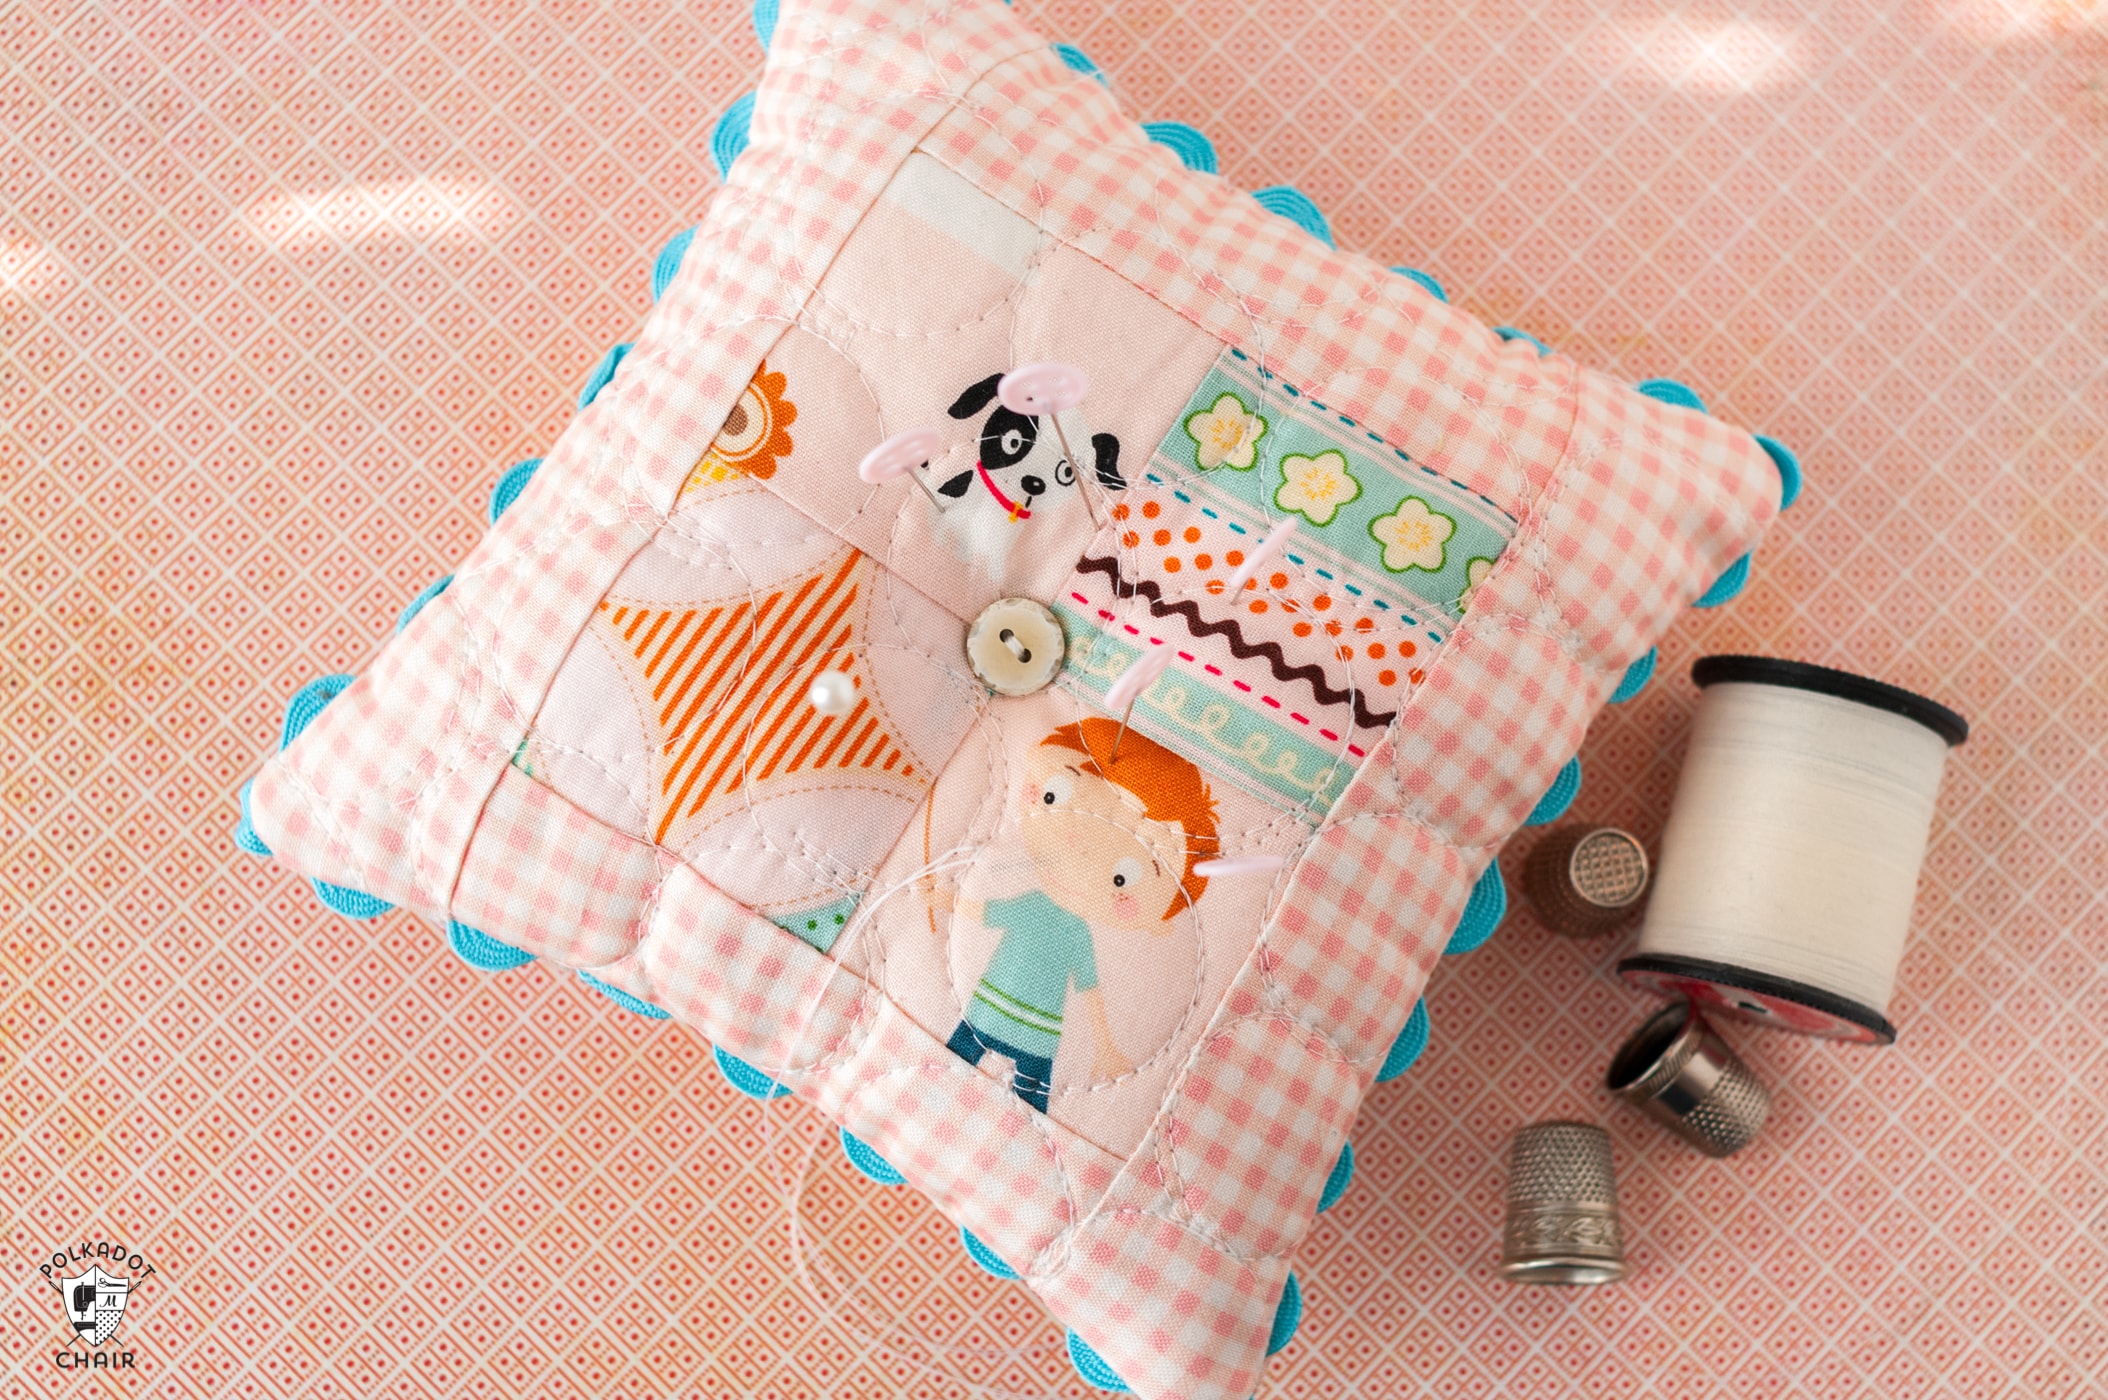
    The pincushion is also double-sided!

    Since I know you will ask, the fabric is from Riley Blake and October Afternoon. I’m quite sure it’s no longer in print. As I said, this is all about using up some of your scraps!

    What Filling to Use in a Pincushion

    pink patchwork pincushion on gingham paper with sewing notions

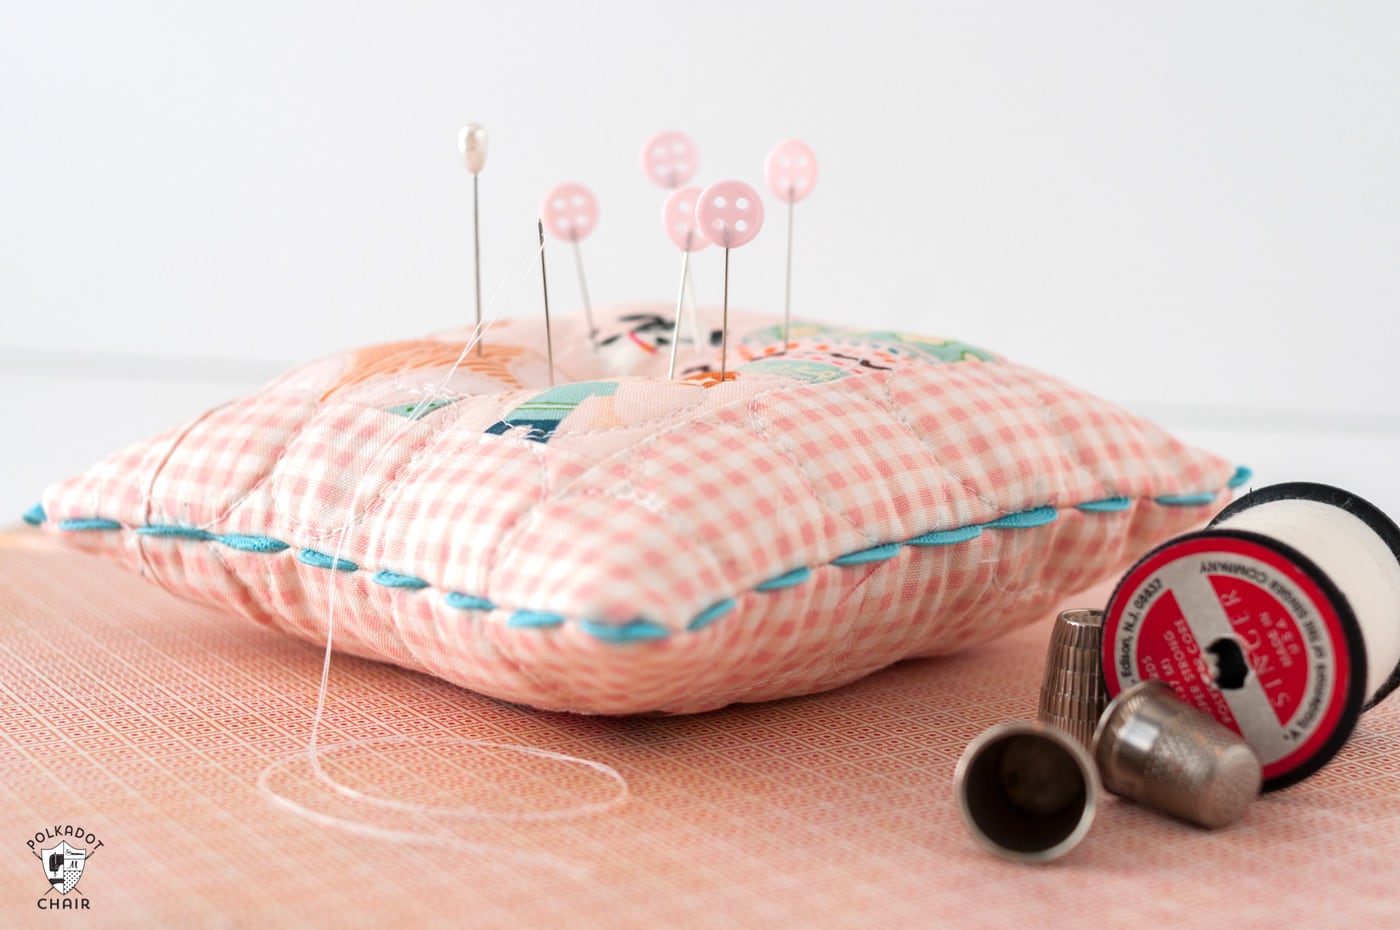
    Many people like to use walnut shells in their pincushions. The shell’s abrasive nature helps to keep your pins sharp, and it doesn’t add extra weight.

    However, it doesn’t give you that “poofy” look that you may want for your pincushion. For this reason, I like to use a combination of walnut shells and polyester fiber fill. You can also use lanolin wool if you don’t want to polyester.

    Pincushion Supplies

    • 8 large scraps of fabric at least 2 ½″ square.
    • Fat Quarter of fabric for borders
    • One package ric rack
    • Polyester fiber fill
    • Walnut Shells
    • 2 buttons
    • Long needle

    Instructions

    pink patchwork pincushion on white table with sewing notions

    Charming Patchwork Pincushion Pattern

    Melissa Mortenson
    Turn some of your favorite fabric scraps into a cute and useful handmade pincushion.
    No ratings yet
    Pin It! Share by Email Share on Facebook
    Prep Time 30 minutes mins
    Active Time 2 hours hrs
    Total Time 2 hours hrs 30 minutes mins

    Equipment

    • Sewing Machine
    • Basic Sewing Tools
    • Rotary Cutter
    • Cutting Mat
    • Quilt Ruler
    • Pins
    • Long Needle

    supplies

    • 8 large scraps Fabric cut to 2 ½″ squares I fussy cut mine to show off the cute illustrations – fabric is from Riley Blake Designs and is several years old.
    • 1 Fat Quarter Fabric For borders
    • 1 yard Ric Rack
    • 2 scraps fabric each 8″ x 8″ these will not show, use any light color
    • 2 pieces Cotton batting cut to 8″ x 8″
    • 1 package Walnut shells
    • 1 large piece polyester fiber fill
    • 2 buttons
    • spool Upholstery Thread

    Instructions
     

    Step One: Piece the Front & Back

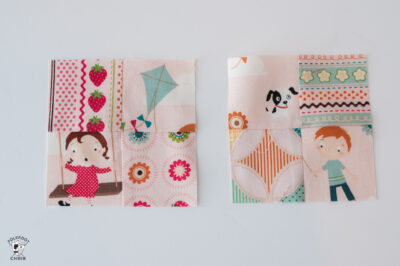
    • Sew four of your 2 ½″ squares together in a 2×2 format.
      Repeat, one of these pieces will be the front of the pincushion, the other is the back.
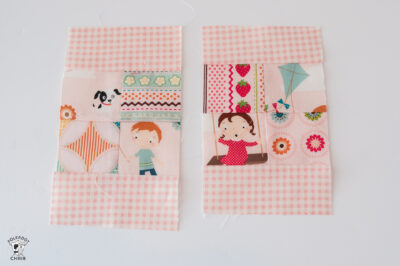
      pink patchwork squares on white table top
    • From the border fabric cut:
      4 pieces each 2" x 4 ½"
      4 pieces each 2" x 8"
    • Sew one 2" x 4 ½" strip to the top and bottom of the patchwork piece for the front of the pincushion.
      pink patchwork squares on white table top
    • Sew one 2" x 8" strip to the sides.
      Press well and trim and square up the piece to 7 ½" x 7 ½".
      Repeat for the patchwork piece for the back of the pincushion.
      pink patchwork squares on white table top

    Step Two: Quilt

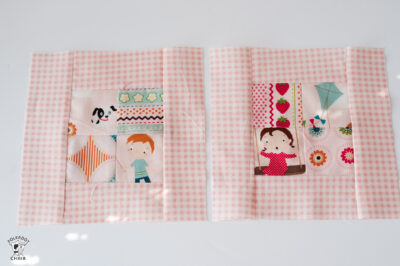
    • Next you will want to add some quilting detail to the pincushion top and bottom pieces.
      Make a quilt “sandwich” with a scrap piece of fabric, a piece of batting then the quilted piece on top.
      pink patchwork squares on white table top
    • Quilt as desired, I free motion quilted some circles, but you can also do straight line quilting with a walking foot.
    • Trim your pieces so that your batting all layers are even.

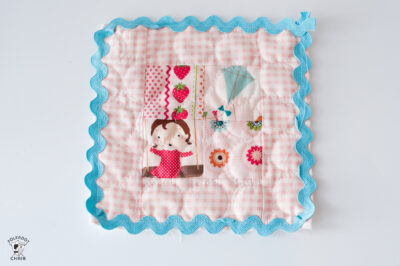
    Step Three: Add Trim

    • Stitch your rick rack to the edge of your quilted front piece.
      To do this stitch right down the middle of the rick rack, pivoting at the corners. TIP: Start stitching at a corner so you can hide the raw edges of your trim in the seam allowance.
      pink patchwork squares on white table top
    • Place the quilted front and back pieces together, right sides facing and sew together.
      Stitch on top of the stitching line you used to attach the ric rack.
      Leave a 2" opening on one side so you can turn it right side out.
    • Turn right side out.

    Finishing

    • Stuff with a combination of walnut shells and stuffing. Hand stitch opening closed.
    • Using upholstery thread, stitch a button to the center of each side of the pin cushion. I find it’s easiest to first do a few stitches to “pinch” the pincushion, then add the buttons at the end.
      pink patchwork pincushion on gingham paper with sewing notions
    PRINT
    Tried this tutorial?Let us know how it was!

    This post has been updated from a previous version published in 2012.

    You May Also Like

    • Learn How to Make a Pincushion with Wool Applique
    • How to make your own Pincushion with a Pocket
    • Dresden Burst Baby Quilt Tutorial

    pink patchwork pincushion on gingham paper with sewing notions

    More Projects You May Enjoy

    • girl throwing giant pillow outdoors
      DIY Giant Floor Pillow Pattern
    • two brightly colored pillows with jockey silk applique on gray chair
      DIY Derby Jockey Silks Pillows
    • collage image with minky fabric and baby blanket
      How to Sew with Minky Fabric: Easy Tips for a Beginner
    • two thread spools on cutting mat in front of thread case
      Thread Weights Used In Machine Quilting Explained

    • Share
    • Email

    About Author

    Melissa Mortenson

    Melissa Mortenson is a blogger, designer, and content creator. She is the Polka Dot Chair blog founder and has been sharing fresh and creative ideas with readers since 2008. She is the author of “Project Teen, Handmade Gifts your Teen will Actually Love.” Her work and designs have been featured on HuffPost, TODAY, Pioneer Woman, HGTV, BuzzFeed, Better Homes & Gardens, and many other established publications. Her first fabric line, “Derby Style,” debuted in January 2015 through Riley Blake Designs.  Additional fabric collections have followed it in subsequent years. A mom of 3, she considers herself lucky to be living in Kentucky.

    Reader Interactions

    Comments

    1. Clara {Clover and Violet} says

      May 28, 2012 at 1:03 pm

      Cute, really love the fabric you used!

      Reply
    2. Gayle says

      May 30, 2012 at 4:51 pm

      Very pretty, love the fabric.

      Reply
    3. Christine S says

      February 04, 2016 at 1:33 pm

      So cute, thanks 🙂

      Reply
    4. Federica says

      April 12, 2023 at 1:33 pm

      Thank you, Melissa. It is lovely!

      Reply

    Leave a Reply Cancel reply

    Your email address will not be published. Required fields are marked *

    This site uses Akismet to reduce spam. Learn how your comment data is processed.

    Primary Sidebar

    Hello! It’s nice to meet you.

    I’m Melissa. I like to design things, like fabric, printables, and projects.

    I’m also a Mom and a Maker. I am like most of you, just trying to do my best every day. Some days I succeed, many days I fail.  I find joy in creating, if you do too, then I hope that you find something here bring a little “happy” to your life.  Find out more about me here.

    COPYRIGHT POLICY

    All my images and text are copyrighted. You may NOT use any images from this site in any kind of Video (this includes YouTube). If you would like to feature my work, you may use ONE (1) NON-COLLAGED image and must “follow” link back to my original blog post. You may NOT edit, crop, or change my images in any way without written permission. You MAY NOT print out or copy and distribute any text, images or patterns from this site. All patterns, content, instructions, and templates are for personal use ONLY! Thank you! Violators will be reported.

    Footer

    ↑ back to top

    About

    • Privacy Policy
    • Disclaimers
    • About Melissa
    • Instagram
    • Facebook
    • YouTube
    • Pinterest

    Newsletter

    • Sign Up! for emails and updates

    Contact

    • Contact
    • FAQ
    • Press
    • Published Books
    • Fabric Collections

    Welcome to the Polka Dot Chair! Here you’ll find easy, step-by-step, sewing, quilting, and crafting projects. We design projects for Makers of all skill levels. Beginners are welcome!

    DISCLAIMER:

    While every effort has been made to ensure the accuracy of the content on this website, the information is made available without warranty of any kind. The Polka Dot Chair accepts no responsibility or liability, whether direct or indirect, as to the currency or accuracy of the information, nor any consequence of its uses. This website is not intended to substitute the advice of a professional.

    Copyright © 2022 Polka Dot Chair

    [ Placeholder content for popup link ] WordPress Download Manager - Best Download Management Plugin