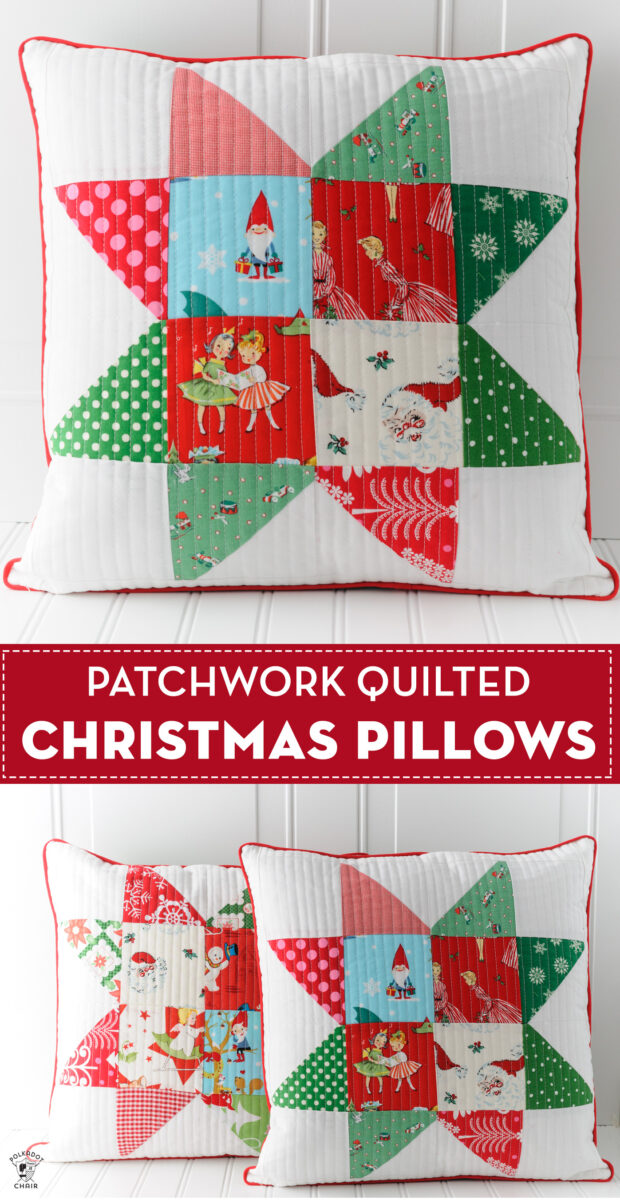
Patchwork Quilted Christmas Pillows
Today I’m sharing with you a free quilting tutorial for these Patchwork Quilted Christmas Pillows made from Christmas Fabric. If you like this project you may also love this Log Cabin Quilted Pillow Tutorial.
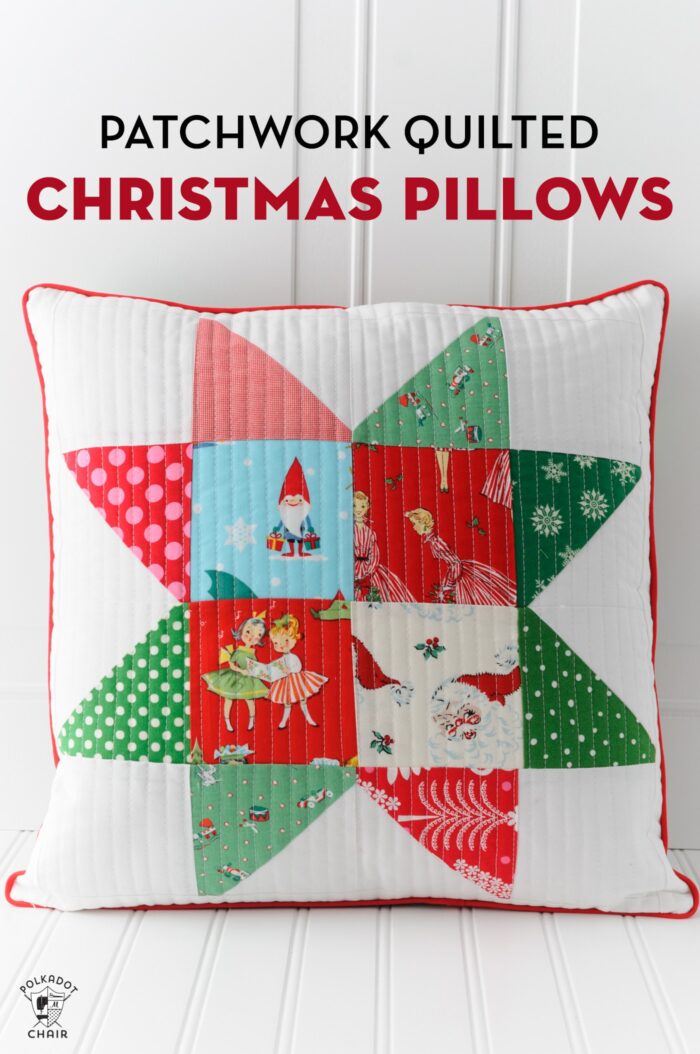
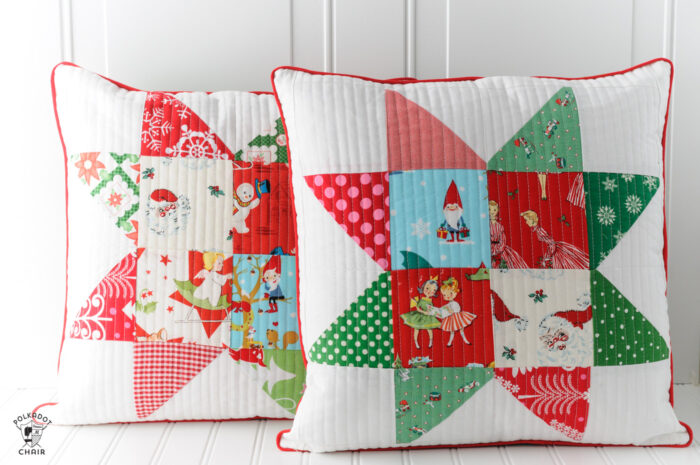
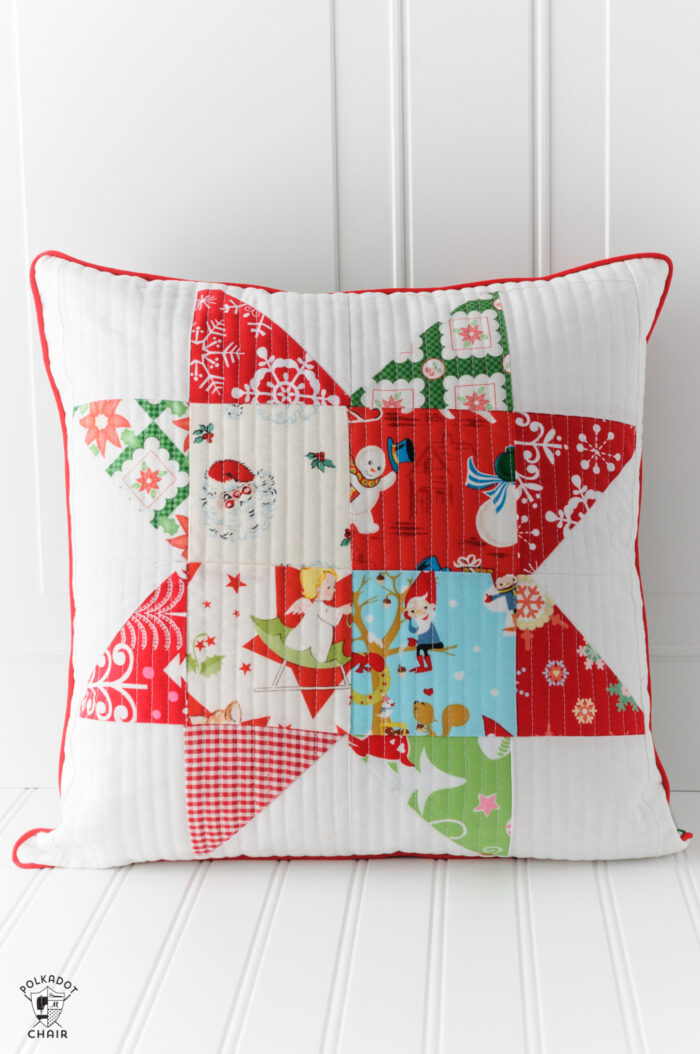
I’m excited to share with you a tutorial for these cute Patchwork Christmas pillows. I made them as gifts several years ago and was smart enough to keep two for myself!
About the Christmas Pillows:
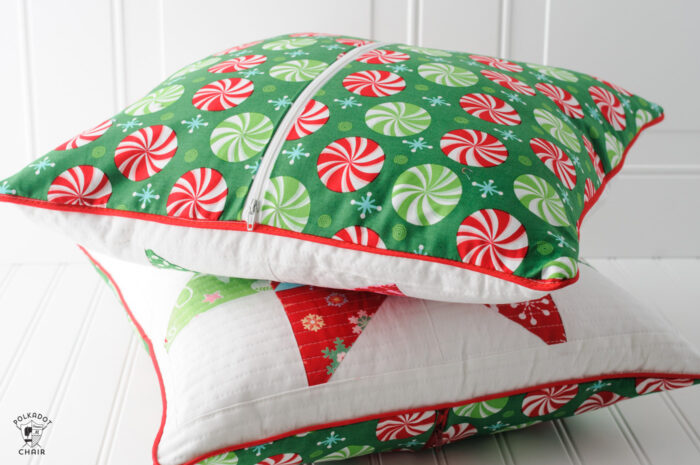
These Christmas pillows are made to fit an 18” pillow form as are my Ghastlie Halloween Pillows. I make all of my Holiday pillows 18″ x 18″.
The reason I did this is that I like the idea that I could buy one 18” pillow form then switch off the cover depending on the holiday or season. I can see this same pattern in bright colors for summer or in warm tones for fall.
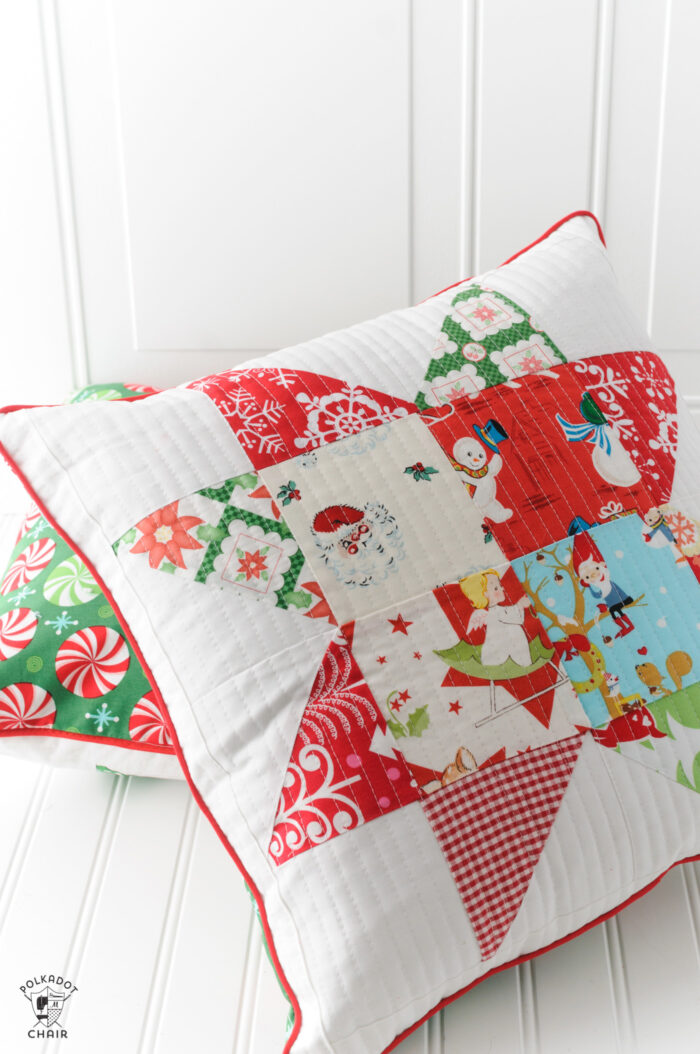
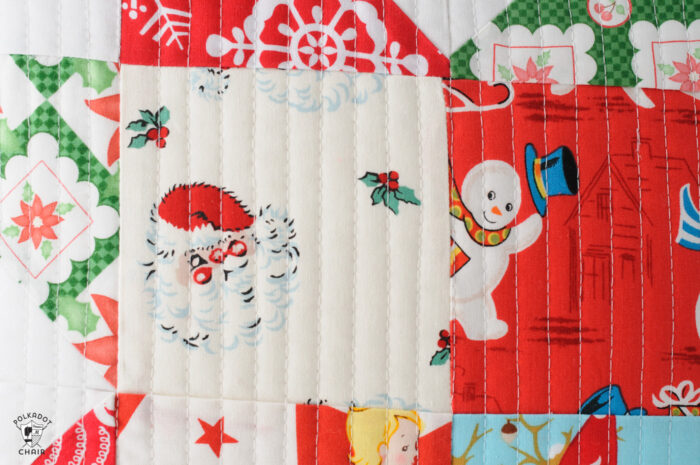
One year, I made a bunch of these as Christmas gifts for close friends and family members. Most of the fabrics came from a quilt pack that I bought from Amy Smart. I never got around to making the quilt so instead used the squares for these pillows.
About the Christmas Fabrics:
I love to collect Holiday fabrics. When I see ones that I love, I pick them up and save them for my stash. I don’t worry too much about what specific purpose I’ll use the fabric for, but I always seem to find a use. Last fall I made a Halloween quilt with some of my collection of Halloween fabrics.
Most of these are vintage or out of print. But they would be adorable made with my upcoming fabric line, Santa Claus Lane from Riley Blake Designs. The line hits stores in May.
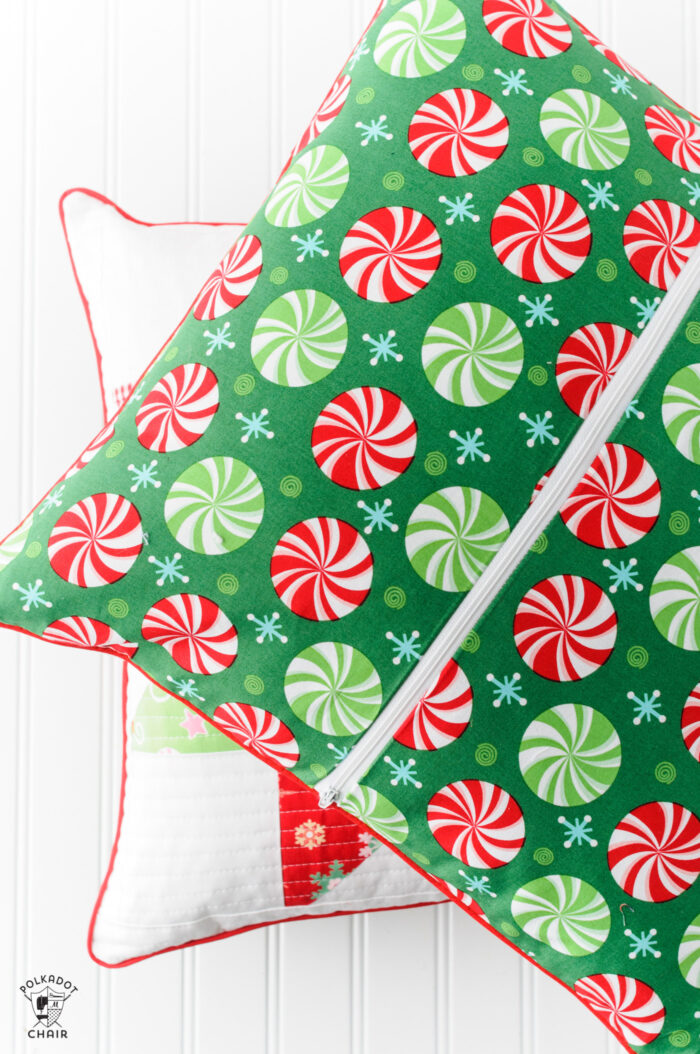
How to Add the Zip Backs:
These pillows have piping around the edge to finish them off and a simple zipper closure in the back. If you’d like to learn how to make the zipper closure, you can see instructions on this post.
Patchwork Quilted Christmas Pillow Tutorial:
If you prefer, you can purchase a Print Ready Copy of this Tutorial (and it comes with two other Christmas Pillow patters TOO!
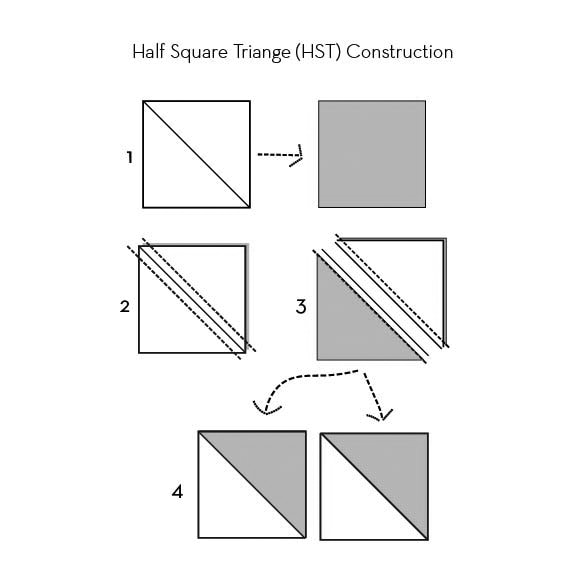
Here’s a breakdown of the construction of the pillow if you’d like to make one yourself. Remember when you make an HST (a half square triangle) that you lose an 1” in the process (i.e. a 5” square will yield a 4” finished HST after trimming).
Just a note, I don’t have repeats of my HST blocks on these pillows because I made several and mixed them up with each other. The HST method will yield 2 identical HST’s, so just know if you don’t want 2 of the same HST on your pillow, you’ll need to make more HST’s.
Christmas Pillow Supplies:
Four 5” white squares
Four 5” printed fabric squares
Four 4 1/2” white squares
Four 4 1/2” printed fabric squares
Two white strips 16 1/2” x 1 1/2” (border)
Two white strips 18 1/2” x 1 1/2” (border)
Step One: Create the Half Square Triangles:
Use your 5” white squares and 5” printed fabric squares to make 8 HST pieces. Use this tutorial if you need to know how to do this.
Step Two: Assemble the Pillow Pieces
Assemble block by rows according to the diagram below:
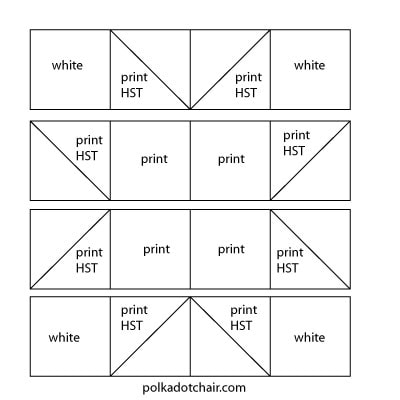
Sew the pieces into rows. Then sew the rows to each other. You want to make sure that you are using an accurate 1/4″ seam allowance. If you’re new to quilting you might want to check out my Quilt Piecing Tips article.
Step Three: Add Borders
Stitch one of the 1 1/2″ x 16 1/2″ strips to each side of the pillow front.
Press.
Stitch one 1 1/2″ x 18 1/2″ strip to the top and bottom of the pillow front.
If you look closely I messed up the seam allowance on my border strips. So be careful when you sew yours!
Square up your block. Then sew the borders to the block, first to the top and bottom, then to the two sides. Trim to 18 1/2” x 18 1/2”.
Quilt as desired (you can use this tutorial for help if you need it).
More Cute Christmas Sewing Projects:
Merry and Bright Christmas Stocking Tutorial
More than 25 Cute Things to Sew for Christmas
20+ Christmas Stocking Sewing Patterns and Tutorials
Same here! Two finished! Plus I have one quilted top and another top 3/4 pieced. Pregnancy and then the newborn stage, small children, other projects . . . made it a slow process. But I’m thankful I persevered!! Recipients love them!! Great learning project too! I can’t wait to have one for my home and some for my widowed brother’s family! My three year-old is asking for his own.
THANK YOU for the tutorial! Such an adorable, meaningful, customizable gift! 😀
Made 2 of these pillows and love how they finished. Great pattern, making more will for sure be in my future.
I really love these! They look so nice and festive! In fact, I bought 5″ squares and learned to make HST’s to make this for family presents and my own house. However, I’m on pillow #2 and noticing my seams move near the start and/or end of sewing–especially where any HST seams combine with another area. Sometimes one side dips slightly just where the endmost seam is; sometimes the general alignment gets slightly off (even with pins). Do you have any advice for this? I’m using a 1/4″ foot with seam guide since I’m new to patchwork quilting. Do you kind of tug the top layer while sewing?
Hi I am trying to make the Christmas pillow cover. The instructions say to sew the 161/2 inch border to the pillow front and then to the block. It then says to square up to 181/2 inches. I am not quite sure how to do this if the border is only161/2 inches long, and what the difference is between the pillow front and the block. Sorry if this is a stupid question but I am new to this. Thank you.
When you make the block before you add the borders its 16 1/2″ square. You then sew the borders on. When you sew the first two borders the blocks is still 16 1/2″ but AFTER the first two borders are sewn on the piece is 16 1/2″ x 18 1/2″ that is why the 2nd set of borders you cut are 18 1/2″ long.
I’m confused….if you lose an inch doing the HSTs, then shouldn’t the measurement for the fabrics be 5.5 inches, so they match up next to the 4.5 inch squares (after they lose an inch)? The five inch squares you said to cut for the HSTs became 4 inches and consequently don’t line up with the 4.5 inch squares. Am i missing something?
You lose 1/2 when making a HST, not 1″. They are 4″ FINISHED and 4 1/2″ before you sew them together.
Hey… I would like to say the same thing … we loose 1/2″ and not 1″…
Have I trim all time afher sewing my HST to 4 1/2″?
Thank you very much for your answer
Kind regards
Cathie
It’s FINISHED size. Which is the size AFTER it is sewn into the project. Start with 5″ create half square triangles that are 4 1/2″ when sewn into the pillow they are 4″.
Loved this pattern and used it again – this time in a table runner.
https://stitchinggrandma.wordpress.com/2016/12/12/a-package-delivered/
I linked back to your post and gave you design credit! Thanks Melissa for a fun, easy pattern and tutorial.
Do you have any leftover fabric from these pillow that you could sell me? I’m particularly interested in the vintage children pattern with red backround with the little girls holding hands.
No I’m sorry I don’t. I just grab them when I see ones I like. I’ve been collecting them for a while now.
What is piping? The thing you did with the red around the pillow. How did you do that?
I love these cushions and also the idea of making these in different fabrics for each festival. Happy sewing. x