Santa’s Stocking Quilt Block for Santa’s Sampler Quilt Along
Today’s Santa’s Sampler block is Santa’s Stocking, and this one is extra special; it features a sparkling Sawtooth Star right at the center! This is block 3 of the quilt-along.

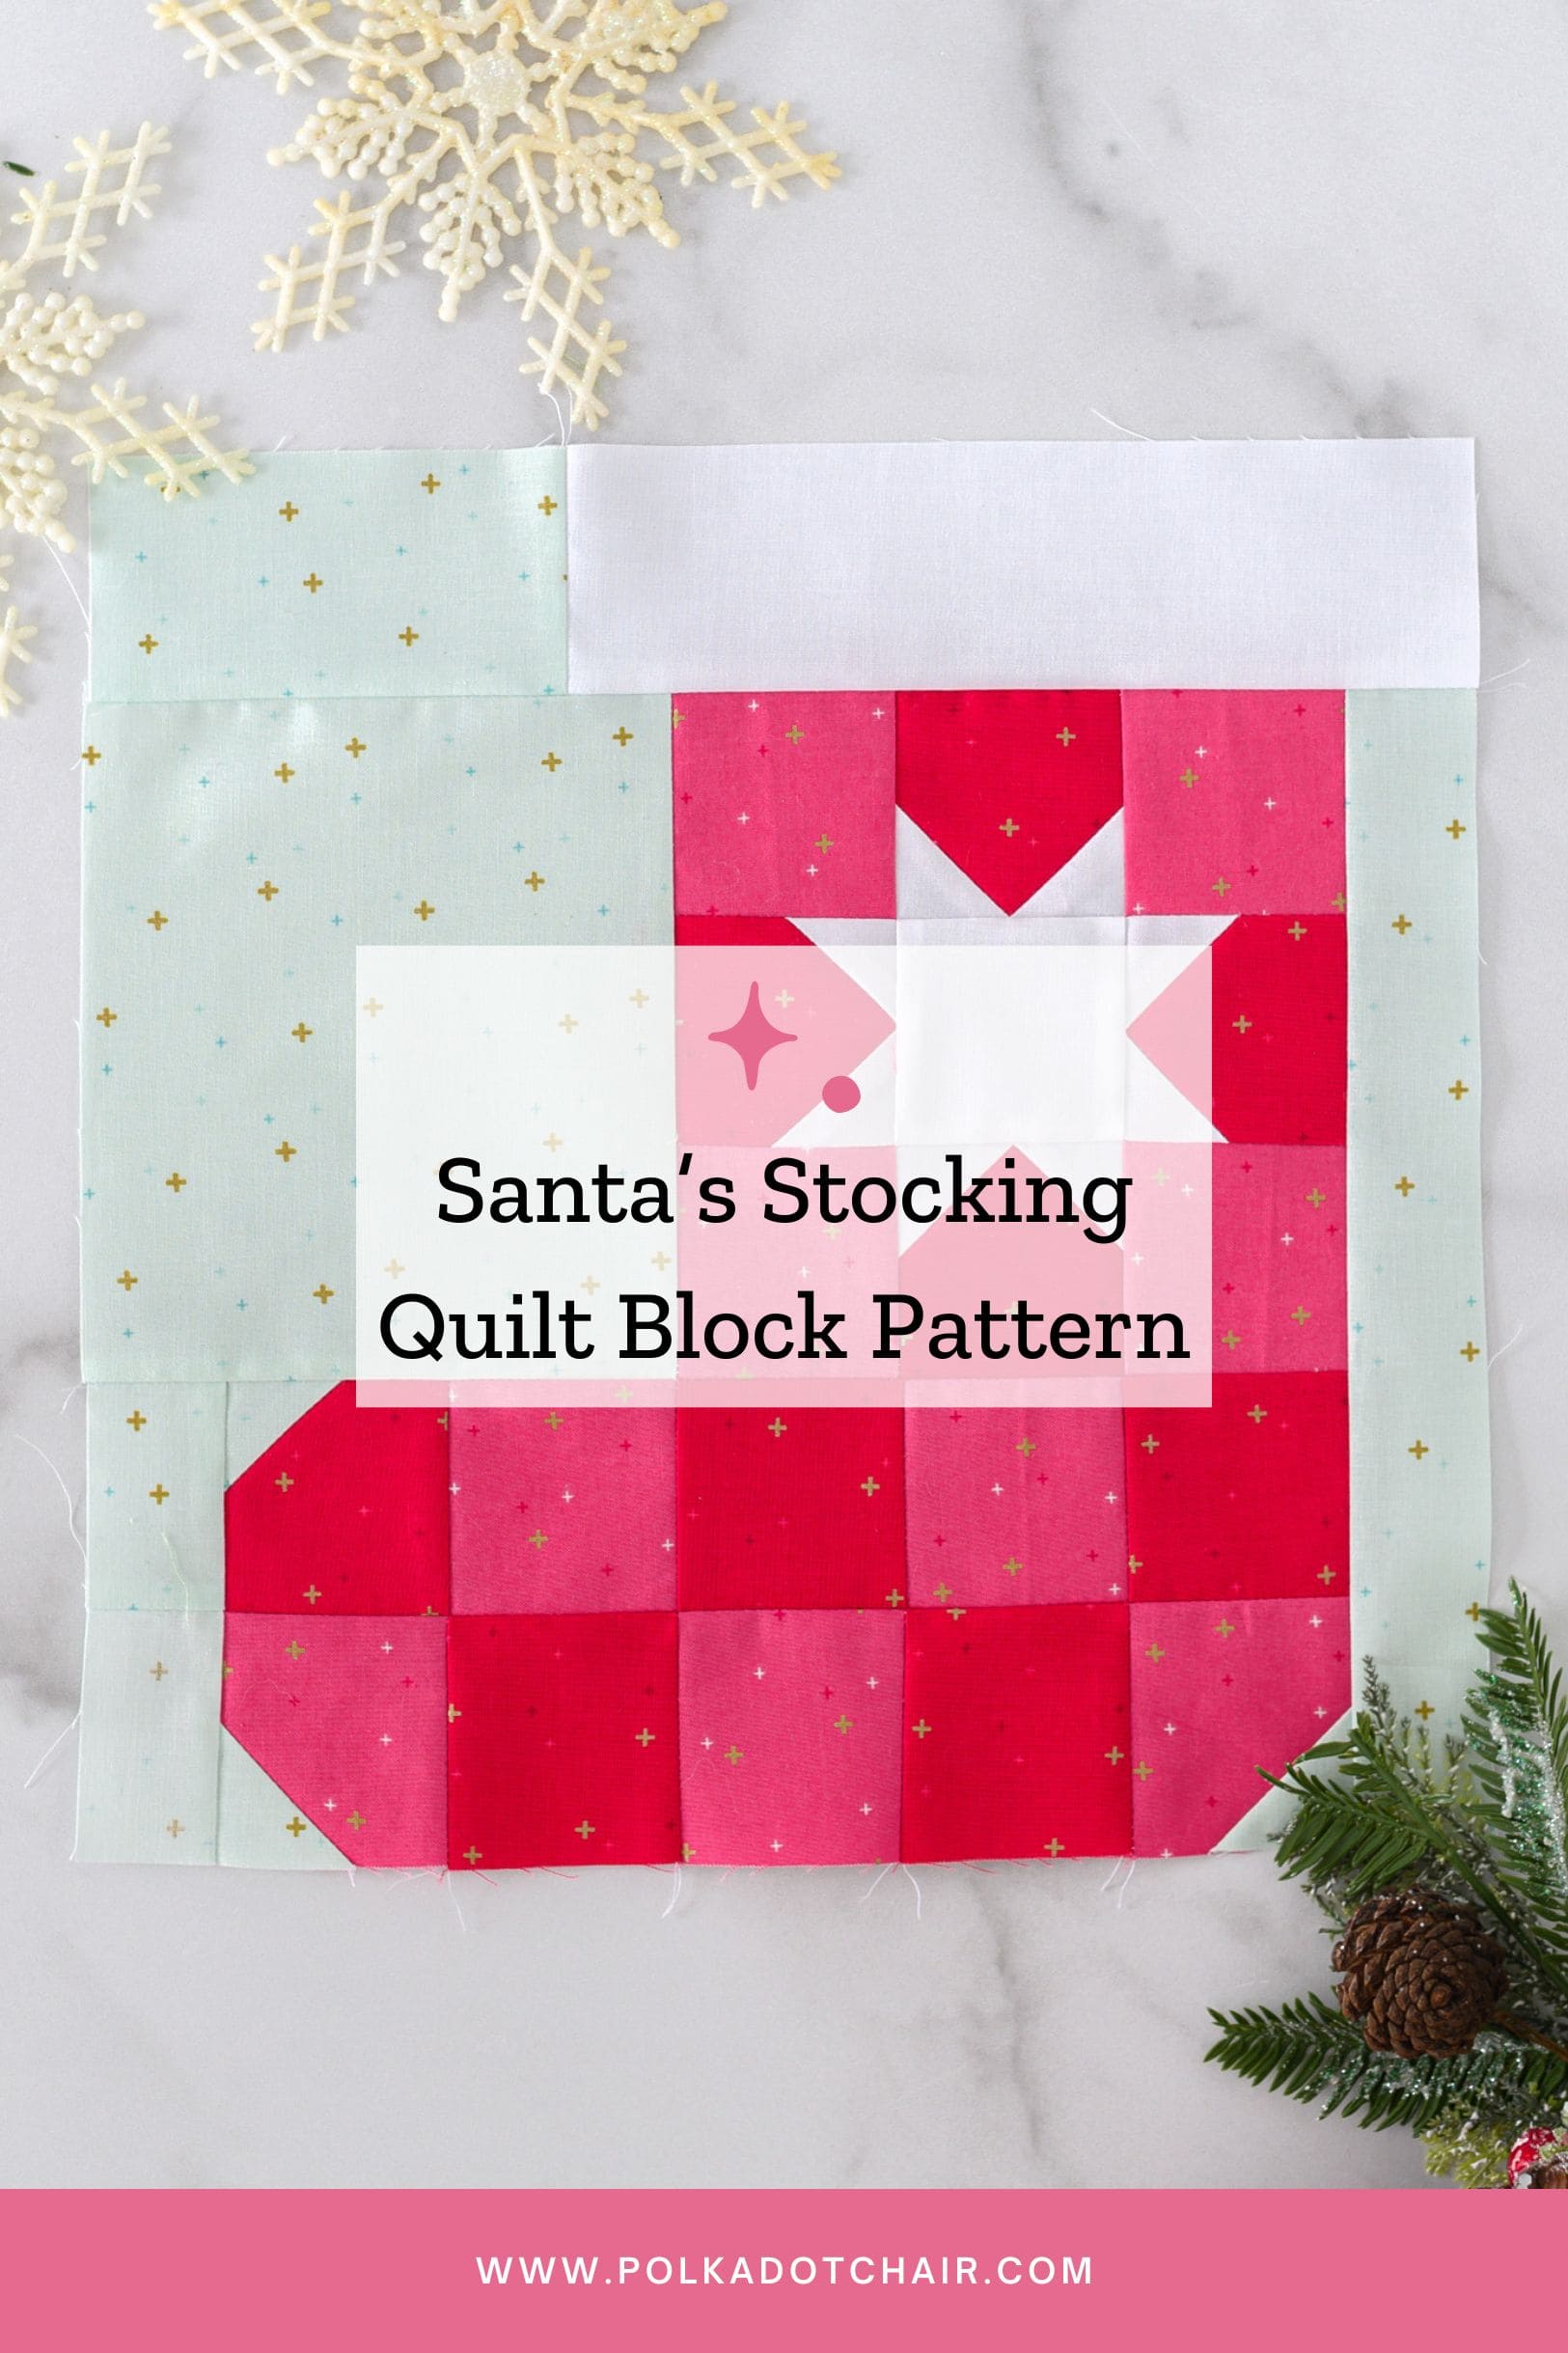
Sewn up in festive reds and pinks, this block combines traditional star piecing with a fun, seasonal shape. It’s a great way to highlight a favorite print or use a mix of scraps for a truly custom look. Grab your fabrics and let’s sew a stocking block that Santa himself would approve of.
About the Quilt Along
Between December 1st and 17th, visit our site to PRINT one of the adorable Christmas quilt blocks (blocks will be posted throughout the month; full schedule below). Even if you don’t want to sew the blocks right now, take a few minutes to print the patterns because, like Cinderella, the patterns will disappear at midnight on December 31st, 2025, and will be moved to our shop.


Santa’s Stocking; 12″ Quilt Block Tutorial
Equipment
supplies
- Please refer to the Santa's Sampler Intro post for fabric requirements
Instructions
Cut:
- Fabric A: Bleached Denim: 1 piece 2 1/2” x 4 1/2”, 1 piece 1 1/2” x 10 1/2”, 1 piece 1 1/2” x 4 1/2”, 1 piece 5 1/2” x 6 1/2”, 3 pieces 1 1/2” x 1 1/2”
- Fabric B: White: 1 piece 2 1/2” x 2 1/2”, 8 pieces 1 1/2” x 1 1/2”, 1 piece 2 1/2” x 8 1/2”
- Fabric C: Red: 9 pieces 2 1/2” x 2 1/2”
- Fabric D: Raspberry: 9 pieces 2 1/2” x 2 1/2”
How to Use the Stitch N Flip Method (SNF)
- Draw a diagonal line on the wrong side of a small square. Place it on top of a larger square (or rectangle), right sides facing.
- Sew along the drawn line.
- Trim 1/4” on the outside of the sewn line. Flip the fabric up and press. The piece should be the same size as the larger piece you began with.
Step One:
- Use the SNF method described at the beginning of the pattern to piece the top corner of a 2 1/2” x 2 1/2” piece of Fabric C with a 1 1/2” x 1 1/2” piece of Fabric A. (Note the direction of the line.)
- Use the SNF method described at the beginning of the pattern to piece the top corner of a 2 1/2” x 2 1/2” piece of Fabric D with a 1 1/2” x 1 1/2” piece of Fabric A. (Note the direction of the line.) Repeat so that you have two pieced units.
Step Two:
- Use the SNF method described at the beginning of the pattern to piece the top corner of a 2 1/2” x 2 1/2” piece of Fabric C with one 1 1/2” x 1 1/2” piece of Fabric B. (Note the direction of the line.)
- Trim and press. Then repeat with another 1 1/2” x 1 1/2” piece of Fabric B on the other top corner of the unit.
- Repeat three more times to have four sewn units.
Step Three:
- Sew the following pieces together in order:
- Step One unit made from Fabric D, 2 1/2” x 2 1/2” Fabric C, 2 1/2” x 2 1/2” Fabric D, 2 1/2” x 2 1/2” Fabric C, Step One unit made with Fabric D.
Step Four:
- Sew the following pieces together in order:
- Step One unit made from Fabric C, 2 1/2” x 2 1/2” Fabric D, 2 1/2” x 2 1/2” Fabric C, 2 1/2” x 2 1/2” Fabric D, 2 1/2” x 2 1/2” Fabric C.
Step Five:
- Sew the Step Three and Four units together. Sew the 1 1/2” x 4 1/2” piece of Fabric A to the left side of the unit.
Step Six:
- Sew the following pieces together in order.
- Row 1: 2 1/2” x 2 1/2” Fabric D, Step Two Unit, 2 1/2” x 2 1/2” Fabric D
- Row 2: Step Two Unit, 2 1/2” x 2 1/2” Fabric B, Step Two Unit.
- Row 3: 2 1/2” x 2 1/2” Fabric D, Step Two Unit, 2 1/2” x 2 1/2” Fabric D
- Sew the rows together to complete the unit.
- Sew the 5 1/2” x 6 1/2” Fabric A piece to the left side of this unit.
Step Seven:
- Sew the 2 1/2” x 4 1/2” piece of Fabric A to the 2 1/2” x 8 1/2” piece of Fabric B.
Final Assembly:
- Sew the Step Five and Step Six units together. Sew the 1 1/2” x 10 1/2” piece of Fabric A to the right side of this unit.
- Sew the Step Seven unit to the top to complete the block.
Notes
- Fabric A: Bleached Denim
- Fabric B: White
- Fabric C: Red
- Fabric D: Raspberry
- Fabric E: Clover
- Fabric F: Riley Green
Quilt Along Schedule
- December 1: Intro & Fabric Requirements
- December 3: Block 1 Santa’s Hat
- December 5: Block 2 Santa’s House
- December 8: Block 3 Santa’s Stocking
- December 10: Block 4 Christmas Tree
- December 12: Block 5 Christmas Gift
- December 15: Block 6 Santa’s Star
- December 17: Finishing
Thanks for sewing along with this festive Santa’s Stocking block! The Sawtooth Star center adds such a fun sparkle, and I can’t wait to see the fabrics you chose. Share your block with the community, and stay tuned—another Santa’s Sampler block is on its way soon.


