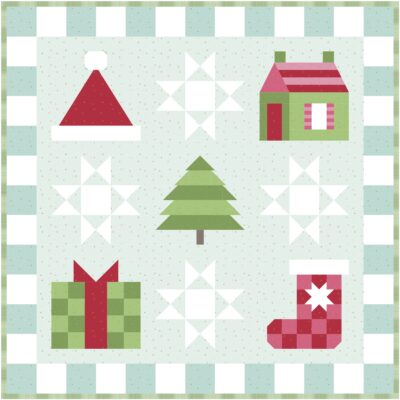
Santa’s Sampler Quilt Along; Finishing Steps
We’ve come to the end of the quilt along! Today, I’ll show you how to finish your Santa’s Sampler quilt top by sewing the blocks together with sashing, then add a checkerboard border using time-saving strip piecing techniques.

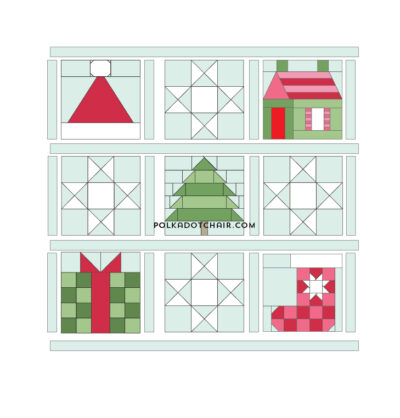
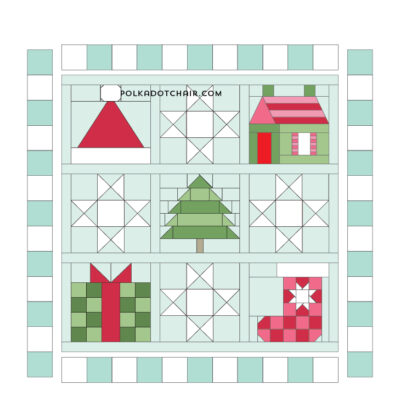
Now that all of the Santa’s Sampler quilt blocks are complete, it’s time to bring everything together into a finished quilt top.
In these final steps, you’ll sew the blocks together with sashing strips in between, which helps each block stand out while giving the quilt a clean, classic layout.
To finish it off, we’ll add a playful checkerboard border around the outside of the quilt. The border is created from White and Songbird color fabrics. Songbird is a beautiful robin’s egg blue that we have not used in any of the blocks so far in the quilt-along.
This border is constructed using a time-saving strip-piecing method, so it comes together quickly while still adding lots of visual interest. Once these steps are complete, your sampler will feel like a finished quilt!

The binding on the mockup of the quilt is a 1/8″ stripe in Clover and White by Riley Blake Designs.
About the Quilt Along
Between December 1st and 17th, visit our site to PRINT one of the adorable Christmas quilt blocks (blocks will be posted throughout the month; full schedule below). Even if you don’t want to sew the blocks right now, take a few minutes to print the patterns because, like Cinderella, the patterns will disappear at midnight on December 31st, 2025, and will be moved to our shop.
Finishing Instructions for Santa’s Sampler Quilt
Instructions
Cutting:
- From Fabric A: (Bleached Denim) 12 pieces 2 1/2” x 12 1/2” 4 pieces 2 1/2” x 40” 4 pieces 2 1/2” x 5”
- From Fabric B: (White) 2 pieces 4 1/2” x WOF 7 pieces 4 1/2” x 4 1/2”
- From Fabric G: (Songbird) 2 pieces 4 1/2” x WOF 6 pieces 4 1/2” x 4 1/2”
Step One:
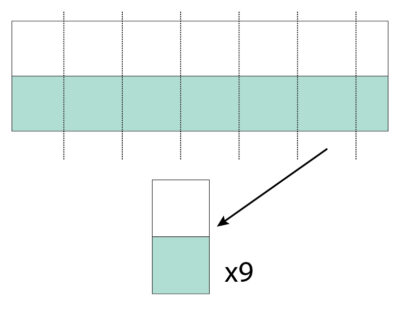
- Sew one 4 1/2” x WOF piece of Fabric G to one 4 1/2” x WOF piece of Fabric B.

- Sub cut this unit into nine units, each 4 1/2” wide.
- Repeat the step to have eighteen sewn units.
Step Two: Construct Border Sets 1 & 2
- Sew five Step One units to each other along the short sides.

- Sew one 4 1/2” x 4 1/2” piece of Fabric A to the end of this unit.
- Repeat.

Step Three:
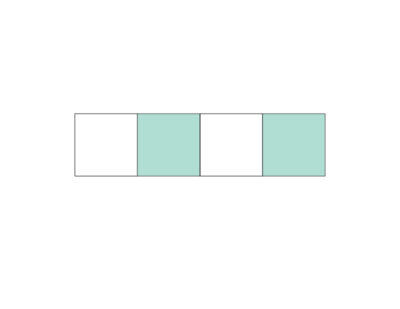
- Sew two 4 1/2” x 4 1/2” pieces of Fabric G to two 4 1/2” x 4 1/2” pieces of Fabric B as shown.
Step Four: Construct Border Set 3
- Sew the following together in order: 4 1/2” x 4 1/2” Fabric G Step One Unit Step One Unit Step One Unit Step Three Unit 4 1/2” x 4 1/2” Fabric B 4 1/2” x 4 1/2” Fabric G


Step Five: Construct Border Set 4
- Sew the following together in order: 4 1/2” x 4 1/2” Fabric G Step One Unit Step One Unit Step One Unit Step One Unit Step One Unit 4 1/2” x 4 1/2” Fabric B 4 1/2” x 4 1/2” Fabric G

Step Six: Sashing
- Sew the rows of the quilt.
- Row 1: 2 1/2” x 12 1/2” Fabric A Santa Hat Block 2 1/2” x 12 1/2” Fabric A Santa Star Block 2 1/2” x 2 1/2” Fabric A Santa’s House Block 2 1/2” x 2 1/2” Fabric A

- Row 2: 2 1/2” x 12 1/2” Fabric A Santa Star Block 2 1/2” x 12 1/2” Fabric A Christmas Tree Block 2 1/2” x 2 1/2” Fabric A Santa Star Block 2 1/2” x 2 1/2” Fabric A
- Row 3: 2 1/2” x 12 1/2” Fabric A Gift Block 2 1/2” x 12 1/2” Fabric A Santa Star Block 2 1/2” x 2 1/2” Fabric A Santa’s Stocking Block 2 1/2” x 2 1/2” Fabric A
- Sew one 2 1/2” x 40” piece of Fabric A to one 2 1/2” x 5” Fabric A, to have a piece that is 2 1/2” x 44 1/2”. Repeat three more times to have four sewn units.
Step Seven:
- Assemble the quilt by rows, sewing 44 1/2” sashing strips in between each row and at the top and bottom of the quilt.
Step Eight:
- Sew Border Sets 1 & 2 to the top and bottom of the quilt.
- Sew Border Sets 3 & 4 to the right and left sides of the quilt to complete the quilt top.
Notes
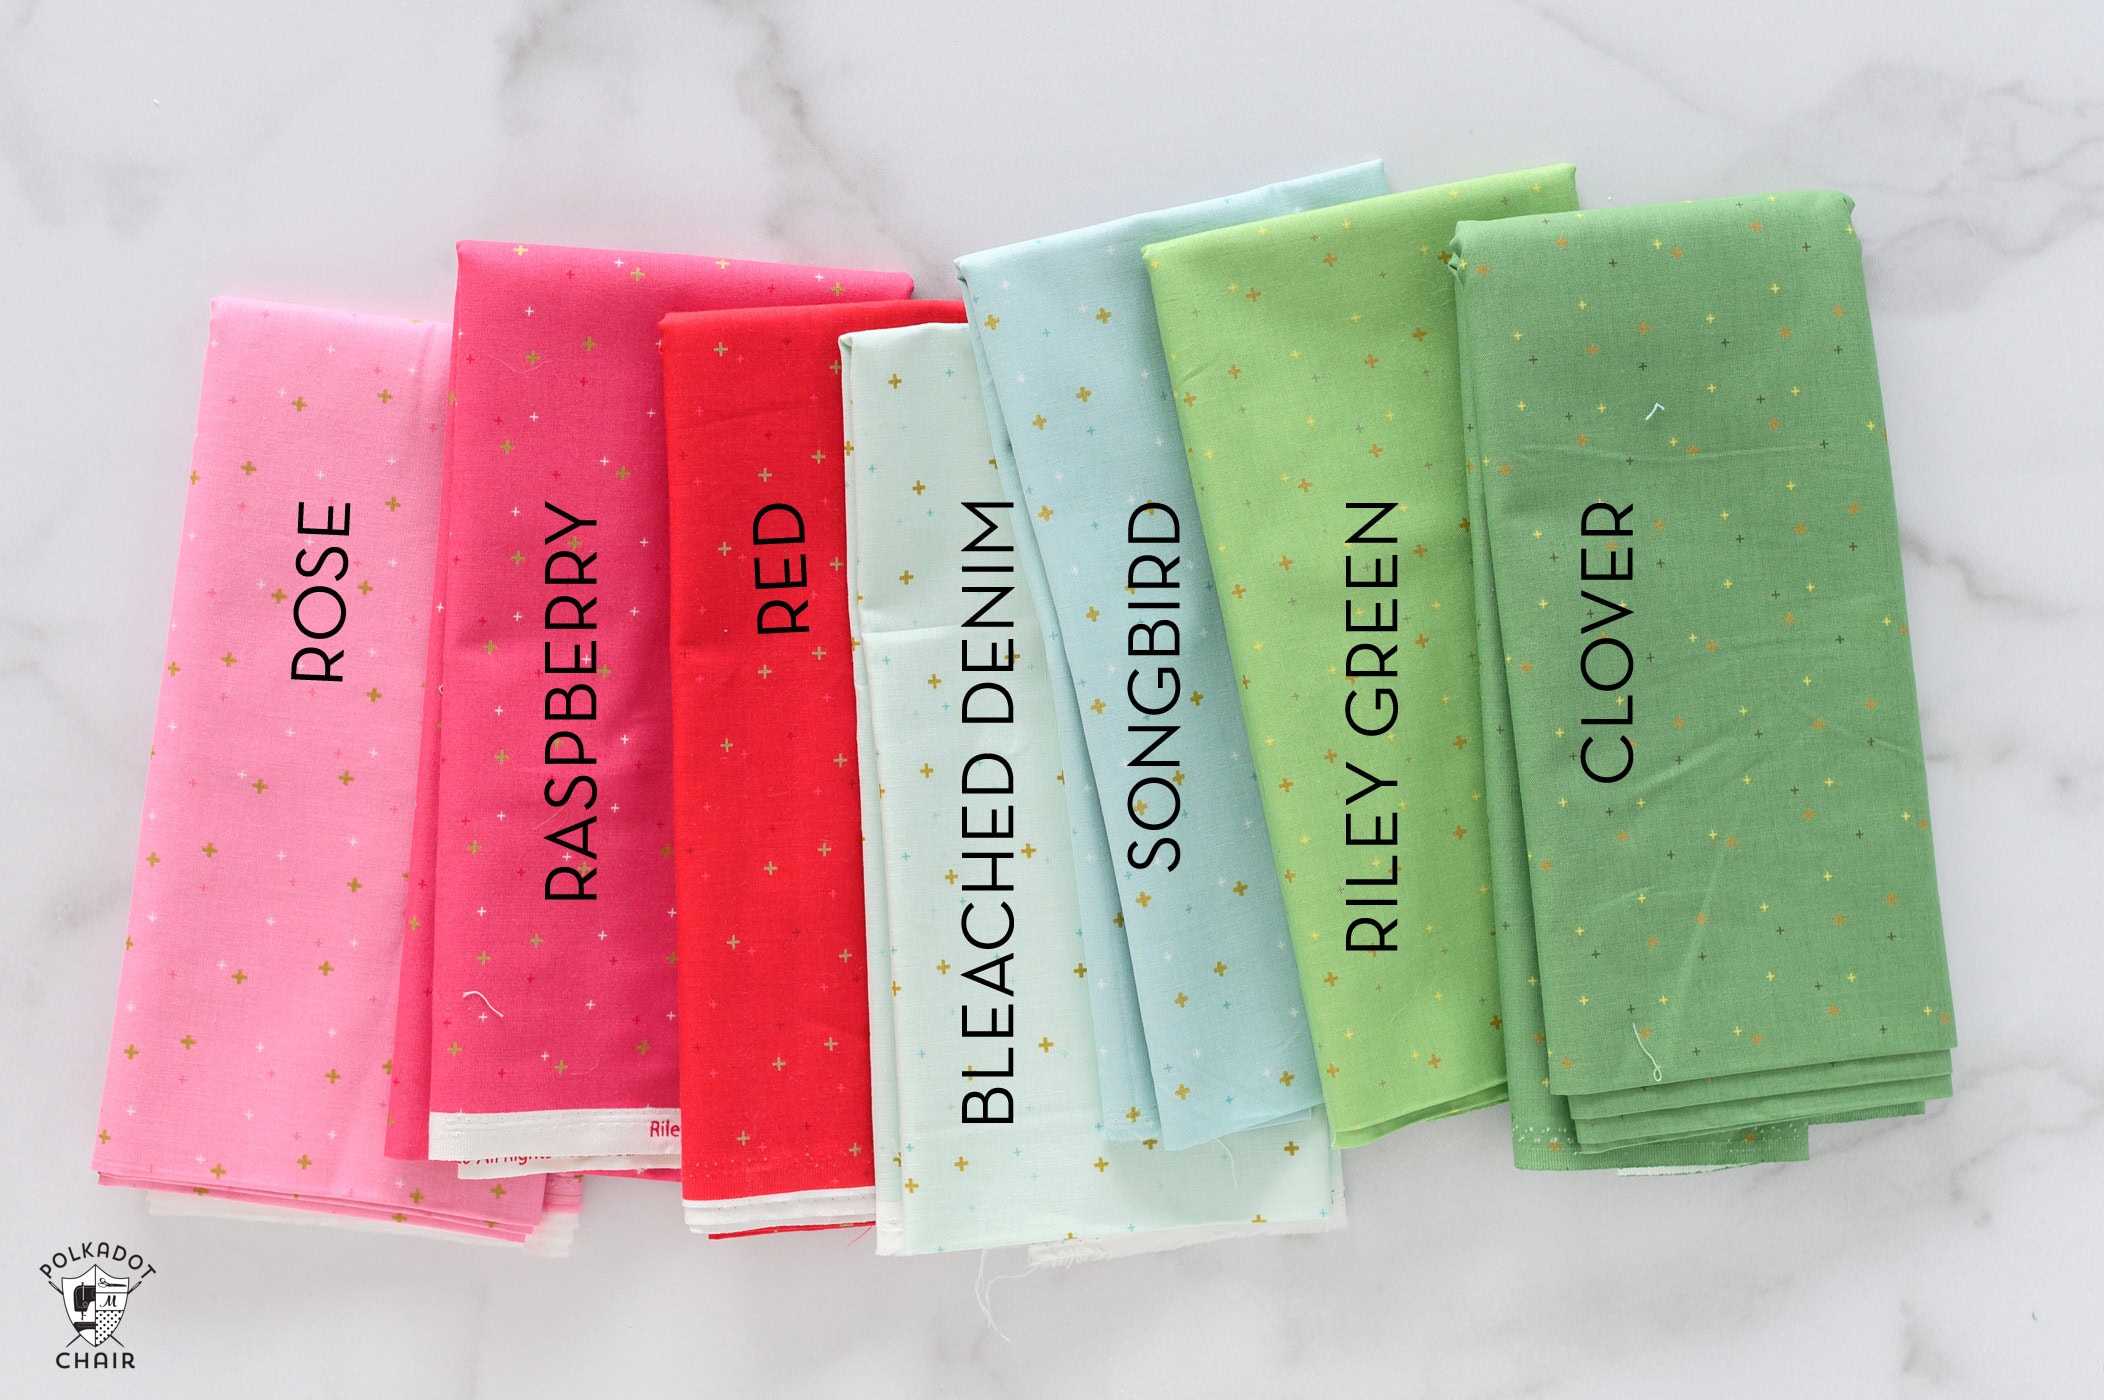
Fabric A: Bleached Denim
Fabric B: White
Fabric C: Red
Fabric D: Raspberry
Fabric E: Clover
Fabric F: Riley Green
Fabric G: Songbird
Quilt Along Schedule
- December 1: Intro & Fabric Requirements
- December 3: Block 1 Santa’s Hat
- December 5: Block 2 Santa’s House
- December 8: Block 3 Santa’s Stocking
- December 10: Block 4 Christmas Tree
- December 12: Block 5 Christmas Gift
- December 15: Block 6 Santa’s Star
- December 17: Finishing
Thank you, Melissa for sharing this beautiful Christmas quilt.
Merry Christmas!
I really was excite when I got the email (I have been busy and did’t see them until today) with their fun sew along, but only the first 2 blocks have links. very disappointing
They all have links, please take a moment and read the directions on the page.
Only the first two blocks have links to PDF files. The other four blocks, the intro, and the finishing instructions do not need PDF files because all the instructions are on the website pages. Half way down each website page there is a bordered PATTERN section with a GREEN PRINT button at the bottom of the section. Click that and print the instructions. Just under that section on every page is the schedule. Click the eight days’ names and the links takes you right to all eight instructions.
There is still plenty of time to print these. I have been very busy myself and got all my instruction pages last night and this morning. It took less than an hour. I hope this helps you.
Thank you for the Santa Sampler patterns.. Merry Christmas to you and yours.
Thank you so much for this darling quilt along! It’s such a fun pattern. I appreciate your generosity with yearly Christmas patterns.
Adorable!