Santa’s Star Quilt Block Pattern for the Santa’s Sampler Quilt Along
A free quilt block pattern for a twelve-inch Star quilt block for the Santa’s Sampler Quilt along.

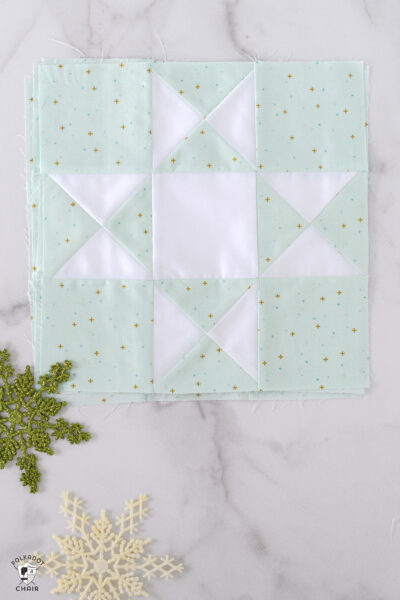
Every sampler needs a beautiful supporting block, and in the Santa’s Sampler Quilt-Along, that honor goes to our Santa’s Star Block (a.k.a. an Ohio Star Block). Pieced in soft whites and soft mint, the classic Ohio Star takes on the airy, delicate feel of a winter snowflake.
It adds balance, sparkle, and a touch of calm to the quilt’s more detailed blocks. This block will be used as an alternate block in the quilt pattern, meaning it alternates with the other five quilt blocks shared so far in the layout.

You need to make FOUR of these blocks to complete your quilt!

Santa’s Star Quilt Block Pattern
Equipment
Instructions
Cutting Directions
- You need to make FOUR blocks for the quilt, the cutting directions are for ONE block, repeat all steps three times to make enough blocks for the quilt.
- Fabric A: Bleached DenimFour pieces 4 1/2” x 4 1/2”2 pieces 5 1/2” x 5 1/2”; for the quarter square triangle units
- Fabric B: White2 pieces 5 1/2” x 5 1/2”; for quarter square triangle units
Step 1: Make Half Square Triangle Units (HST)
- Draw a diagonal line on the wrong side of the two 5 1/2” x 5 1/2” Fabric B pieces.

- Pair one 5 1/2” x 5 1/2” Fabric B piece with one 5 1/2” x 5 1/2” Fabric A piece, right sides facing.
- Cut on the drawn line. Press toward Fabric B.
- Repeat to have four half square triangle units.

Step 2: Make Quarter Square Triangle Units (QST)
- Take two Step 1 units and place them right sides facing so that the two Fabric B pieces are not on top of each other.
- The seams of the blocks should be on top of each other and “nested”.
- Draw a line perpendicular to the seam (corner to corner). 9.
- Sew 1/4” on both sides of the line, then cut on the drawn line to make two-quarter square triangle units.
- Repeat with the remaining units to have four quarter square triangles.
- Trim and square up to 4 1/2” x 4 1/2”
- TIP: As you trim your block, make sure you trim from the center out. If you remove too much fabric from one side of the block, you will not have precise corners.

Step 3: Layout the Block
- Layout your 3×3 grid:
- Corners: 4 Fabric A 4½” squares
- Center: 1 4½" square
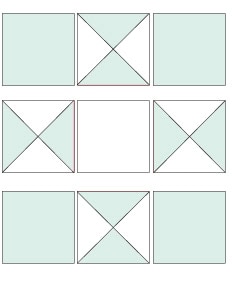
Step 4: Sew the Rows and Assemble the Block
- Sew each row together. Press the seams of Row 1 and Row 3 away from the center and press the seams of Row 2 towards the center of the block.
- Sew rows together, pinning at intersections.
- If necessary, trim and square up the block to 12½” x 12½”.

Notes
- Fabric A: Bleached Denim
- Fabric B: White
- Fabric C: Red
- Fabric D: Raspberry
- Fabric E: Clover
- Fabric F: Riley Green

Quilt Along Schedule
- December 1: Intro & Fabric Requirements
- December 3: Block 1 Santa’s Hat
- December 5: Block 2 Santa’s House
- December 8: Block 3 Santa’s Stocking
- December 10: Block 4 Christmas Tree
- December 12: Block 5 Christmas Gift
- December 15: Block 6 Santa’s Star
- December 17: Finishing
This soft, snowy Ohio Star block adds such a lovely breath of winter to the quilt. I hope you enjoyed sewing this simple, timeless design. Don’t forget to share your progress (tag me on Instagram @polkadotchair) and watch for the quilt finishing instructions next.

Where is the link to get the pattern? 12-22-25
Jamie, please take a moment and READ the directions on the page. There is also a FAQ on the introduction post that will answer many of the questions you keep asking over and over again. https://www.polkadotchair.com/join-me-for-the-santas-sampler-quilt-along/
Love this Santa Sampler Quilt!!!
Used some scraps and fat quarters of bright Christmas fabric. Making this has helped me get through the long holiday hours at work. Thanks for such a cute free pattern.