• Skip to primary navigation
  • Skip to main content
  • Skip to primary sidebar

The Polka Dot Chair logo

  • SEWING
    • Free Sewing Patterns
    • Bag Patterns
    • Costumes
    • Apparel
    • Learn to Sew
    • Beginner Friendly
    • Embroidery Projects
    • Tips & Techniques
    • All Sewing
  • QUILTING
    • Quilt Blocks
    • Learn to Quilt
    • Free Patterns
    • Quilt Patterns
    • All Quilting
  • CRAFTS
    • Disney
    • Cricut
    • Printables
    • All Crafts
  • HOLIDAYS
    • Seasonal Projects
    • Valentine’s Day
    • Easter
    • 4th of July
    • Halloween
    • Thanksgiving
    • Christmas
    • All Holidays
  • TUTORIALS
  • ABOUT
    • About Me
    • My Fabric Collections
    • Published Books
    • Press
    • FAQ’s
    • Contact
  • SUBSCRIBE
  • SHOP
menu icon
go to homepage
  • SHOP
  • TUTORIALS
  • SEWING
  • QUILTING
  • SUBSCRIBE
  • CRAFTS
  • HOLIDAY PROJECTS
  • ABOUT
    • Published Books
    • My Fabric Collections
  • CONTACT
    • Facebook
    • Instagram
    • Pinterest
    • YouTube
  • subscribe
    search icon
    Homepage link
    • SHOP
    • TUTORIALS
    • SEWING
    • QUILTING
    • SUBSCRIBE
    • CRAFTS
    • HOLIDAY PROJECTS
    • ABOUT
      • Published Books
      • My Fabric Collections
    • CONTACT
    • Facebook
    • Instagram
    • Pinterest
    • YouTube
  • ×

    Home » Seasonal Projects » Fall

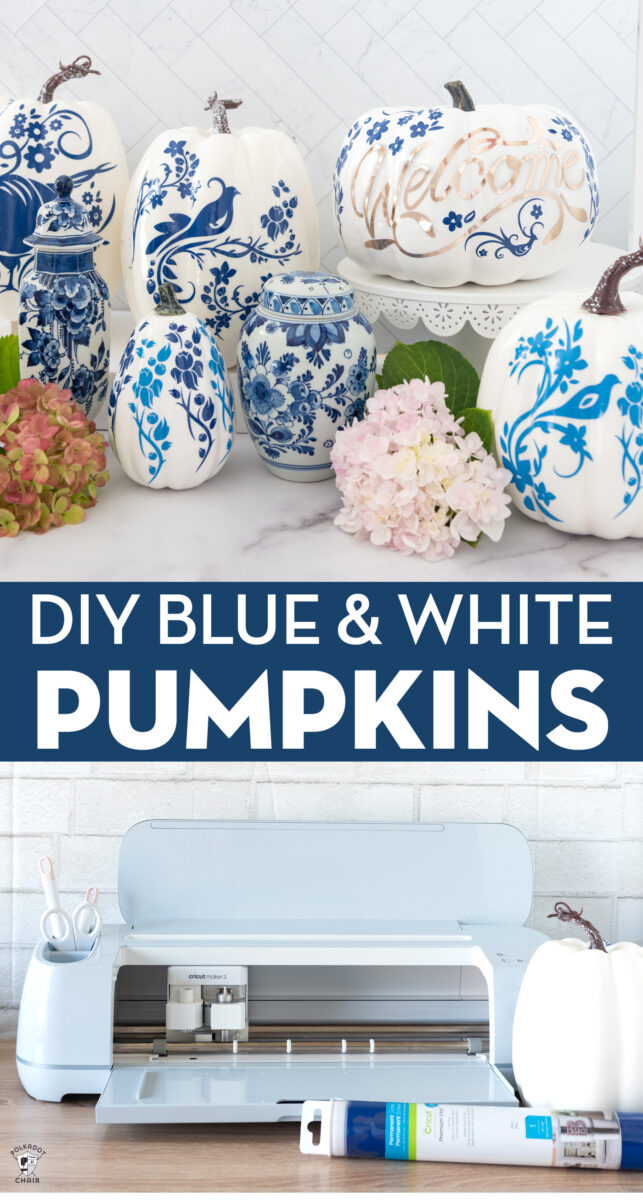
    DIY Blue & White Chinoiserie Pumpkins

    Updated: Oct 21, 2022 by Melissa Mortenson · This post may contain affiliate links · This blog generates income via ads · 3 Comments

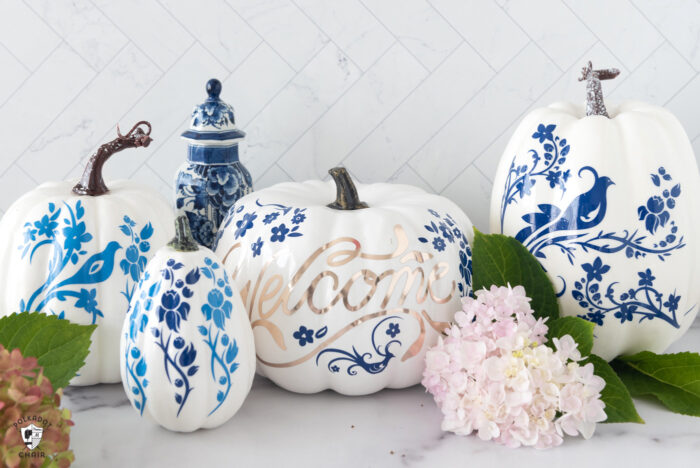
    Create a set of chinoiserie-inspired blue and white pumpkins to add to your Fall decor this year! It’s an elegant take on Autumn decor and oh so easy to create with a Cricut machine. No drawing or hand painting skills are required!

    a collection of blue and white pumpkins on a white counter top with flowers

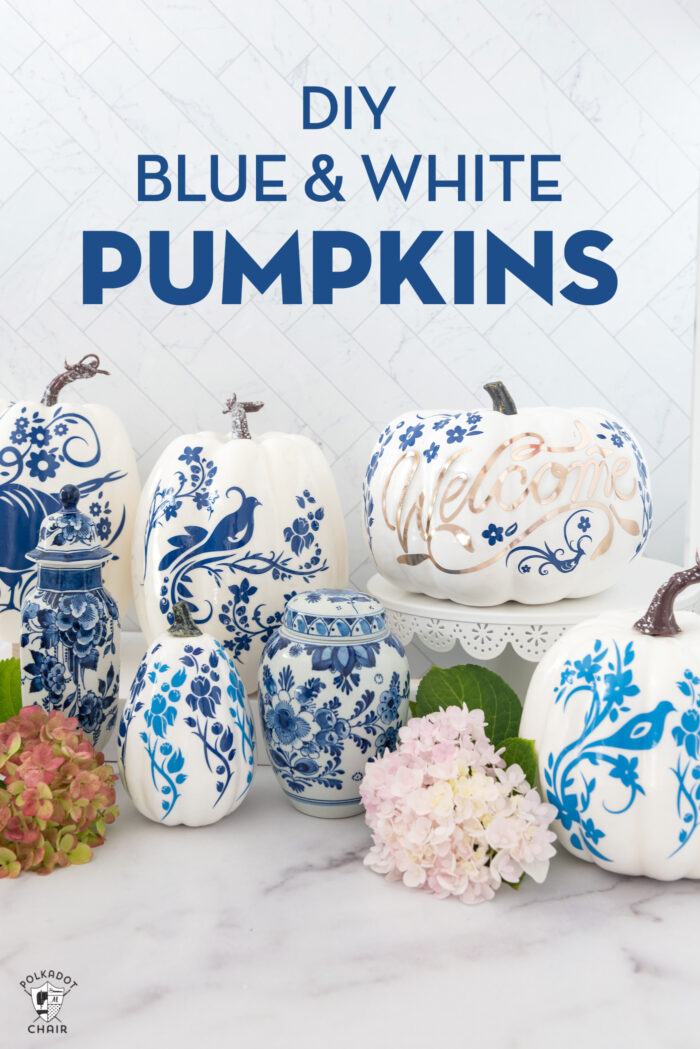
    The last couple of years I’ve noticed blue and white pumpkins popping up everywhere. The recent resurgence in blue and white pottery and china in home decor doesn’t surprise me. (I love the blue trend!)

    Table of Contents
    • Supplies Needed
    • Video Instructions
    • You Might Also Like
    a collection of blue and white pumpkins on a white counter top with flowers

    Personally, I have a small collection of Delft pottery that my husband picked up while he was living in the Netherlands. We keep it in our dining room. In the years since he’s been home, we’ve added a few pieces to our collection (the ginger jars might be some of my favorites in the collection).

    a collection of blue and white pumpkins on a white counter top with flowers

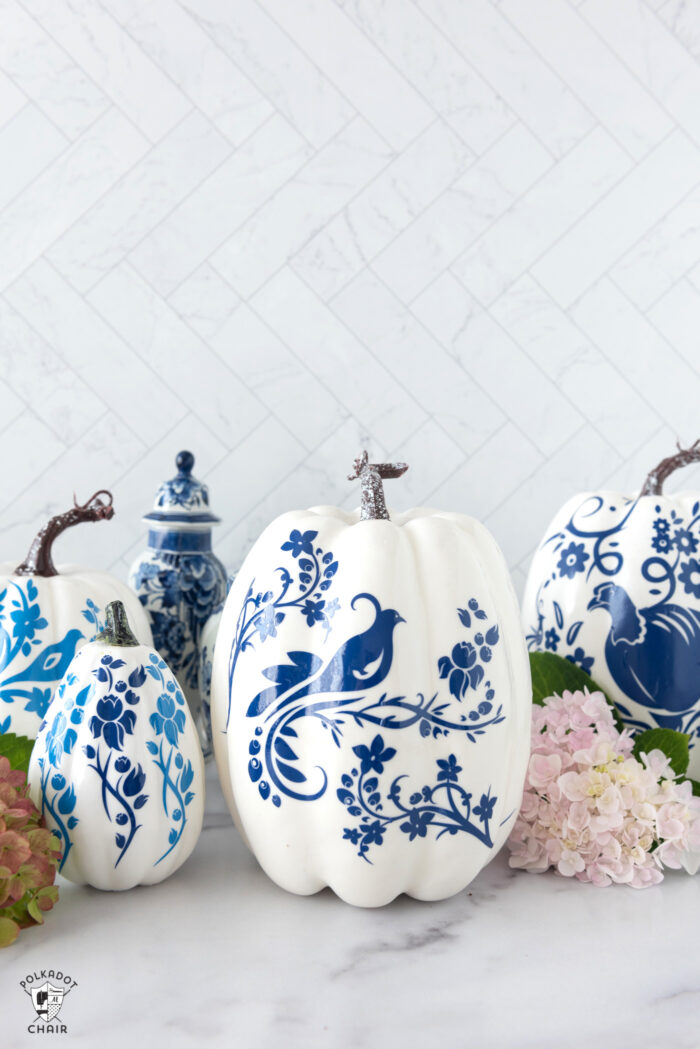
    Most of the blue and white chinoiserie pumpkins that I have seen are hand-painted. They are gorgeous but I know that not everyone has the skills to hand paint a pumpkin.

    I’ve also seen chinoiserie pumpkin DIY’s that feature decoupaging pumpkins with blue and white paper napkins. I don’t love how messy a coat of mod podge can be (it’s hard to get a clean coat without fingerprints), so I decided to try DIY pumpkins with Glossy Vinyl from Cricut instead of paint or napkins.

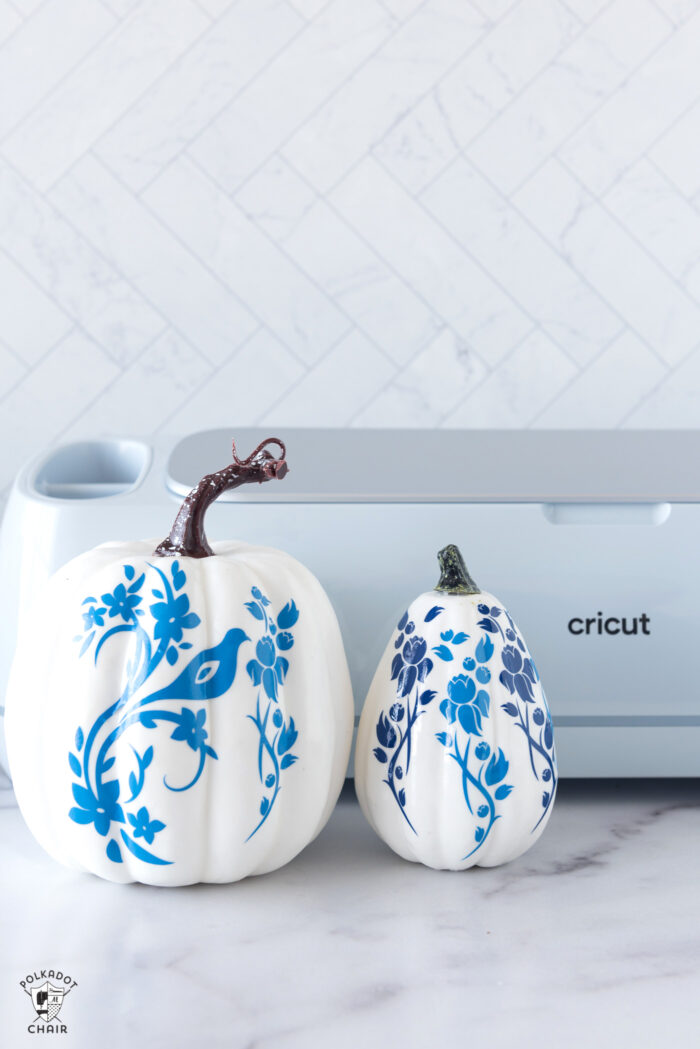
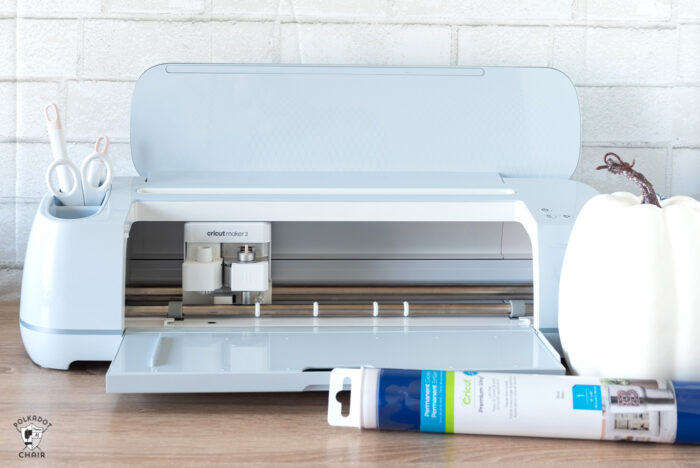
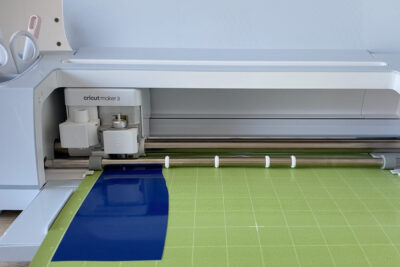
    I decided to figure out a way to create these blue and white pumpkins using my Cricut (I have the Maker 3) machine. Today I’m excited to share with you how I did it!

    TIP: If you don’t love the blue and white color scheme, you can easily choose whatever colors of vinyl match your home decor the best! These would also be beautiful in black and white.

    blue and white pumpkins on white table with flowers

    Supplies Needed

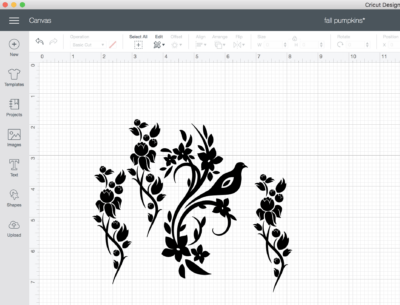
    For this project, you’re going to need a few supplies. The images that I cut out with my Cricut machine can be found in Cricut Design Space, just type “bird floral” into the search box and an entire set of chinoiserie images will pop up. You’ll have plenty to pick from!

    • Cricut Machine, both the Explore & Maker machines will work
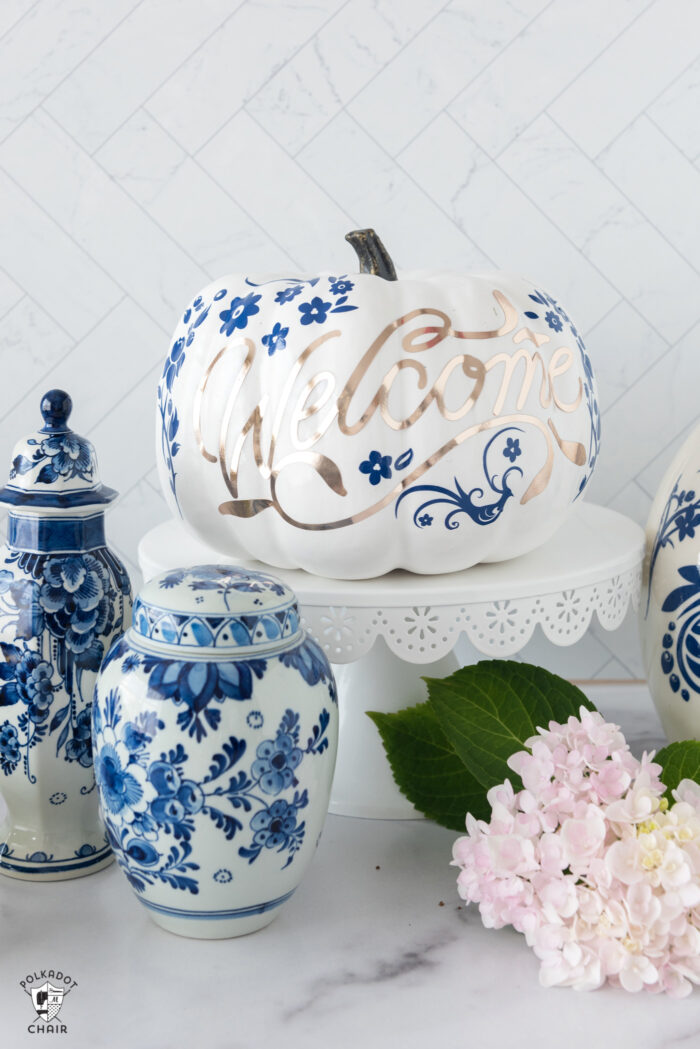
    • Blue Glossy Vinyl
    • Rose Gold Adhesvie Foil (for the Welcome pumpkin)
    • White Pumpkins
    • Clear Sealer
    • Optional: Gold paint for the stems, I didn’t paint mine gold, but might go back and do it later.

    Video Instructions

    I’ve created a very short video walking you through the basic steps on how to make a blue and white pumpkin.

    a collection of blue and white pumpkins on a white counter top with flowers

    How to Make Blue & White Pumpkins

    Melissa Mortenson
    Use your Cricut to create a set of chinoiserie pumpkins. Beautiful blue and white pumpkins that you can DIY. Perfect for elegant Fall decor.
    5 from 1 vote
    Pin It! Share by Email Share on Facebook
    Prep Time 30 mins
    Active Time 1 hr
    Total Time 1 hr 30 mins

    Equipment

    • Cricut Machine
    • Cricut Weeding Tools

    supplies

    • 1 Roll Permanent Glossy Vinyl Blue
    • 1 Roll Adhesvie Foil Rose Gold
    • 1 White Pumpkin
    • 1 can Spray Sealer
    • 1 Roll Transfer Tape

    Instructions
     

    Create the File in Cricut Design Space

    • In Cricut Design Space, create the file that you want to cut out to apply to your pumpkins.
      The files I used can be found in design space by typing "chinoiserie" into the search box.
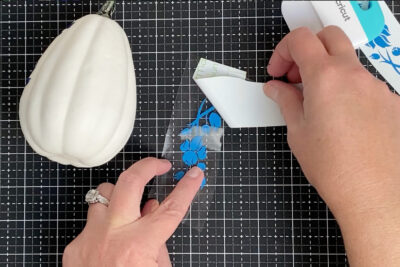
    • Measure your pumpkin and size the images in design space accordingly.
      TIP: Because of the grooves in the pumpkin, it will be easier to apply many smaller images to the pumpkins than one large one.

    Cut Out Images

    • Once your files are prepared, send the images to your machine to cut.
      cricut machine with green cutting mat and blue vinyl
    • Remove the excess vinyl (a process referred to as weeding) and cut the images out so that there is not a lot of excess backing paper.
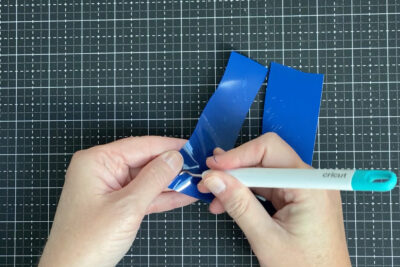
    • Cut out a piece of transfer tape about the same size as your image. Peel off the backing and apply it to your cut-out vinyl, sticky side down.
    • Remove the vinyl from the paper backing. It should be stuck to the transfer tape.

    Apply to Pumpkin

    • Place the vinyl on top of the pumpkin in the desired location. Adhere a little bit of the vinyl at a time so that you can bend it around the grooves in the pumpkin. Remove the transfer tape as you go.

    Finishing

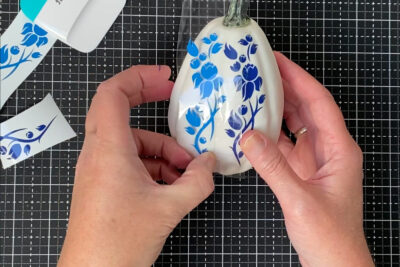
    • Using a flat surface (like the Cricut tool, or an old credit card), smooth the vinyl out and remove as many bumps and bubbles as possible.
    • To finish, coat the pumpkin with a clear glossy sealer.

    Notes

    Tips:
    When working with larger images, cut “slits” in your transfer tape/vinyl to allow the image to bend around the pumpkin grooves.
    Cut out a sheet of extra flowers to add to the pumpkin to fill in blank spaces after you are finsihed.
     
    PRINT
    Tried this tutorial?Let us know how it was!

    You Might Also Like

    • 12 Fabric Pumpkin Sewing Patterns
    • Wool Felt Pumpkin Banner Tutorial; a DIY Fall Craft Idea
    • How to Make a Cute Patchwork Pumpkin Pillow
    • Cute Pumpkin Crafts! Create a Paper Leaf Pumpkin
    • Friday Favorites; Autumn Colors

    More Projects You May Enjoy

    • How to Make a Retro Diorama Ornament
    • How to Make String Christmas Ornaments
    • How to Make a Halloween Potions Centerpiece & Free Printable Potions Jar Labels
    • How to Make Fabric Kimekomi Christmas Ornaments

    • Share
    • Email

    About Author

    Melissa Mortenson

    Melissa Mortenson is a blogger, designer, and content creator. She is the Polka Dot Chair blog founder and has been sharing fresh and creative ideas with readers since 2008. She is the author of “Project Teen, Handmade Gifts your Teen will Actually Love.” Her work and designs have been featured on HuffPost, TODAY, Pioneer Woman, HGTV, BuzzFeed, Better Homes & Gardens, and many other established publications. Her first fabric line, “Derby Style,” debuted in January 2015 through Riley Blake Designs.  Additional fabric collections have followed it in subsequent years. A mom of 3, she considers herself lucky to be living in Kentucky.

    Reader Interactions

    Comments

    1. Shawna says

      October 31, 2021 at 8:19 pm

      I have tried to find the chinoiserie file that you mentioned on design space. Doesn’t come up at all. Is there something I’m doing wrong? Please help

      Reply
      • Melissa Mortenson says

        October 31, 2021 at 8:24 pm

        It’s so weird that it doesn’t show up under Chinoiserie, the image ID is M23C46209 – try typing “floral bird” into the search bar as well.

        Reply
    2. Julie says

      September 19, 2022 at 9:36 pm

      I never thought to trying this with a cricut! I love your delftware and your DIY blue and white chinoiserie pumpkins!

      Reply

    Leave a Reply Cancel reply

    Your email address will not be published. Required fields are marked *

    This site uses Akismet to reduce spam. Learn how your comment data is processed.

    Primary Sidebar

    Hello! It’s nice to meet you.

    I’m Melissa. I like to design things, like fabric, printables, and projects.

    I’m also a Mom and a Maker. I am like most of you, just trying to do my best every day. Some days I succeed, many days I fail.  I find joy in creating, if you do too, then I hope that you find something here bring a little “happy” to your life.  Find out more about me here.

    COPYRIGHT POLICY

    All my images and text are copyrighted. You may NOT use any images from this site in any kind of Video (this includes YouTube). If you would like to feature my work, you may use ONE (1) NON-COLLAGED image and must “follow” link back to my original blog post. You may NOT edit, crop, or change my images in any way without written permission. You MAY NOT print out or copy and distribute any text, images or patterns from this site. All patterns, content, instructions, and templates are for personal use ONLY! Thank you! Violators will be reported.

    Footer

    ↑ back to top

    About

    • Privacy Policy
    • Disclaimers
    • About Melissa
    • Instagram
    • Facebook
    • YouTube
    • Pinterest

    Newsletter

    • Sign Up! for emails and updates

    Contact

    • Contact
    • FAQ
    • Press
    • Published Books
    • Fabric Collections

    Welcome to the Polka Dot Chair! Here you’ll find easy, step-by-step, sewing, quilting, and crafting projects. We design projects for Makers of all skill levels. Beginners are welcome!

    DISCLAIMER:

    While every effort has been made to ensure the accuracy of the content on this website, the information is made available without warranty of any kind. The Polka Dot Chair accepts no responsibility or liability, whether direct or indirect, as to the currency or accuracy of the information, nor any consequence of its uses. This website is not intended to substitute the advice of a professional.

    Copyright © 2022 Polka Dot Chair

    [ Placeholder content for popup link ] WordPress Download Manager - Best Download Management Plugin