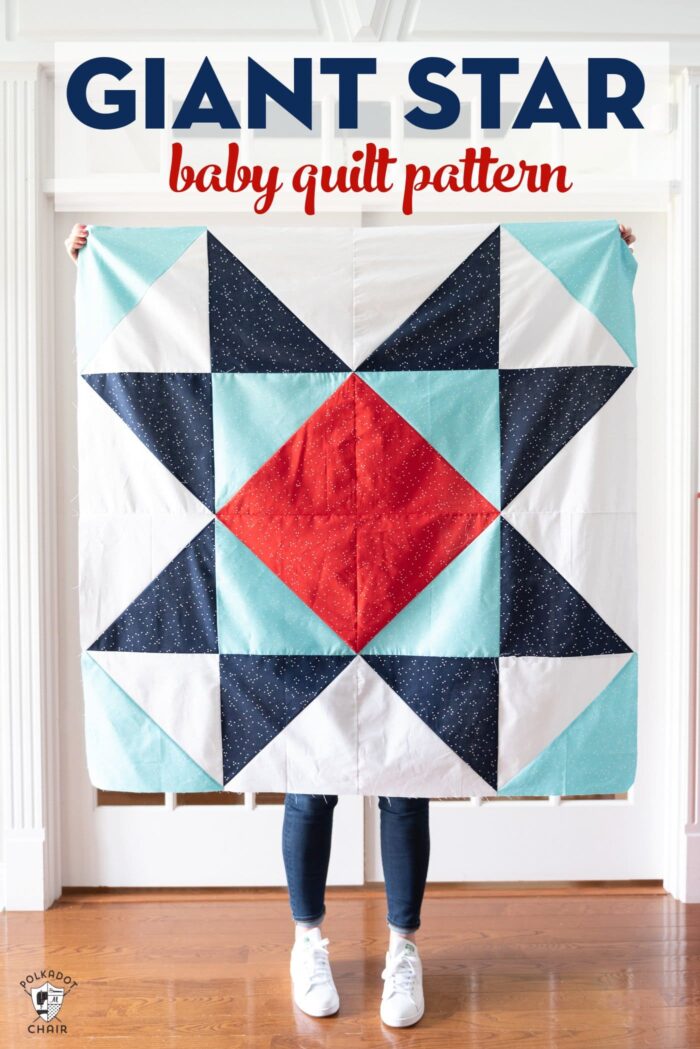
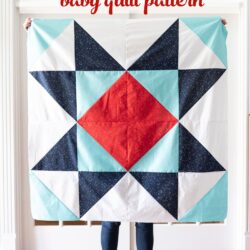
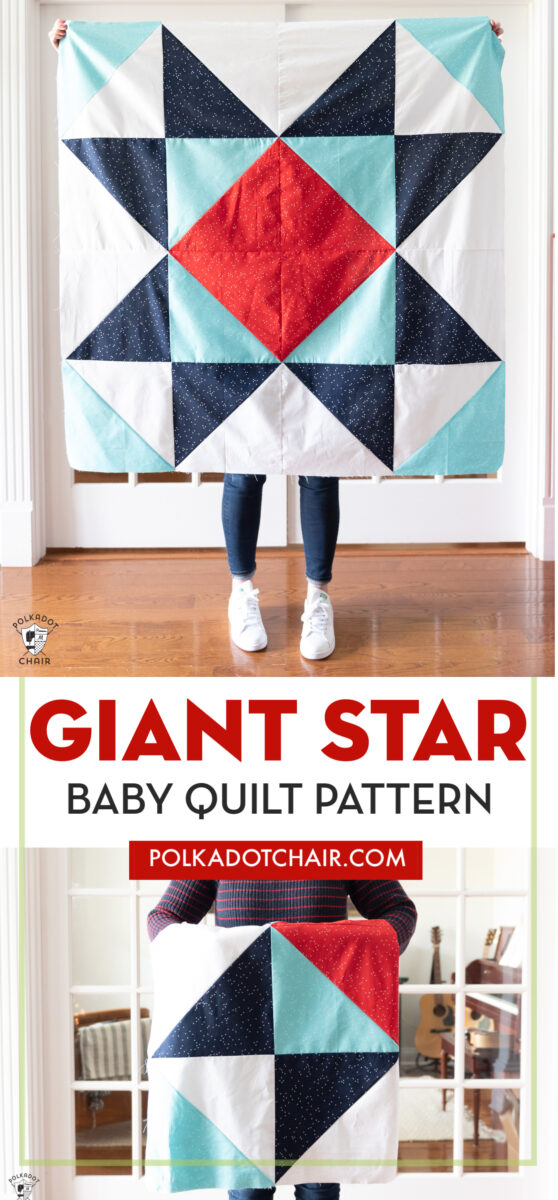
Giant Star Baby Quilt Pattern

Stitch up a baby quilt in an afternoon with this Giant Star baby quilt pattern! The giant star quilt block is not only striking and modern but oh so fast to sew!
Funny story. This baby quilt was made on accident (I feel like there’s a potential double entendre in that sentence LOL!). I was writing the pattern for the last block in my Just for Fun Quilt along and messed up the quilt math. I ended up with a quilt block that was two times too big!
Luckily the mistake was caught before I posted the block pattern (you can read all about it here). Today I thought that I’d share with you how to make this “bonus” easy baby quilt pattern.
This quilt features one large Sawtooth Star Quilt block, sometimes called a variable star. I’ve shared a few other large quilt block baby quilt patterns in the past. This one from Amy Smart is a particular favorite of mine.
Since this quilt block is constructed as one large block (instead of several smaller blocks) it is very quick to make. It’s a very simple baby quilt and I love that it feels a bit modern. In fact, I made mine in about 2 hours.
How to Make a Giant Star Baby Quilt:
I have noticed that many of my daughter and nieces friends who are having babies prefer more graphic or modern baby quilts. If you know someone who’s taste leans a bit more towards clean lines then this baby quilt pattern might be a good choice.
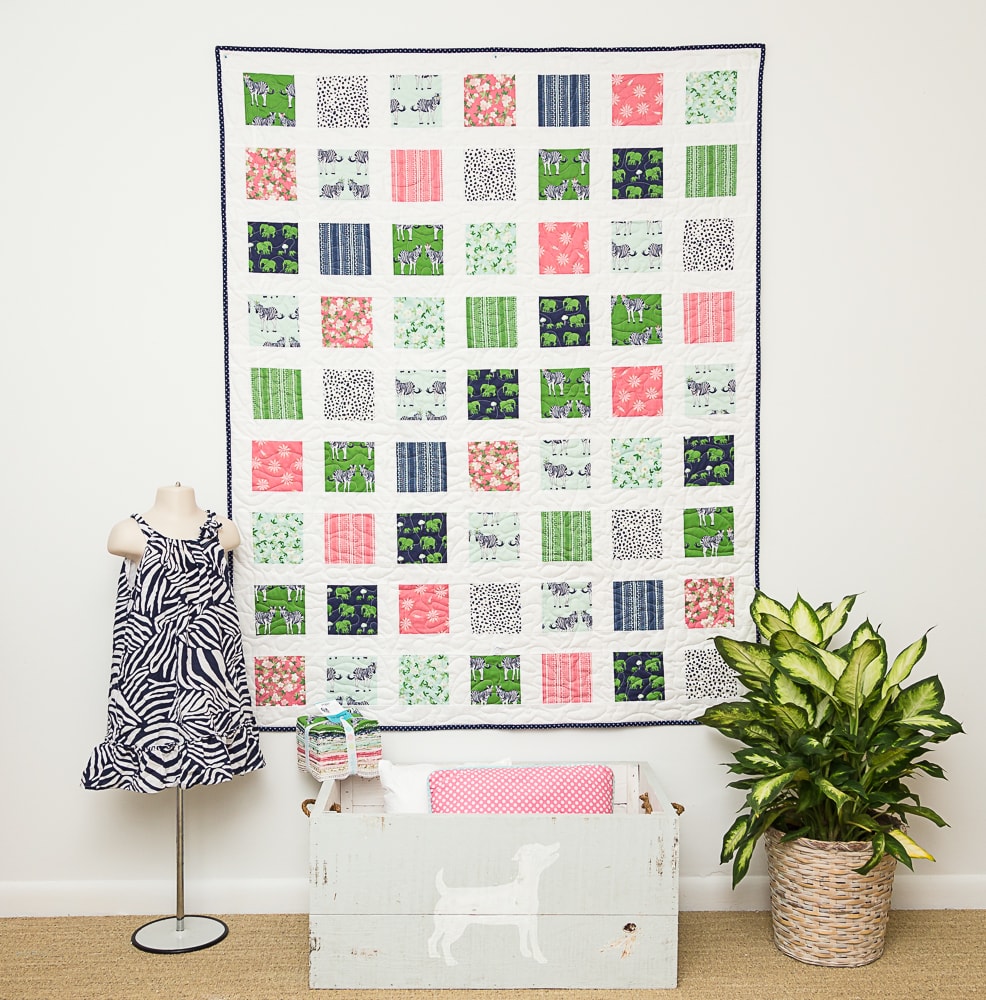
All fabrics are from the Blossom Line by Riley Blake Designs. You can purchase it here. Because of the large size of the quilt blocks in this quilt, I do not recommend using a fat quarter of fabric. Purchasing yardage is a more economical way to make the baby quilt.
Fabric Requirements
- Navy Fabric: 3/4 Yard Fabric
- Aqua Fabric: 3/4 Yard Fabric
- Red Fabric: 1/2 Yard Fabric
- White Fabric: 3/4 Yard Fabric
Baby Quilt Size:
Approximate Dimensions: 48″ x 48″
If you’re brand new to quilting, here are a few tips to keep in mind. 1- Be careful as you cut to keep your measurements precise.
2- Double check your seam allowance on your sewing machine. You want it to be 1/4″ exactly. I recommend marking that spot on your machine with a bit of washi tape so you don’t forget where it is.
Also check out: 3 Tips for Beginning Quilters & How to Make a Quilt from start to finish.
Giant Star Baby Quilt Pattern
Equipment
supplies
- Navy Fabric: 3/4 Yard
- Aqua Fabric: 3/4 Yard
- Red Fabric: 1/2 Yard
- White Fabric: 3/4 Yard
Instructions
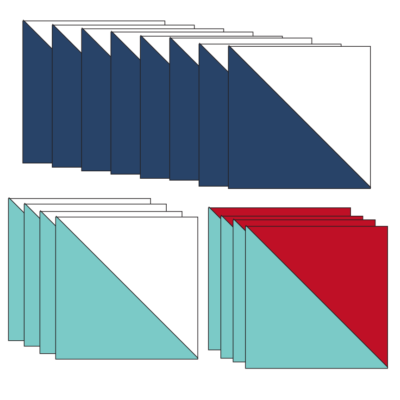
Cutting Directions
- Navy Fabric: 4 Pieces each 13″ x 13″
- Aqua Fabric: 4 Pieces each 13″ x 13″
- Red Fabric: 2 Pieces each 13″ x 13″
- White Fabric: 6 Pieces each 13″ x 13″
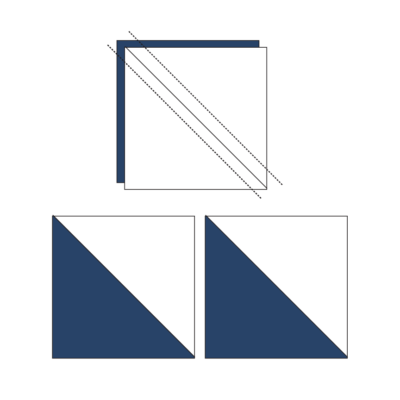
Create the White and Navy Half Square Triangles
- Pair one Navy 13″ x 13″ pieces of fabric with one of the White 13″ x13″ pieces of fabric. Create 2 Navy/White Half square triangles.

- Repeat, 3 times. You should have 8 Navy/ White Half Square triangles.
- Trim and square up to 12 1/2″ x 12 1/2″
- If you need help making a Half Square Triangle, you can view THIS post for full instructions.
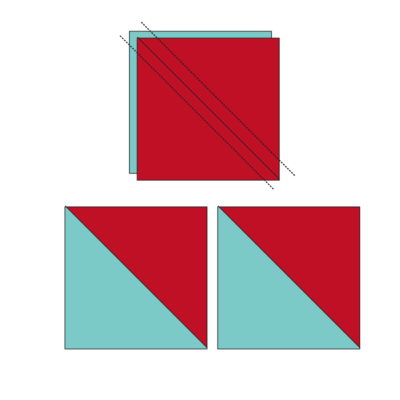
Create Aqua and Red Half Square Triangles
- Pair one Red Square with one of the Aqua Squares. Create 2 Red/Aqua Half Square Triangles.
- Repeat. You should have 4 Red/Aqua Half Square Triangles. Trim and square up to 12 1/2″ x 12 1/2″
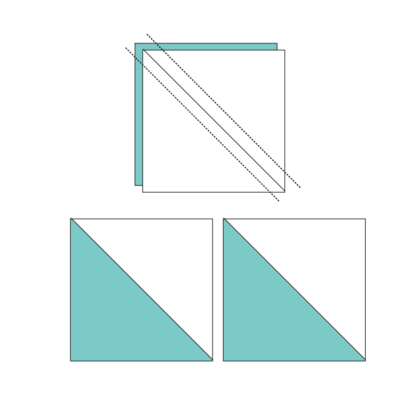
Aqua and White Half Square Triangles
- Using 1 white and 1 Aqua squares of fabric, create 2 Aqua/White Half Square Triangles.
- Repeat. You should have 4 Aqua/White Half Square Triangles. Trim and square up to 12 1/2″ x 12 1/2″
Count Your Blocks; you should have:
- 8 White and Navy Half Square Triangles
- 4 Red and Aqua Half Square Triangles
- 4 Aqua and White Half Square Triangles.
- All pieces should be 12 1/2″ x 12 1/2″
Finishing
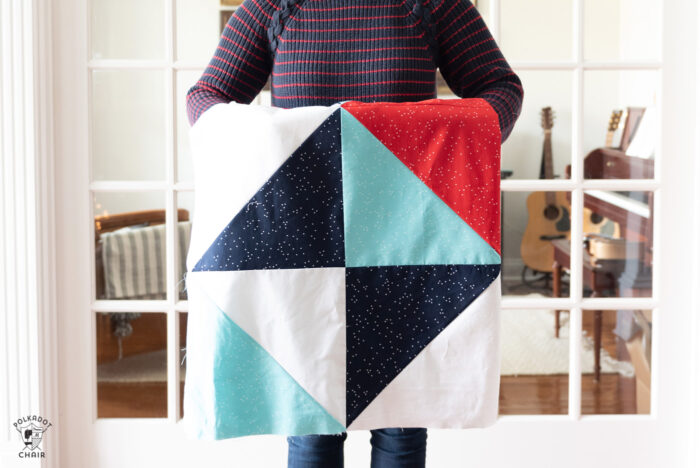
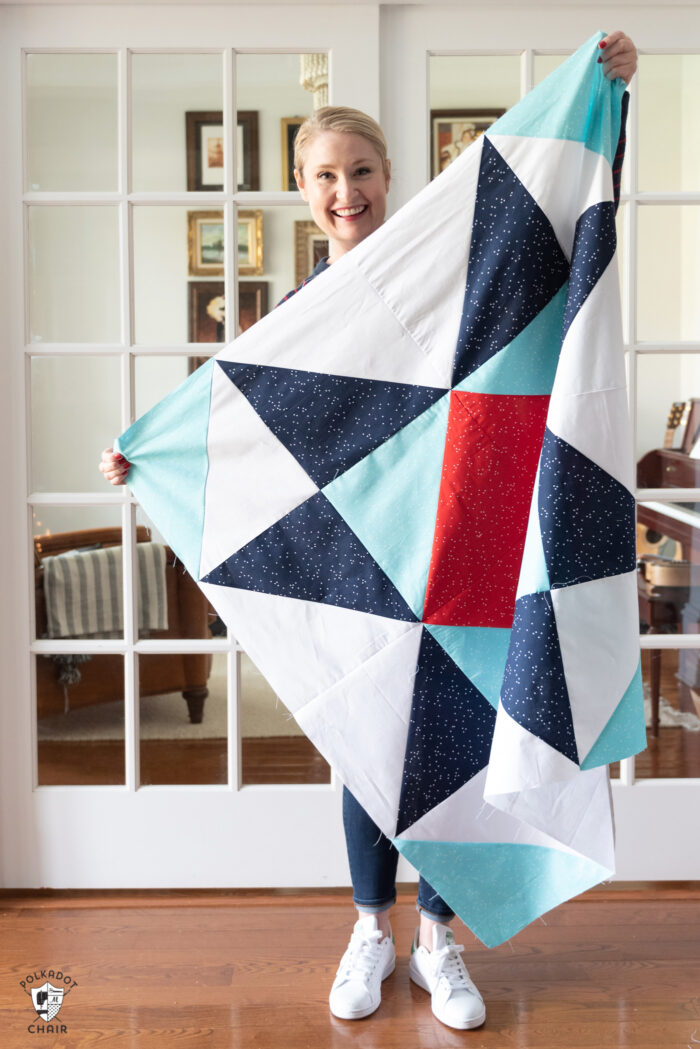
- Assemble the quilt top by rows according to the diagram.
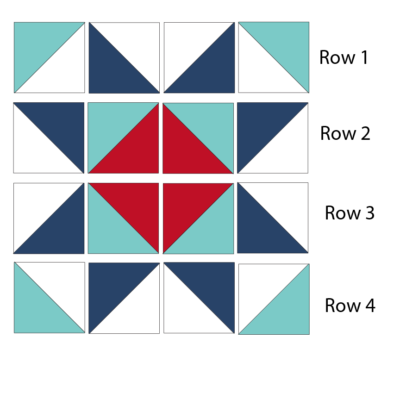
Finished Quilt
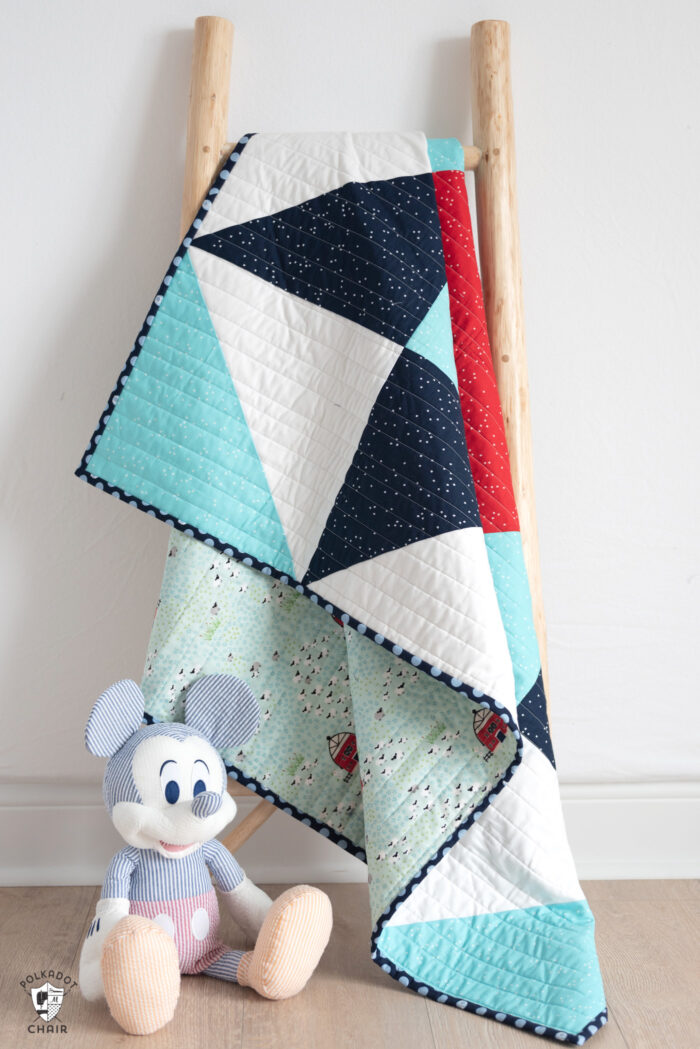
I finished my quilt on my domestic machine. It is quilted with straight lines, approx 1″ apart. You can find all the details for my finished project in my Finish it Friday blog series.
More Free Baby Quilt Ideas & Free Baby Quilt Patterns:
Turnstile Block Baby Quilt Pattern