• Skip to primary navigation
  • Skip to main content
  • Skip to primary sidebar

The Polka Dot Chair logo

  • SEWING
    • Free Sewing Patterns
    • Bag Sewing Patterns
    • Costumes Sewing Tutorials
    • Apparel Sewing Patterns
    • Learn to Sew
    • Beginner Friendly Sewing Projects
    • Hand Embroidery Patterns
    • Tips & Techniques
    • All Sewing
  • QUILTING
    • Quilt Block Patterns
    • Learn to Quilt
    • Free Quilt Patterns
    • Quilt Patterns
    • All Quilting
  • CRAFTS
    • Disney
    • Cricut
    • Printables
    • All Crafts
  • HOLIDAYS
    • Seasonal Projects
    • Valentine’s Day
    • Easter
    • 4th of July
    • Halloween
    • Thanksgiving
    • Christmas
    • All Holidays
  • TUTORIALS
  • ABOUT
    • About Me
    • My Fabric Collections
    • Published Books
    • Press
    • FAQ’s
    • Contact
  • SUBSCRIBE
  • SHOP
menu icon
go to homepage
  • SHOP
  • TUTORIALS
  • SEWING
  • QUILTING
  • SUBSCRIBE
  • CRAFTS
  • HOLIDAY PROJECTS
  • ABOUT
    • Published Books
    • My Fabric Collections
  • CONTACT
    • Facebook
    • Instagram
    • YouTube
  • subscribe
    search icon
    Homepage link
    • SHOP
    • TUTORIALS
    • SEWING
    • QUILTING
    • SUBSCRIBE
    • CRAFTS
    • HOLIDAY PROJECTS
    • ABOUT
      • Published Books
      • My Fabric Collections
    • CONTACT
    • Facebook
    • Instagram
    • YouTube
  • ×

    Home » Crafts

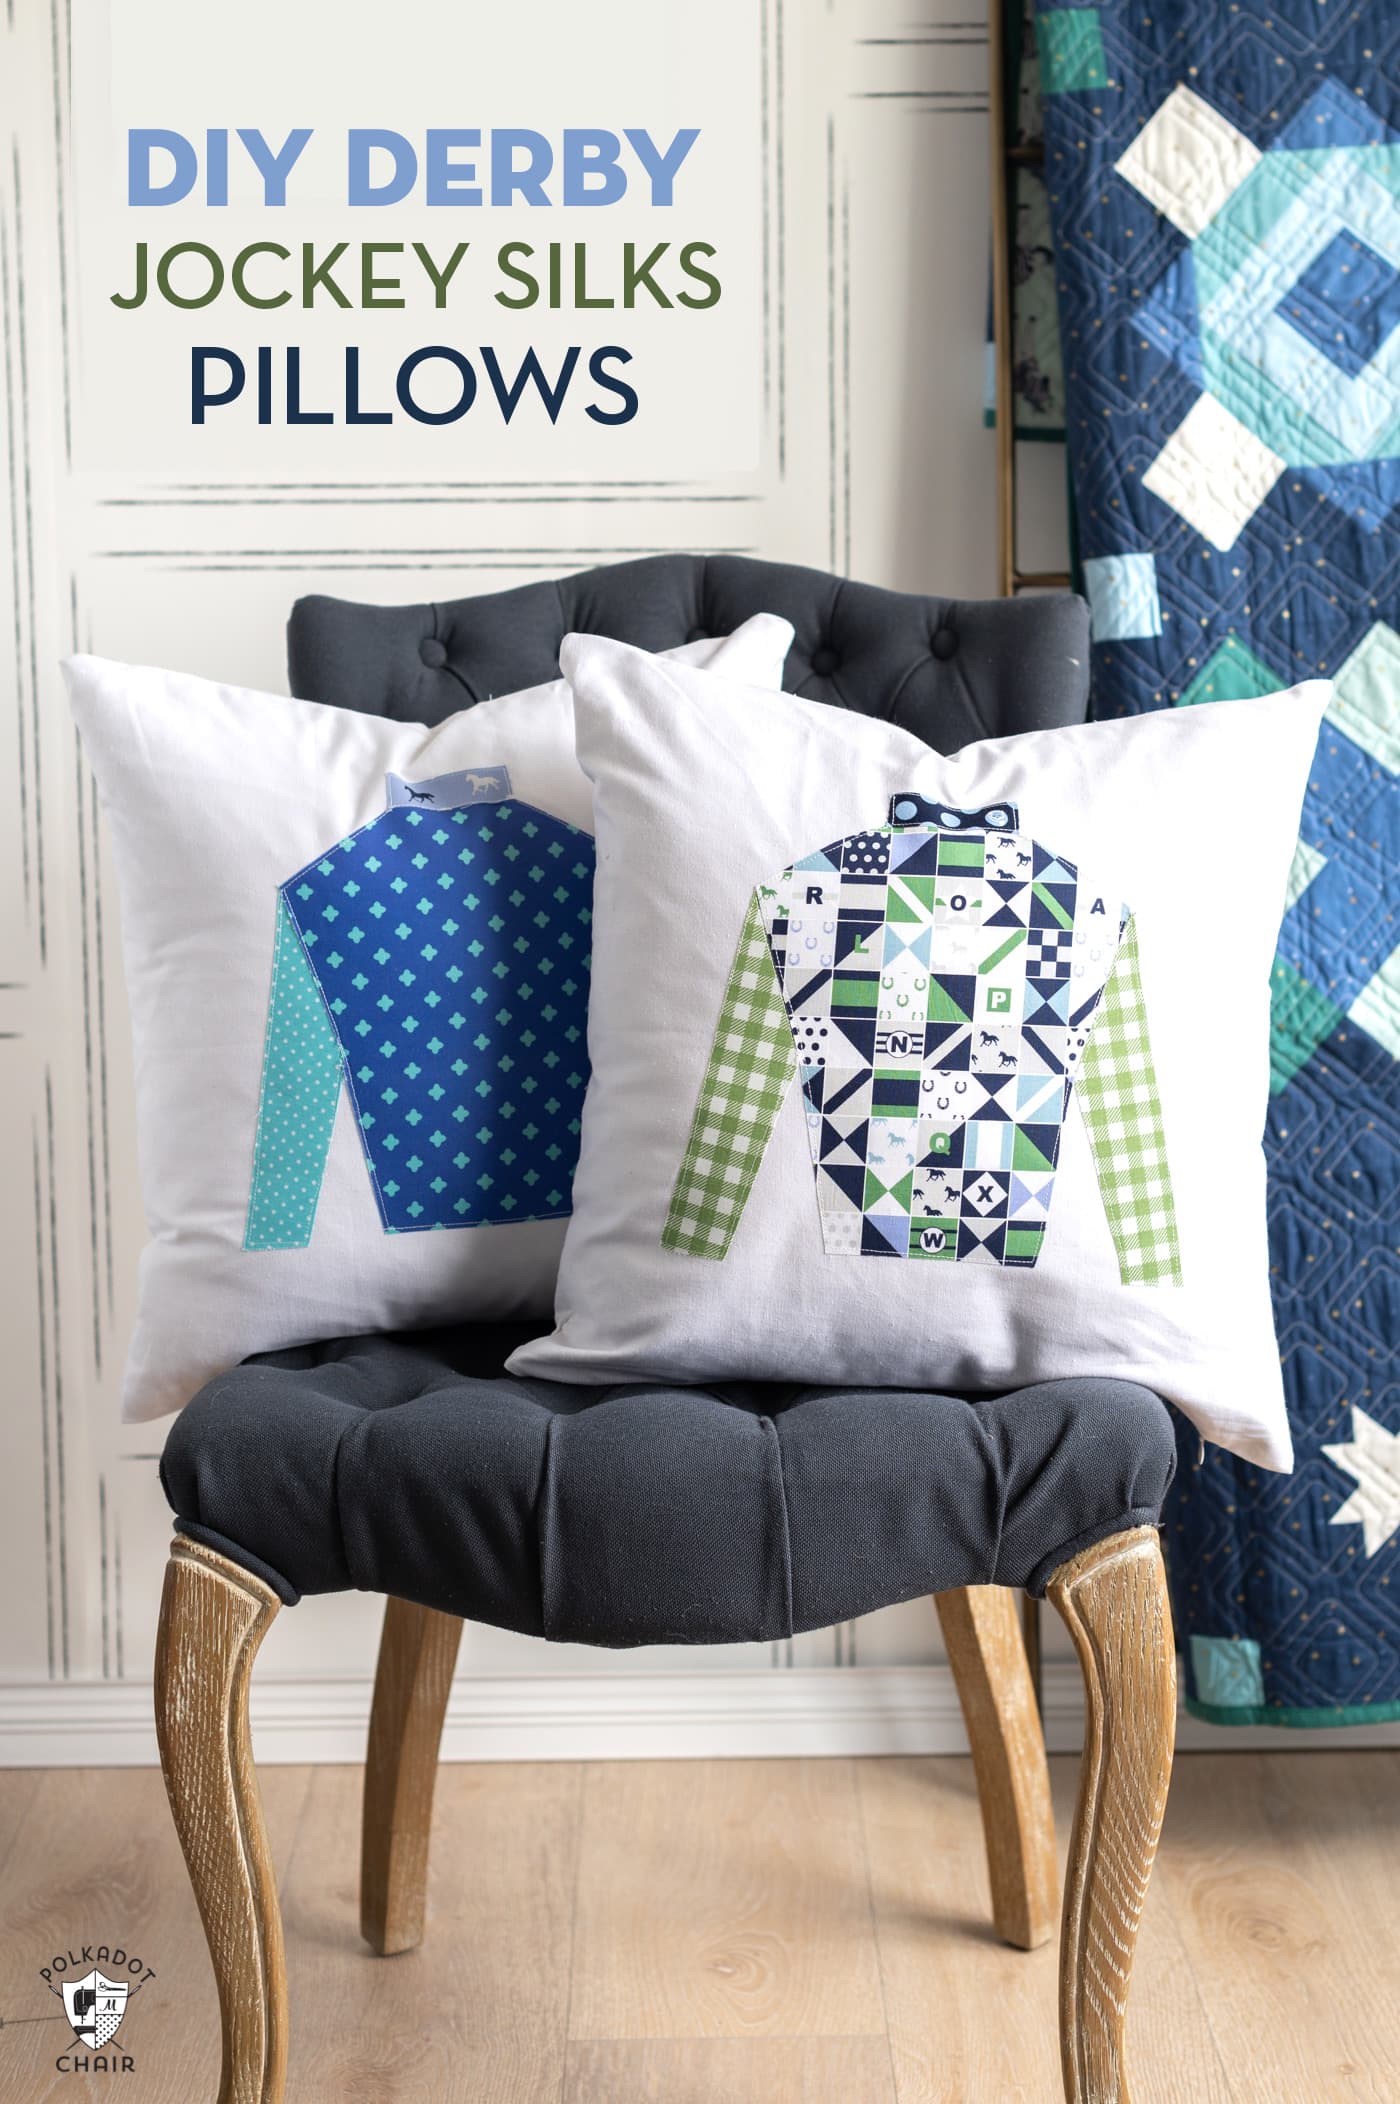
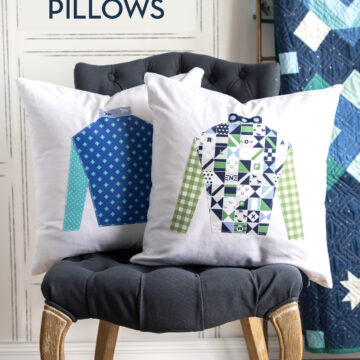
    DIY Derby Jockey Silks Pillows

    Updated: Apr 25, 2023 by Melissa Mortenson · This post may contain affiliate links · This blog generates income via ads · 1 Comment

    This tutorial will teach you how to make Jockey Silks pillows, a perfect way to add a bit of Kentucky Derby decor to your home! Included in the directions are options for sew and no-sew pillows. To make this project as easy as possible, we’ve even created a free jockey silks applique pattern for you.

    two brightly colored pillows with jockey silk applique on gray chair

    It’s been a while since I’ve shared a Derby-inspired craft project with all of you! If you don’t know, I live in Louisville, Kentucky, famous for the most exciting two minutes in sports, the Kentucky Derby!

    Table of Contents
    • Two Construction Options
    • Supplies Required
    • What Fabric Should I Use?
    • How to Get the Applique Pattern
    • Instructions
    woman in green shirt holding jockey silks pillow

    Even though I didn’t grow up here, I moved here 27 years ago and have enjoyed embracing everything, Derby! For many years we hosted family-friendly Derby parties in our home on Derby Day. These are still some of my favorite memories when my children were smaller. I’ve never been to the Derby, but we’ve got to Thurby and the Kentucky Oaks many times.

    Derby Day Fabric by Melissa Mortenson for Riley Blake Designs

    Recently, I had a string of tight deadlines all in a row. I was feeling a bit burnt out and decided that I needed a fun and quick project as a creative reset. I made these pillows in an afternoon. They would be great for a crafternoon with your best girlfriends!

    Two Construction Options

    Option 1: Sew

    There are two construction options when making these pillows. The first is a method that requires a sewing machine.

    Option 2: No Sew

    The second is a NO SEW method. You buy a premade pillow cover and literally glue the fabric to the pillow. It’s so easy!

    Supplies Required

    There are no special tools required; you should have most of them at home already. I did use a lightbox, and I recommend this one if you don’t have one. If you don’t have a lightbox, you can also use your phone flashlight under a large clear plastic box.

    • 18″ Canvas Pillow Cover
    • Scraps of fabric in coordinating prints, with one piece at least 8 ½″ x 11″ in size.
    • For the Sew project – Heat N Bond Lite Fusible Paper Backed Web
    • For the No-Sew Project – Heat N Bond Ultra Hold
    • 18″ Pillow Insert
    • Lightbox – I love my Brightpad

    What Fabric Should I Use?

    two brightly colored pillows with jockey silk applique on gray chair

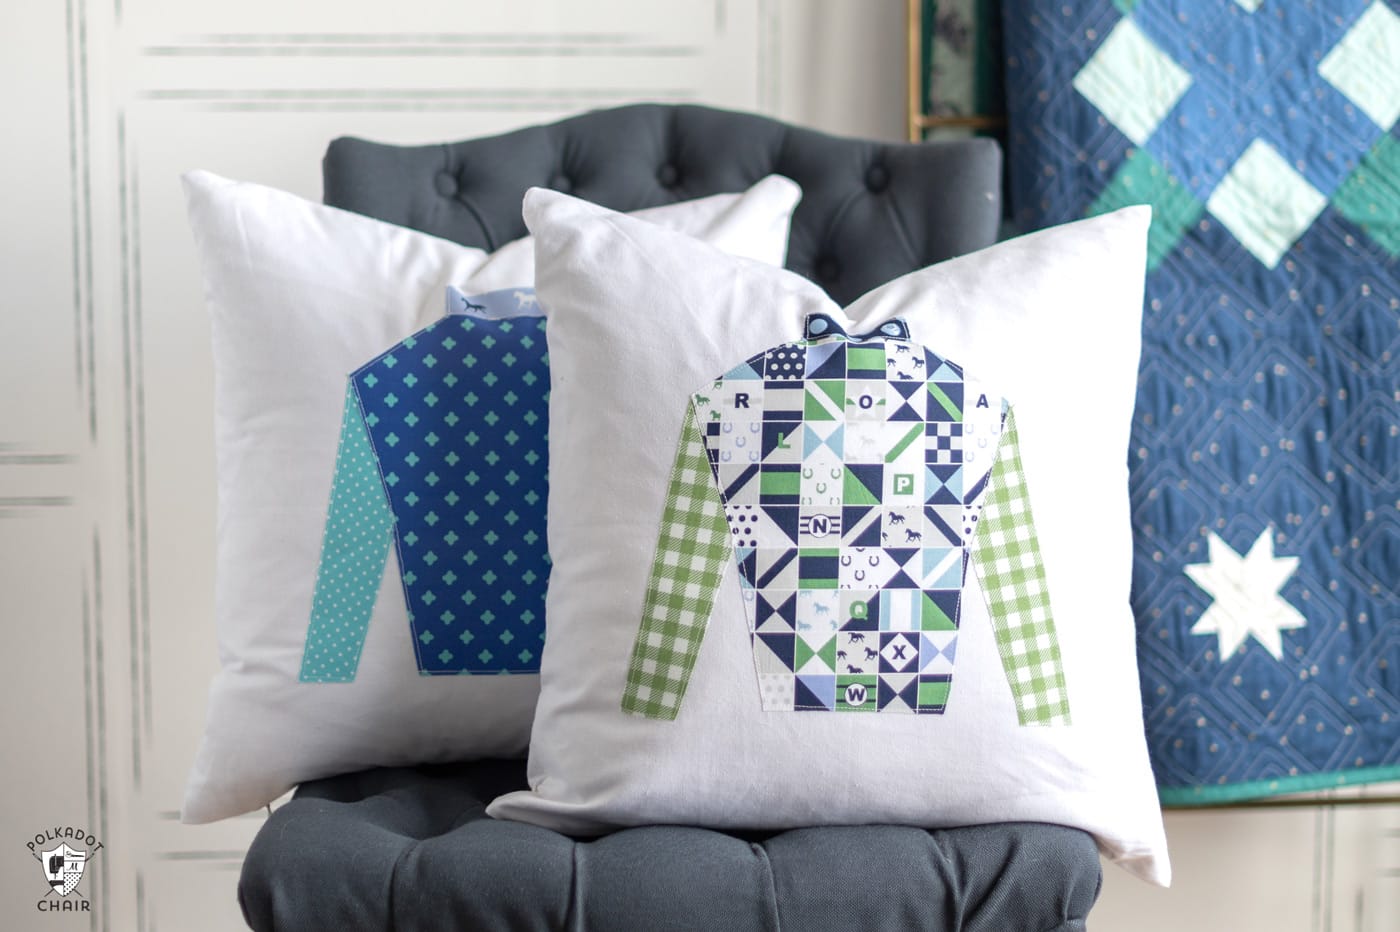
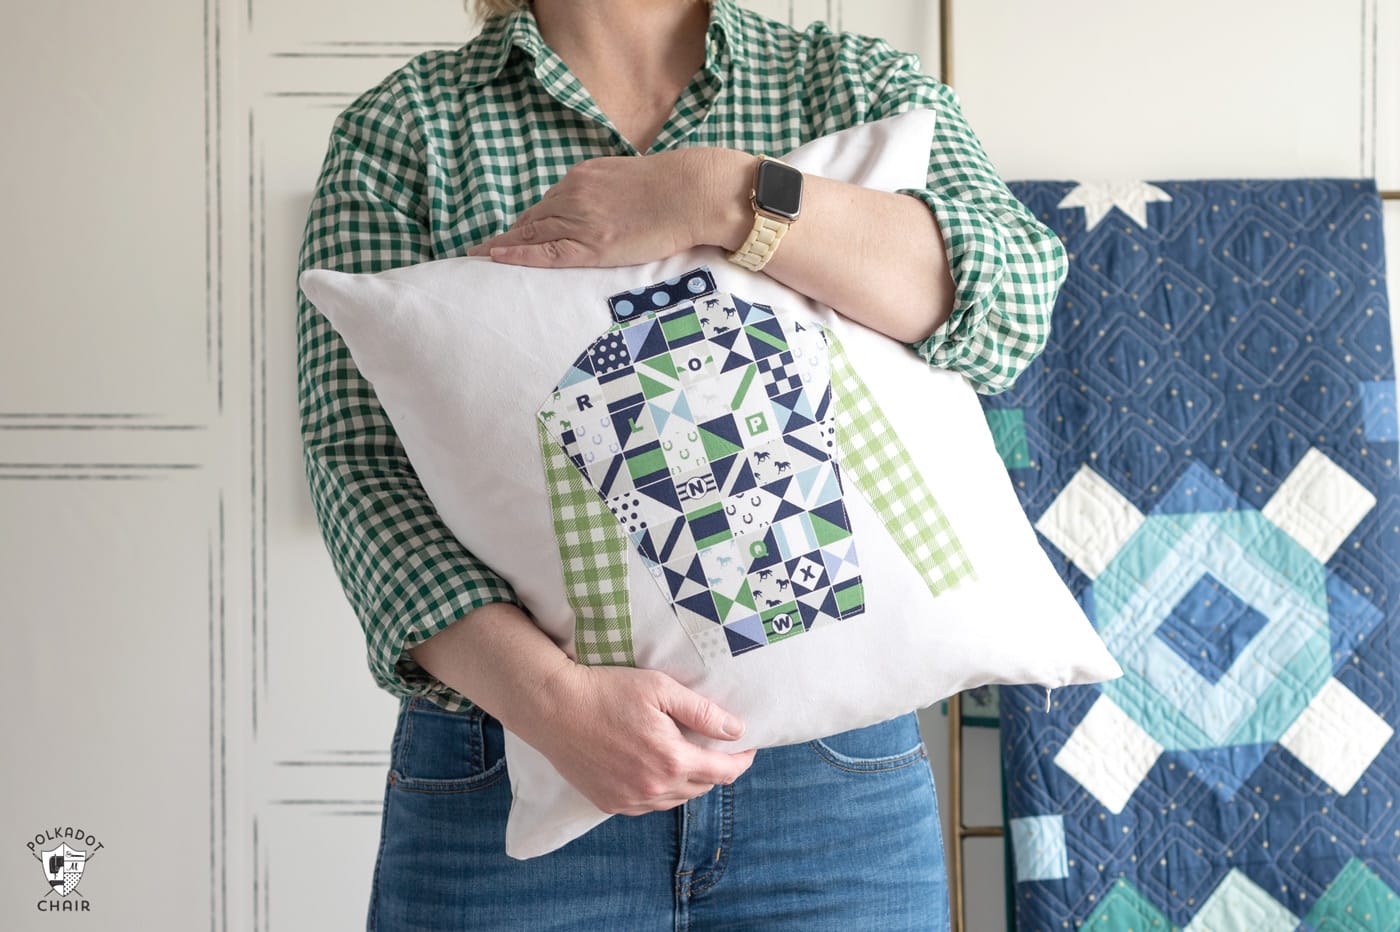
    Since jockey silks are brightly colored with bold geometric shapes, I recommend looking for fabric prints in simple geometric shapes, such as polka dots, stripes, gingham, checkerboard & harlequin prints. My fabric is from my Derby Day and Summer Picnic collections and from my scrap box!

    How to Get the Applique Pattern

    Fill out this form, and we will email you a copy of the Jockey Silks Applique pattern. It comes in two sizes, so you can also make a smaller pillow if you prefer. You can also use it to create a set of Derby placemats.

    Instructions

    two brightly colored pillows with jockey silk applique on gray chair

    Derby Jockey Silks Applique Pillow Pattern

    Melissa Mortenson
    Create a set of throw pillows perfect for the Kentucky Derby with our Jockey Silks pillow applique pattern. This can be a no-sew project.
    5 from 1 vote
    Pin It! Share by Email Share on Facebook
    Prep Time 15 minutes mins
    Active Time 1 hour hr
    Total Time 1 hour hr 15 minutes mins

    Equipment

    • Sewing Machine
    • Small Sharp Scissors
    • Cricut Bright Pad (or another lightbox)

    supplies

    • 2-3 Scraps Fabric in coordinating colors One of the scraps should be at least 8 ½" x 11"
    • 1 package Heat N Bond Lite for the sew version
    • 1 package Heat N Bond Ultra Hold for the no-sew version
    • 1 18" square Pillow Cover
    • 1 18" Pillow Insert
    • 1 Applique Pattern Get it by filling out the form on this blog post.

    Instructions
     

    Instructions for both the Sew and No-Sew Versions

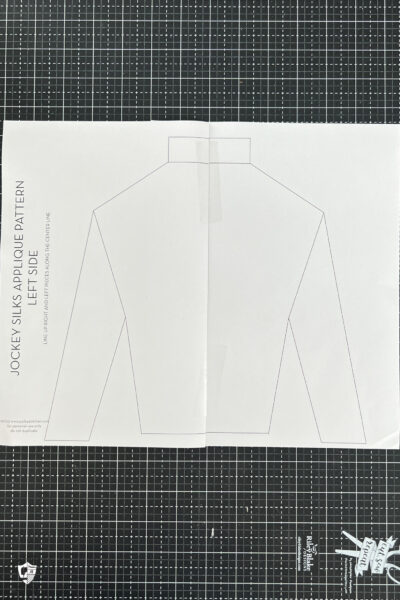
    • Print out the Jockey Silks applique pattern and tape the two pieces together along the center line.
      Taped applique pattern on black cutting mat
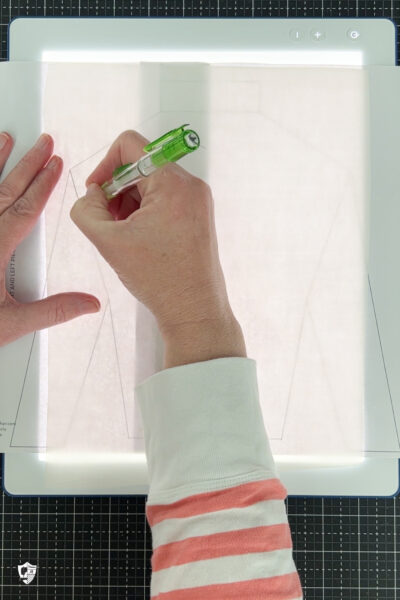
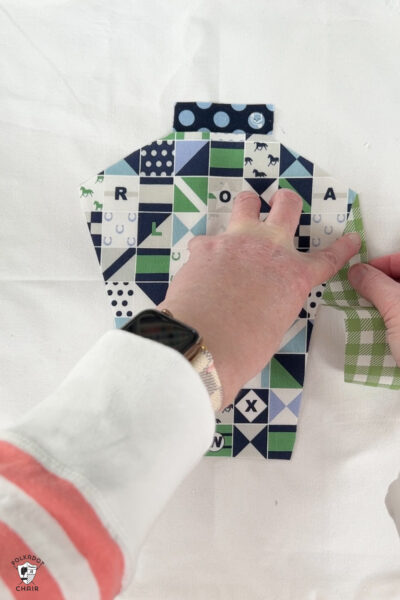
    • There are three main "groups" on the applique pattern, the shirt, the collar, and the sleeves. Trace each group on to the paper side of the Heat N Bond. Use the "lite" for the sew version and the "ultra hold" for the no-sew version.
      I recommend tracing each group onto a different fabric print.
      Cut out the pieces loosely around the line you drew.
      hand tracing image onto paper
    • Iron the cutout pieces onto the wrong side of your fabric.
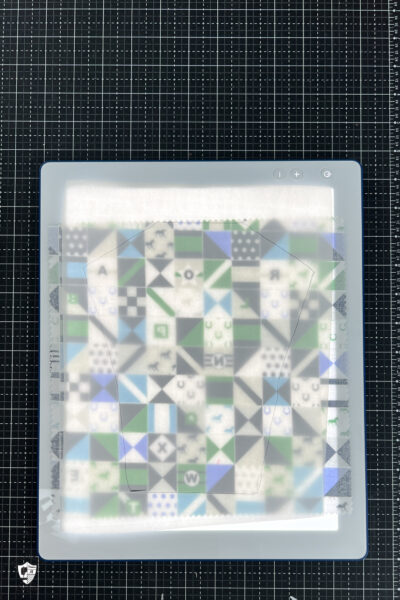
    • TIP: Use your lightbox to get the exact fabric placement you want in your final project. This is especially important if you are working with large fabric prints.
      fabric on lightbox with paper
    • Cut out the pieces, this time precisely.

    For the New Sew Version

    • Peel the paper backing off of the pieces you cut out and place them on the purchased pillow cover.
      hand applying fabric to white pillow
    • Secure in place using your iron. Ensure that you didn't miss a spot and that the corners of the pieces are secure.
      This is the last step for the no-sew version.
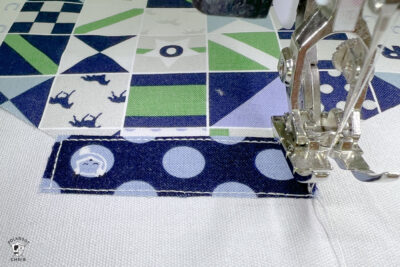
    For the Sew Version

    • Using your seam ripper, unpick two of the seams in the purchased pillow form. This will allow you to get to the applique pieces as you sew.
    • Peel the paper backing off of the pieces you cut out and place them on the purchased pillow cover.
      hand applying fabric to white pillow
    • Secure in place using your iron. Ensure that you don't miss a spot and that the corners of the pieces are secure.
    • On your sewing machine, stitch around the entire applique shape using a straight stitch. Be sure to put your needle down and pivot at the corners.
      close up of applique stitches on fabric
    • After you've completed the applique stitching, sew the seams in the pillow back together.
    • Enjoy your new pillow!
      two brightly colored pillows with jockey silk applique on gray chair
    PRINT
    Tried this tutorial?Let us know how it was!

    You May Also Like:

    • How to Make a Braided Padded Headband
    • Jockey Silks Table Topper Pattern; A DIY Derby Project
    • Jockey Silks Placemats
    • Sparkly Lucky T-shirt; a Kids DIY Kentucky Derby T-Shirt
    • Quilt Block Construction Tips

    More Projects You May Enjoy

    • How to Make a Vintage Folded Fabric Star Ornament
    • close up of round fabric ornament with trim and ribbon attached
      How to Make a Retro Fabric Christmas Ornament with a Photo
    • multiple blown egg ornaments with painted hedgehogs on white wood table
      DIY Blown Egg Ornaments
    • close up of paint inside of glass ornament
      DIY Splatter Paint Christmas Ornaments

    • Share
    • Email

    About Author

    Melissa Mortenson

    Melissa Mortenson is a blogger, designer, and content creator. She is the Polka Dot Chair blog founder and has been sharing fresh and creative ideas with readers since 2008. She is the author of “Project Teen, Handmade Gifts your Teen will Actually Love.” Her work and designs have been featured on HuffPost, TODAY, Pioneer Woman, HGTV, BuzzFeed, Better Homes & Gardens, and many other established publications. Her first fabric line, “Derby Style,” debuted in January 2015 through Riley Blake Designs.  Additional fabric collections have followed it in subsequent years. A mom of 3, she considers herself lucky to be living in Kentucky.

    Reader Interactions

    Comments

    1. SewingKevin says

      April 28, 2023 at 10:42 am

      Great post on sewing patterns! As a fellow sewing enthusiast, I appreciate the effort you put into sharing your knowledge with the community.

      Reply

    Leave a Reply Cancel reply

    Your email address will not be published. Required fields are marked *

    This site uses Akismet to reduce spam. Learn how your comment data is processed.

    Primary Sidebar

    Hello! It’s nice to meet you.

    I’m Melissa. I like to design things, like fabric, printables, and projects.

    I’m also a Mom and a Maker. I am like most of you, just trying to do my best every day. Some days I succeed, many days I fail.  I find joy in creating, if you do too, then I hope that you find something here bring a little “happy” to your life.  Find out more about me here.

    COPYRIGHT POLICY

    All my images and text are copyrighted. You may NOT use any images from this site in any kind of Video (this includes YouTube). If you would like to feature my work, you may use ONE (1) NON-COLLAGED image and must “follow” link back to my original blog post. You may NOT edit, crop, or change my images in any way without written permission. You MAY NOT print out or copy and distribute any text, images or patterns from this site. All patterns, content, instructions, and templates are for personal use ONLY! Thank you! Violators will be reported.

    Footer

    ↑ back to top

    About

    • Privacy Policy
    • Disclaimers
    • About Melissa
    • Instagram
    • Facebook
    • YouTube
    • Pinterest

    Newsletter

    • Sign Up! for emails and updates

    Contact

    • Contact
    • FAQ
    • Press
    • Published Books
    • Fabric Collections

    Welcome to the Polka Dot Chair! Here you’ll find easy, step-by-step, sewing, quilting, and crafting projects. We design projects for Makers of all skill levels. Beginners are welcome!

    DISCLAIMER:

    While every effort has been made to ensure the accuracy of the content on this website, the information is made available without warranty of any kind. The Polka Dot Chair accepts no responsibility or liability, whether direct or indirect, as to the currency or accuracy of the information, nor any consequence of its uses. This website is not intended to substitute the advice of a professional.

    Copyright © 2022 Polka Dot Chair

    [ Placeholder content for popup link ] WordPress Download Manager - Best Download Management Plugin