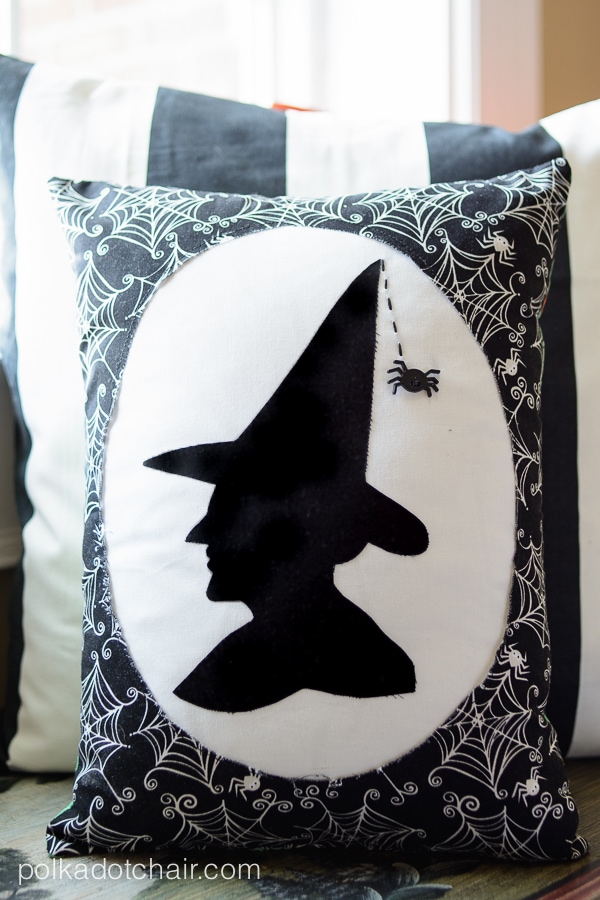
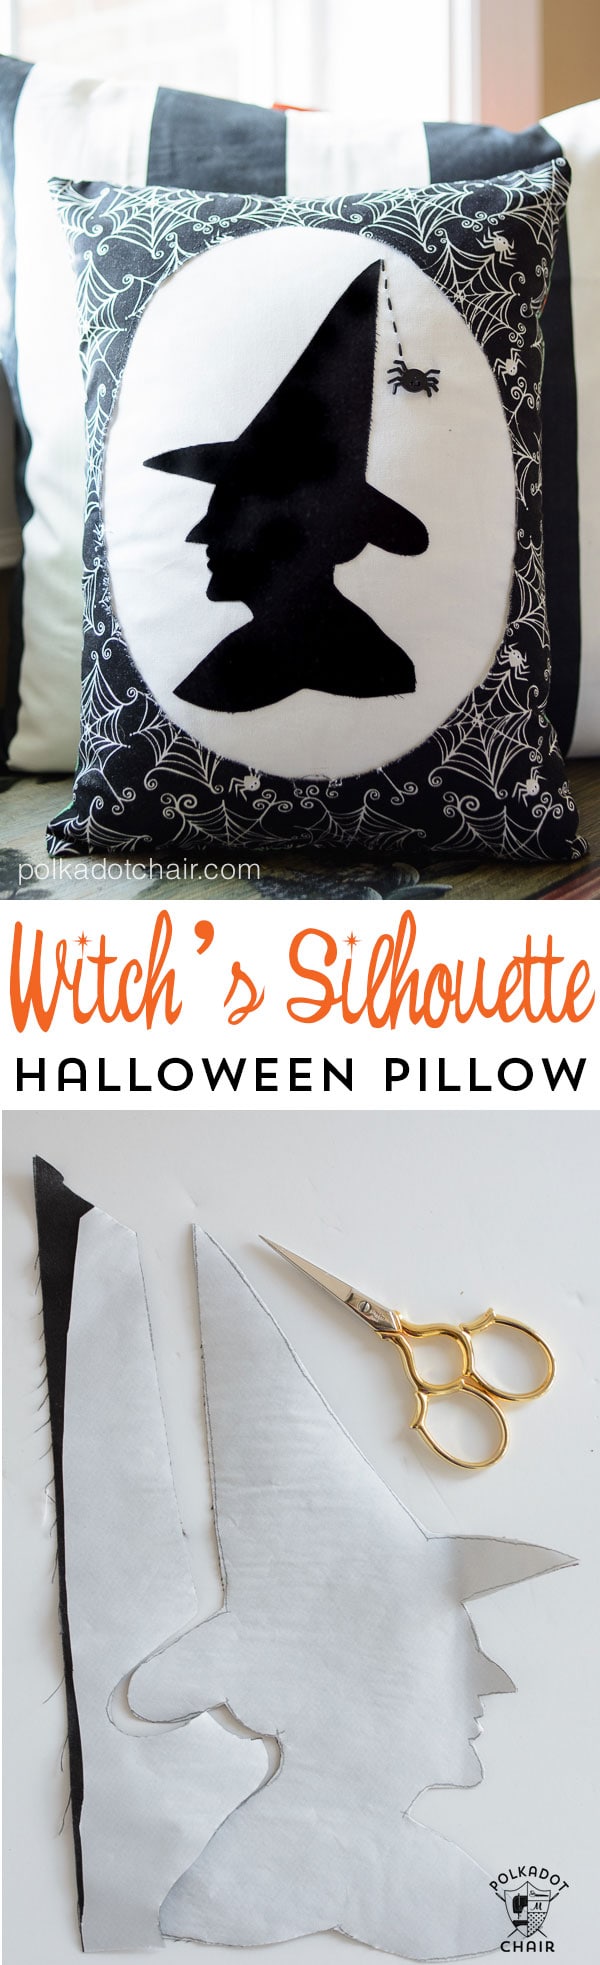
Witch’s Silhouette Halloween Pillow Pattern

Add a bit of spooky decor to your home this Halloween with this Witch’s Silhouette Halloween Pillow sewing tutorial. If you like this project, you may also like this sewing pattern for a simple Halloween Table Runner.

I love decorating with black and white at Halloween, and I thought this would be a fun addition to my Ghastly Halloween pillows from a couple of years ago. The oval in this pillow is reverse appliqued, and the witch is raw-edge appliqued.
Tips for Creating Holiday Pillows
When I sew pillows to decorate my home for the holidays, I prefer to make them all the same size. That way, I can purchase one set of pillow forms and easily swap out the pillows each season.
My favorite sizes are 18″ x 18″ (the size of my Cat & Pumpkin Halloween pillows) and 12″ x 16″, which is the size of the pillow used in today’s tutorial.
This tutorial shows you how to sew a pillow back onto your pillow. However, I prefer to add a zippered back to a pillow instead. In our free tutorial, you can find out how to add a zipper to a sewn pillow.
Okay, now are you ready to learn how to make the pillow?
Printable Copy of Pattern
If you prefer a printable copy of this Halloween pillow pattern, you can now purchase a PRINTABLE copy of this pattern bundled with 2 of our most popular Halloween sewing projects! Find out more information in the shop.
How to Get the Witch Shape
Fill out the form above and we will email you a copy of the witch shape.

Witch’s Silhouette Halloween Pillow Pattern
Equipment
- Fabric Safe Marking Pen
supplies
- 1 12″ x 16″ pillow form
- 2 fat quarters Fabric one for the front and one for the back of the pillow
- 1 fat quarter Black Fabric for witch silhouette
- 1 fat quarter White Fabric for oval
- Spider Button
- Embroidery Floss
- Heat N Bond Lite
- Fusible Seam Tape
Instructions
Step One: Get the Free Printable Witch Silhouette
- Fill out the pattern form above, and we will email you a copy of the pattern.
Step Two: Trace the Image
- Place the pattern piece upside down on a lightbox or bright window. Trace the reversed image onto the paper side of a piece of Heat ‘n Bond Lite. Cut out loosely around the image.

- Press the cut image onto a piece of black fabric. Cut out the witch silhouette carefully after it is fused to the fabric. Set aside.


Step Three:
- Cut your two fat quarters for the pillow front and back to 12″ x 16″.
- Cut out the oval from the printable pattern piece.
- Lining up the centers of the oval and the centers of the 12″ x16″ fabric for the front of the pillow, trace the oval onto the fabric. Use a fabric-safe pen. Cut out the oval from the center of the fabric.

Step Four:
- Cut your white fabric larger than the hole left in the pillow front fabric.
- Adhere the white fabric to the wrong side of the pillow front fabric using the fusible seam tape.
- On your sewing machine, stitch around the edge of the cutout oval on the front of the pillow fabric piece.

Step Five:
- Remove the paper backing from the witch silhouette and position it as you want on the oval on the front of the pillow. Press in place.

Step Six: Finishing Details
- Draw a line with your fabric-safe pen on the front of the pillow for your spider’s web. Stitch over this line using the black embroidery floss and sew the spider button at the bottom.
- Sew the front and back pieces with the right sides facing. Stitch with a 1/2″ seam allowance. Leave a 6″ hole in the bottom of the pillow to turn it right side out. Clip corners and turn right side out. Slip into pillow form. Whipstitch opening closed.

More Halloween Craft Projects:
DIY Spooky Burlap Table Runner