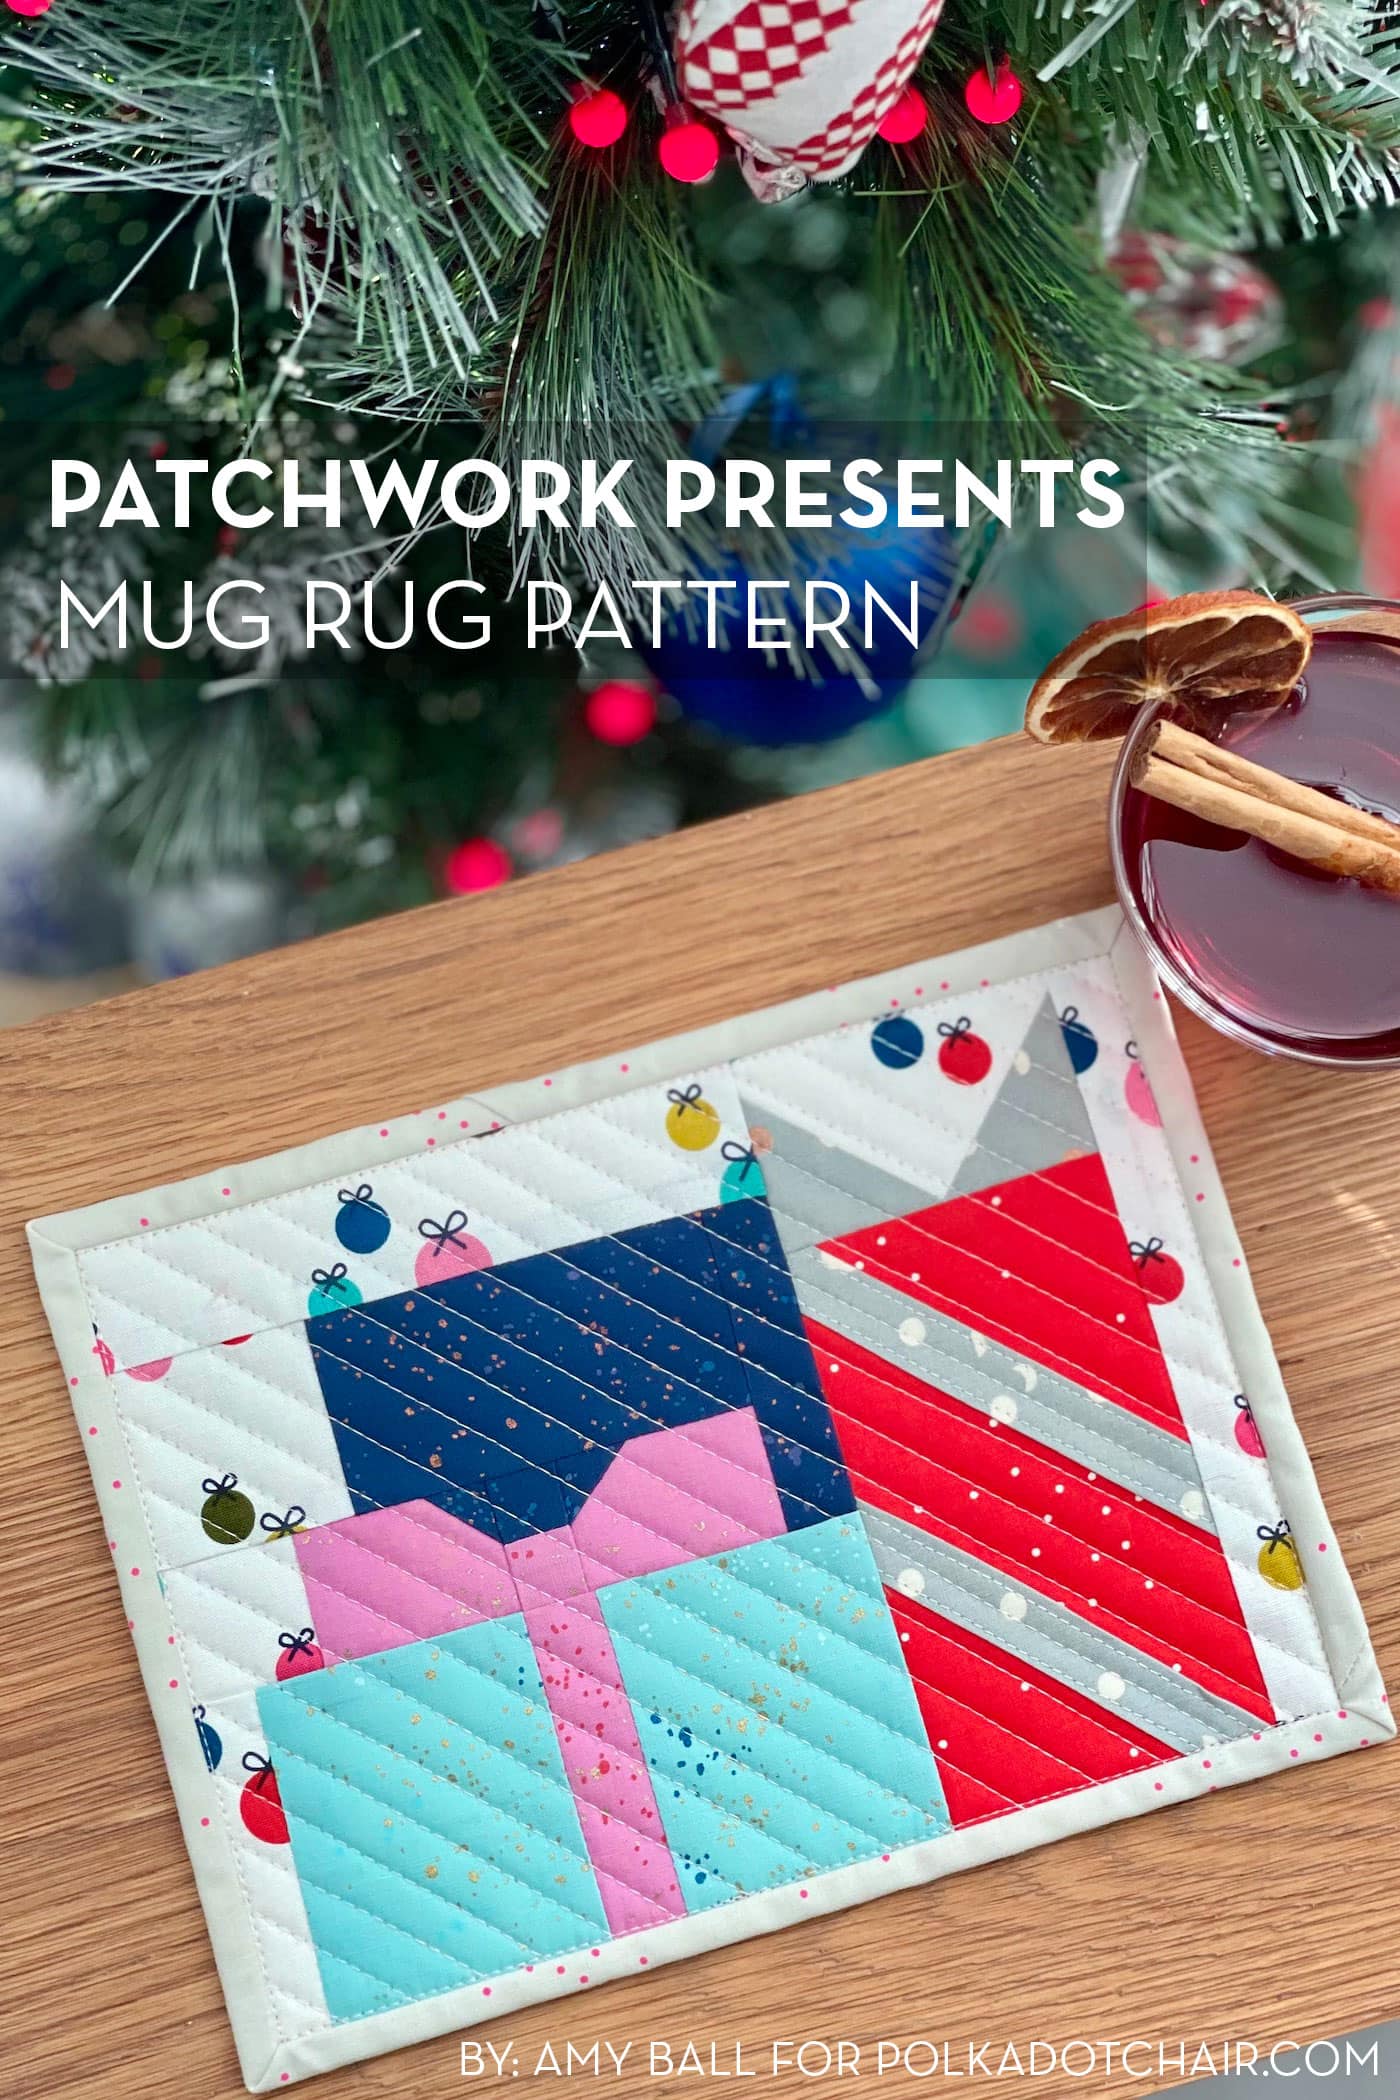
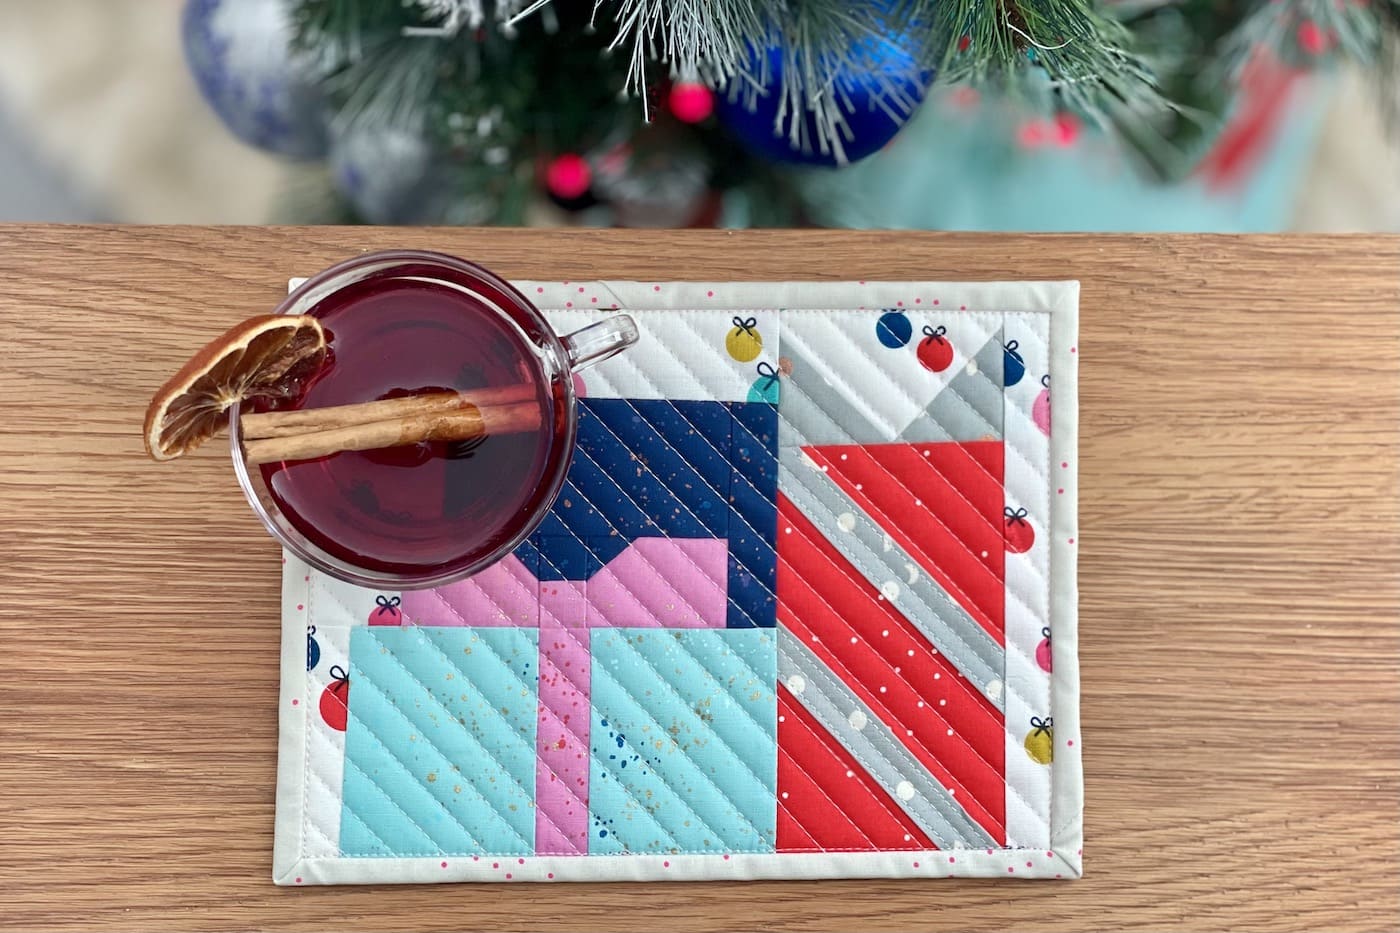
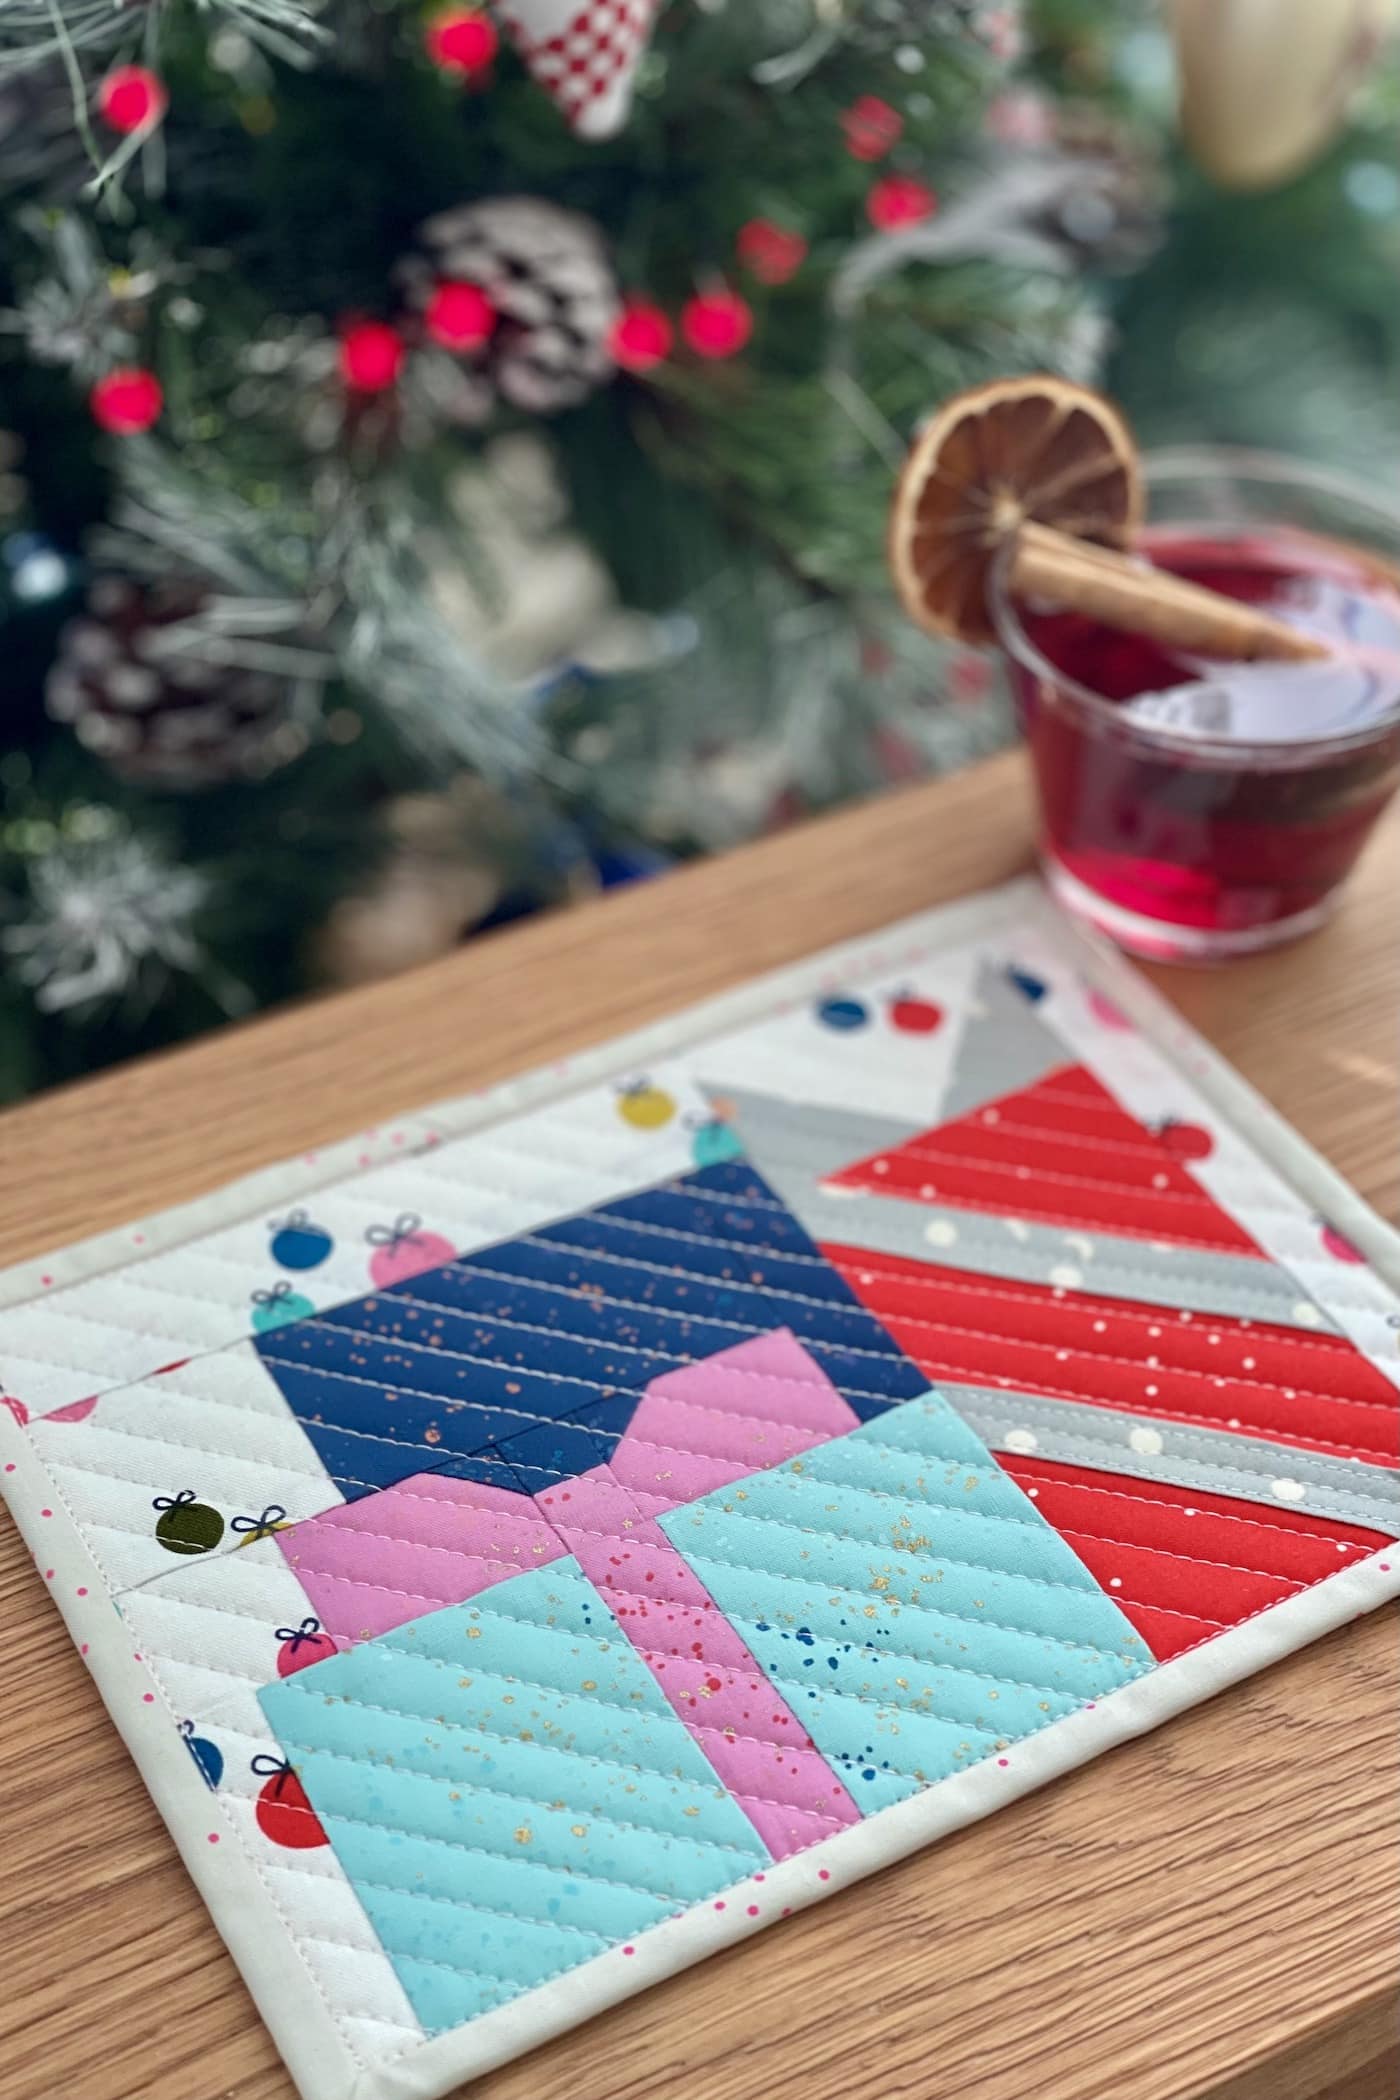
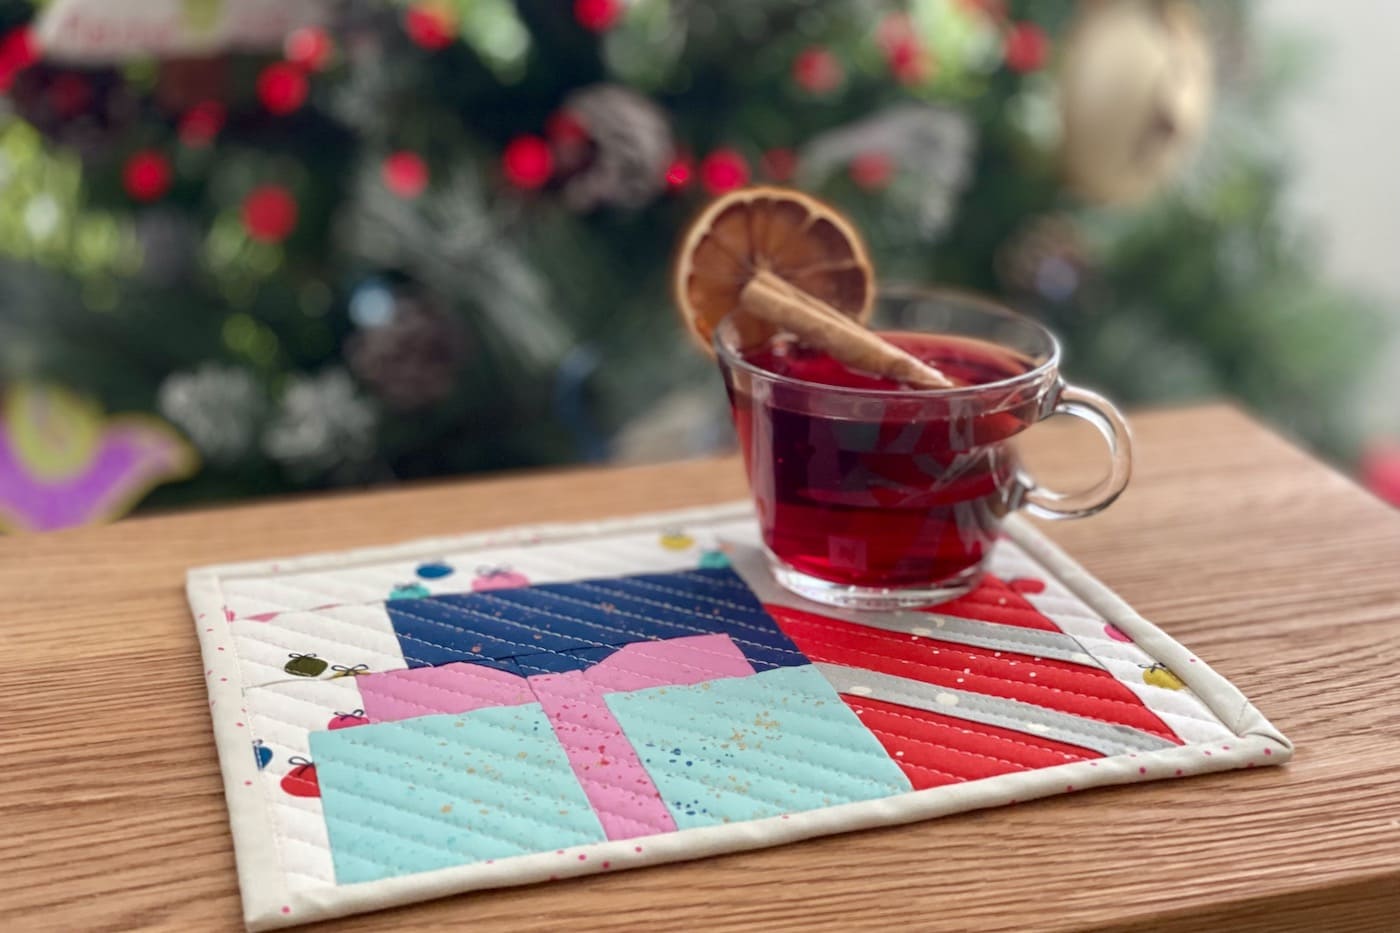
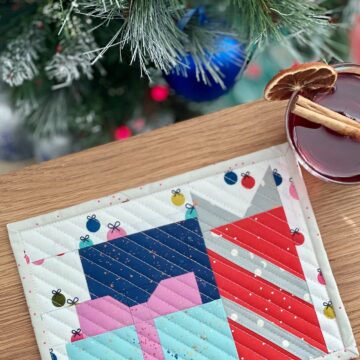
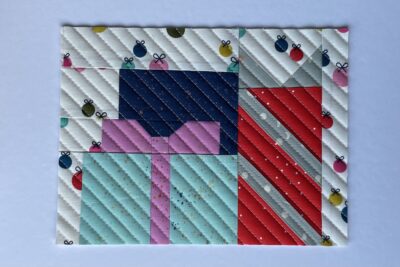
Patchwork Presents Mug Rug Pattern
Our December free mug rug pattern is a cute patchwork presents mug rug made using present quilt blocks that could easily be used for other special occasions during the year!
I can’t believe it’s my final mug rug pattern of the year. I hope you have enjoyed making some (or all!) of the 12 designs as much as I have enjoyed creating them.
If you have followed me through the year, with each monthly tutorial, we’ve worked on a new sewing skill, too…that’s a lot of different skills and techniques!
The final mug rug of the year doesn’t have a new technique focus; December is often so full of things to do; adding a new sewing technique to your “to-do” list seemed like a bit much, so this one is just for fun!
But there are plenty of opportunities to have another go at quite a few of the techniques that previous tutorials have focused on…
- Add fussy cutting to one of the presents (February)
- Use hand quilting (June)
- Make sure all your seam lines are perfectly matched (August)
- Add a big stitch binding (October)
Monthly Mug Rug Patterns & Skill Focus
- January: Fabric Flash Mug Rug – Using Selvages
- February: First Edition Mug Rug – Fussy Cutting
- March: English Bloom Mug Rug – English Paper Piecing (EPP)
- April: Coffee Cabin Mug Rug – Binding with Quilt Backing
- May: Street Party Bunting – Raw Edge Applique
- June: Big Stitch Mug Rug – Hand Quilting
- July: Summer Sun Mug Rug – Improv Piecing
- August: Heart Mug Rug – Patchwork Piecing
- September: Pumpkin Face Mug Rug – Reverse Applique
- October: Cozy Cup Mug Rug – Big Stitch Binding
- November: Christmas Tree Mug Rug – Free Motion Quilting
Although this December mug rug features three Christmas presents, by choosing different fabrics, you could make this to celebrate birthdays throughout the year, too.
Instructions
Patchwork Presents Mug Rug
Equipment
supplies
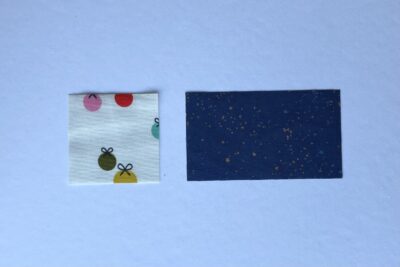
Materials Fabrics:
- 1 piece Present One Fabric large scrap*
- 1 piece Present Two Main Fabric large scrap*
- 1 piece Present Two Ribbon Fabric large scrap*
- 1 piece Present Three Main Fabric large scrap*
- 1 piece Present Three Ribbon Fabric large scrap*
[* all the presents’ main and ribbon fabrics can be cut from charm squares]
- 1 fat eighth Background Fabric
- 1 fat eighth Backing Fabric1
- 1 fat eighth Binding Fabric
- 1 piece Batting 10” x 8”
Instructions
Cutting:
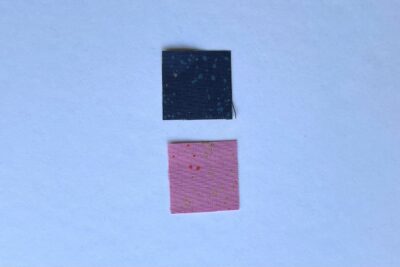
- From Present One Fabric cut 3½” x 2” (1), 1” x 3” (1), and 1” square (3). From Present Two Main Fabric cut 2½” x 3” (2). From Present Two Ribbon Fabric cut 2” x 1½ (2), 1” x 3” (1), and 1” square (1).From Present Three Main Fabric cut 3” x 5” (1).From Present Three Ribbon Fabric cut 1¾” square (2) and 1” x 6” (2).From Background Fabric cut 5½” x 1½” (1), 3” x 2” (1), 2” square (1),1½” square (1), 1” x 6½” (1), and 1” x 3” (1).From Backing Fabric cut 10” x 8” (1).From Binding Fabric cut WOF x 2¼” (2).

Construction: Use a ¼” seam allowance unless stated otherwise.
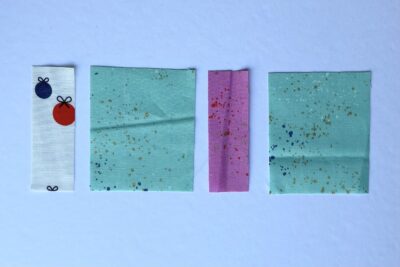
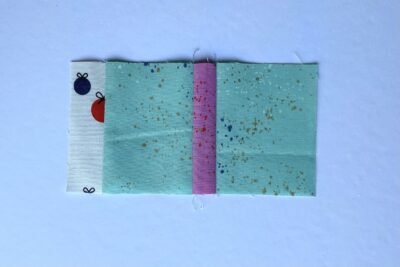
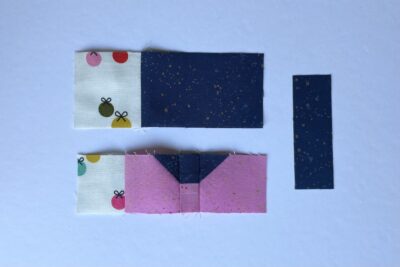
- Take one Background Fabric 1” x 3” rectangle, one Present Two Main Fabric 2½” x 3” rectangle, one Present Two Ribbon Fabric 1” x 3” rectangle, and another Present Two Main Fabric 2½” x 3” rectangle.
- Sew together in this order, matching the longer edges. Set aside for later.
- Take one Present One Fabric 1” square and one Present Two Ribbon Fabric 1” square. Sew them together with the Present One Fabric on top.
- Take two Present One Fabric 1” squares and draw a diagonal line on the wrong side of each. Now take two Present Two Ribbon Fabric 2” x 1½ rectangles.
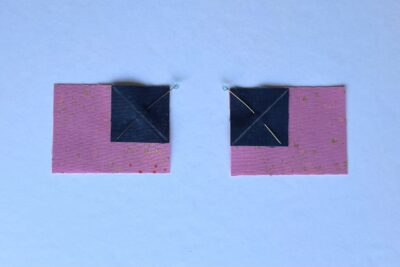
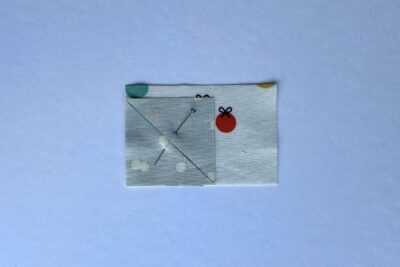
- Pin one Present One Fabric 1” square, right sides together, onto the top right corner of one Present Two Ribbon Fabric rectangle with the diagonal line running top left to bottom right. Then pin the other Present One Fabric 1” square, right sides together, onto the top left corner of the other Present Two Ribbon Fabric rectangle with the diagonal line running bottom left to top right. Sew along both drawn lines, trim off the excess corner fabric (with a ¼” seam allowance), and press out.
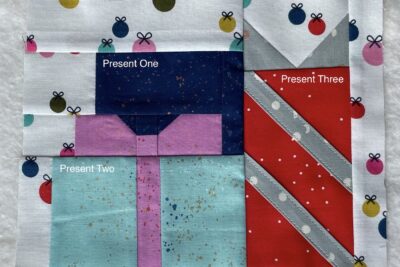
- Take the small unit and sew it in the middle of the two units from above, using the photo as a guide for placement.
- The three Present One Fabric sections should all meet in the middle. Press well.
- Take one Background Fabric 1½” square and sew it to the left edge of the unit from above. Set aside.
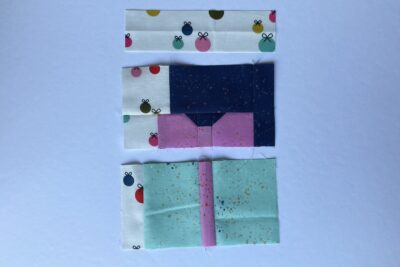
- Take one Background Fabric 2” square and one Present One Fabric 3½” x 2” rectangle. Sew together with the Background Fabric square on the left.
- Take the unit from step 7, the unit from step 7, and one Present One Fabric 1” x 3” rectangle. Sew thew two units together first, with the “bow” on the bottom) then add the rectangle to the right edge. Use the photo as a guide for placement.
- Now take one Background Fabric 5½” x 1½” rectangle, the unit from step 7 and the unit from step 1. Sew them together in this order, using the photo as a guide for placement.
- Press well and set aside for later.
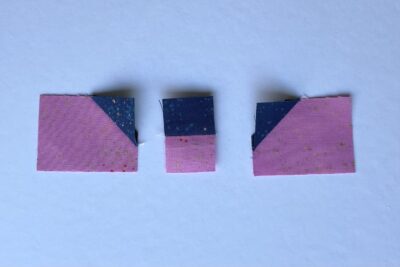
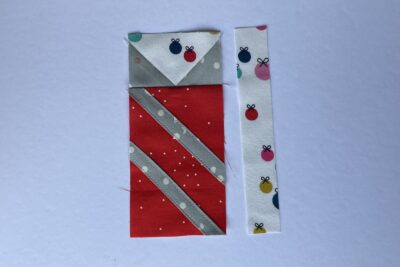
- Take one Present Three Ribbon Fabric 1¾” square and draw a diagonal line on the wrong side. Pin this square, right sides together, to the bottom left corner of one Background Fabric 3” x 2” rectangle with the diagonal line running top left to bottom right. Sew along the drawn line, trim off the excess corner fabric (with a ¼” seam allowance), and press out.
- Take one Present Three Ribbon Fabric 1¾” square and draw a diagonal line on the wrong side. Pin this square, right sides together, to the bottom right corner of the unit from above with the diagonal line running bottom left to top right. Sew along the drawn line, trim off the excess corner fabric (with a ¼” seam allowance), and press out.
- Set aside for later.
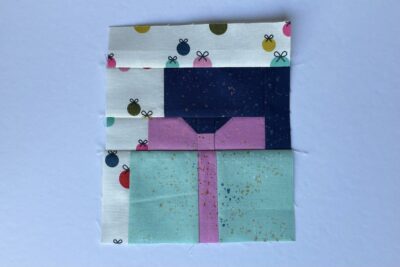
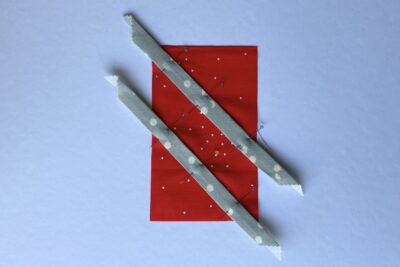
- Take two Present Three Ribbon Fabric 1” x 6” rectangles. Press the long edges into the centre of each strip, wrong sides together, with a ¼” seam allowance.
- Take one Present Three Main Fabric 3” x 5” rectangle and draw a 45° diagonal line on the right side of the fabric, starting at the top left corner.
- Take one of the pressed strips and pin it (with the folded edges underneath) to the Present Three Main Fabric rectangle using the drawn line as a guide. Leaving about a 1” space, pin the second pressed strip below the first one, using is as a guide for the angle.
- Sew the strips in place, stitching close to the folded edges. Press well.
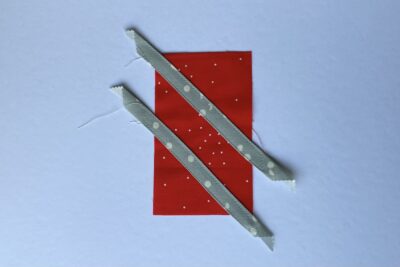
- Trim away the excess strip fabric using the Present Three Main Fabric rectangle as your guide.
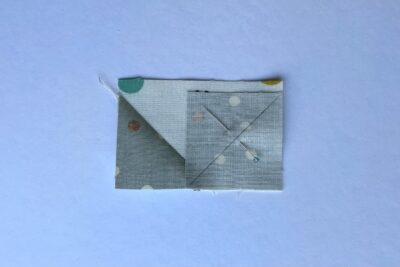
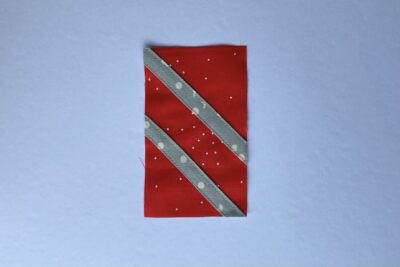
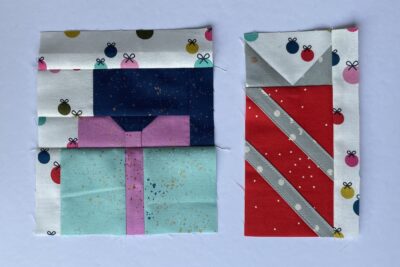
- Take the unit from step 15 and the unit from step 20. Sew together, using the photo as a guide for placement.
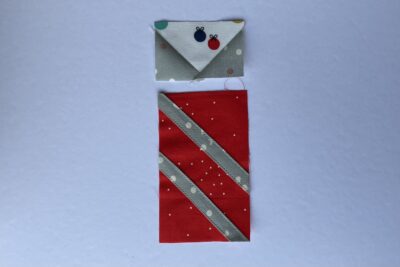
- Sew one Background Fabric 1” x 6½” rectangle to the right edge of the unit from above.
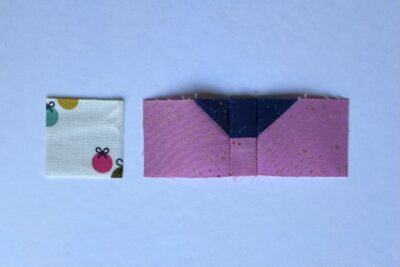
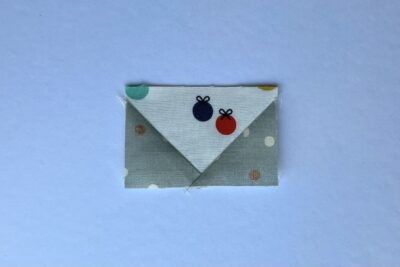
- Take the unit from step 12 and the unit from step 22. Sew together, using the photo as a guide for placement, to complete the mug rug block. Press well.

Finishing:
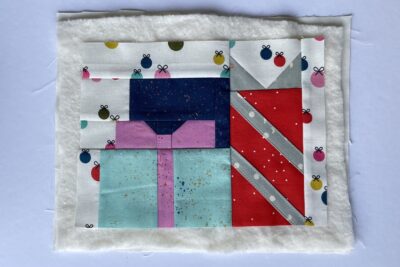
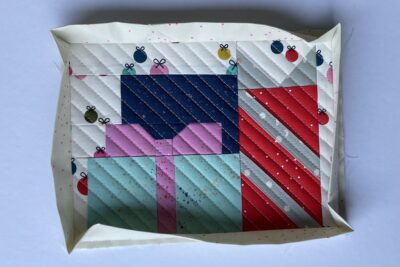
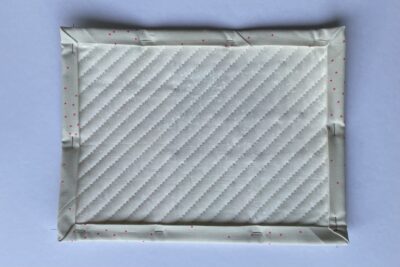
- Take the Backing Fabric rectangle and place it right side facing down, add the batting rectangle and then place the pieced mug rug block on top with the right side facing towards you. Make sure all the layers are smooth and flat then baste together using your preferred method.
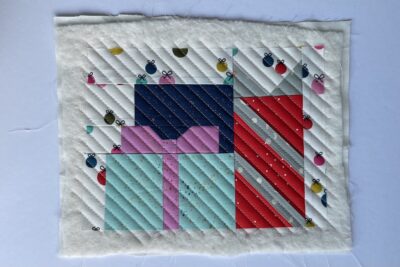
- Quilt as desired. I have machine quilted with diagonal straight lines. I started with a line a quilting down the centre of the two ribbons strips on Present Three and then filled the rest with lines spaced at ¼”.
- Trim away excess batting and Backing Fabric.
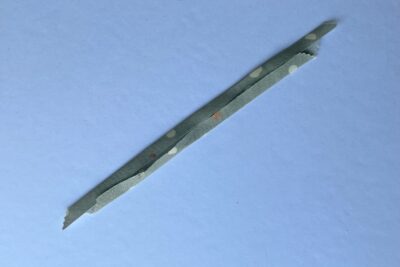
- Take the two Binding Fabric WOF x 2¼” strips. Draw a 45° line on the wrong side of one strip, at the top corner from top left to bottom right. Pin right sides together so the strips are at a right angle to each other and the drawn line is visible. Sew along the drawn line then trim off the excess corner fabric with a ¼” seam allowance and press to create a long strip. Fold the strip in half along the full length (wrong sides together) and press.
- Pin/clip the binding in place on the front, round the mug rug edges, with the raw edges of the binding and raw edge of the mug rug matching up. [TIP: Clip the binding around all four edges before you start sewing to make sure the seam line from when you joined the two strips aren’t going to be close to any of the corners as this would create too much bulk; ideally you want the binding seams to be close to the middle of the edges.]
- Sew the binding to the front of the mug rug using a ¼” seam allowance, in the same way you would add binding to a quilt top. Take your time to give the four corners neat mitres.
- Fold and press the binding round to the back. Pin/clip in place, making sure your mitred corners are nice and neat. You can either hand sew the binding in place, or machine sew on the front of the mug rug right against the binding seam, catching the binding edge in place on the back.
- Grab a festive drink and enjoy your new Patchwork Presents mug rug.

Have you enjoyed our free mug rug pattern series this year? If so let me know in the comments section!


thank you and the monthly projects are very helpful and appreciated. Thank you . I hope there will be repeats of this in 2024..