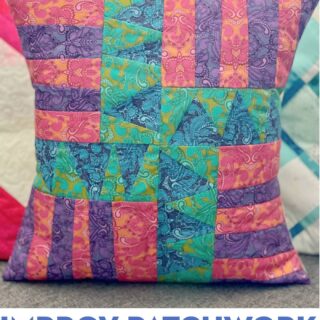
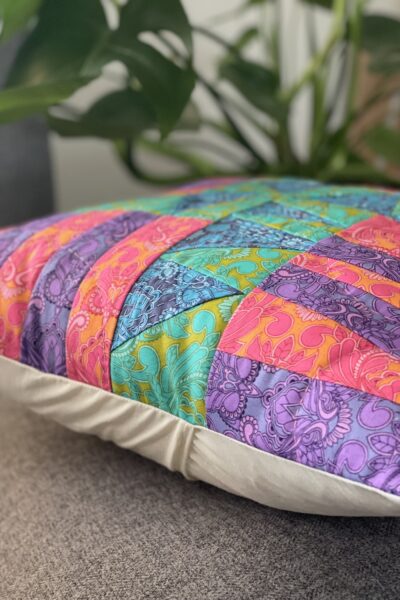
Improv Patchwork Easy Going Pillow Pattern
If you’ve ever wanted to try an improvisational quilt piecing technique, then I have the perfect project for you today! Amy Ball is teaching you how to make an improv quilt block pillow. The best part is that this project is a bit of a “hybrid” project. Part improv piecing and part traditional piecing, so if you’re more accustomed to traditional quilt piecing, this will help you to “baby step” your way into the improv world!
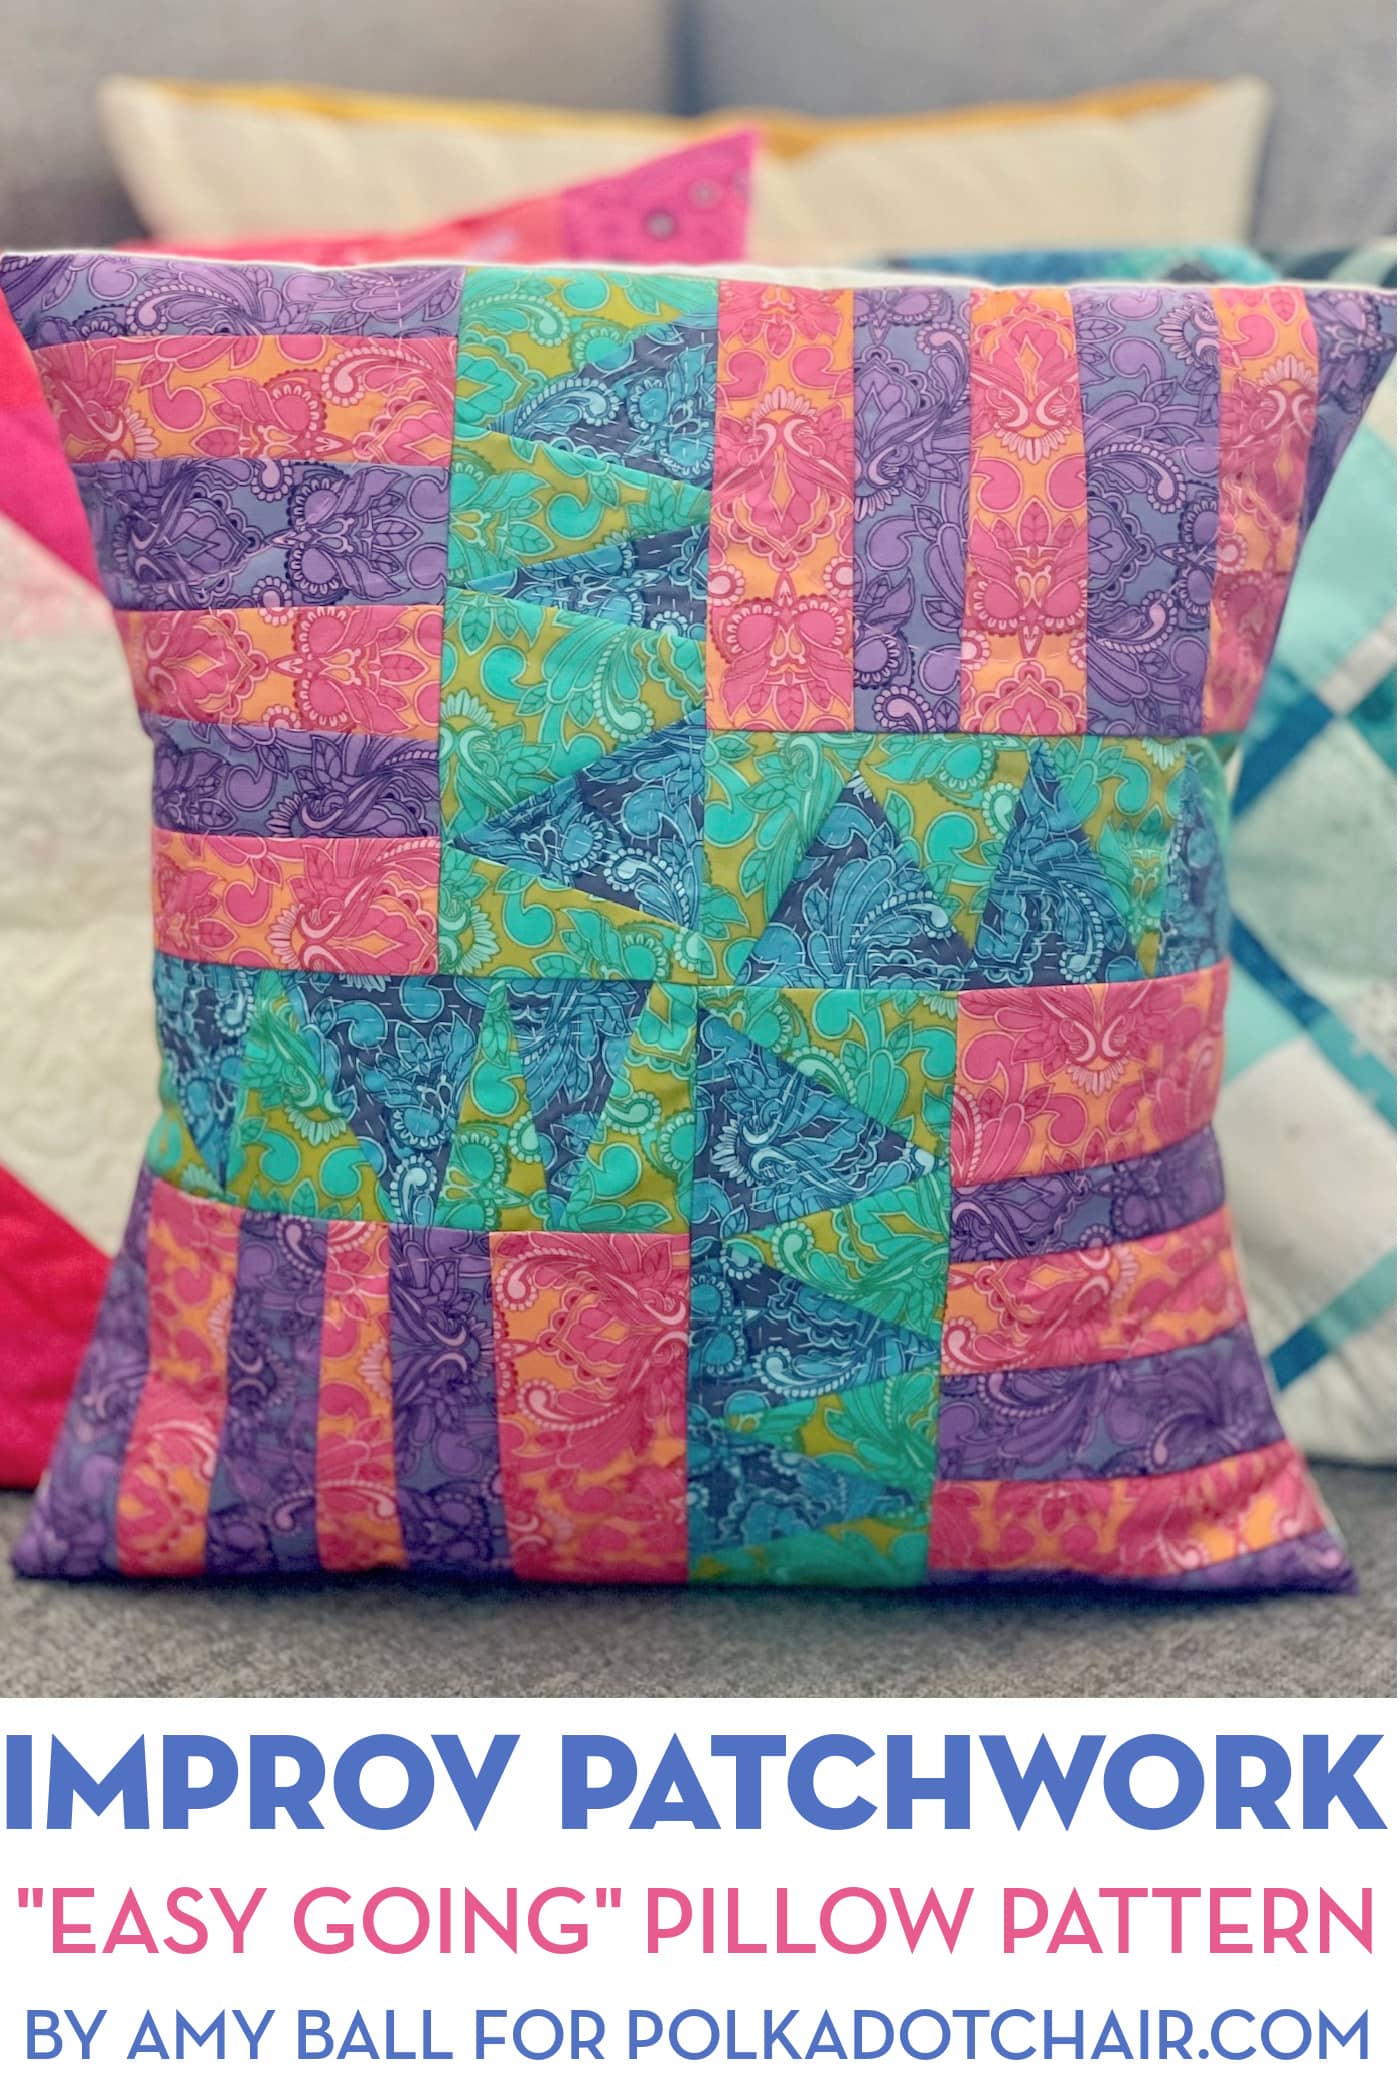
So often, patchwork designs focus on clean lines, even shapes, and matching seams; it’s actually one of my favorite things about patchwork. But sometimes it can be really fun to make something a little more casual and laid-back…enter my Easy-going Patchwork Pillow!
Why Improv Patchwork?
This pillow design uses improv (or improvisational) patchwork. Although the piecing, pressing, and trimming techniques of traditional patchwork quilting still apply, “improv patchwork” essentially creates a more free and flexible design.
Improv patchwork and quilting can be hard to get on board with (believe me, I know!) when you’ve been so used to the precision and accuracy of more traditional patchwork piecing, but improv patchwork has plenty of benefits… it’s a great scrap buster; generally, it’s a faster piecing process, and you don’t need to worry about imperfect corners or matching seams.
The Easy-going Patchwork Pillow isn’t full-on improv because I’ve still given you a block design to base your piecing on, and that block is repeated to complete the pillow front.
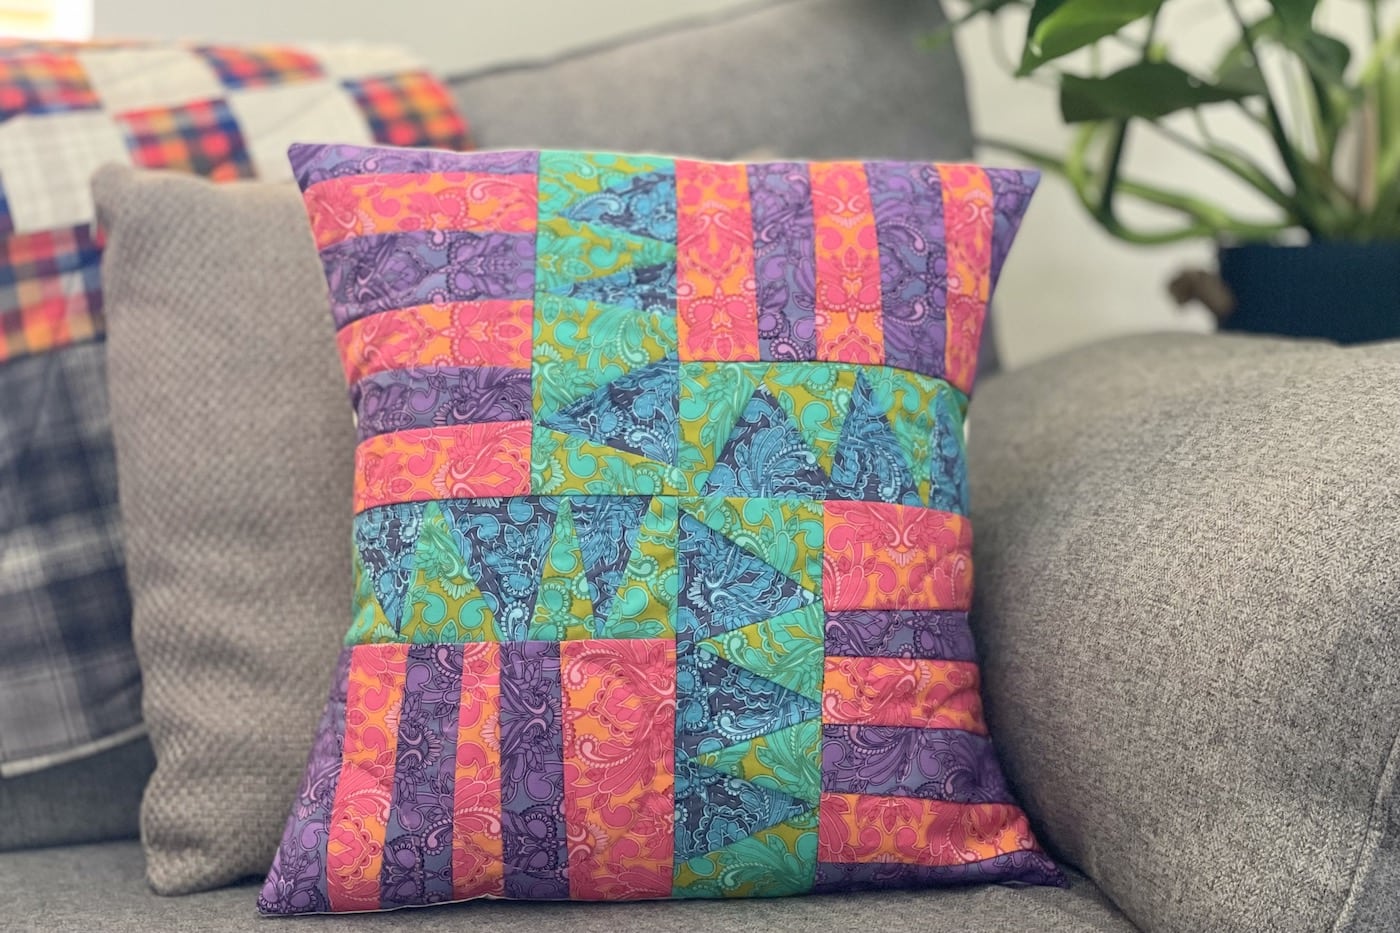
Although the four blocks won’t look exactly the same, they will still be similar to each other. My hope is that this might bridge the gap between traditional patchwork piecing and improv and be a gentle “ease in” to improvisational patchwork quilting.
Pillow of the Month Patterns

Amy has been writing quilted pillow patterns for us all year. In case you missed it, here are all the pillow patterns she has created this year!
- January: Patchwork Plaid Pillow
- February: Heart Quilted Pillow
- March: SLEEP Pieced Letters Pillow Pattern
- April: Patchwork Beehive Pillow
- May: Queens Jubilee Celebration Pillow Pattern
- June: Moroccan Tiles Pillow
- July: Prism Paw Quilted Pillow Pattern
- August: Strawberry Fields Patchwork Pillow
- September: Improv Patchwork Pillow Pattern
- October: Twin Pines Quilted Pillow Pattern
- November: Peeking Reindeer Patchwork Pillow
- December: Christmas Presents Pillow
Easy Going Improv Patchwork Pillow Pattern
Equipment
- quilting ruler
supplies
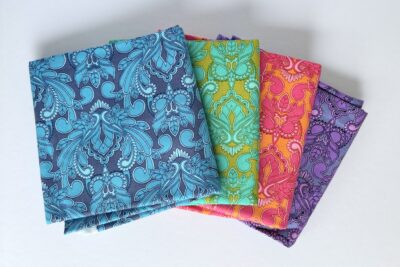
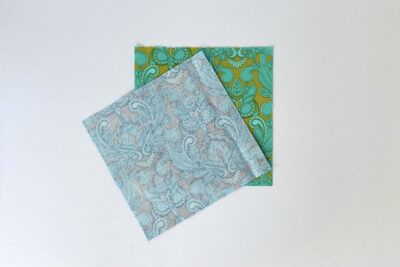
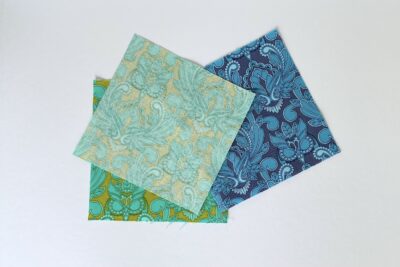
Fabrics:
- 1 fat eighth Purple fabric
- 1 fat eighth Pink fabric
- 1 fat quarter Blue fabric
- 1 fat quarter Green fabric
- 1 fat quarter Light backing fabric
Other:
- Batting 18” x 18” Pillow back fabric 0.5 yards
- Cushion pad: 16” x 16”
Instructions
Cutting:
- Cutting for an improv patchwork design doesn’t need as much precision as usual but I have listed a guide for sizes to avoid too much wastage and also so there is enough to create the correct sized blocks too. The number of pieces of each color needs to be followed exactly.
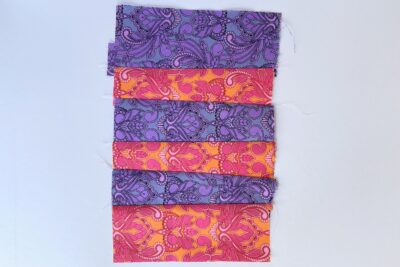
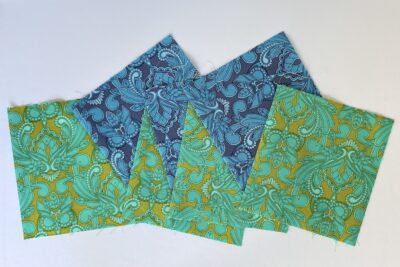
- From Purple fabric, cut roughly 6” x 2” (12).From Pink fabric, cut roughly 6” x 2” (12).From Green fabric, cut roughly 5” square (16).From Blue fabric, cut roughly 5” square (12).From Pillow back fabric cut, 16½” x 11” (2).
Construction:
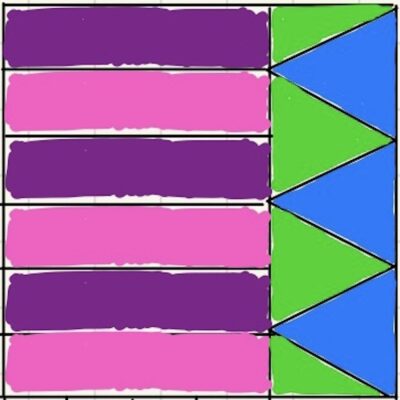
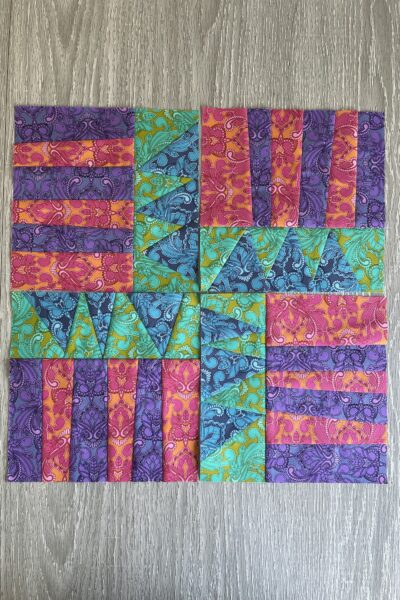
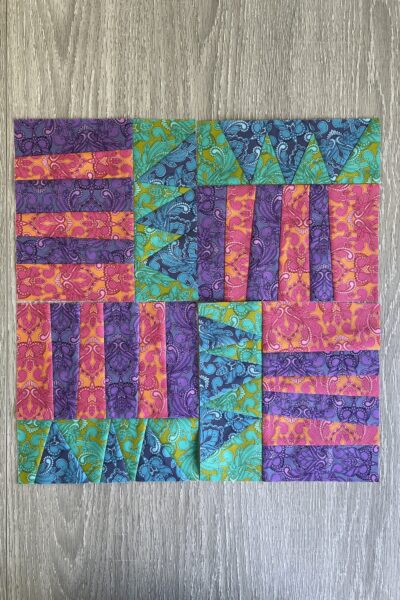
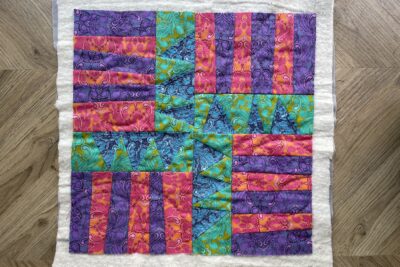
- The pillow front is made up of four blocks, each measuring 8½” square.

- The sketch shows the rough block design you are aiming for with the fabric pieces. Each block is split into two units; stripes and triangles.

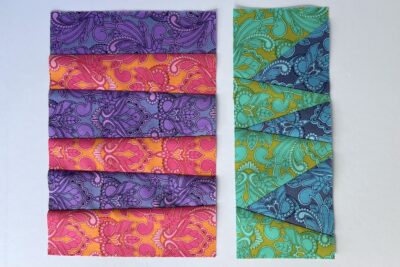
Stripes construction:
- To create one stripes unit take three purple 6” x 2” rectangles and three pink 6” x 2” rectangles. Start with one purple rectangle and place one pink rectangle on top, right sides together. Sew together along one long edge. Remember…you don’t need to sew a perfect ¼” seam allowance or a straight seam line, in fact you should make sure that you sew the seam line at a slight angle. Then press the seam to the side.
- Repeat step one alternating between purple and pink fabric pieces, and making sure the seam lines are at uneven and changing angles.
- Sew six rectangles together.
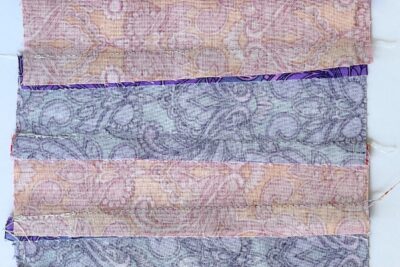
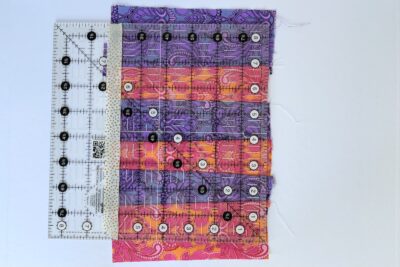
- Once you have pieced the six rectangles, turn the unit over and check the seam allowances. Trim them all down to ¼” to avoid too much bulk later in the project.
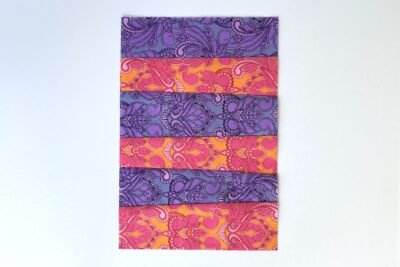
- Now turn the unit back to the right side and trim it down to 5¾” x 8½”. Press well.
- Repeat steps 1 to 4 to make three more stripes units. Set aside.
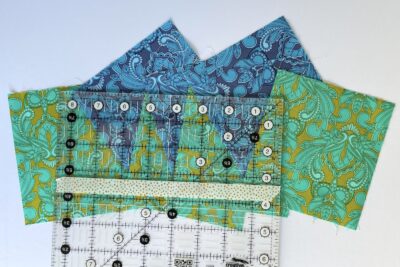
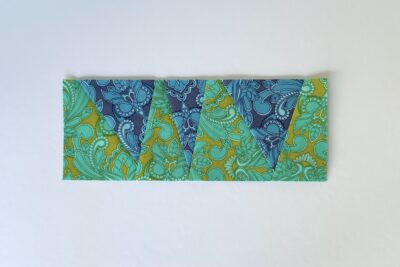
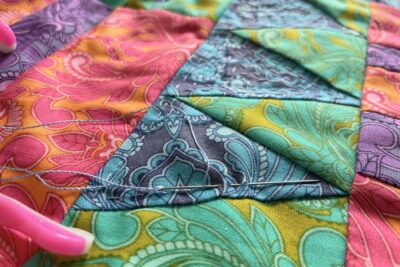
Triangles construction:
- Read these top tips for the triangles unit before you start sewing, as it is a little trickier than the stripes unit!
- To help with fabric placement, fold a rough seam allowance along the edge you will sew in place (fold it wrong sides together) then place the folded edge where the sewn seam will be and re-position if required. Then carefully fold back, without moving the fabric placement, and pin in place then sew using the fold line as your guide.
- Achieving the correct sizing and spacing with the triangles unit is more difficult than with the strips unit; If you are confident that you’ll get good placement (without needing to unpick any seams!) then I recommend trimming the excess fabric away after each seam is sewn (this will avoid extra bulk later on in the project) But if you’re not so confident and think you might need to unpick and make adjustments after a few seams have been sewn; then I recommend not trimming any excess whilst sewing, but instead, trim out any bulk and excess with scissors once you’ve finished the whole unit.
- Keep track of the overall size of the unit during the construction process; it will be trimmed down to 8½” x 3¼”, so you need to make sure that you have at least this, if not more, that can be trimmed to size.
- To create one triangles unit take four green 5” squares and three blue 5” squares. Start with one green square and place one blue square, right sides together, on top but at roughly a 45° angle running top left to bottom right (use the step photo as a guide for placement). Sew together along the right edge of the blue square. Remember…you don’t need to sew a perfect ¼” seam allowance or a straight seam line. Then trim away the excess fabric and press the seam to the side.
- Repeat step six alternating between green and blue fabric pieces, and alternating the placement angle (switching between top left-bottom right and top right-bottom left will create the triangle shapes). As a guide for fabric placement, if you aim for the top edge of the blue triangles to be about 2¾”-3” long then you should end up with the full unit length slightly longer than 8½” with not too much to trim off.
- Sew seven squares together.
- Once you have pieced the seven squares, trim it down to 8½” x 3¼”.
- Press well.
- Repeat steps to make three more triangles units.
Final construction: Use a ¼” seam allowance.
- Take one stripes unit with purple at the top and one triangles unit with the points of the blue triangles facing to the left. Sew together along the long edges. Press the seam towards the stripes unit to help with bulk and set the block aside.
- Repeat step to make three more blocks.
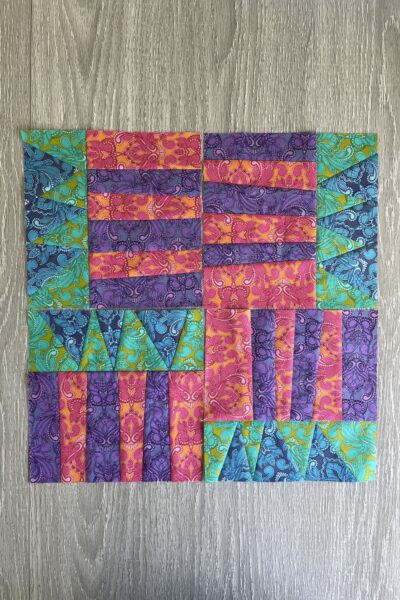
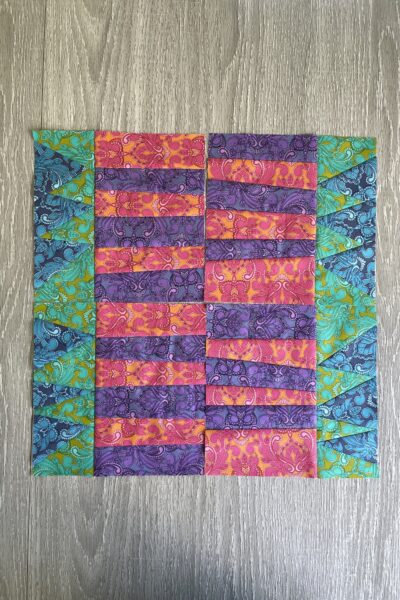
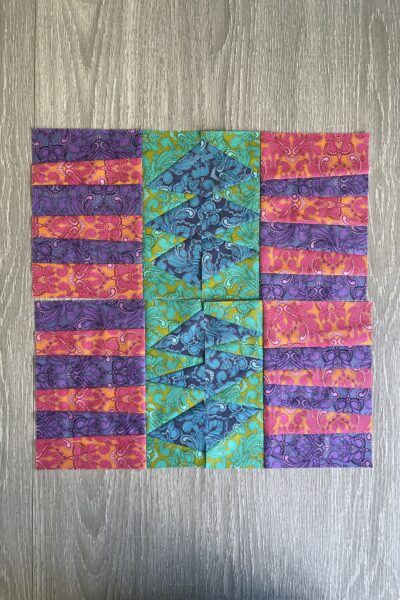
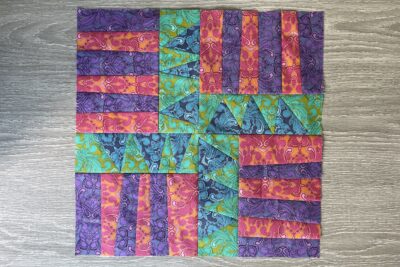
- Now you need to sew the four blocks together to create a square. As this is “improv” I have given you six different layout suggestions from which to choose.Option A

- Option B
- Option C
- Option D
- Option E
- Option F
- Sew the four blocks together, first into two rows of two.
- Next sew the two rows together to complete the pillow front. Press well.


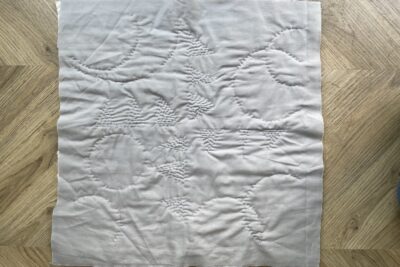
Quilting:
- Now it’s time to make a quilt sandwich. Place your light backing fabric square (right side facing down) with your batting on top, then add the patchwork pillow front with the right side facing towards you. Make sure all the layers are smooth and flat then baste the layers together using your preferred method.
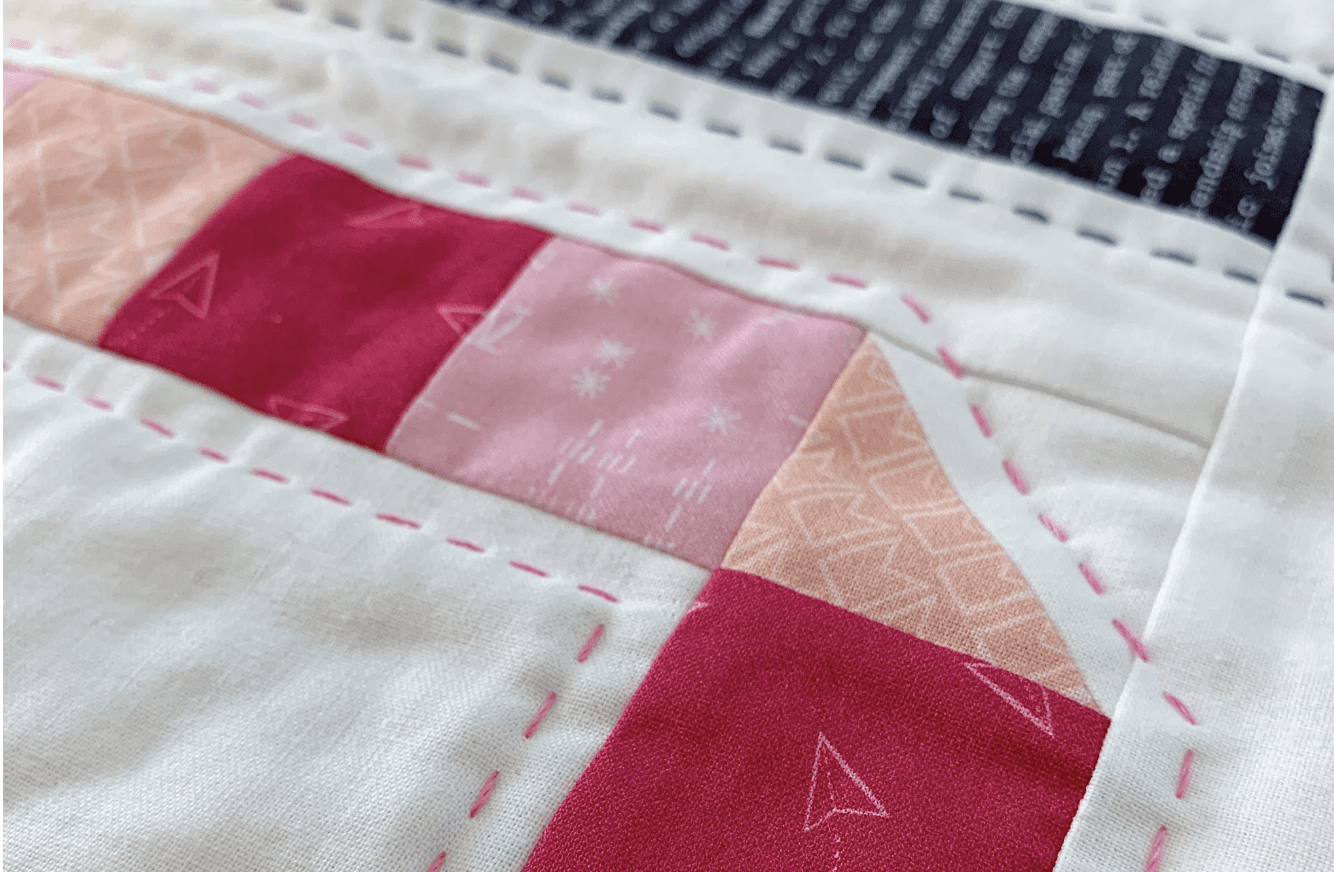
- Quilt as desired. To keep with the improv style I have filled the blue triangles with spiral rows of blue hand quilting, and added large circles and arcs of pink hand quilting over the stripes sections (each stripes section has different sizes of circles/arcs).
- Once you have finished quilting, trim off any excess backing fabric and batting, and square up your pillow block if required.
Finishing:
- Take one pillow back 16½” x 11” rectangle and hem one long edge by pressing the raw edge to the wrong side by ¼” then again by another ¼”. Press well and sew. Then repeat for the second pillow back 16½” x 11” rectangle.
- Pin or clip the pillow back pieces to the quilted block, right sides together, all around the four side.
- Sew around all four edges using a ¼” seam allowance, securing the start and finish with some back-stitching.
- Trim the corners, turn the pillow cover the right way out, carefully poke out the four corners and then press.
- Stuff with an 16” square pad and enjoy your new Easy-going Patchwork Pillow.
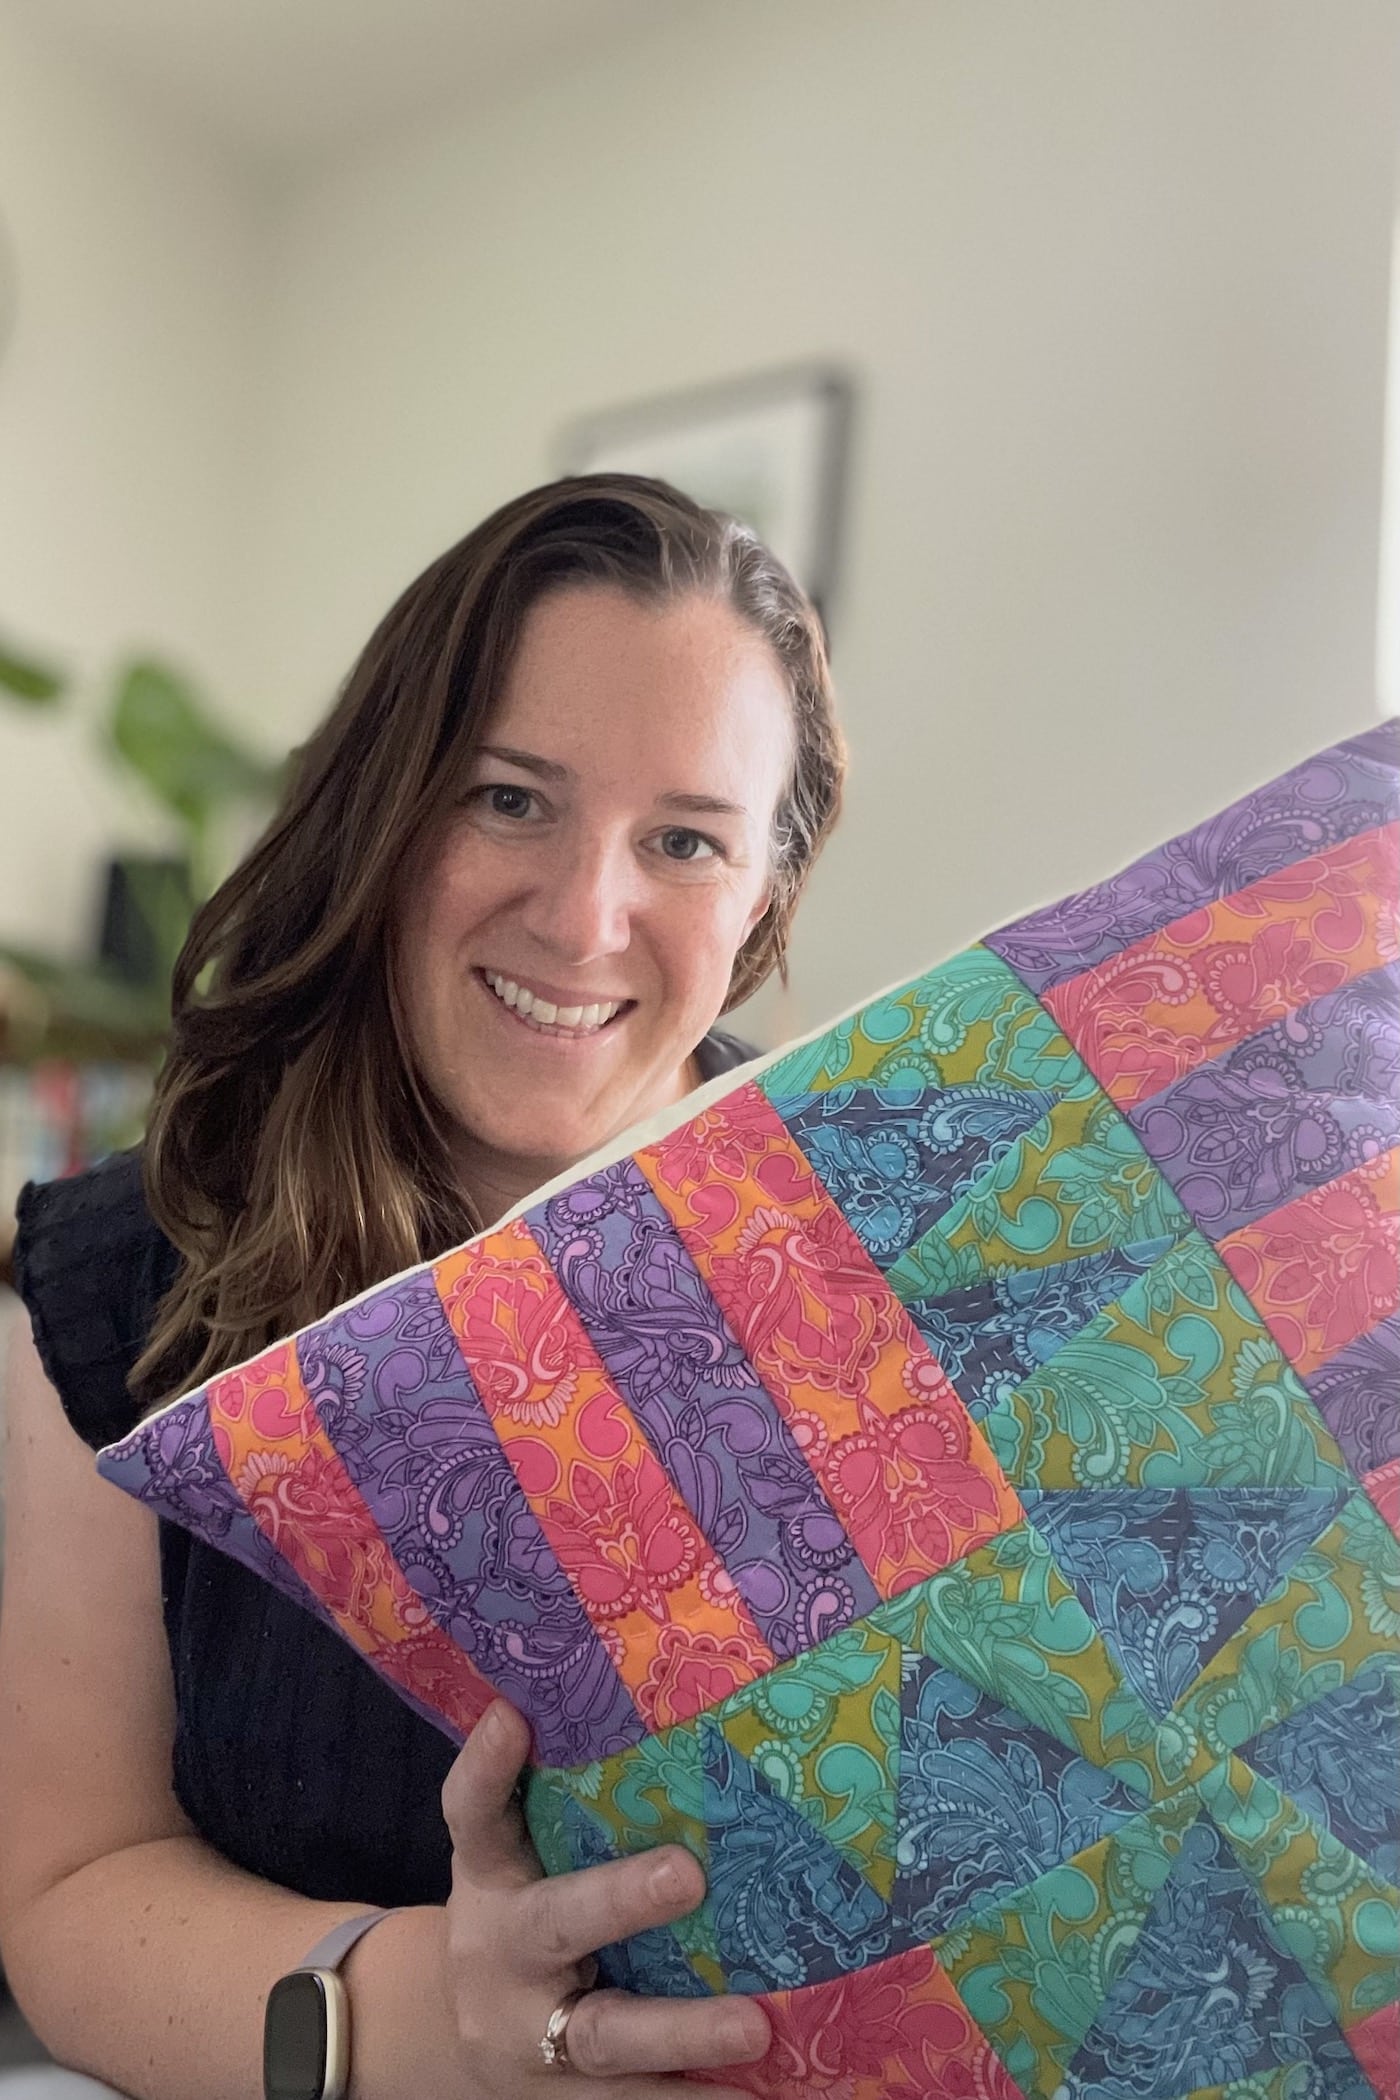
About the Designer

Amy lives in the north of England with her husband and son. When she’s not sewing and quilting, Amy can usually be found baking or reading. You can find her on Instagram @amyatthegate
Also by Amy:
A Helping hand For Hand Quilting
More Lights On | How To Improve Your Hand Sewing Lighting
Free Guide to (near) Perfect Patchwork
This is a fun and beautiful pillow! I have been trying to learn precision piecing so my first thought, when looking at the picture, was one of those triangles are too small! Will take alittle to sew off kilter! But I love it!